NISSAN ROGUE 2014 2.G Quick Reference Guide
Manufacturer: NISSAN, Model Year: 2014, Model line: ROGUE, Model: NISSAN ROGUE 2014 2.GPages: 28, PDF Size: 2.11 MB
Page 11 of 28
9
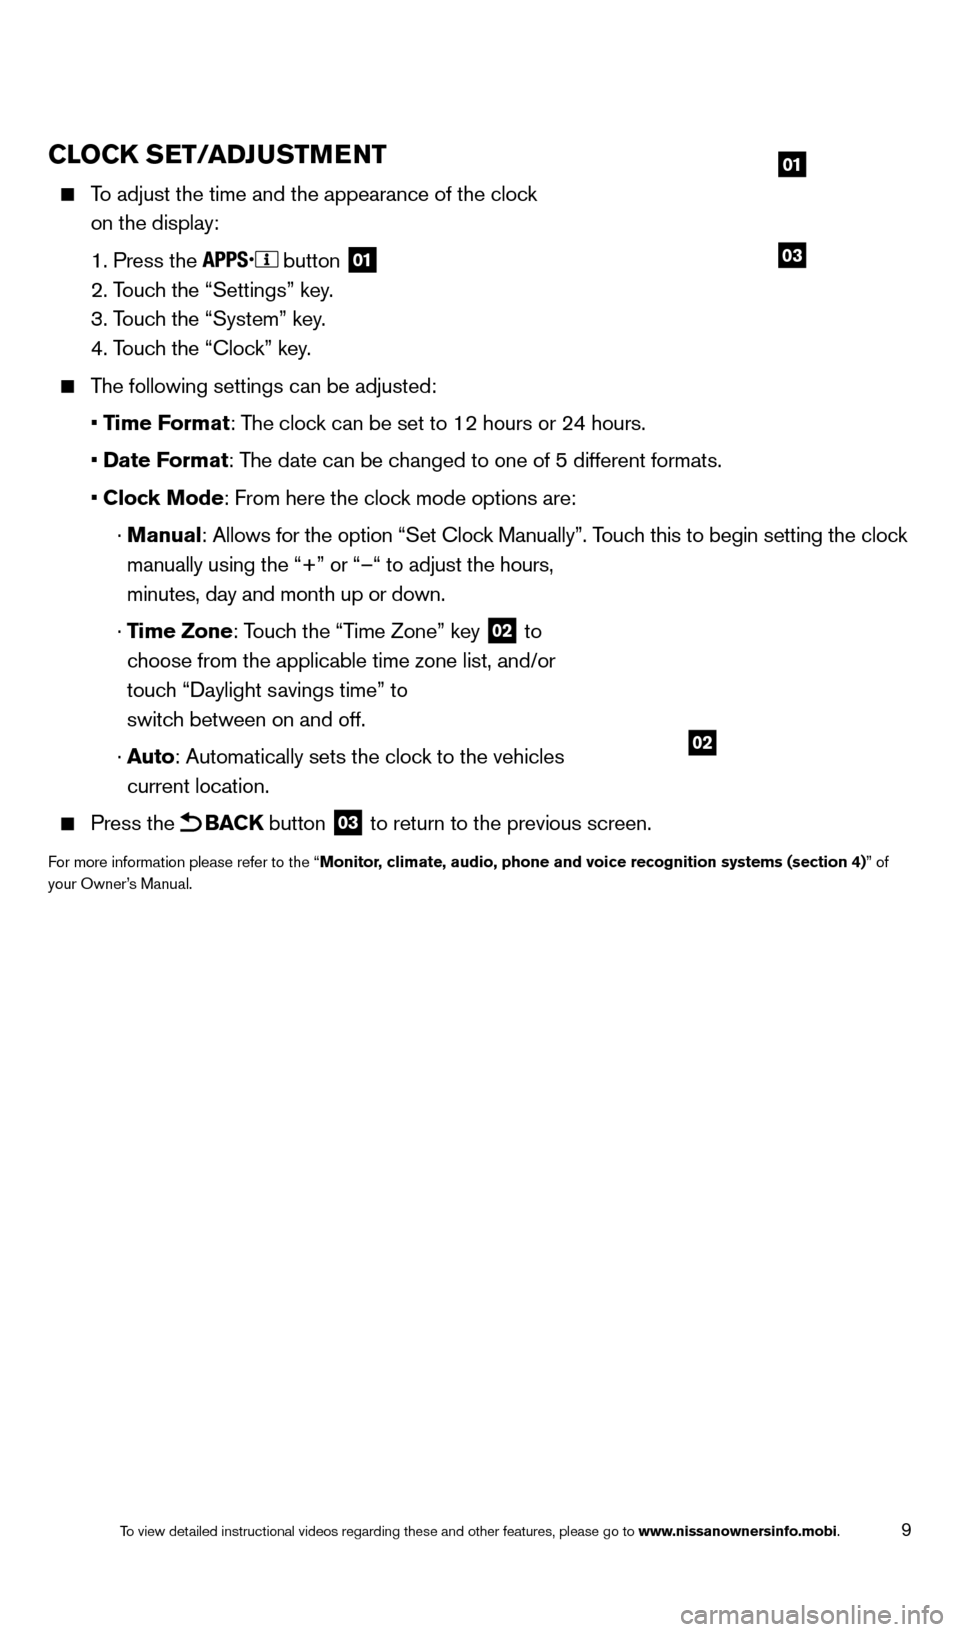
CLOCK SET/ADJUSTMENT
To adjust the time and the appearance of the clock
on the display:
1. Press the button 01
2. Touch the “Settings” key.
3. Touc
h the “System” key.
4. Touc
h the “Clock” key.
The following settings can be adjusted:
• T
ime Format: The clock can be set to 12 hours or 24 hours.
• Date
Format: The date can be changed to one of 5 different formats.
• Clock Mode
: From here the clock mode options are:
· Manual: Allows for the option “Set Cloc
k Manually”. Touch this to begin setting the clock
manually using the “+” or “–“ to adjust the hours,
minutes, day and month up or down.
· T
ime Zone: Touch the “Time Zone” key
02 to
choose from the applicable time zone list, and/or
touch “Daylight savings time” to
switch between on and off.
· Auto
: Automatically sets the clock to the vehicles
current location.
Press the BACK button 03 to return to the previous screen.
For more information please refer to the “Monitor, climate, audio, phone and voice recognition systems (section 4)” of
your Owner’s Manual.
03
01
02
1766904_14d_Rogue_QRG_062514.indd 96/25/14 3:29 PM
To view detailed instructional videos regarding these and other features, please go\
to www.nissanownersinfo.mobi.
Page 12 of 28
10
FIRST DRIVE FEATURES
NISSAN INTELLIGENT KEY® SYSTEM (if so equipped)
The NISSAN Intelligent Key® System allows you to lock or
unlock the vehicle, open your liftgate and start the engine. It
is important to make sure the Intelligent Key is with you
(that is, in your pocket or purse).
The operating range of the Intelligent Key is within
31.5 in (8 0 cm) from each request switch.
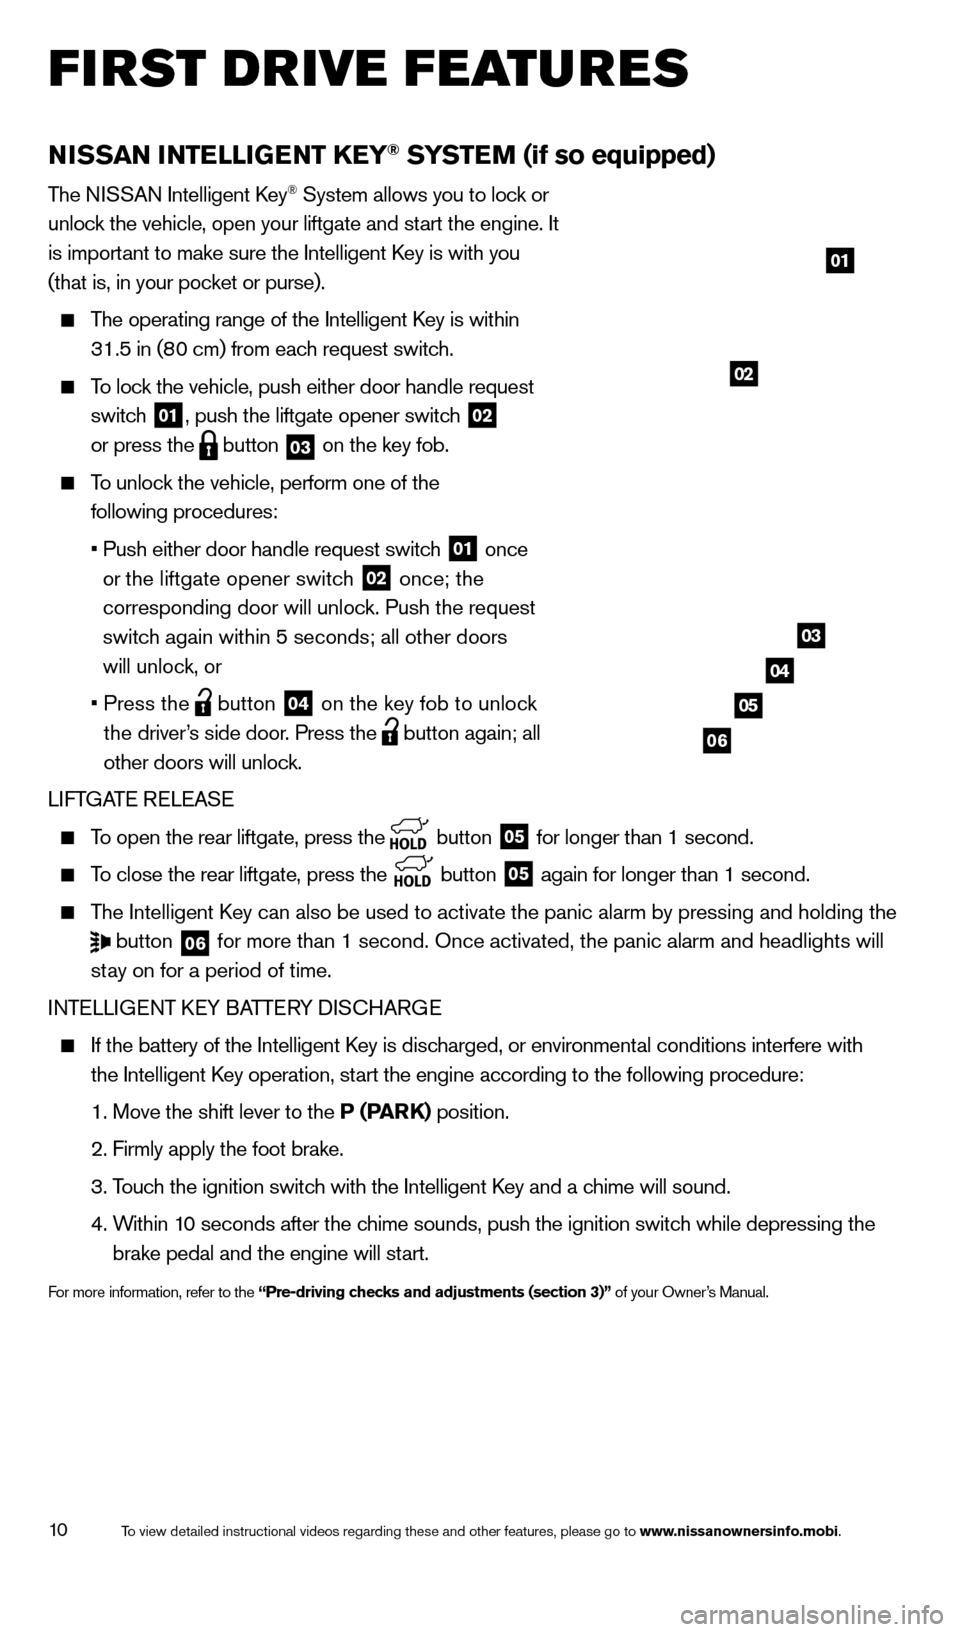
To lock the vehicle, push either door handle request
switc h
01, push the liftgate opener switch 02
or press the
button 03 on the key fob.
To unlock the vehicle, perform one of the
following procedures:
• Push either door handle request switch 01 once
or the liftgate opener switch
02 once; the
corresponding door will unlock. Push the request
switch again within 5 seconds; all other doors
will unlock, or
• Press the button 04 on the key fob to unlock
the driver’s side door. Press the
button again; all
other doors will unlock.
LIFTGATE RELEASE
To open the rear liftgate, press the button 05 for longer than 1 second.
To close the rear liftgate, press the
button 05 again for longer than 1 second.
The Intelligent Key can also be used to activate the panic alarm by pressing and holding \
the
button 06 for more than 1 second. Once activated, the panic alarm and headlights \
will
stay on for a period of time.
INTELLIGENT KEY BATTERY DISCHARGE
If the battery of the Intelligent Key is disc harged, or environmental conditions interfere with
the Intelligent Key operation, start the engine according to the following procedure:
1. Move the shift lever to the P (P
ARK) position.
2. Firmly apply the foot brake.
3. Touc
h the ignition switch with the Intelligent Key and a chime will sound.
4. Within 1
0 seconds after the chime sounds, push the ignition switch while depressing the
brake pedal and the engine will start.
For more information, refer to the “Pre-driving checks and adjustments (section 3)” of your Owner’s Manual.
01
03
04
05
02
06
1766904_14d_Rogue_QRG_062514.indd 106/25/14 3:29 PM
To view detailed instructional videos regarding these and other features, please go\
to www.nissanownersinfo.mobi.
Page 13 of 28
11
POWER LIFTGATE (if so equipped)
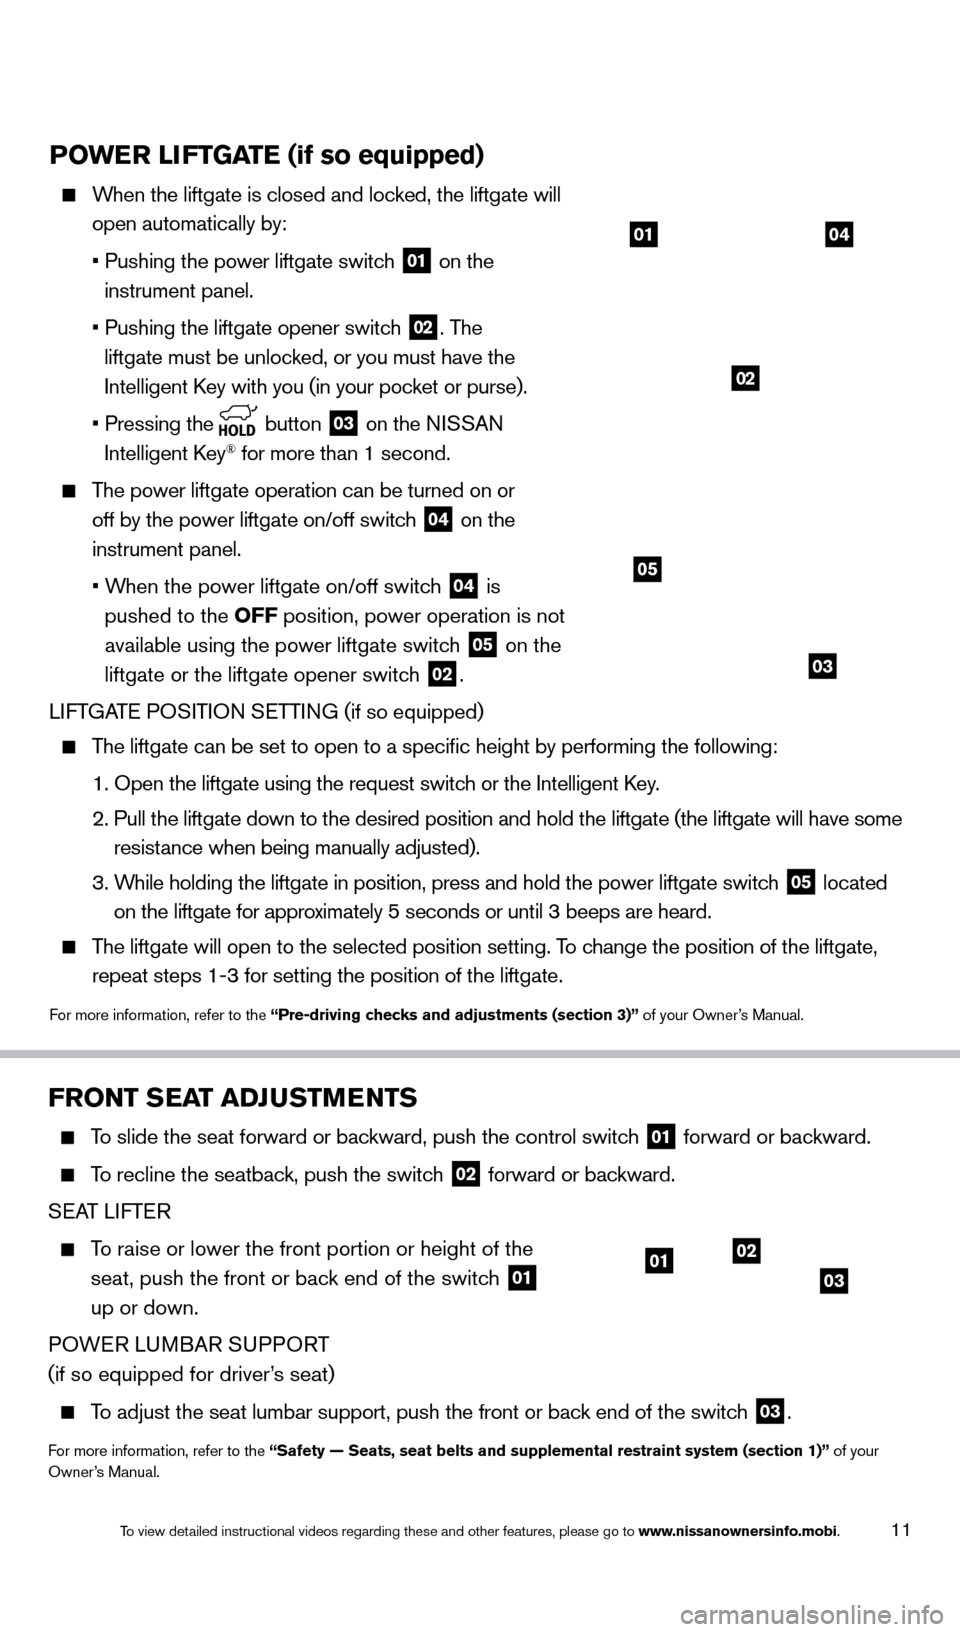
When the liftgate is closed and locked, the liftgate will
open automatically by:
•
Pushing the power liftgate switch 01 on the
instrument panel.
• Pushing the liftgate opener switch 02. The
liftgate must be unlocked, or you must have the
Intelligent Key with you (in your pocket or purse).
• Pressing
the
button 03 on the NISSAN
Intelligent Key® for more than 1 second.
The power liftgate operation can be turned on or
off by the power liftgate on/off switc h
04 on the
instrument panel.
• When the power liftgate on/off switc
h
04 is
pushed to the OFF position, power operation is not
available using the power liftgate switch
05 on the
liftgate or the liftgate opener switch
02.
LIFTGATE POSITION SETTING (if so equipped)
The liftgate can be set to open to a specific height by performing the \
following:
1. Open the liftgate using the request switch or the Intelligent K
ey.
2. Pull the liftgate down to the desired position and hold the liftgate (t\
he liftgate will have some
resist
ance when being manually adjusted).
3. While holding the liftgate in position, press and hold the p
ower liftgate switch
05 located
on the liftgate for approximately 5 seconds or until 3 beeps are heard.
The liftgate will open to the selected position setting. To change the position of the liftgate,
repeat steps 1-3 for setting the position of the liftgate.
For more information, refer to the “Pre-driving checks and adjustments (section 3)” of your Owner’s Manual.
03
0401
02
05
FRONT SEAT ADJUSTMENTS
To slide the seat forward or backward, push the control switch 01 forward or backward.
To recline the seatback, push the switch 02 forward or backward.
SEAT LIFTER
To raise or lower the front portion or height of the
seat, push the front or bac k end of the switch
01
up or down.
POWER LUMBAR SUPPORT
(if so equipped for driver’s seat)
To adjust the seat lumbar support, push the front or back end of the switch 03.
For more information, refer to the “Safety — Seats, seat belts and supplemental restraint system (se\
ction 1)” of your
Owner’s Manual.
0102
03
1766904_14d_Rogue_QRG_062514.indd 116/25/14 3:29 PM
To view detailed instructional videos regarding these and other features, please go\
to www.nissanownersinfo.mobi.
Page 14 of 28
12
FIRST DRIVE FEATURES
2ND ROW SEATS
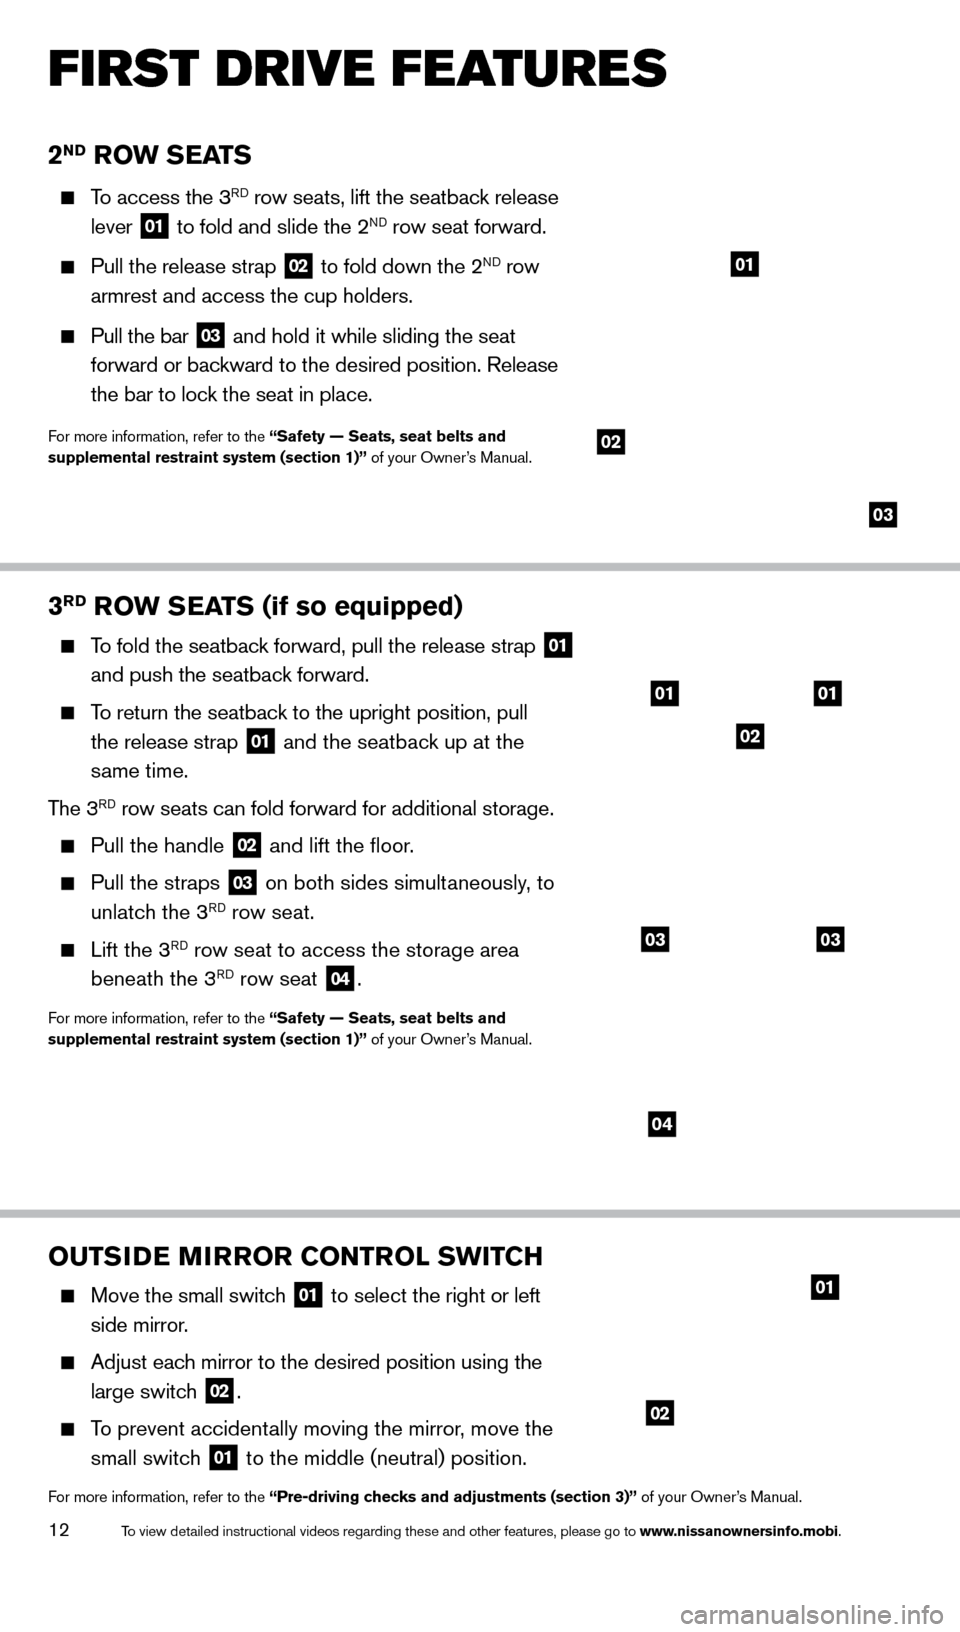
To access the 3RD row seats, lift the seatback release
lever
01 to fold and slide the 2ND row seat forward.
Pull the release strap 02 to fold down the 2ND row
armrest and access the cup holders.
Pull the bar 03 and hold it while sliding the seat
forward or backward to the desired position. Release
the bar to lock the seat in place.
For more information, refer to the “Safety — Seats, seat belts and
supplemental restraint system (section 1)” of your Owner’s Manual.
01
OUTSIDE MIRROR CONTROL SWITCH
Move the small switch 01 to select the right or left
side mirror.
Adjust each mirror to the desired position using the
large switch
02.
To prevent accidentally moving the mirror, move the
small switc h
01 to the middle (neutral) position.
For more information, refer to the “Pre-driving checks and adjustments (section 3)” of your Owner’s Manual.
3RD ROW SEATS (if so equipped)
To fold the seatback forward, pull the release strap 01
and push the seatback forward.
To return the seatback to the upright position, pull
the release strap
01 and the seatback up at the
same time.
The 3
RD row seats can fold forward for additional storage.
Pull the handle 02 and lift the floor.
Pull the straps 03 on both sides simultaneously, to
unlatch the 3RD row seat.
Lift the 3RD row seat to access the storage area
beneath the 3RD row seat 04.
For more information, refer to the “Safety — Seats, seat belts and
supplemental restraint system (section 1)” of your Owner’s Manual.
01
02
02
03
0101
02
0303
04
1766904_14d_Rogue_QRG_062514.indd 126/25/14 3:29 PM
To view detailed instructional videos regarding these and other features, please go\
to www.nissanownersinfo.mobi.
Page 15 of 28
13
HEADLIGHT CONTROL SWITCH
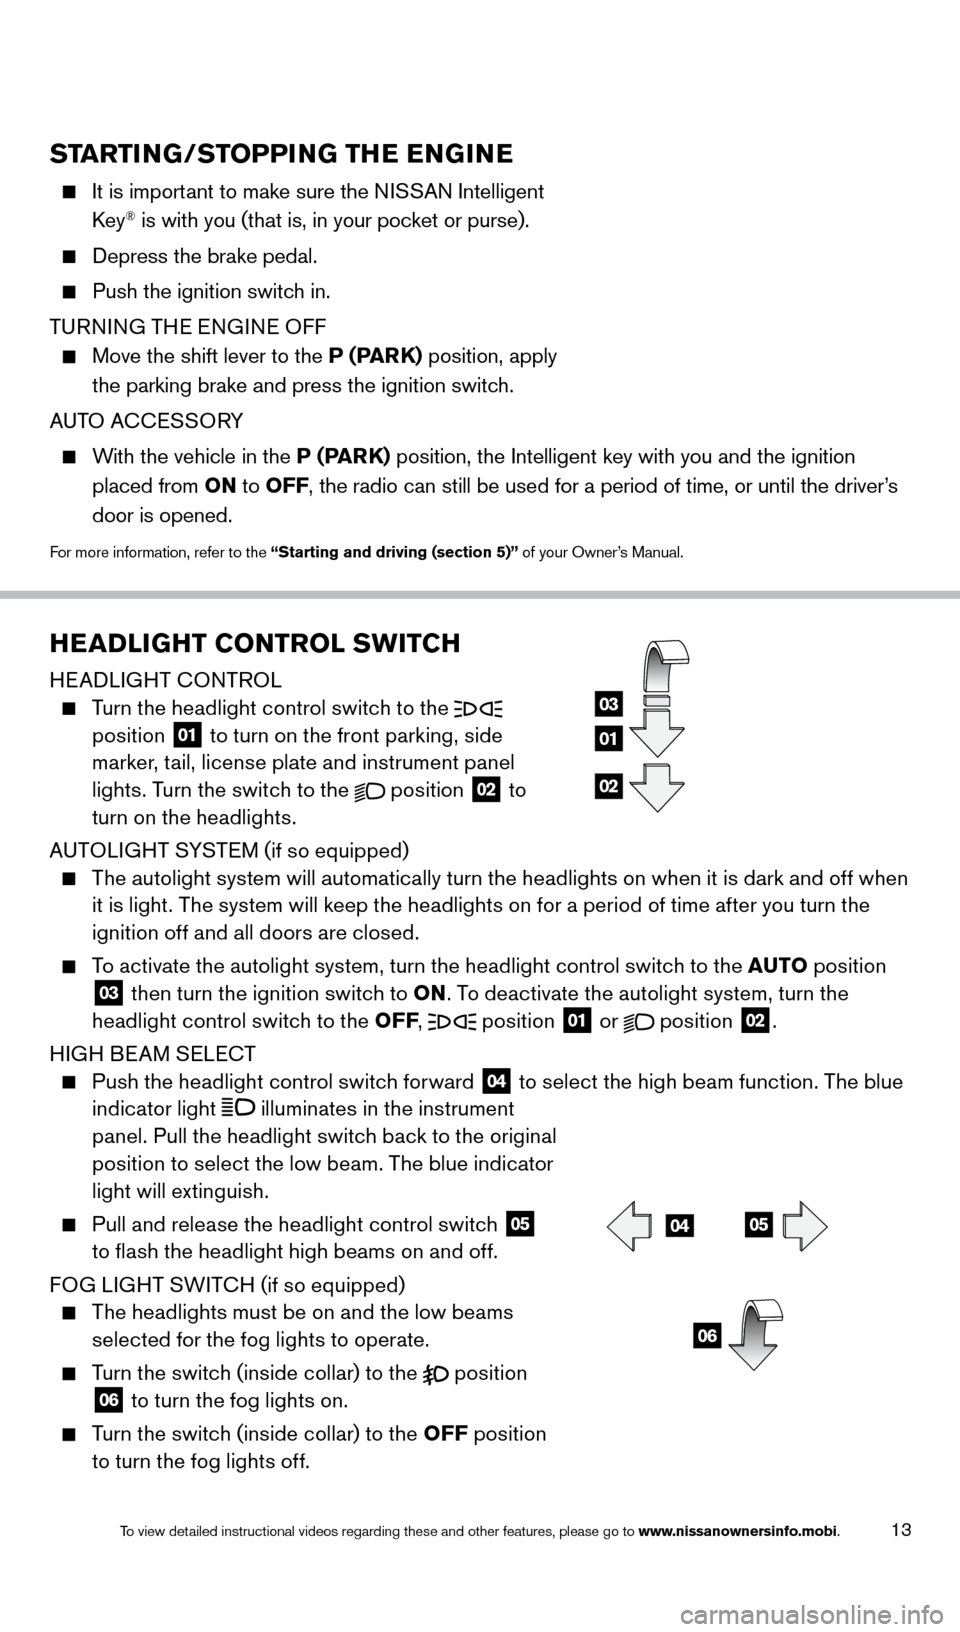
HEADLIGHT CONTROL
Turn the headlight control switch to the
position 01 to turn on the front parking, side
marker, tail, license plate and instrument panel
lights. Turn the switch to the
position 02 to
turn on the headlights.
AUTOLIGHT SYSTEM (if so equipped)
The autolight system will automatically turn the headlights on when it is dark and off when
i
t is light. The system will keep the headlights on for a period of time after you turn the
ignition off and all doors are closed.
To activate the autolight system, turn the headlight control switch to the AUTO po sition 03 then turn the ignition switch to ON. To deactivate the autolight system, turn the
headlight control switch to the OFF ,
position
01 or
position 02.
HIGH BEAM SELECT
Push the headlight control switch forward 04 to select the high beam function. The blue
indicator light
illuminates in the instrument
panel. Pull the headlight switch back to the original
position to select the low beam. The blue indicator
light will extinguish.
Pull and release the headlight control switch 05
to flash the headlight high beams on and off.
FOG LIGHT SWITCH (if so equipped)
The headlights must be on and the low beams
s
elected for the fog lights to operate.
Turn the switch (inside collar) to the position 06 to turn the fog lights on.
Turn the switch (inside collar) to the OFF
po sition
to turn the fog lights off.
01
03
02
0405
06
STARTING/STOPPING THE ENGINE
It is important to make sure the N ISSAN Intelligent
Key® is with you (that is, in your pocket or purse).
Depress the brake pedal.
Push the ignition switch in.
T
URNING THE ENGINE OFF
Move the shift lever to the P (P ARK) position, apply
the parking brake and press the ignition switch.
AUTO ACCESSORY
With the vehicle in the P (PARK) position, the Intelligent key with you and the ignition
placed from ON to OFF, the radio can still be used for a period of time, or until the driver’s
door is opened.
For more information, refer to the “Starting and driving (section 5)” of your Owner’s Manual.
1766904_14d_Rogue_QRG_062514.indd 136/25/14 3:29 PM
To view detailed instructional videos regarding these and other features, please go\
to www.nissanownersinfo.mobi.
Page 16 of 28
14
FIRST DRIVE FEATURES
WINDSHIELD WIPER AND WASHER SWITCH
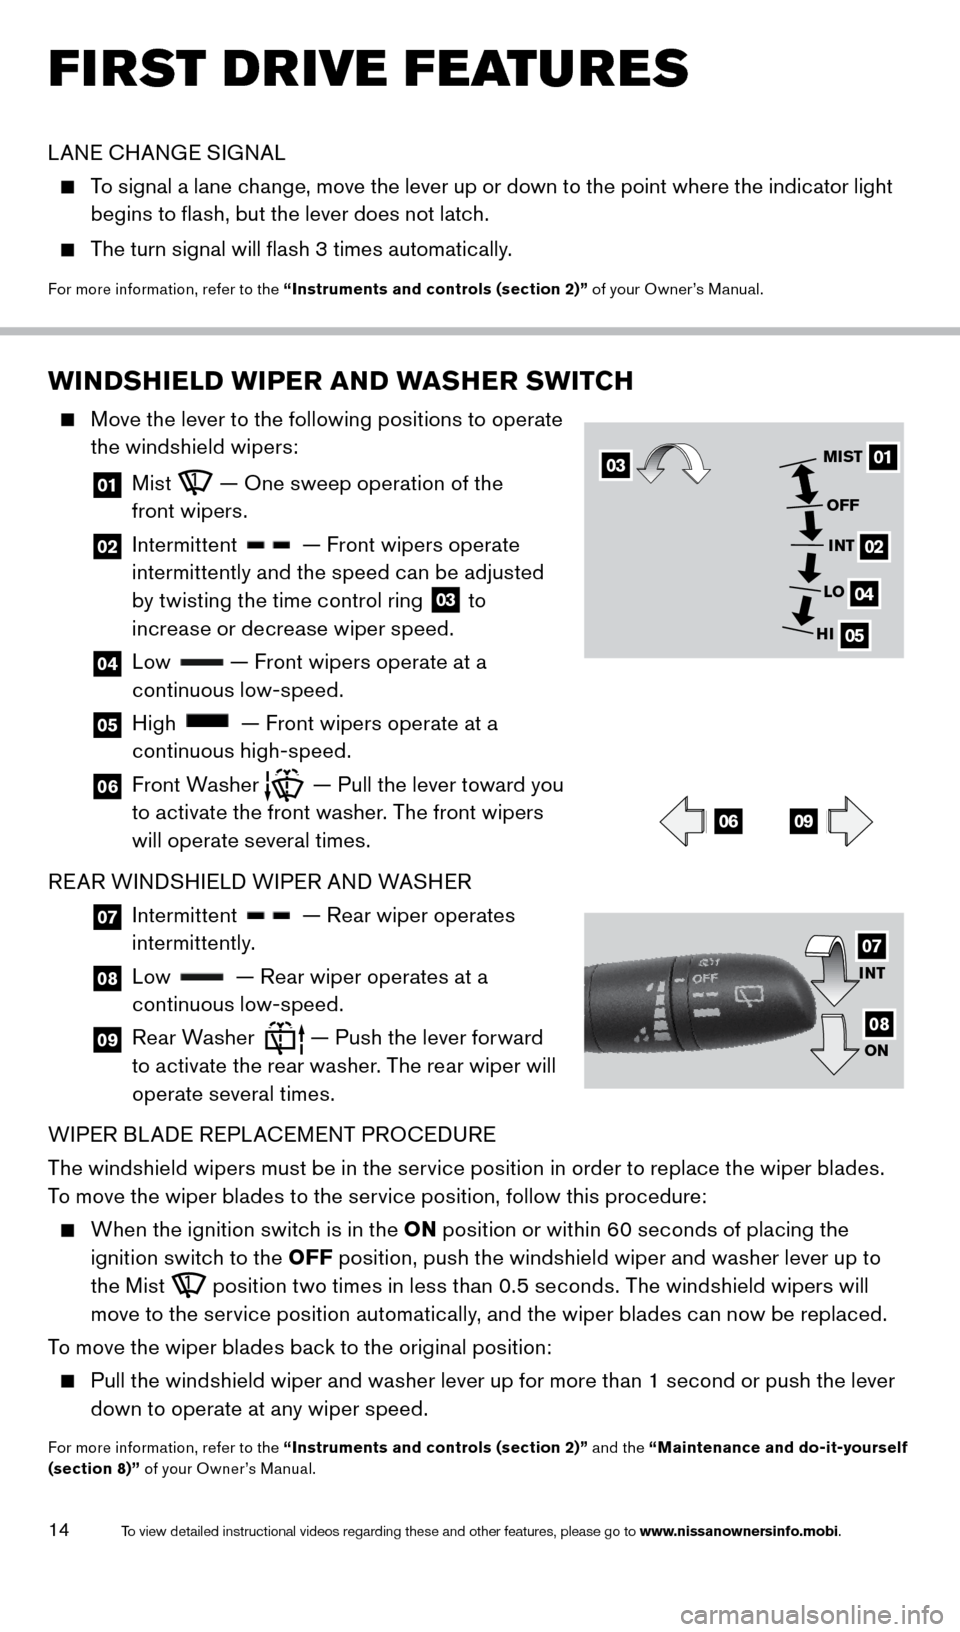
Move the lever to the following positions to operate
the windshield wipers:
01 Mist — One sweep operation of the
front wipers.
02 Intermittent — Front wipers operate
intermittently and the speed can be adjusted
by twisting the time control ring
03 to
increase or decrease wiper speed.
04 Low — Front wipers operate at a
continuous low-speed.
05 High — Front wipers operate at a
continuous high-speed.
06 Front Washer — Pull the lever toward you
to activate the front washer. The front wipers
will operate several times.
REAR WINDSHIELD WIPER AND WASHER
07 Intermittent — Rear wiper operates
intermittently.
08 Low — Rear wiper operates at a
continuous low-speed.
09 Rear Washer — Push the lever forward
to activate the rear washer. The rear wiper will
operate several times.
WIPER BLADE REPLACEMENT PROCEDURE
The windshield wipers must be in the service position in order to replace the wiper blades.
To move the wiper blades to the service position, follow this procedure:
When the ignition switch is in the ON p osition or within 60 seconds of placing the
ignition switch to the OFF position, push the windshield wiper and washer lever up to
the Mist
position two times in less than 0.5 seconds. The windshield wipers will
move to the service position automatically, and the wiper blades can now be replaced.
To move the wiper blades back to the original position:
Pull the windshield wiper and washer lever up for more than 1 second or push the lever
d own to operate at any wiper speed.
For more information, refer to the “Instruments and controls (section 2)” and the “Maintenance and do-it-yourself
(section 8)” of your Owner’s Manual.
0301
02
04
05
MIST
OFFINT
LO
HI
0609
INT
ON07
08
LANE CHANGE SIGNAL
To signal a lane change, move the lever up or down to the point where the indicator light
b egins to flash, but the lever does not latch.
The turn signal will flash 3 times automatically.
For more information, refer to the “Instruments and controls (section 2)” of your Owner’s Manual.
1766904_14d_Rogue_QRG_062514.indd 146/25/14 3:29 PM
To view detailed instructional videos regarding these and other features, please go\
to www.nissanownersinfo.mobi.
Page 17 of 28
15
AUTOMATIC CLIMATE CONTROLS (if so equipped)
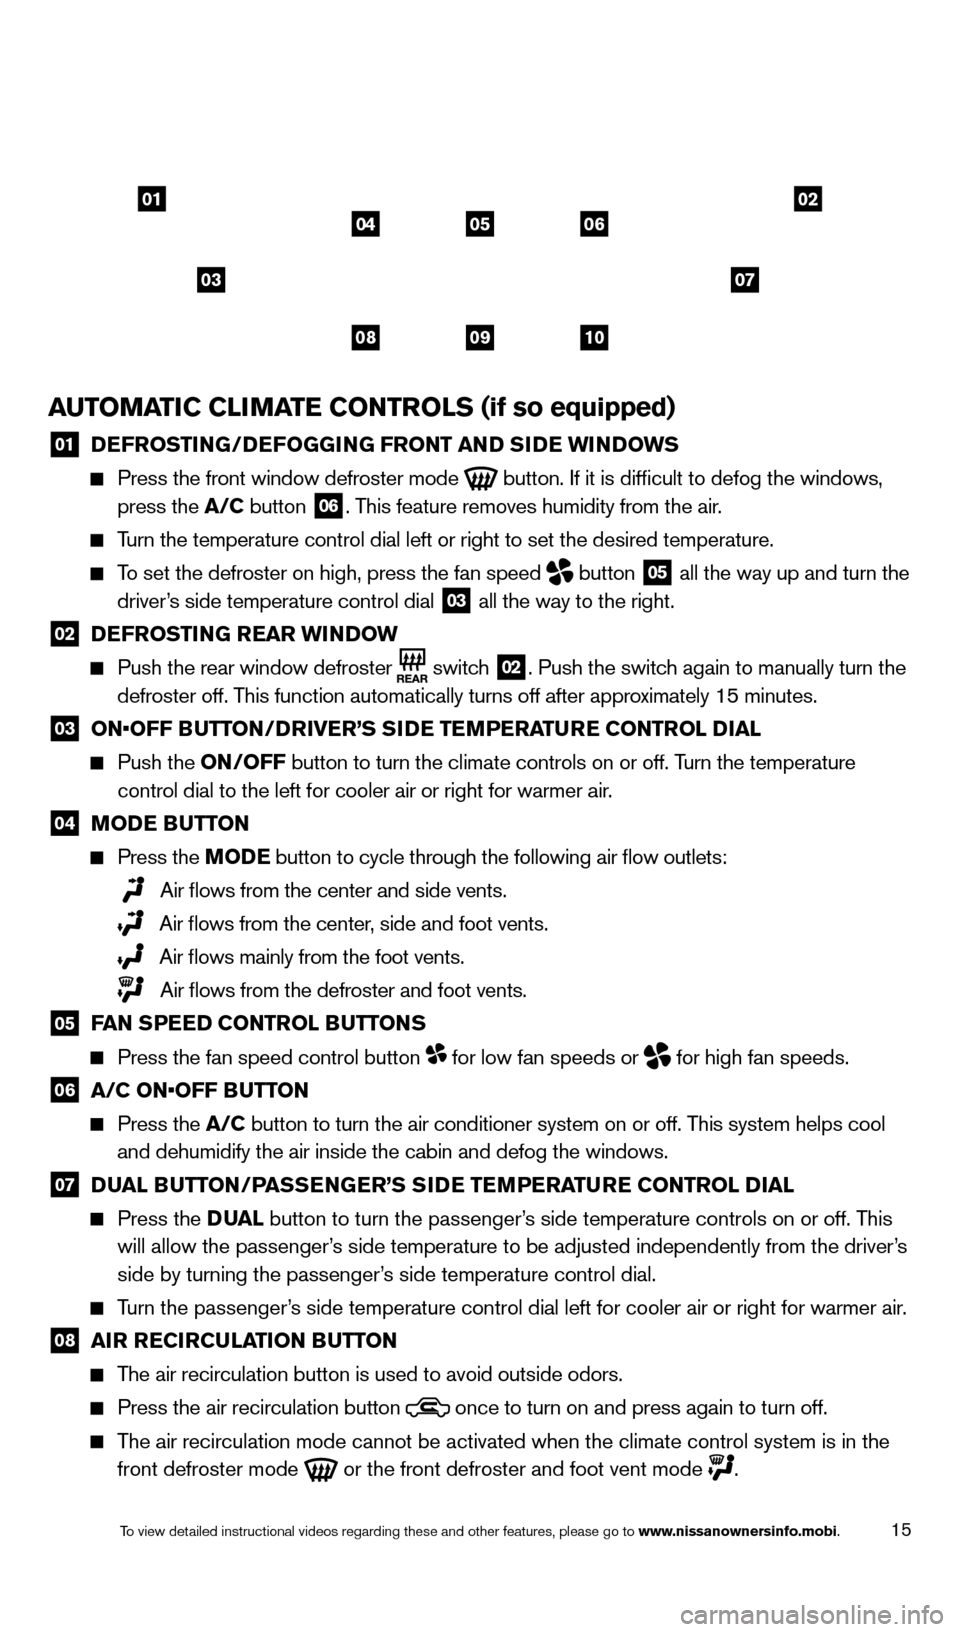
01 DEFROSTING/DEFOGGING FRONT AND SIDE WINDOWS Press the front window defroster mode
button. If it is difficult to defog the windows,
press the A/C button 06. This feature removes humidity from the air.
Turn the temperature control dial left or right to set the desired temper\
ature.
To set the defroster on high, press the fan speed
button
05 all the way up and turn the
driver’s side temperature control dial
03 all the way to the right.
02 DE FROSTING REAR WINDOW Push the rear window defroster
switch
02. Push the switch again to manually turn the
defroster off. This function automatically turns off after approximately 15 minutes.
03 ON•OFF B UTTON/DRIVER’S SIDE TEMPERATURE CONTROL DIAL Push the
ON/OFF button to turn the climate controls on or off. T urn the temperature
control dial to the left for cooler air or right for warmer air.
04 MODE BUTTON
Press the M ODE button to cycle through the following air flow outlets:
Air flows from the center and side vents.
Air flows from the center, side and foot vents.
Air flows mainly from the foot vents.
Air flows from the defroster and foot vents.
05 FAN SPEED CONTROL BUTTONS Press the fan speed control button for low fan speeds or
for high fan speeds.
06 A/C ON•OFF B UTTON Press the
A/C button to turn the air conditioner system on or off. This system helps cool
and dehumidify the air inside the cabin and defog the windows.
07 DU AL BUTTON/PASSENGER’S SIDE TEMPERATURE CONTROL DIAL Press the
D UA L button to turn the passenger’s side temperature controls on or off. This
will allow the passenger’s side temperature to be adjusted independently from the driver’s
side by turning the passenger’s side temperature control dial.
Turn the passenger’s side temperature control dial left for cooler air or right for warmer \
air.
08 AIR R ECIRCULATION BUTTON The air recirculation button is used to avoid outside odors.
Press the air recirculation button
once to turn on and press again to turn off.
The air recirculation mode cannot be activated when the climate control s\
ystem is in the
front defroster mode
or the front defroster and foot vent mode .
01
03
0205
09
04
08
06
10
07
1766904_14d_Rogue_QRG_062514.indd 156/25/14 3:29 PM
To view detailed instructional videos regarding these and other features, please go\
to www.nissanownersinfo.mobi.
Page 18 of 28
16
FIRST DRIVE FEATURES
FM/AM/SiriusXM®* SATELLITE RADIO WITH CD PLAYER
(if so equipped)
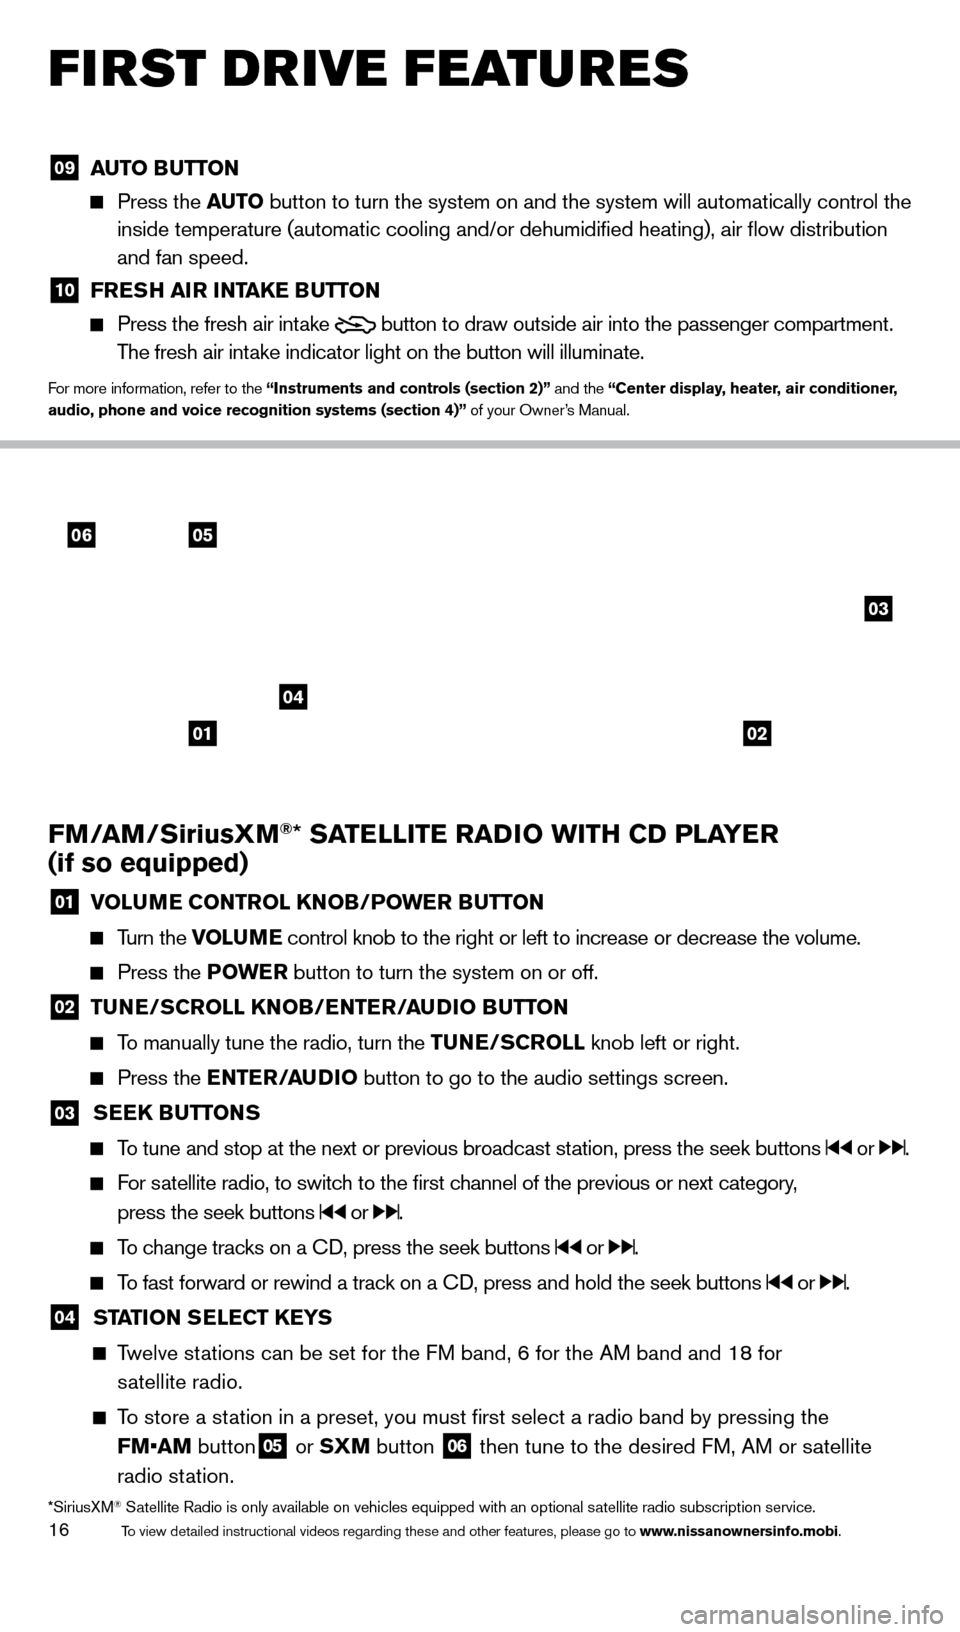
01 VOLU ME CONTROL KNOB/POWER BUTTON
Turn the VOLUME control knob to the right or left to increase or decrease the volume.
Press the P
OWE R button to turn the system on or off.
02 TUNE/SCROLL KNOB/ENTER/AUDIO BUTTON
To manually tune the radio, turn the TUNE/SCROLL
knob left or right.
Press the ENTER/AUDIO button to go to the audio settings screen.
03 SEEK BUTTONS
To tune and stop at the next or previous broadcast station, press the seek buttons or .
For satellite radio, to switch to the first channel of the previous or next category,
press the seek buttons
or .
To change tracks on a CD, press the seek buttons or .
To fast forward or rewind a track on a CD, press and hold the seek buttons or .
04 STA TION SELECT KEYS
Twelve stations can be set for the FM band, 6 for the AM band and 18 for
s
atellite radio.
To store a station in a preset, you must first select a radio band by pressing the \
FM•AM button
05 or SXM button 06 then tune to the desired FM, AM or satellite
radio station.
*SiriusXM® Satellite Radio is only available on vehicles equipped with an optional s\
atellite radio subscription service.
06
04
03
05
0102
09 AUT O BUTTON Press the
AUT O button to turn the system on and the system will automatically control \
the
inside temperature (automatic cooling and/or dehumidified heating), \
air flow distribution
and fan speed.
10 FRE SH AIR INTAKE BUTTON Press the fresh air intake
button to draw outside air into the passenger compartment.
The fresh air intake indicator light on the button will illuminate.
For more information, refer to the “Instruments and controls (section 2)” and the “Center display, heater, air conditioner,
audio, phone and voice recognition systems (section 4)” of your Owner’s Manual.
1766904_14d_Rogue_QRG_062514.indd 166/25/14 3:29 PM
To view detailed instructional videos regarding these and other features, please go\
to www.nissanownersinfo.mobi.
Page 19 of 28
17
CRUISE CONTROL
The cruise control system enables you to set a constant
cruising speed once the vehicle has reac hed 25 mph
(40 km/h). The system will automatically maintain the
set speed until you tap the brake pedal, accelerate,
cancel or turn the system off.
To activate the cruise control, push the ON•OFF
switch
01. The CRUISE indicator light in the
instrument panel will illuminate.
To set cruising speed, accelerate the vehicle to the
desired speed, push the COAST/SET switch
02 and release. The SET indicator light
in the instrument panel will illuminate and the set speed will display next to \
the indicator
light. Take your foot off the accelerator pedal. Your vehicle will maintain the set speed.
To reset at a faster cruising speed, push and hold the ACCEL/RES switc h 03.
When the vehicle attains the desired speed, release the switch.
To reset at a slower cruising speed, push and hold the COAST/SET switch 02.
Release the switch when the vehicle slows to the desired speed.
To cancel the preset speed, tap the brake pedal or push the CANCEL switch 04.
To turn off cruise control, push the ON•OFF switch 01. Both the CRUISE indicator light
and SET indicator light in the instrument panel will extinguish.
For more information, refer to the “Starting and driving (section 5)” of your Owner’s Manual.
03
02
01
04
USB (Universal Serial Bus) CONNECTION PORT/AUX JACK
and iPOD® INTERFACE
The USB port/Aux jack 01 is located beneath the
climate controls.
When a compatible USB memory device, iPod® or
auxiliary device is plugged into the USB port/Aux
jack, compatible audio files stored on the device can
be played through the vehicle’s audio system.
For more information, refer to the “Center display, heater, air conditioner, audio, phone and voice recognition systems
(section 4)” of your Owner’s Manual.
01
Then press and hold the desired station select button (1 -6 ) until a beep is heard and the
sound is briefly muted. The channel indicator will appear on the display and the sound will
resume. Programing is now complete.
To retrieve a previously set station, select the radio band where the preset was stored
then press the corresponding st ation select button (1-6 ).
For more information, refer to the “Center display, heater, air conditioner, audio, phone and voice recognition systems
(section 4)” of your Owner’s Manual.
1766904_14d_Rogue_QRG_062514.indd 176/25/14 3:29 PM
To view detailed instructional videos regarding these and other features, please go\
to www.nissanownersinfo.mobi.
Page 20 of 28
18
FIRST DRIVE FEATURES
POWER PANORAMIC MOONROOF (if so equipped)
To fully open or close the moonroof, push the switch
to the open position
01 or the close position 02
and release it. The roof will automatically open or
close. To stop the roof, push the switch once more
while it is opening or closing.
To tilt the moonroof open, press the tilt button 03.
To close the moon roof, push the switch to the close
position
02.
AUTO-REVERSE
When the auto-reverse function is activated, the moonroof will automatica\
lly open or tilt up
when the control unit detects something caught in the moonroof when the \
moonroof is closing
or tilting down.
For more information, refer to the “Instruments and controls (section 2)” of your Owner’s Manual.
01
03
02
CENTER CONSOLE STORAGE BOX
To access the top storage tray, pull up on the driver’s
side lever
01.
To access the bottom storage bin, pull up on the
passenger ’s side lever
02.
For more information, refer to the “Instruments and controls (section 2)”
of your Owner’s Manual.
TILT AND TELESCOPIC STEERING WHEEL ADJUSTMENTS
Release the lock lever by pulling it down.
Adjust the steering wheel forward or backward by
moving it to the desired position.
Adjust the steering wheel up or down to the
desired position.
Lock the steering wheel in place by pushing the lock lever
up firmly.
For more information, refer to the “Pre-driving checks and adjustments
(section 3)” of your Owner’s Manual.
0102
1766904_14d_Rogue_QRG_062514.indd 186/25/14 3:30 PM
To view detailed instructional videos regarding these and other features, please go\
to www.nissanownersinfo.mobi.