NISSAN SENTRA 2002 B15 / 5.G Owners Manual
Manufacturer: NISSAN, Model Year: 2002, Model line: SENTRA, Model: NISSAN SENTRA 2002 B15 / 5.GPages: 235, PDF Size: 1.97 MB
Page 211 of 235
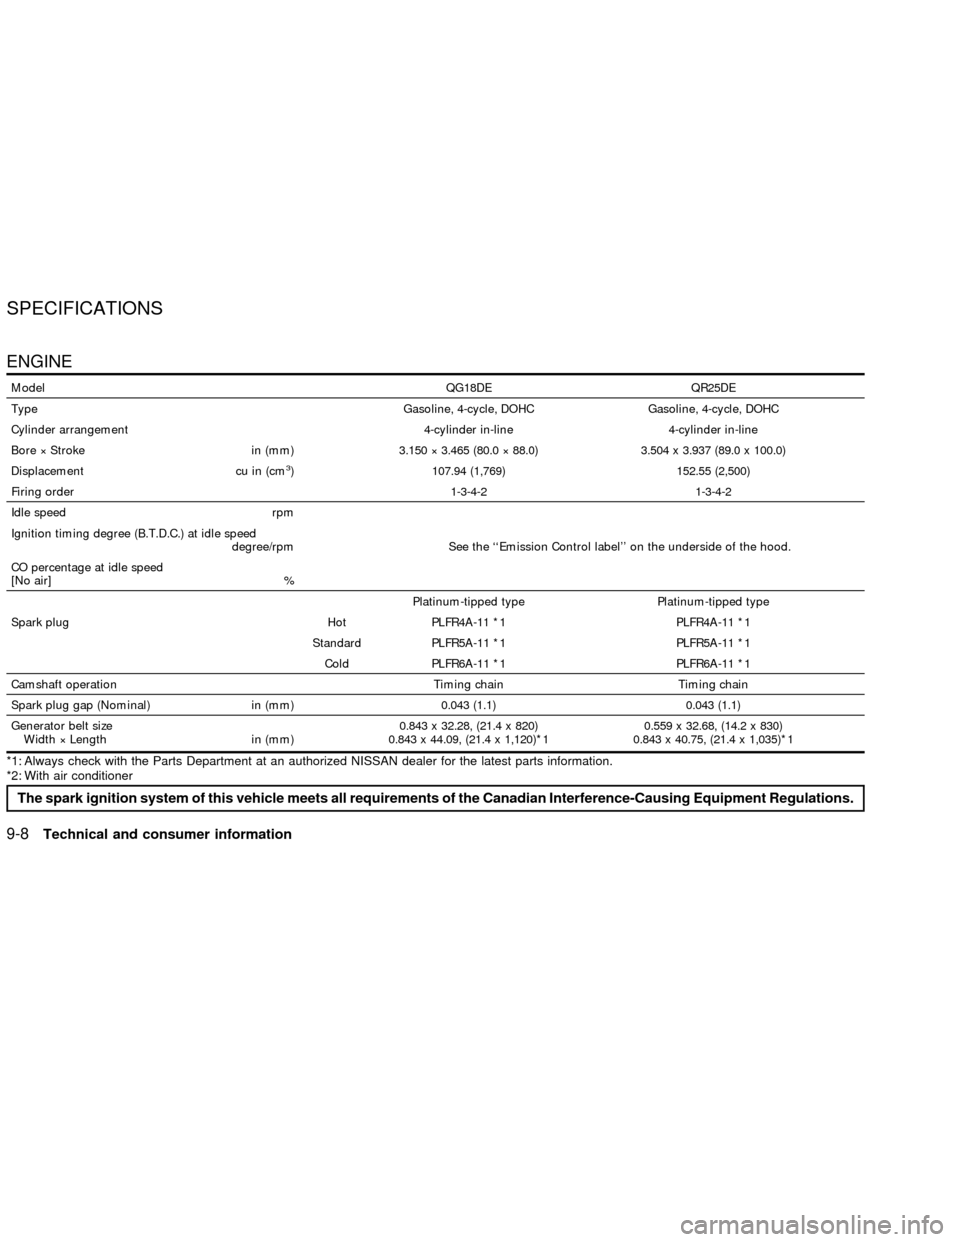
ENGINE
ModelQG18DE QR25DE
Type Gasoline, 4-cycle, DOHC Gasoline, 4-cycle, DOHC
Cylinder arrangement 4-cylinder in-line 4-cylinder in-line
Bore ý Stroke in (mm) 3.150 ý 3.465 (80.0 ý 88.0) 3.504 x 3.937 (89.0 x 100.0)
Displacement cu in (cm
3) 107.94 (1,769) 152.55 (2,500)
Firing order1-3-4-2 1-3-4-2
Idle speed rpm
See the ``Emission Control label'' on the underside of the hood. Ignition timing degree (B.T.D.C.) at idle speed
degree/rpm
CO percentage at idle speed
[No air] %
Platinum-tipped type Platinum-tipped type
Spark plug Hot PLFR4A-11 *1 PLFR4A-11 *1
Standard PLFR5A-11 *1 PLFR5A-11 *1
Cold PLFR6A-11 *1 PLFR6A-11 *1
Camshaft operation Timing chain Timing chain
Spark plug gap (Nominal) in (mm) 0.043 (1.1) 0.043 (1.1)
Generator belt size
Width ý Length in (mm)0.843 x 32.28, (21.4 x 820)
0.843 x 44.09, (21.4 x 1,120)*10.559 x 32.68, (14.2 x 830)
0.843 x 40.75, (21.4 x 1,035)*1
*1: Always check with the Parts Department at an authorized NISSAN dealer for the latest parts information.
*2: With air conditioner
The spark ignition system of this vehicle meets all requirements of the Canadian Interference-Causing Equipment Regulations.
SPECIFICATIONS
9-8Technical and consumer information
ZX
Page 212 of 235

WHEELS AND TIRES
Wheel
DimensionOffset
in (mm)
Road wheel
149steel w/bottom
cover14 ý 5.5JJ 1.57 (40)
159aluminum alloy 15 x 6JJ 1.77 (45)
169aluminum alloy 16 ý 6JJ 1.77 (45)
179aluminum alloy 17 x 7JJ 1.85 (47)
Conventional tire size
P185/65R/14 14 x 5.5JJ
P195/60R/15 15 x 6JJ
P195/55R/16 16 x 6JJ
P215/45ZR17 17 x 7JJ
Spare tire size
T115/70*14 14 ý 4T
T125/70*15 15 x 4T
T135/90*15 15 x 4T
*: ªRº or ªDº depending on tire manufacturer
DIMENSIONS AND WEIGHTS
SENTRA
Overall length in (mm) 177.4 (4505)
Overall width in (mm) 67.3 (1710)
Overall height in (mm) 55.5 (1410)
Front tread 14 inch in (mm) 58.3 (1480)
15/16 inch in (mm) 57.9 (1470)
17 inch in (mm) 57.7 (1466)
Rear tread 14 inch in (mm) 57.5 (1460)
15/16 inch in (mm) 57.1 (1450)
17 inch in (mm) 56.9 (1446)
Wheelbase in (mm) 99.8 (2,535)
Gross vehicle weight
ratinglb (kg)See the ``F.M.V.S.S. cer-
tification label'' on the
center pillar between
the driver's side front
and rear doors. Gross axle weight rating
Front lb (kg)
Rear lb (kg)
Technical and consumer information9-9
ZX
Page 213 of 235

When planning to travel in another coun-
try,you should first find out if the fuel avail-
able is suitable for your vehicle's engine.
Using fuel with too low an octane/cetane
rating may cause engine damage. All gaso-
line vehicles must be operated with un-
leaded gasoline. Therefore, avoid taking
your vehicle to areas where appropriate fuel
is not available.
When transferring the registration of
your vehicle to another country, state,
province or district,it may be necessary to
modify the vehicle to meet local laws and
regulations.
The laws and regulations for motor vehicle
emission control and safety standards vary
according to the country, state, province or
district. Therefore, vehicle specifications
may differ.
When any vehicle is to be taken into
another country, state, province or dis-
trict and registered, its modifications,
transportation, and registration are the
responsibility of the user. NISSAN is not
responsible for any inconvenience that
may result.
VEHICLE IDENTIFICATION
NUMBER (VIN) PLATE
The vehicle identification number (VIN)
plate is attached to the top of the instrument
panel on the driver's side. This number is
the identification for your vehicle and is
used in the vehicle registration.
VEHICLE IDENTIFICATION
NUMBER (Chassis number)
The chassis number is stamped as shown.
TI1050MLTI0007
WHEN TRAVELING OR
REGISTERING YOUR VEHICLE
IN ANOTHER COUNTRYVEHICLE IDENTIFICATION
9-10Technical and consumer information
ZX
Page 214 of 235

ENGINE SERIAL NUMBER
The engine serial number is stamped on the
engine as shown.
F.M.V.S.S. CERTIFICATION
LABEL
The Federal Motor Vehicle Safety Standard
(F.M.V.S.S.) certification label is affixed as
shown. This label contains valuable vehicle
information, such as: Gross Vehicle Weight
Ratings (GVWR), Gross Axle Weight Rating
(GAWR), month and year of manufacture,
Vehicle Identification Number, (VIN), etc.
Review it carefully.
LTI0006WTI0032WTI0012
Technical and consumer information9-11
ZX
Page 215 of 235

EMISSION CONTROL INFORMA-
TION LABEL
The emission control information label is
attached as shown.
TIRE PLACARD
The cold tire pressure is shown on the tire
placard affixed to the driver's side rear door
pillar.
AIR CONDITIONER SPECIFICA-
TION LABEL
The air conditioner specification label is
affixed as shown.
LTI1008LTI0011LTI1009
9-12Technical and consumer information
ZX
Page 216 of 235

Use the following steps to mount the front
license plate:
1. Make holes on the plastic finisher at the
location mark (small dimple) using a 0.31
in (8 mm) drill. Apply light pressure to the
drill. Install the license plate holder using
the two screws provided with the holder.
2. Mount the license plateusing two
M6-14mm bolts.
License plate bolt tightening torque:
3.8 to 4.7 ft-lb (5.10 to 6.37 Nzm)
LTI0010
INSTALLING FRONT LICENSE
PLATE
Technical and consumer information9-13
ZX
Page 217 of 235
WARNING
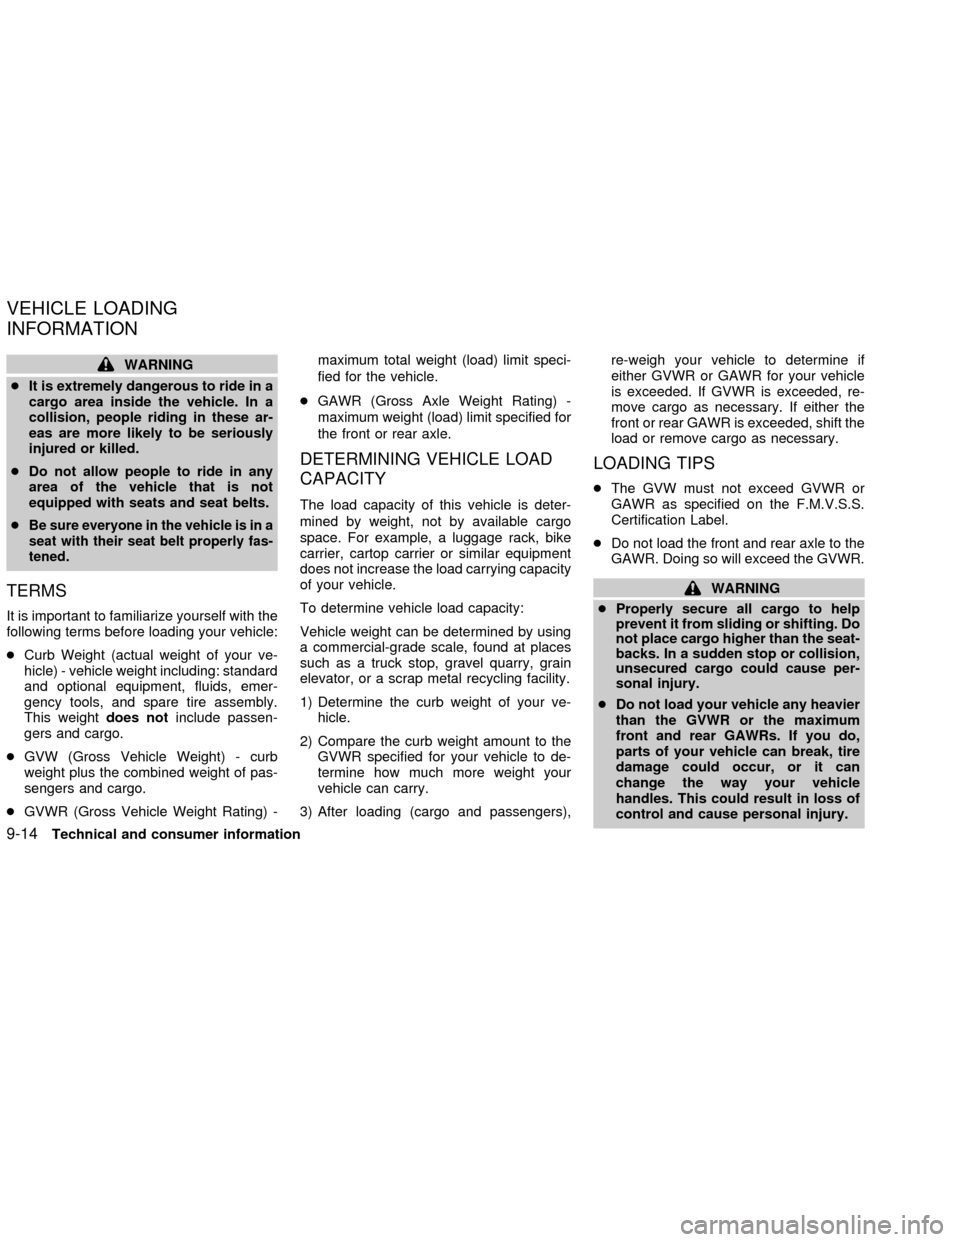
cIt is extremely dangerous to ride in a
cargo area inside the vehicle. In a
collision, people riding in these ar-
eas are more likely to be seriously
injured or killed.
cDo not allow people to ride in any
area of the vehicle that is not
equipped with seats and seat belts.
c
Be sure everyone in the vehicle is in a
seat with their seat belt properly fas-
tened.
TERMS
It is important to familiarize yourself with the
following terms before loading your vehicle:
cCurb Weight (actual weight of your ve-
hicle) - vehicle weight including: standard
and optional equipment, fluids, emer-
gency tools, and spare tire assembly.
This weightdoes notinclude passen-
gers and cargo.
cGVW (Gross Vehicle Weight) - curb
weight plus the combined weight of pas-
sengers and cargo.
cGVWR (Gross Vehicle Weight Rating) -maximum total weight (load) limit speci-
fied for the vehicle.
cGAWR (Gross Axle Weight Rating) -
maximum weight (load) limit specified for
the front or rear axle.
DETERMINING VEHICLE LOAD
CAPACITY
The load capacity of this vehicle is deter-
mined by weight, not by available cargo
space. For example, a luggage rack, bike
carrier, cartop carrier or similar equipment
does not increase the load carrying capacity
of your vehicle.
To determine vehicle load capacity:
Vehicle weight can be determined by using
a commercial-grade scale, found at places
such as a truck stop, gravel quarry, grain
elevator, or a scrap metal recycling facility.
1) Determine the curb weight of your ve-
hicle.
2) Compare the curb weight amount to the
GVWR specified for your vehicle to de-
termine how much more weight your
vehicle can carry.
3) After loading (cargo and passengers),re-weigh your vehicle to determine if
either GVWR or GAWR for your vehicle
is exceeded. If GVWR is exceeded, re-
move cargo as necessary. If either the
front or rear GAWR is exceeded, shift the
load or remove cargo as necessary.
LOADING TIPS
cThe GVW must not exceed GVWR or
GAWR as specified on the F.M.V.S.S.
Certification Label.
cDo not load the front and rear axle to the
GAWR. Doing so will exceed the GVWR.
WARNING
cProperly secure all cargo to help
prevent it from sliding or shifting. Do
not place cargo higher than the seat-
backs. In a sudden stop or collision,
unsecured cargo could cause per-
sonal injury.
cDo not load your vehicle any heavier
than the GVWR or the maximum
front and rear GAWRs. If you do,
parts of your vehicle can break, tire
damage could occur, or it can
change the way your vehicle
handles. This could result in loss of
control and cause personal injury.
VEHICLE LOADING
INFORMATION
9-14Technical and consumer information
ZX
Page 218 of 235
cOverloading can shorten the life of
the vehicle. Failures caused by over-
loading are not covered by the vehi-
cle's warranty.
Your new vehicle was designed to be used
primarily to carry passengers and cargo.
Remember that towing a trailer places ad-
ditional loads on your vehicle's engine, drive
train, steering, braking and other systems.
A Nissan Trailer Towing Guide (U.S. only)
containing information on trailer towing abil-
ity and the special equipment required may
be obtained from an authorized NISSAN
dealer.MAXIMUM LOAD LIMITS
Maximum trailer loads
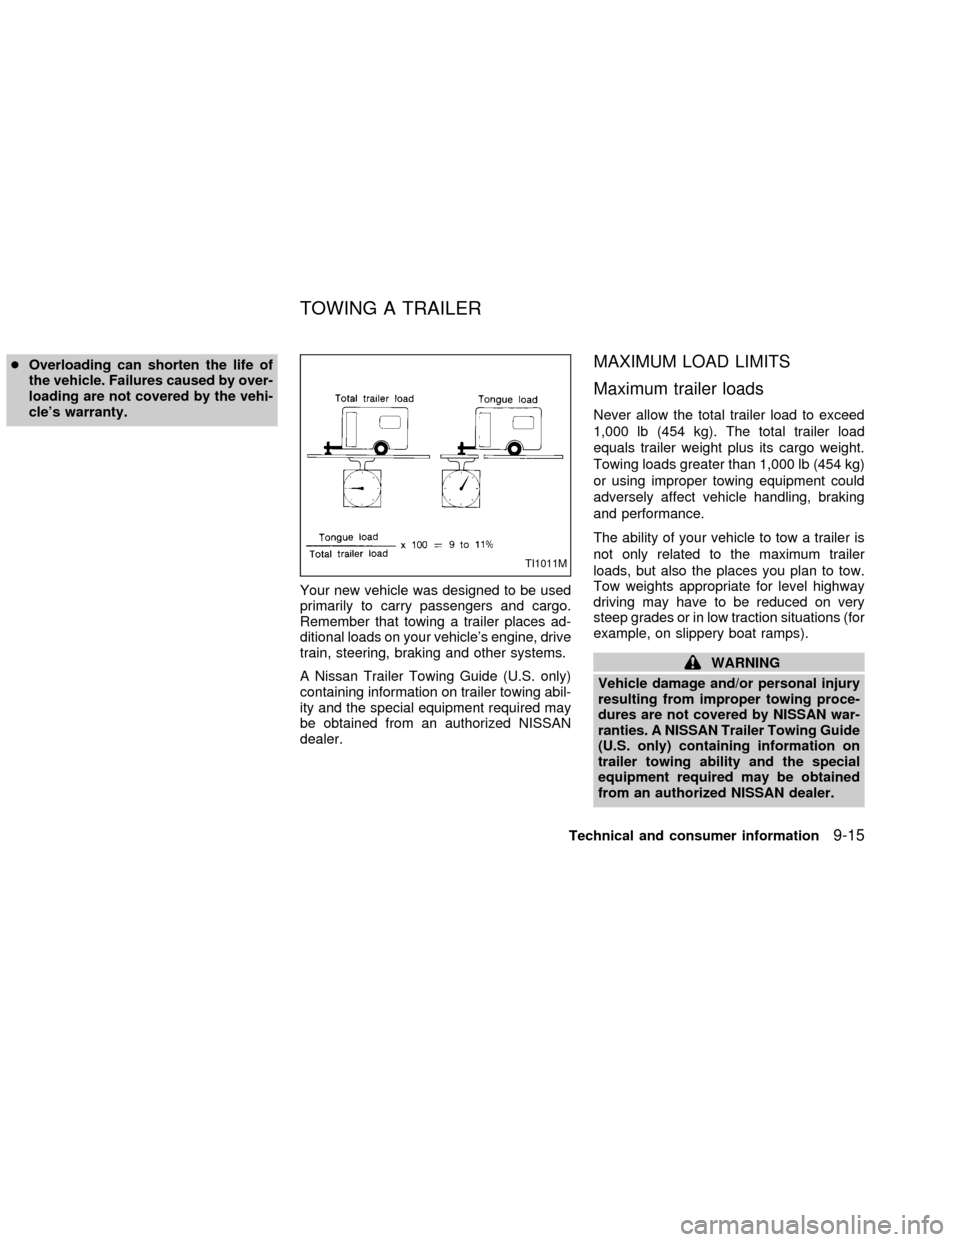
Never allow the total trailer load to exceed
1,000 lb (454 kg). The total trailer load
equals trailer weight plus its cargo weight.
Towing loads greater than 1,000 lb (454 kg)
or using improper towing equipment could
adversely affect vehicle handling, braking
and performance.
The ability of your vehicle to tow a trailer is
not only related to the maximum trailer
loads, but also the places you plan to tow.
Tow weights appropriate for level highway
driving may have to be reduced on very
steep grades or in low traction situations (for
example, on slippery boat ramps).
WARNING
Vehicle damage and/or personal injury
resulting from improper towing proce-
dures are not covered by NISSAN war-
ranties. A NISSAN Trailer Towing Guide
(U.S. only) containing information on
trailer towing ability and the special
equipment required may be obtained
from an authorized NISSAN dealer.
TI1011M
TOWING A TRAILER
Technical and consumer information9-15
ZX
Page 219 of 235
Tongue load
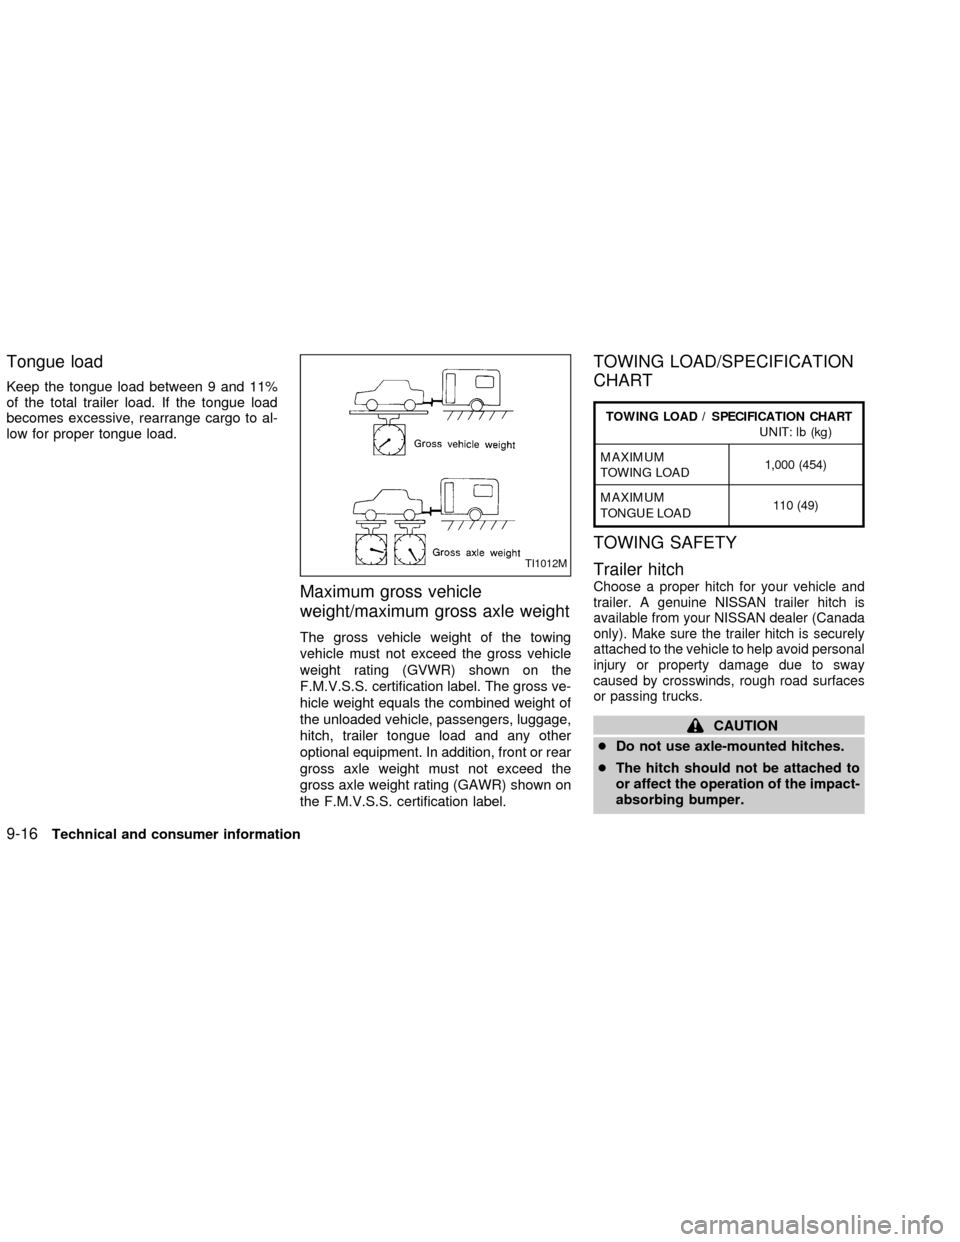
Keep the tongue load between 9 and 11%
of the total trailer load. If the tongue load
becomes excessive, rearrange cargo to al-
low for proper tongue load.
Maximum gross vehicle
weight/maximum gross axle weight
The gross vehicle weight of the towing
vehicle must not exceed the gross vehicle
weight rating (GVWR) shown on the
F.M.V.S.S. certification label. The gross ve-
hicle weight equals the combined weight of
the unloaded vehicle, passengers, luggage,
hitch, trailer tongue load and any other
optional equipment. In addition, front or rear
gross axle weight must not exceed the
gross axle weight rating (GAWR) shown on
the F.M.V.S.S. certification label.
TOWING LOAD/SPECIFICATION
CHART
TOWING LOAD / SPECIFICATION CHART
UNIT: lb (kg)
MAXIMUM
TOWING LOAD1,000 (454)
MAXIMUM
TONGUE LOAD110 (49)
TOWING SAFETY
Trailer hitch
Choose a proper hitch for your vehicle and
trailer. A genuine NISSAN trailer hitch is
available from your NISSAN dealer (Canada
only). Make sure the trailer hitch is securely
attached to the vehicle to help avoid personal
injury or property damage due to sway
caused by crosswinds, rough road surfaces
or passing trucks.
CAUTION
cDo not use axle-mounted hitches.
cThe hitch should not be attached to
or affect the operation of the impact-
absorbing bumper.
TI1012M
9-16Technical and consumer information
ZX
Page 220 of 235
cDo not modify the vehicle exhaust
system, brake system, etc. to install
a trailer hitch.
cTo reduce the possibility of addi-
tional damage if your vehicle is
struck from the rear, where practical,
remove the hitch and/or receiver
when not in use.
cAfter the hitch is removed, seal the
bolt holes to prevent exhaust fumes,
water or dust from entering the pas-
senger compartment.
cRegularly check that all hitch mount-
ing bolts are securely mounted.
Tire pressures
cWhen towing a trailer, inflate the vehicle
tires to the recommended cold tire pres-
sure indicated on the tire placard (lo-
cated on the driver's side rear door
pillar).
cTrailer tire condition, size, load rating
and proper inflation pressure should be
in accordance with the trailer and tire
manufacturers' specifications.
Safety chains
Always use suitable safety chains between
your vehicle and the trailer. Safety chains
should be crossed and should be attached
to the hitch, not to the vehicle bumper or
axle. Be sure to leave enough slack in the
chains to permit turning corners.
Trailer lights
Trailer lights should comply with federal
and/ or local regulations. When wiring the
vehicle for towing, connect the stop and tail
light pickup into the vehicle electrical circuit.
Trailer brakes
If your trailer is equipped with a braking
system, make sure it conforms to federal
and/or local regulations and that it is prop-
erly installed.
WARNING
Never connect a trailer brake system
directly to the vehicle brake system.
Pre-towing tips
cBe certain your vehicle maintains a level
position when a loaded and/or unloadedtrailer is hitched. Do not drive the vehicle if
it has an abnormal nose-up or nose- down
condition; check for improper tongue load,
overload, worn suspension or other pos-
sible causes of either condition.
cAlways secure items in the trailer to
prevent load shift while driving.
cBe certain your rear view mirrors con-
form to all federal, state or local regula-
tions. If not, install any mirrors required
for towing before driving the vehicle.
Trailer towing tips
In order to gain skill and an understanding
of the vehicle's behavior, you should prac-
tice turning, stopping and backing up in an
area which is free from traffic. Steering,
stability, and braking performance are
somewhat different than under normal driv-
ing conditions.
cAlways secure items in the trailer to
prevent load shift while driving.
c
Avoid abrupt starts, acceleration or stops.
cAvoid sharp turns or lane changes.
cAlways drive your vehicle at a moderate
speed.
Technical and consumer information
9-17
ZX