lock NISSAN SENTRA 2006 B15 / 5.G User Guide
[x] Cancel search | Manufacturer: NISSAN, Model Year: 2006, Model line: SENTRA, Model: NISSAN SENTRA 2006 B15 / 5.GPages: 256, PDF Size: 4.1 MB
Page 32 of 256
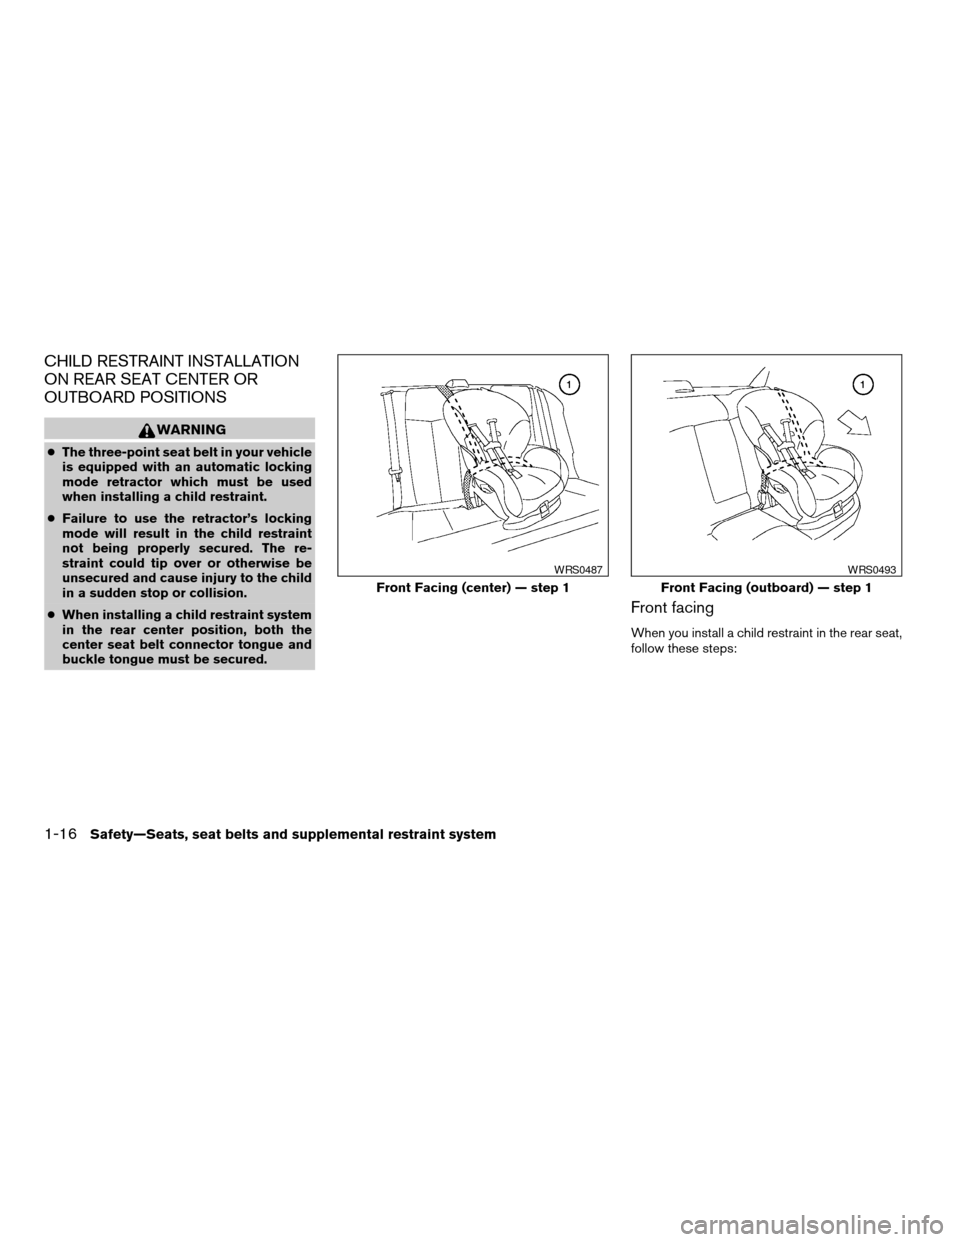
CHILD RESTRAINT INSTALLATION
ON REAR SEAT CENTER OR
OUTBOARD POSITIONS
WARNING
cThe three-point seat belt in your vehicle
is equipped with an automatic locking
mode retractor which must be used
when installing a child restraint.
cFailure to use the retractor’s locking
mode will result in the child restraint
not being properly secured. The re-
straint could tip over or otherwise be
unsecured and cause injury to the child
in a sudden stop or collision.
cWhen installing a child restraint system
in the rear center position, both the
center seat belt connector tongue and
buckle tongue must be secured.
Front facing
When you install a child restraint in the rear seat,
follow these steps:
Front Facing (center) — step 1
WRS0487
Front Facing (outboard) — step 1
WRS0493
1-16Safety—Seats, seat belts and supplemental restraint system
ZREVIEW COPYÐ2006 Sentra(b15)
Owners ManualÐUSA_English(nna)
09/01/05Ðdebbie
X
Page 33 of 256
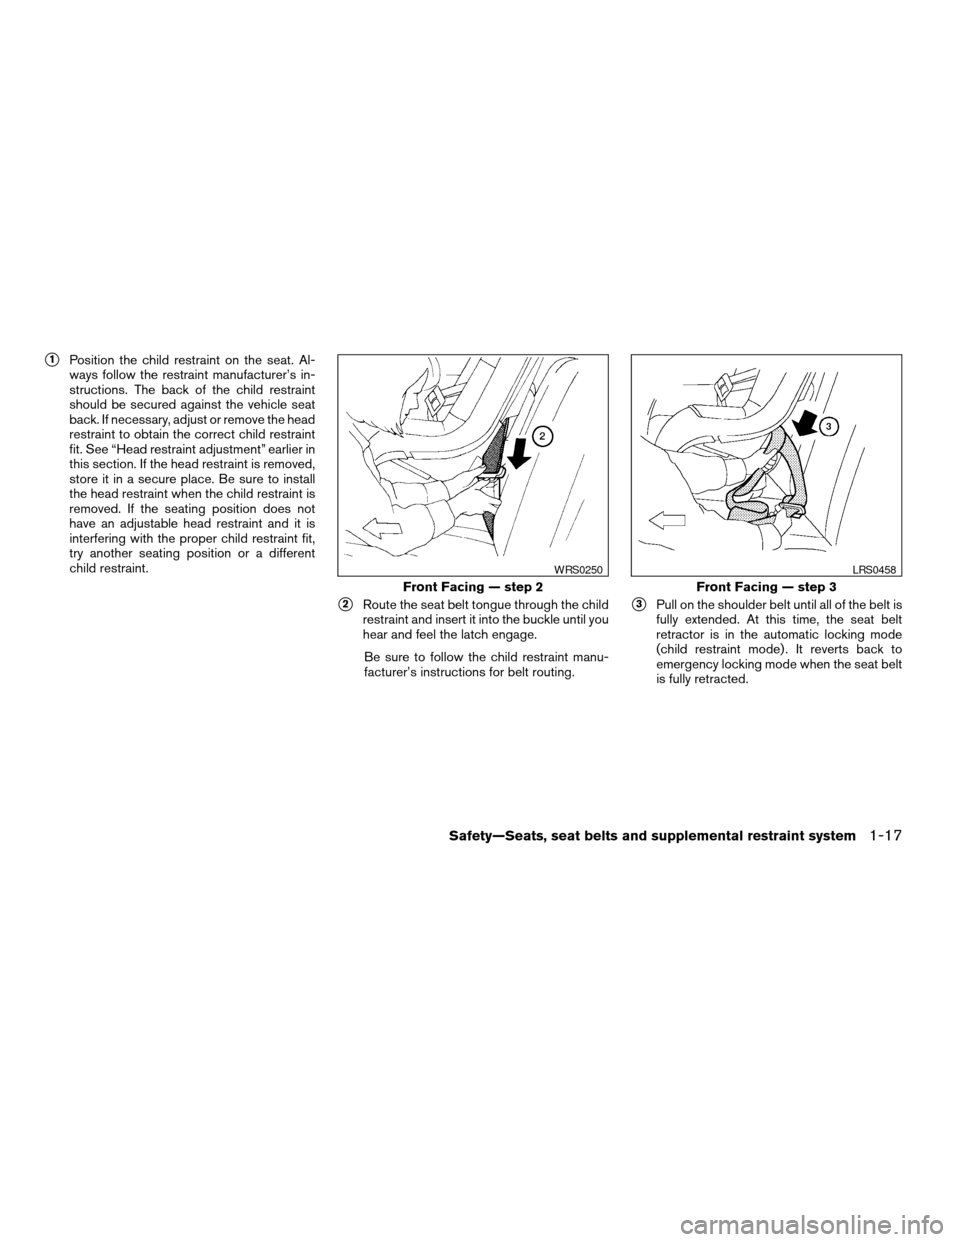
s1Position the child restraint on the seat. Al-
ways follow the restraint manufacturer’s in-
structions. The back of the child restraint
should be secured against the vehicle seat
back. If necessary, adjust or remove the head
restraint to obtain the correct child restraint
fit. See “Head restraint adjustment” earlier in
this section. If the head restraint is removed,
store it in a secure place. Be sure to install
the head restraint when the child restraint is
removed. If the seating position does not
have an adjustable head restraint and it is
interfering with the proper child restraint fit,
try another seating position or a different
child restraint.
s2Route the seat belt tongue through the child
restraint and insert it into the buckle until you
hear and feel the latch engage.
Be sure to follow the child restraint manu-
facturer’s instructions for belt routing.s3Pull on the shoulder belt until all of the belt is
fully extended. At this time, the seat belt
retractor is in the automatic locking mode
(child restraint mode) . It reverts back to
emergency locking mode when the seat belt
is fully retracted.
Front Facing — step 2
WRS0250
Front Facing — step 3
LRS0458
Safety—Seats, seat belts and supplemental restraint system1-17
ZREVIEW COPYÐ2006 Sentra(b15)
Owners ManualÐUSA_English(nna)
09/01/05Ðdebbie
X
Page 34 of 256
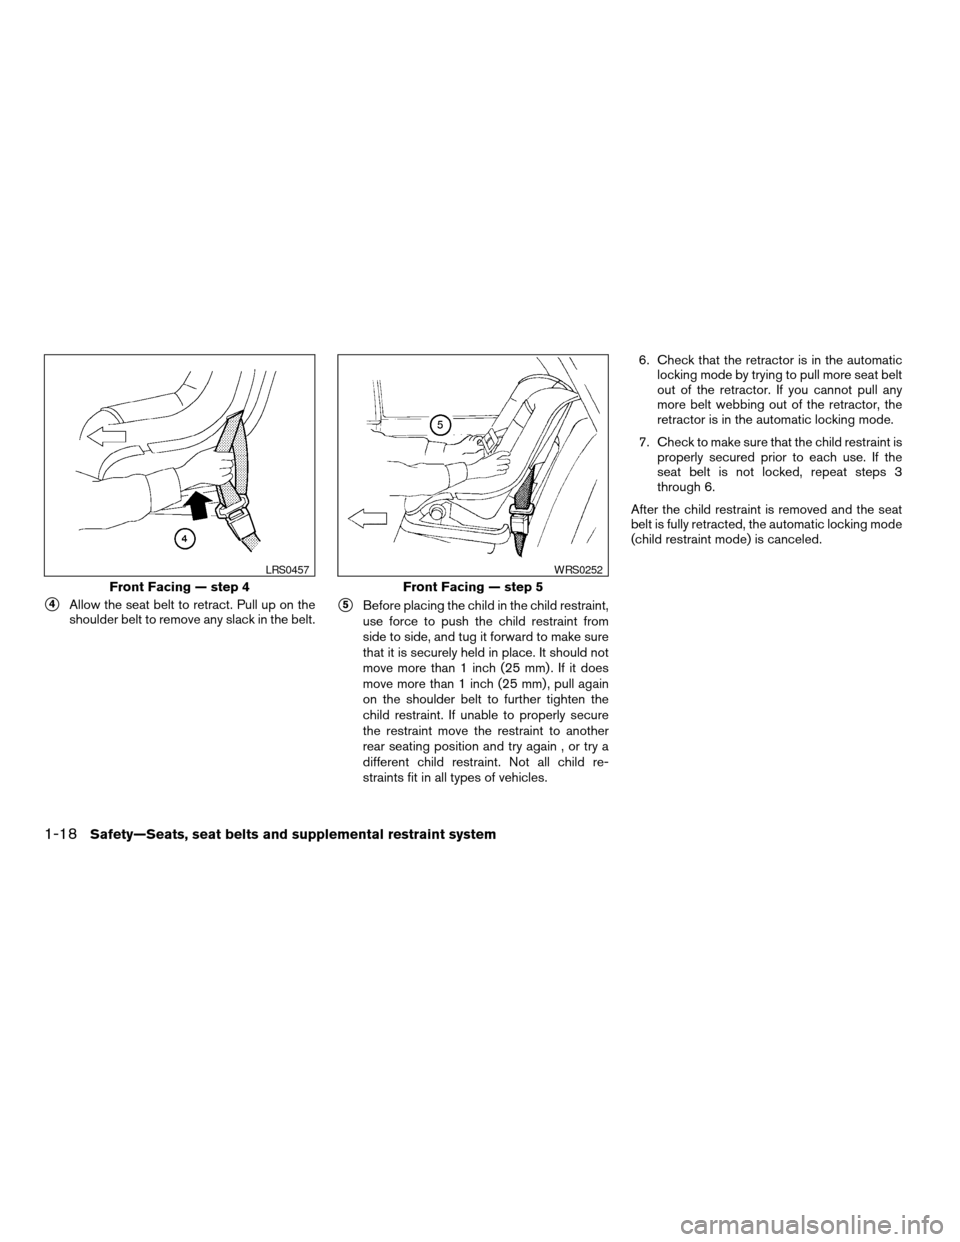
s4Allow the seat belt to retract. Pull up on the
shoulder belt to remove any slack in the belt.s5Before placing the child in the child restraint,
use force to push the child restraint from
side to side, and tug it forward to make sure
that it is securely held in place. It should not
move more than 1 inch (25 mm) . If it does
move more than 1 inch (25 mm) , pull again
on the shoulder belt to further tighten the
child restraint. If unable to properly secure
the restraint move the restraint to another
rear seating position and try again , or try a
different child restraint. Not all child re-
straints fit in all types of vehicles.6. Check that the retractor is in the automatic
locking mode by trying to pull more seat belt
out of the retractor. If you cannot pull any
more belt webbing out of the retractor, the
retractor is in the automatic locking mode.
7. Check to make sure that the child restraint is
properly secured prior to each use. If the
seat belt is not locked, repeat steps 3
through 6.
After the child restraint is removed and the seat
belt is fully retracted, the automatic locking mode
(child restraint mode) is canceled.
Front Facing — step 4
LRS0457
Front Facing — step 5
WRS0252
1-18Safety—Seats, seat belts and supplemental restraint system
ZREVIEW COPYÐ2006 Sentra(b15)
Owners ManualÐUSA_English(nna)
09/01/05Ðdebbie
X
Page 36 of 256

s3Pull on the shoulder belt until all of the belt is
fully extended. At this time, the seat belt
retractor is in the automatic locking mode
(child restraint mode) . It reverts to emer-
gency locking mode when the seat belt is
fully retracted.s4Allow the seat belt to retract. Pull up on the
shoulder belt to remove any slack in the belt.s5Before placing the child in the child restraint,
use force to push the child restraint from
side to side, and tug it forward to make sure
that it is securely held in place. It should not
move more than 1 inch (25 mm) . If it does
move more than 1 inch (25 mm) , pull again
on the shoulder belt to further tighten the
child restraint. If unable to properly secure
the restraint move the restraint to another
rear seating position and try again , or try a
different child restraint. Not all child re-
straints fit in all types of vehicles.
Rear Facing — step 3
LRS0490
Rear Facing — step 4
LRS0491
Rear Facing — step 5
LRS0492
1-20Safety—Seats, seat belts and supplemental restraint system
ZREVIEW COPYÐ2006 Sentra(b15)
Owners ManualÐUSA_English(nna)
09/01/05Ðdebbie
X
Page 37 of 256

6. Check that the retractor is in the automatic
locking mode by trying to pull more seat belt
out of the retractor. If you cannot pull any
more seat belt webbing out of the retractor,
the retractor is in the automatic locking
mode.
7. Check to make sure that the child restraint is
properly secured prior to each use. If the belt
is not locked, repeat steps 3 through 6.
After the child restraint is removed and the seat
belt fully retracted, the automatic locking mode
(child restraint mode) is canceled.
WRS0154
Safety—Seats, seat belts and supplemental restraint system1-21
ZREVIEW COPYÐ2006 Sentra(b15)
Owners ManualÐUSA_English(nna)
09/01/05Ðdebbie
X
Page 40 of 256

CHILD RESTRAINT INSTALLATION
ON FRONT PASSENGER SEAT
WARNING
cNever install a rear-facing child re-
straint in the front passenger seat.
Supplemental front air bags inflate with
great force. A rear-facing child restraint
could be struck by the supplemental
front air bag in a crash and could seri-
ously injure or kill your child.cNISSAN recommends that child re-
straints be installed in the rear seat.
However, if you must install a forward-
facing child restraint in the front pas-
senger seat, move the passenger seat
to the rearmost position.
cA child restraint with a top tether strap
should not be used in the front passen-
ger seat.
cThe three-point seat belt in your vehicle
is equipped with an automatic locking
mode retractor which must be used
when installing a child restraint.cFailure to use the retractor’s locking
mode will result in the child restraint
not being properly secured. The re-
straint could tip over or otherwise be
unsecured and cause injury to the child
in a sudden stop or collision.
WRS0256WRS0378
1-24Safety—Seats, seat belts and supplemental restraint system
ZREVIEW COPYÐ2006 Sentra(b15)
Owners ManualÐUSA_English(nna)
09/01/05Ðdebbie
X
Page 42 of 256

s3Pull on the shoulder belt until all of the belt is
fully extended. At this time, the seat belt
retractor is in the automatic locking mode
(child restraint mode) . It reverts to emer-
gency locking mode when the seat belt is
fully retracted.s4Allow the seat belt to retract slightly. Pull up
on the shoulder belt to remove any slack in
the belt.s5Before placing the child in the child restraint,
use force to push the child restraint from
side to side, and tug it forward to make sure
that it is securely held in place. It should not
move more than 1 inch (25 mm) . If it does
move more than 1 inch (25 mm) , pull again
on the shoulder belt to further tighten the
child restraint. If unable to properly secure
the restraint move the restraint to another
seating position and try again , or try a differ-
ent child restraint. Not all child restraints fit in
all types of vehicles.
Front Facing — step 3
WRS0160
Front Facing — step 4
LRS0457
Front Facing — step 5
WRS0380
1-26Safety—Seats, seat belts and supplemental restraint system
ZREVIEW COPYÐ2006 Sentra(b15)
Owners ManualÐUSA_English(nna)
09/01/05Ðdebbie
X
Page 43 of 256
6. Check that the retractor is in the automatic
locking mode by trying to pull more seat belt
out of the retractor. If you cannot pull any
more belt webbing out of the retractor, the
retractor is in the automatic locking mode.
7. Check to make sure the child restraint is
properly secured prior to each use. If the
seat belt is not locked, repeat steps 3
through 6.
After the child restraint is removed and the seat
belt is fully retracted, the automatic locking mode
(child restraint mode) is canceled.PRECAUTIONS ON BOOSTER
SEATS
WARNING
cInfants and small children should al-
ways be placed in an appropriate child
restraint while riding in the vehicle.
Failure to use a child restraint or
booster seat can result in serious injury
or death.
cInfants and small children should never
be carried on your lap. It is not possible
for even the strongest adult to resist the
forces of a severe accident. The child
could be crushed between the adult and
parts of the vehicle. Also, do not put the
same seat belt around both your child
and yourself.
cNISSAN recommends that the booster
seat be installed in the rear seat. Ac-
cording to accident statistics, children
are safer when properly restrained in
the rear seat than in the front seat.cA booster seat must only be installed in
a seating position that has a
lap/shoulder belt. Failure to use a
three-point type seat belt with a
booster seat can result in a serious in-
jury in sudden stop or collision.
cAn improperly installed booster seat
could lead to serious injury or death in
an accident.
BOOSTER SEATS
Safety—Seats, seat belts and supplemental restraint system1-27
ZREVIEW COPYÐ2006 Sentra(b15)
Owners ManualÐUSA_English(nna)
09/01/05Ðdebbie
X
Page 45 of 256
All U.S. states and Canadian provinces or
territories require that infants and small
children be restrained in an approved child
restraint at all times while the vehicle is
being operated.
WARNING
cImproper use of a booster seat can in-
crease the risk or severity of injury for
both the child and other occupants of
the vehicle.
cFollow all of the booster seat manufac-
turer’s instructions for installation and
use. When purchasing a booster seat,
be sure to select one which will fit your
child and vehicle. It may not be possible
to properly install some types of
booster seats in your vehicle.
cIf the booster seat and seat belt is not
used properly, the risk of a child being
injured in a collision or a sudden stop
greatly increases.
cAdjustable seatbacks should be posi-
tioned to fit the booster seat, but as
upright as possible.cAfter placing the child in the booster
seat and fastening the seat belt, make
sure the shoulder portion of the belt is
away from the child’s face and neck and
the lap portion of the belt does not
cross the abdomen.
cDo not put the shoulder belt behind the
child or under the child’s arm. If you
must install a booster seat in the front
seat, see “Booster seat installation on
front passenger seat” later in this
section.
cWhen your booster seat is not in use,
keep it secured with a seat belt to pre-
vent it from being thrown around in
case of a sudden stop or accident.
CAUTION
Remember that a booster seat left in a
closed vehicle can become very hot.
Check the seating surface and buckles
before placing your child in the booster
seat.
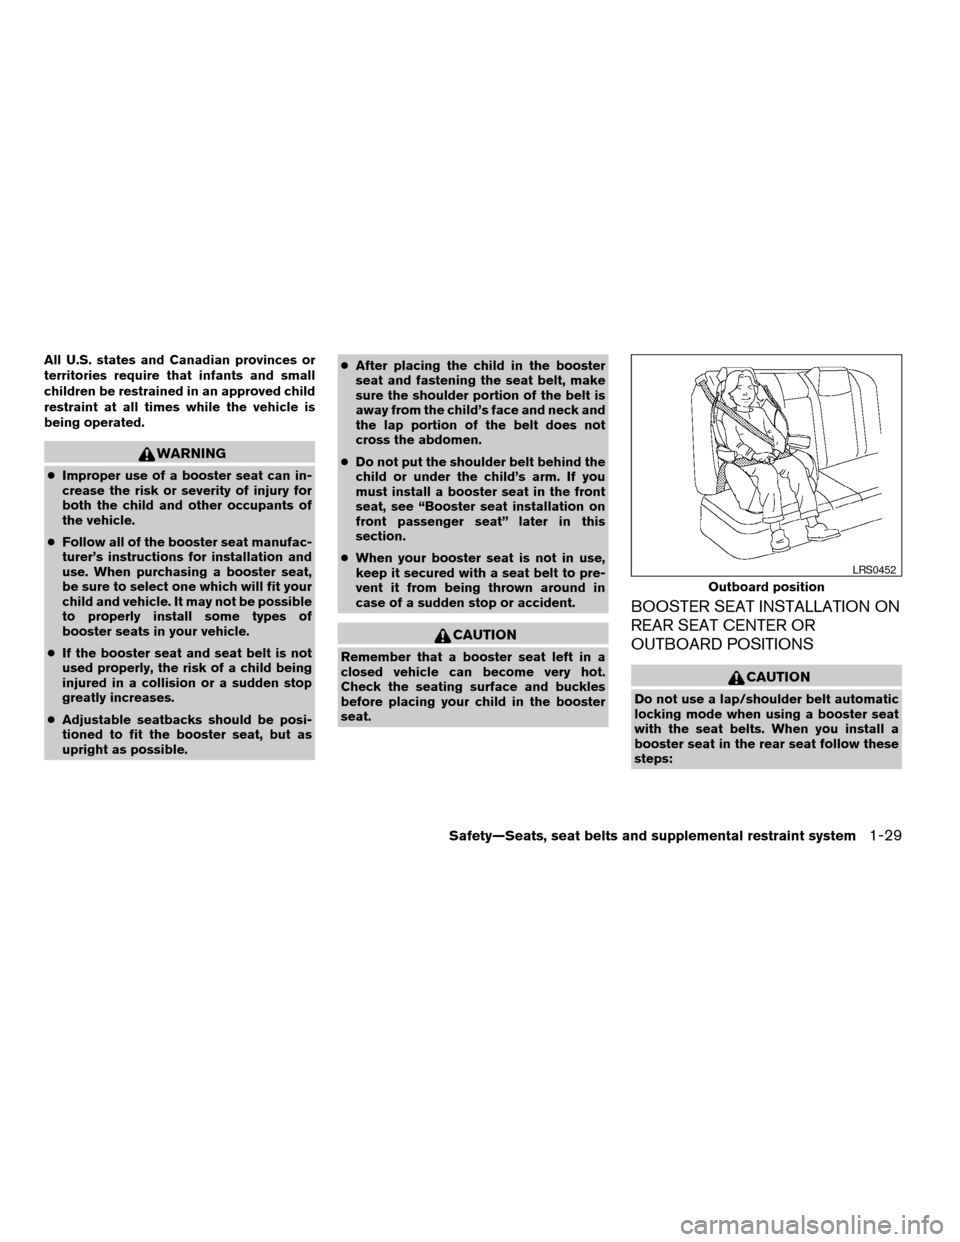
BOOSTER SEAT INSTALLATION ON
REAR SEAT CENTER OR
OUTBOARD POSITIONS
CAUTION
Do not use a lap/shoulder belt automatic
locking mode when using a booster seat
with the seat belts. When you install a
booster seat in the rear seat follow these
steps:
Outboard position
LRS0452
Safety—Seats, seat belts and supplemental restraint system1-29
ZREVIEW COPYÐ2006 Sentra(b15)
Owners ManualÐUSA_English(nna)
09/01/05Ðdebbie
X
Page 58 of 256

SUPPLEMENTAL AIR BAG
WARNING LIGHT
The supplemental air bag warning light,
displayingin the instrument panel, moni-
tors the circuits of the supplemental front air
bags, pre-tensioner seat belt and supplemental
side air bag (if so equipped) systems. The circuits
monitored by the supplemental air bag warning
light are the diagnosis sensor unit, supplemental
air bag modules, pre-tensioner seat belts and all
related wiring.
When the ignition key is in the ON or START
position, the supplemental air bag warning lightilluminates for about 7 seconds and then turns
off. This means the system is operational.
If any of the following conditions occur, the
supplemental front air bag, supplemental side air
bag and pre-tensioner seat belt systems need
servicing:
cThe supplemental air bag warning light re-
mains on after approximately 7 seconds.
cThe supplemental air bag warning light
flashes intermittently.
cThe supplemental air bag warning light does
not come on at all.
Under these conditions, the supplemental front
air bag, supplemental side air bag or pre-
tensioner seat belt systems may not operate
properly. It must be checked and repaired. Take
your vehicle to the nearest NISSAN dealer.
WARNING
If the supplemental air bag warning light
is on, it could mean that the supplemental
front air bag or supplemental side air bag
system will not operate in an accident. To
help avoid injury to yourself or others,
have your vehicle checked by a NISSAN
dealer as soon as possible.
Repair and replacement procedure
The supplemental front air bags, pre-tensioner
seat belts and supplemental side air bags (if so
equipped) are designed to inflate on a one-time-
only basis. As a reminder, unless it is damaged,
the supplemental air bag warning light remains
illuminated after inflation has occurred. Repair
and replacement of these supplemental air bag
systems should be done only by a NISSAN
dealer.
When maintenance work is required on the ve-
hicle, the supplemental front air bags, supple-
mental side air bags (if so equipped) , pre-
tensioner seat belts and related parts should be
pointed out to the person performing the mainte-
nance. The ignition key should always be in the
LOCK position when working under the hood or
inside the vehicle.
LRS0100
1-42Safety—Seats, seat belts and supplemental restraint system
ZREVIEW COPYÐ2006 Sentra(b15)
Owners ManualÐUSA_English(nna)
09/01/05Ðdebbie
X