display NISSAN SENTRA 2007 B16 / 6.G Owners Manual
[x] Cancel search | Manufacturer: NISSAN, Model Year: 2007, Model line: SENTRA, Model: NISSAN SENTRA 2007 B16 / 6.GPages: 320, PDF Size: 4.88 MB
Page 5 of 320

Table of
ContentsIllustrated table of contents
Safety—Seats, seat belts and supplemental restraint system
Instruments and controls
Pre-driving checks and adjustments
Display screen, heater, air conditioner, audio and phone systems
Starting and driving
In case of emergency
Appearance and care
Maintenance and do-it-yourself
Technical and consumer information
Index
0
1
2
3
4
5
6
7
8
9
10
Page 12 of 320

1. Headlight/fog light (if so equipped)/turn
signal switch (P. 2-19); Manual shift
paddles (if so equipped) (P.5-13 )
2. Steering wheel switch for audio control
and BluetoothTHands-Free Phone Sys-
tem (if so equipped) (P. 4-35, 4-37)3. Driver’s supplemental air bag/Horn
(P. 1-41, 2-22)
4. Meters and gauges (P. 2-3)
5. Instrument brightness control (P. 2-21)
6. Cruise control main/set switches (if so
equipped) (P. 5-19)7.
Windshield wiper/washer switch (P. 2-18)
8. Storage bin (if so equipped) (P. 2-23)
9. Audio system (P. 4-15)
10. Center ventilator (P. 4-6)
11. Passenger’s supplemental air bag
(P. 1-41)
12. Control panel display (if so equipped)
(P. 4-2)
13. Side ventilator (P. 4-6)
14. Engine oil pressure gauge
(if so equipped) (P. 2-6)
15. G-gauge (if so equipped) (P. 2-5)
16. Hazard warning flasher switch
(if so equipped) (P. 2-22)
17. Hazard warning flasher switch (if so
equipped) (P. 2-22); Manual shift mode
switch (if so equipped) (P.5-13 )
18. Glove box (P. 2-27)
19. Passenger air bag status light (P. 1-41)
20. Climate control (P. 4-7)
21. Shift selector lever (P. 5-11)
22. Power outlet (P. 2-23)
23. Ignition switch (P. 5-6)
24. Tilt steering (P.3-26)
25. Sunglasses holder (P. 2-25)
26. Hood release lever (P. 3-22)
See the page number indicated in paren-
theses for operating details.
WIC1115
INSTRUMENT PANEL
0-6Illustrated table of contents
ZREVIEW COPYÐ2007 Sentra(sen)
Owners ManualÐUSA_English(nna)
11/28/06Ðarosenma
X
Page 72 of 320

cause irritation and choking. Those with a history
of a breathing condition should get fresh air
promptly.
After the pre-tensioner seat belts have activated,
load limiters allow the seat belt to release web-
bing (if necessary) to reduce forces against the
chest.
If any abnormality occurs in the pre-tensioner
system, the supplemental air bag warning
light
will not come on, will flash intermit-
tently or will turn on for 7 seconds and remain on
after the ignition key has been turned to the ON or
START position. In this case, the pre-tensioner
seat belt may not function properly. They must be
checked and repaired. Take your vehicle to the
nearest NISSAN dealer.
When selling your vehicle, we request that you
inform the buyer about the pre-tensioner seat belt
system and guide the buyer to the appropriate
sections in this Owner’s Manual.
1. SRS Front Air Bag Warning Labels
2. SRS Side Air Bag Warning Label
SUPPLEMENTAL AIR BAG
WARNING LABELS
Warning labels about the supplemental front air
bag and supplemental side air bag systems are
placed in the vehicle as shown in the illustration.
SUPPLEMENTAL AIR BAG
WARNING LIGHT
The supplemental air bag warning light,
displayingin the instrument panel, moni-
tors the circuits of the supplemental front air bag,
supplemental side air bag and curtain side-
impact air bag and pre-tensioner seat belt sys-
tems. The circuits monitored by the supplemental
air bag warning light are the diagnosis sensor
unit, crash zone sensor, satellite sensors, front air
bag modules, side air bag modules, curtain side-
impact air bag modules, pre-tensioner seat belts
and all related wiring.
LRS0695LRS0100
1-56Safety—Seats, seat belts and supplemental restraint system
ZREVIEW COPYÐ2007 Sentra(sen)
Owners ManualÐUSA_English(nna)
11/27/06Ðarosenma
X
Page 76 of 320

1. Headlight/fog light (if so equipped)/turn
signal switch (P. 2-19); Manual shift
paddles (if so equipped) (P.5-13 )
2. Steering wheel switch for audio control
and BluetoothTHands-Free Phone Sys-
tem (if so equipped) (P. 4-35, 4-37)3. Driver’s supplemental air bag/Horn
(P. 1-41, 2-22)
4. Meters and gauges (P. 2-3)
5. Instrument brightness control (P. 2-21)
6. Cruise control main/set switches
(if so equipped) (P. 5-19)7.
Windshield wiper/washer switch (P. 2-18)
8. Storage bin (if so equipped) (P. 2-23)
9. Audio system (P. 4-15)
10. Center ventilator (P. 4-6)
11. Passenger’s supplemental air bag
(P. 1-41)
12. Control panel display (if so equipped)
(P. 4-2)
13. Side ventilator (P. 4-6)
14. Engine oil pressure gauge
(if so equipped) (P. 2-6)
15. G-gauge (if so equipped) (P. 2-5)
16. Hazard warning flasher switch
(if so equipped) (P. 2-22)
17. Hazard warning flasher switch (if so
equipped) (P. 2-22); Manual shift mode
switch (if so equipped) (P.5-13 )
18. Glove box (P. 2-27)
19. Passenger air bag status light (P. 1-41)
20. Climate control (P. 4-7)
21. Shift selector lever (P. 5-11)
22. Power outlet (P. 2-23)
23. Ignition switch (P. 5-6)
24.. Tilt steering (P.3-26)
25. Sunglasses holder (P. 2-25)
26. Hood release lever (P. 3-22)
See the page number indicated in paren-
theses for operating details.
WIC1115
INSTRUMENT PANEL
2-2Instruments and controls
ZREVIEW COPYÐ2007 Sentra(sen)
Owners ManualÐUSA_English(nna)
11/28/06Ðarosenma
X
Page 78 of 320

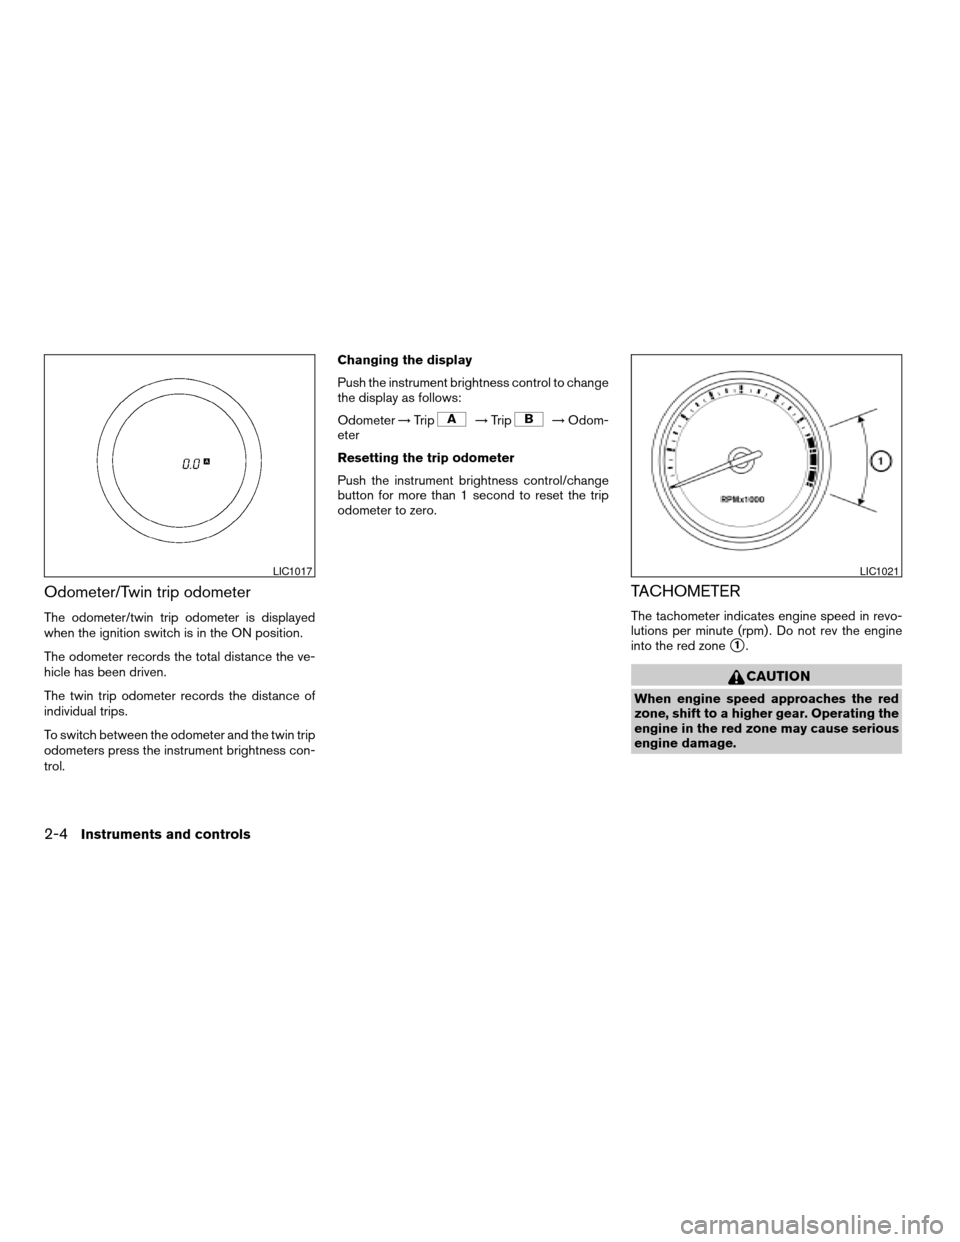
Odometer/Twin trip odometer
The odometer/twin trip odometer is displayed
when the ignition switch is in the ON position.
The odometer records the total distance the ve-
hicle has been driven.
The twin trip odometer records the distance of
individual trips.
To switch between the odometer and the twin trip
odometers press the instrument brightness con-
trol.Changing the display
Push the instrument brightness control to change
the display as follows:
Odometer!Trip
!Trip!Odom-
eter
Resetting the trip odometer
Push the instrument brightness control/change
button for more than 1 second to reset the trip
odometer to zero.
TACHOMETER
The tachometer indicates engine speed in revo-
lutions per minute (rpm) . Do not rev the engine
into the red zone
s1.
CAUTION
When engine speed approaches the red
zone, shift to a higher gear. Operating the
engine in the red zone may cause serious
engine damage.
LIC1017LIC1021
2-4Instruments and controls
ZREVIEW COPYÐ2007 Sentra(sen)
Owners ManualÐUSA_English(nna)
11/27/06Ðarosenma
X
Page 139 of 320

4 Display screen, heater, air conditioner,
audio and phone systems
Control panel buttons (if so equipped)...............4-2
How to use the TRIP INFO button................4-3
Clock.........................................4-5
How to use the AUDIO button
(for control panel)..............................4-5
Door warning..................................4-6
Ventilators........................................4-6
Heater and air conditioner (manual)..................4-7
Controls.......................................4-8
Heater operation...............................4-9
Air conditioner operation (if so equipped)........4-10
Air flow charts.................................4-11
Servicing air conditioner...........................4-14
Audio system....................................4-15
Radio........................................4-15
FM radio reception............................4-15
AM radio reception............................4-15
Satellite radio reception (if so equipped).........4-15
Audio operation precautions....................4-16FM/AM radio with compact disc (CD) player
(if so equipped)...............................4-21
FM/AM/SAT radio with compact disc (CD)
player (if so equipped).........................4-25
FM/AM/SAT radio with compact disc (CD)
changer (if so equipped).......................4-29
CD care and cleaning..........................4-34
Steering wheel switch for audio control
(If so equipped)...............................4-35
Antenna......................................4-36
Car phone or CB radio............................4-36
BluetoothTHands-Free Phone System
(if so equipped)..................................4-37
Using the system..............................4-39
Control buttons...............................4-41
Getting started................................4-41
List of voice commands........................4-43
Speaker adaptation (SA) mode..................4-48
Troubleshooting guide.........................4-49
ZREVIEW COPYÐ2007 Sentra(sen)
Owners ManualÐUSA_English(nna)
11/28/06Ðarosenma
X
Page 140 of 320

WARNING
cDo not disassemble or modify this sys-
tem. If you do, it may result in accidents,
fire, or electrical shock.
cDo not use this system if you notice any
abnormality, such as a frozen screen or
lack of sound. Continued use of the
system may result in accident, fire or
electric shock.
cIn case you notice any foreign object in
the system hardware, spill liquid on it,
or notice smoke or smell coming from
it, stop using the system immediately
and contact your nearest NISSAN
dealer. Ignoring such conditions may
lead to accidents, fire or electrical
shock.
WHA0700
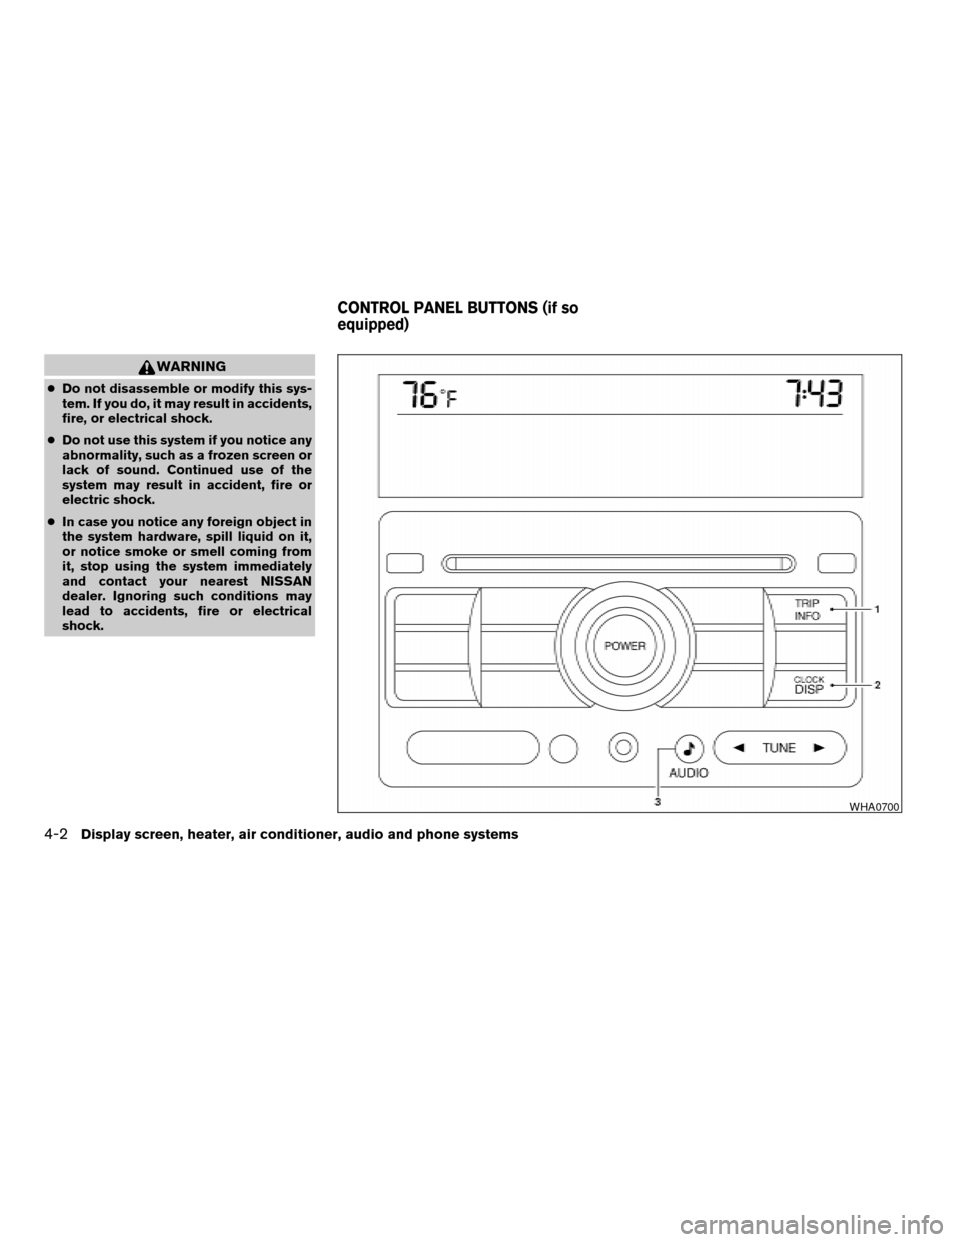
CONTROL PANEL BUTTONS (if so
equipped)
4-2Display screen, heater, air conditioner, audio and phone systems
ZREVIEW COPYÐ2007 Sentra(sen)
Owners ManualÐUSA_English(nna)
11/28/06Ðarosenma
X
Page 141 of 320

1. TRIP INFO button (P. 4-3)
2. CLOCK DISP button (P. 4-5)
3.
AUDIO button (P. 4-5)
When you use this system, make sure the engine
is running.
If you use the system with the engine not
running (ignition ON or ACC) for a long
time, it will use up all the battery power,
and the engine will not start.
Reference symbols:
TRIP INFO button — This is a button on the
control panel. By pressing this button you can
select the item or perform this action.
HOW TO USE THE TRIP INFO
BUTTON
When the TRIP INFO button is pressed, the
following modes will display on the screen.
Dist. to Empty!Average Speed!Fuel
Economy!Trip Time!Audio or OFF!Dist. to
Empty
Distance to empty (MI or km)
The Distance To Empty (DTE) mode provides you
with an estimation of the distance that can be
driven before refueling. The DTE is constantly
calculated based on the amount of fuel in the fuel
tank and the actual fuel consumption. The display
is updated every 30 seconds. When the fuel level
is low, the DTE display will change to — .NOTE:
cIf the amount of fuel added while the ignition
switch is OFF is small, the display just before
the ignition switch is turned OFF may con-
tinue to be displayed.
cWhen driving uphill or rounding curves, the
fuel in the tank shifts, which may momentarily
change the display.
WHA0701
Display screen, heater, air conditioner, audio and phone systems4-3
ZREVIEW COPYÐ2007 Sentra(sen)
Owners ManualÐUSA_English(nna)
11/28/06Ðarosenma
X
Page 142 of 320

Average speed (MPH or km/h)
The Average Speed mode shows the average
speed since the last reset. To calculate the aver-
age speed, driving distance is divided by driving
time.
For approximately the first 30 seconds after a
reset or reconnecting the battery cables, the
display will show —.
Resetting average speed
The average speed calculation can be reset to 0.
Press the TRIP INFO button for more than ap-
proximately 2 seconds.
Fuel economy (MPG or L/100 km)
The Fuel Economy mode shows the average fuel
economy since the last reset.
For approximately the first 30 seconds and 1/3
mile (500 m) after a reset or connecting the
battery cables, the display will show —.
Resetting fuel economy
The fuel economy calculation can be reset to 0.
Press the TRIP INFO button for more than ap-
proximately 2 seconds.
Trip time
The trip time mode displays the trip time since the
last reset.
The maximum time that can be displayed by the
Trip Time screen is 99 hours : 59 minutes : 59
seconds.
Resetting trip time
The Trip Time calculation can be reset to 0. Press
the TRIP INFO button for more than approxi-
mately 2 seconds.
WHA0702WHA0703WHA0704
4-4Display screen, heater, air conditioner, audio and phone systems
ZREVIEW COPYÐ2007 Sentra(sen)
Owners ManualÐUSA_English(nna)
11/28/06Ðarosenma
X
Page 143 of 320

CLOCK
The digital clock displays the time when the igni-
tion key is in OFF, ACC or ON. To enable the
clock display, press the CLOCK DISP button.
If the power supply is disconnected, the
clock will not indicate the correct time.
Readjust the time.
Adjusting the time
The audio system must be turned off to adjust the
time.
To adjust the time, press and hold the CLOCK
DISP button for more than approximately 1.5
seconds. Hour Adjust will appear on the screen
and the hours will start flashing.
Press the SEEK or TUNE button to adjust the
hour.
Press the CLOCK DISP button again. Minute
Adjust will appear on the screen and the minutes
will start flashing.
Press the SEEK or TUNE button to adjust the
minutes.
Press the CLOCK DISP button again. Clock Is
Set will appear on the screen.NOTE:
If you enter the clock adjustment mode and
do not press any button for approximately 7
seconds, the screen will change to Clock Is
Set. The screen will exit out of the clock
adjustment mode and return to the audio or
off screen.
HOW TO USE THE AUDIO BUTTON
(for control panel)
The audio system must be turned on to access
this menu.
Pressing the
AUDIO button will change
the settings menu as follows:
Bass!Mid!Treble!Fade!Balance!
Speed Sense Volume!Beep ON/OFF!Lan-
guage!Audio or OFF!Bass
For additional information, see “Audio System”
later in this section.
Beep on/off
To turn off the beep, press the TUNE button to
select “OFF”. This will disable the beep sound
during menu selection (except some caution
beep sounds) .
Language
The language can be changed to “ENGLISH” or
“FRANÇAIS” by pressing the TUNE button.
Display screen, heater, air conditioner, audio and phone systems4-5
ZREVIEW COPYÐ2007 Sentra(sen)
Owners ManualÐUSA_English(nna)
11/28/06Ðarosenma
X