NISSAN SENTRA 2007 B16 / 6.G Quick Reference Guide
Manufacturer: NISSAN, Model Year: 2007, Model line: SENTRA, Model: NISSAN SENTRA 2007 B16 / 6.GPages: 12, PDF Size: 1.71 MB
Page 1 of 12
Sh ift_fun
2007
SE NTRA
Q U I C K R E F E R E N C E G U I D E
Page 2 of 12
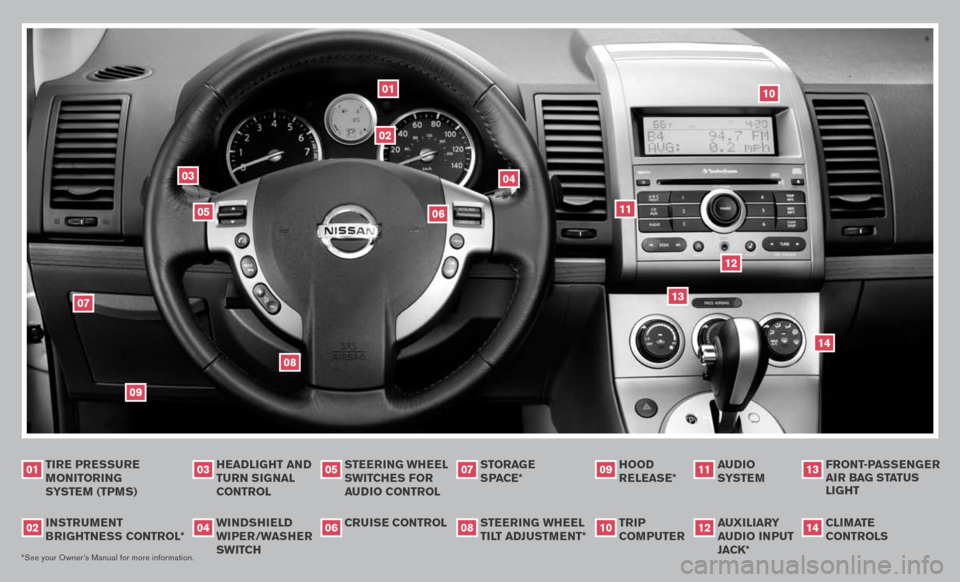
headlight and turn signal control
instru Ment
B rightness control*
tire pressure
M onitoring
syste M (tpM s)
0102
03
*See your Owner’s Manual for more information.
cruise control
steering Wheel
sWitches F
or
audio control
Windshield
W iper /Washer
sWitch
04
0506
hood
release*
steering Wheel
tilt adjustM ent*
storage
s
pace
*
0708
09
trip
coM puter
10
0102
04
06
03
08
05
13
09
07
audio
syste M
11
14
10
11
auxiliary
a udio input
jack*
12
Front -passenger
air B ag status
light
13
cliMate controls
14
12
Page 3 of 12
headlight and turn signal control
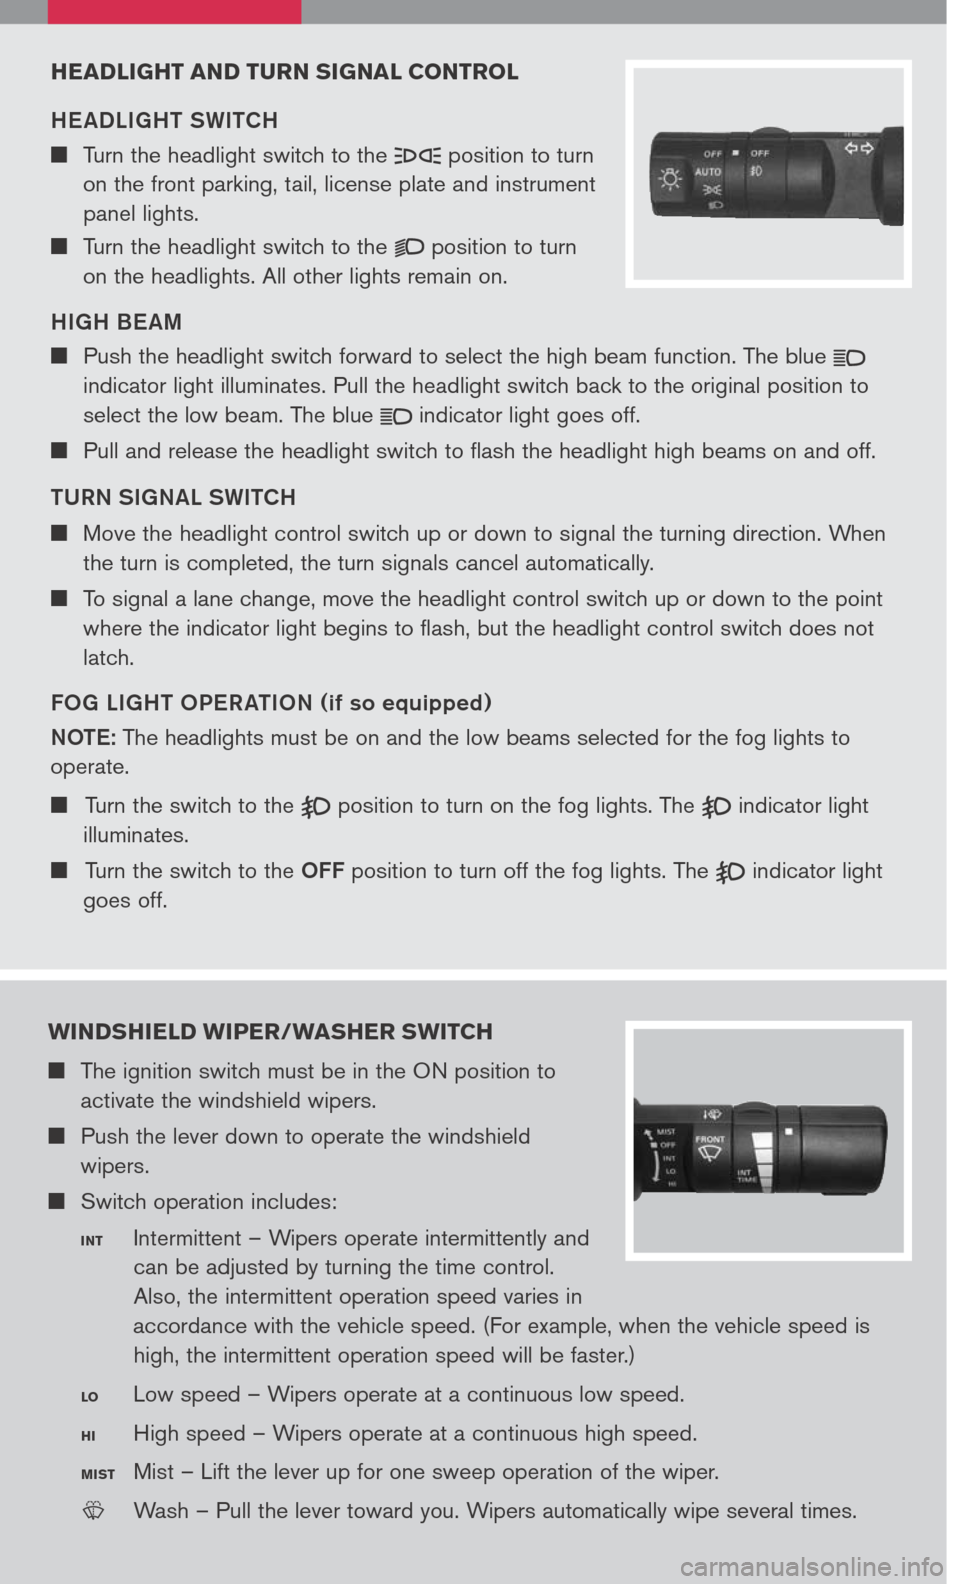
HE ADLIGHT SWITCH
Turn the headlight switch to the position to turn
on the front parking, tail, license plate and instrument
panel lights.
Turn the headlight switch to the position to turn
on the headlights. All other lights remain on.
HIGH BE AM
Push the headlight switch forward to select the high beam function. The blue
indicator light illuminates. Pull the headlight switch back to the original position to
select the low beam. The blue indicator light goes off.
Pull and release the headlight switch to flash the headlight high beams on and off.
TURN SIGNAL SWITCH
Move the headlight control switch up or down to signal the turning direction. When
the turn is completed, the turn signals cancel automatically.
To signal a lane change, move the headlight control switch up or down to the point
where the indicator light begins to flash, but the headlight control switch does not
latch.
FOG LIGHT OPER ATION (if so equipped)
NOTE:
The headlights must be on and the low beams selected for the fog lights to
operate.
Turn the switch to the position to turn on the fog lights. The indicator light
illuminates.
Turn the switch to the OFF position to turn off the fog lights. The indicator light
goes off.
W indshield Wiper /Washer s W itch
The ignition switch must be in the ON position to
activate the windshield wipers.
Push the lever down to operate the windshield
wipers.
Switch operation includes:
Intermittent – Wipers operate intermittently and
can be adjusted by turning the time control.
Also, the intermittent operation speed varies in
accordance with the vehicle speed. (For example, when the vehicle speed is
high, the intermittent operation speed will be faster.)
Low speed – Wipers operate at a continuous low speed.
High speed – Wipers operate at a continuous high speed.
Mist – Lift the lever up for one sweep operation of the wiper.
LCN0042
Wash – Pull the lever toward you. Wipers automatically wipe several times.
int
lo
hi
M ist
Page 4 of 12
cruise control (if so equipped)
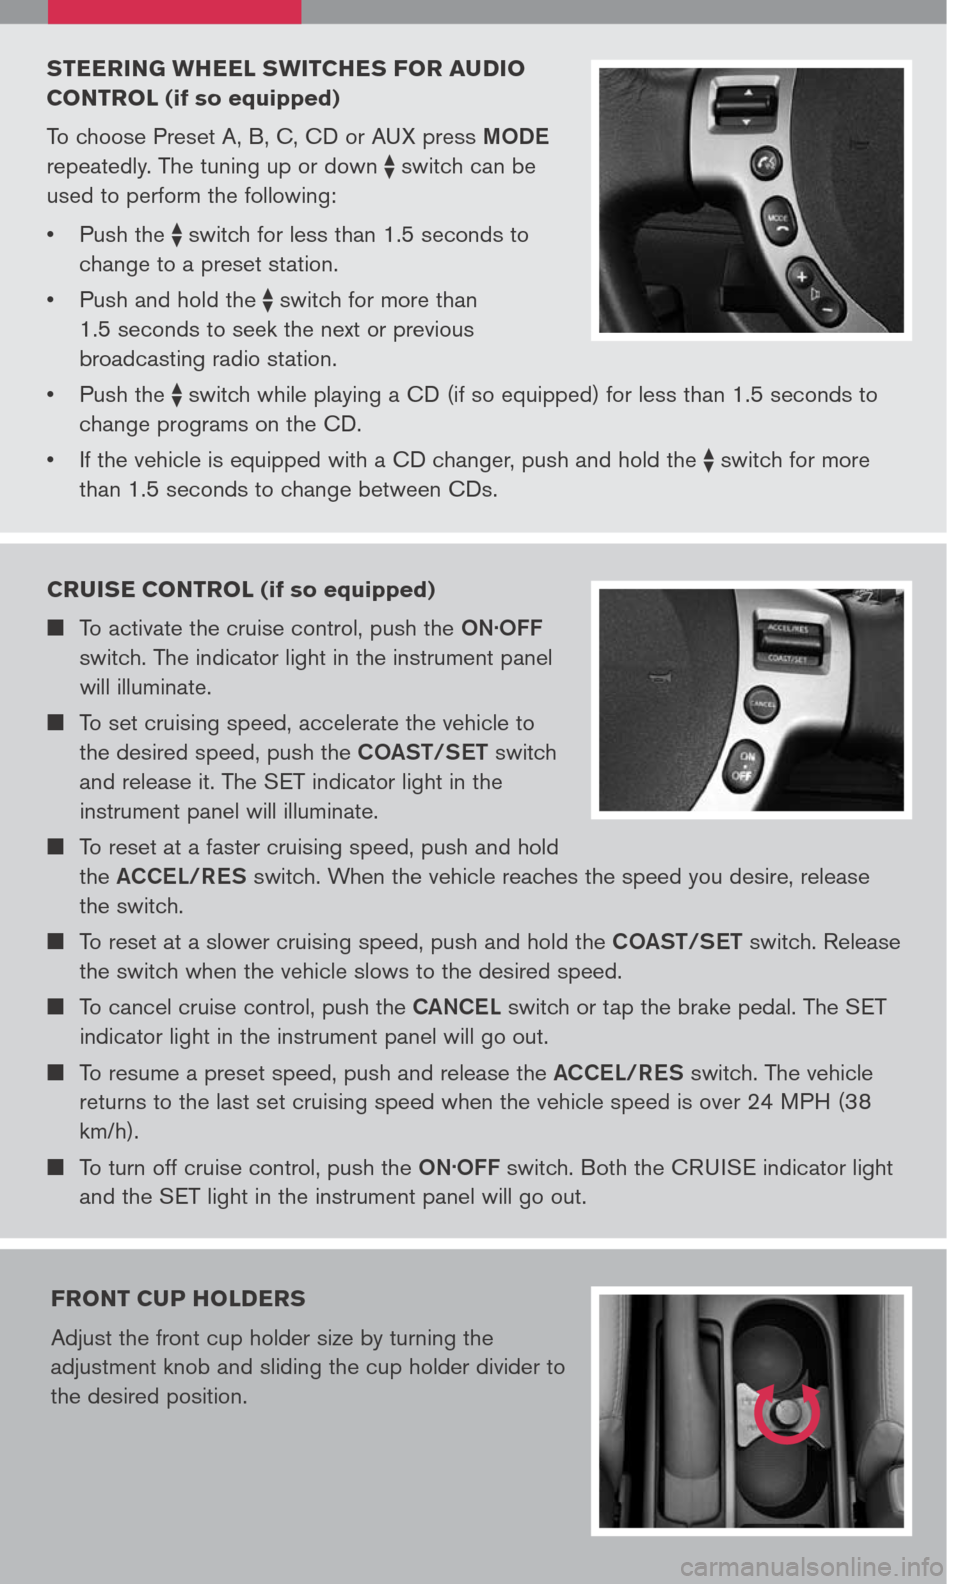
To activate the cruise control, push the ON.OFF
switch. The indicator light in the instrument panel
will illuminate.
To set cruising speed, accelerate the vehicle to
the desired speed, push the COAST/SET switch
and release it. The SET indicator light in the
instrument panel will illuminate.
To reset at a faster cruising speed, push and hold
the ACCEL/RES switch. When the vehicle reaches the speed you desire, release
the switch.
To reset at a slower cruising speed, push and hold the COAST/SET switch. Release
the switch when the vehicle slows to the desired speed.
To cancel cruise control, push the CANCEL switch or tap the brake pedal. The SET
indicator light in the instrument panel will go out.
To resume a preset speed, push and release the ACCEL/RES switch. The vehicle
returns to the last set cruising speed when the vehicle speed is over 24 MPH (38
km/h).
To turn off cruise control, push the ON.OFF switch. Both the CRUISE indicator light
and the SET light in the instrument panel will go out.
steering W heel sW itches F or audio
control (if so equipped)
To choose Preset A, B, C, CD or AUX press MODE
repeatedly. The tuning up or down switch can be
used to perform the following:
• Push the
switch for less than 1.5 seconds to
change to a preset station.
• Push and hold the
switch for more than
1.5 seconds to seek the next or previous
broadcasting radio station.
• Push the
switch while playing a CD (if so equipped) for less than 1.5 seconds to
change programs on the CD.
• If the vehicle is equipped with a CD changer, push and hold the
switch for more
than 1.5 seconds to change between CDs.
Front cup holders
Adjust the front cup holder size by turning the
adjustment knob and sliding the cup holder divider to
the desired position.
Page 5 of 12
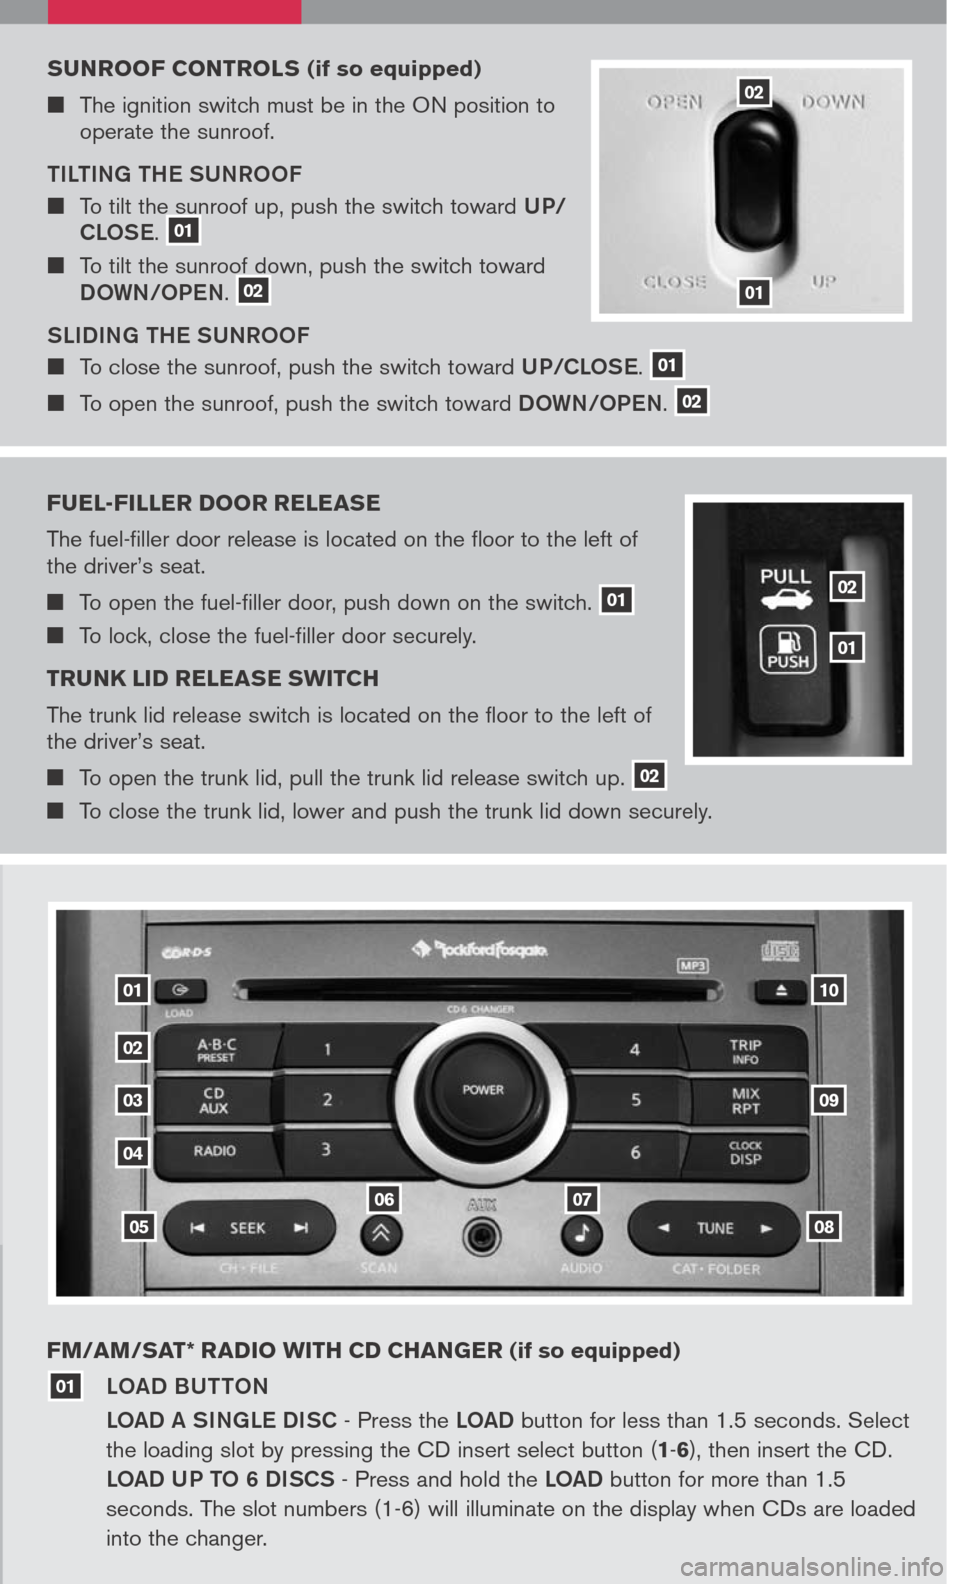
sunrooF controls (if so equipped)
The ignition switch must be in the ON position to operate the sunroof.
TILTING THE SUNROOF
To tilt the sunroof up, push the switch toward UP/
CLOSE. 01 To tilt the sunroof down, push the switch toward DOWN/OPEN. 02
SLIDING THE SUNROOF
To close the sunroof, push the switch toward UP/CLOSE. 01
To open the sunroof, push the switch toward DOWN/OPEN. 02
Fuel -Filler door release
The fuel-filler door release is located on the floor to the left of the driver’s seat.
To open the fuel-filler door, push down on the switch. 01
To lock, close the fuel-filler door securely.
trunk lid release s W itch
The trunk lid release switch is located on the floor to the left of the driver’s seat.
To open the trunk lid, pull the trunk lid release switch up. 02
To close the trunk lid, lower and push the trunk lid down securely.
LOAD BUTTON
LOAD A SINGLE DISC - Press the LOAD button for less than 1.5 seconds. Select
the loading slot by pressing the CD insert select button (1-6), then insert the CD.
LOAD UP TO 6 DISCS - Press and hold the LOAD button for more than 1.5
seconds. The slot numbers (1-6) will illuminate on the display when CDs are loaded
into the changer.
FM/
aM/ sat * radio With cd changer (
if so equipped)
01
02
01
01
02
03
04
05
0607
08
09
10
01
02
Page 6 of 12
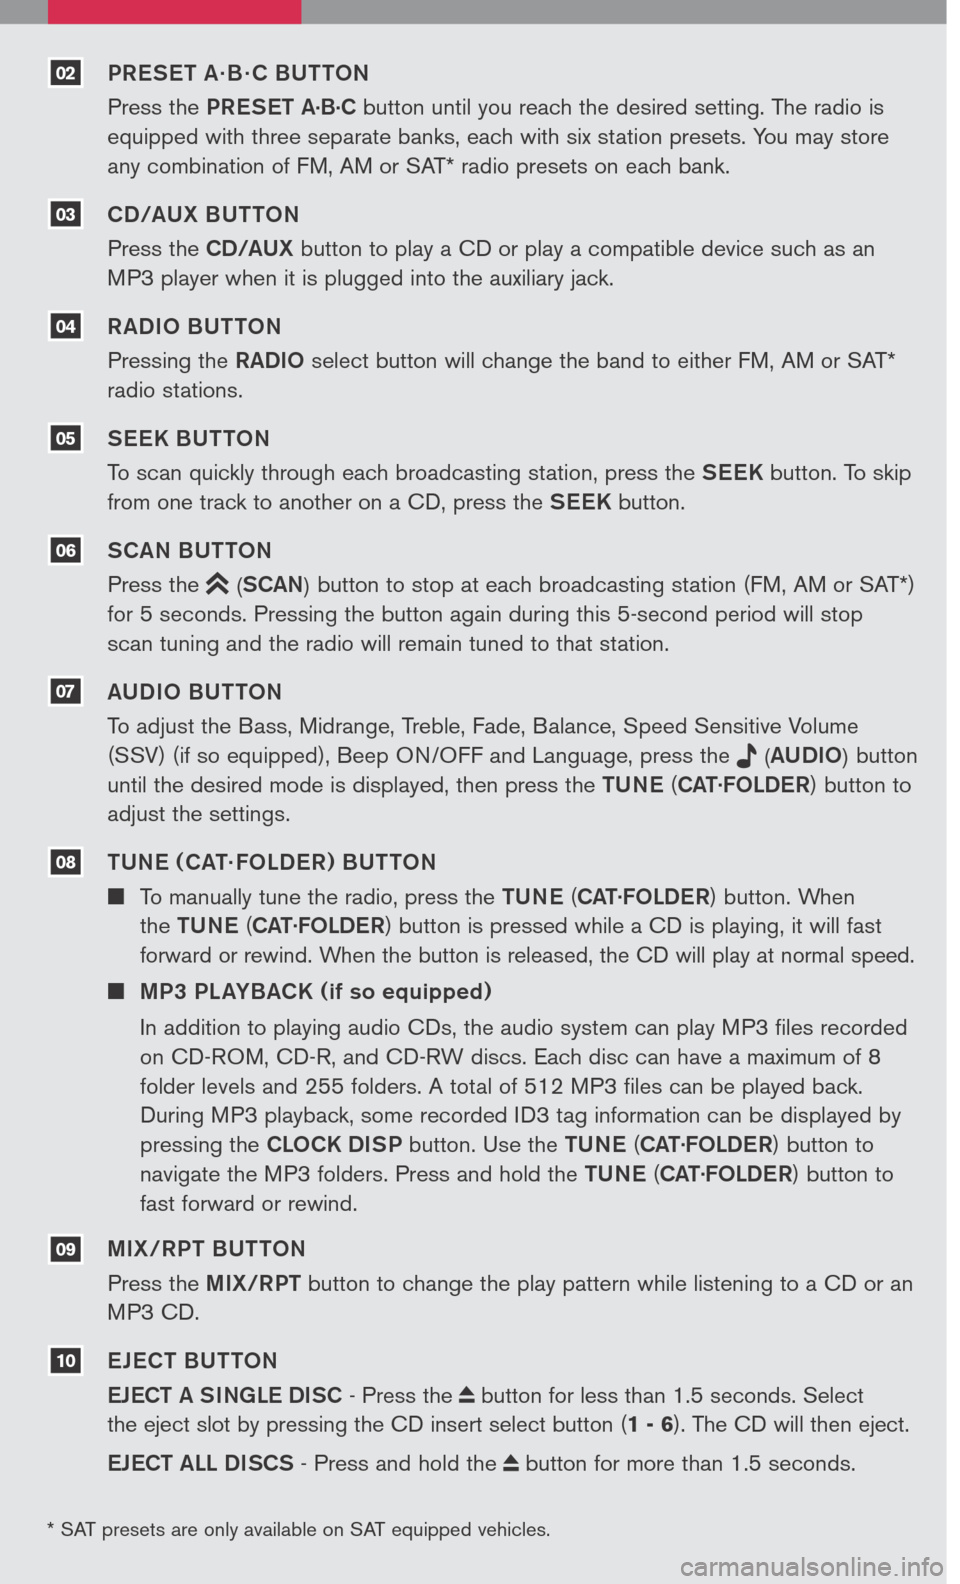
PRESET A · B · C BUTTON
Press the PRESET A.B.C button until you reach the desired setting. The radio is
equipped with three separate banks, each with six station presets. You may store
any combination of FM, AM or SAT* radio presets on each bank.
CD/AUX BUTTON
Press the CD/AUX button to play a CD or play a compatible device such as an
MP3 player when it is plugged into the auxiliary jack.
R ADIO BUTTON
Pressing the RADIO select button will change the band to either FM, AM or SAT*
radio stations.
SEEK BUTTON
To scan quickly through each broadcasting station, press the SEEK button. To skip
from one track to another on a CD, press the SEEK button.
SCAN BUTTON
Press the (SCAN) button to stop at each broadcasting station (FM, AM or SAT*)
for 5 seconds. Pressing the button again during this 5-second period will stop
scan tuning and the radio will remain tuned to that station.
AUDIO BUTTON
To adjust the Bass, Midrange, Treble, Fade, Balance, Speed Sensitive Volume
(SSV) (if so equipped), Beep ON/OFF and Language, press the (AUDIO) button
until the desired mode is displayed, then press the TUNE (CAT·FOLDER) button to
adjust the settings.
TUNE ( CAT· FOLDER ) BUTTON
To manually tune the radio, press the TUNE (CAT·FOLDER) button. When
the TUNE (CAT·FOLDER) button is pressed while a CD is playing, it will fast
forward or rewind. When the button is released, the CD will play at normal speed.
MP3 PL AYBACK (if so equipped)
In addition to playing audio CDs, the audio system can play MP3 files recorded
on CD-ROM, CD-R, and CD-RW discs. Each disc can have a maximum of 8
folder levels and 255 folders. A total of 512 MP3 files can be played back.
During MP3 playback, some recorded ID3 tag information can be displayed by
pressing the CLOCK DISP button. Use the TUNE (CAT·FOLDER) button to
navigate the MP3 folders. Press and hold the TUNE (CAT·FOLDER) button to
fast forward or rewind.
MIX /RPT BUTTON
Press the MIX/RPT button to change the play pattern while listening to a CD or an
MP3 CD.
EJECT BUTTON
EJECT A SINGLE DISC - Press the button for less than 1.5 seconds. Select
the eject slot by pressing the CD insert select button (1 - 6). The CD will then eject.
EJECT ALL DISCS - Press and hold the button for more than 1.5 seconds.
02
* SAT presets are only available on SAT equipped vehicles.
03
04
05
06
07
08
10
09
Page 7 of 12
010203
05070604
05
04
03
02
01
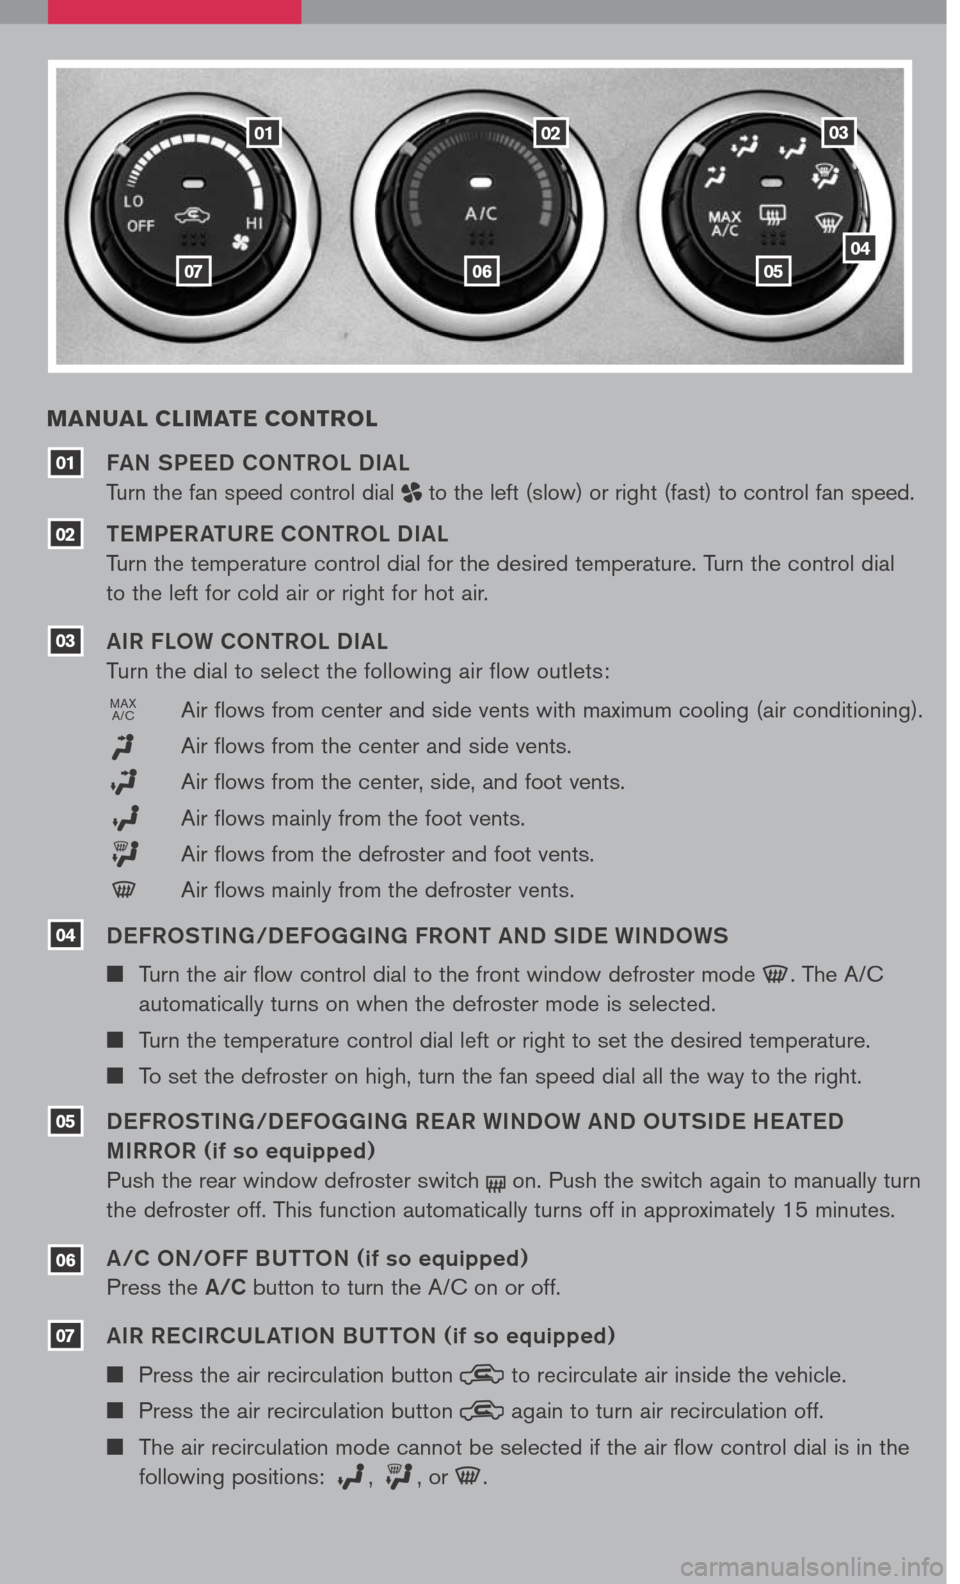
Manual cli M ate control
07
06
FAN SPEED CONTROL DIAL
Turn the fan speed control dial to the left (slow) or right (fast) to control fan speed.
TEMPER ATURE CONTROL DIAL
Turn the temperature control dial for the desired temperature. Turn the control dial
to the left for cold air or right for hot air.
AIR FLOW CONTROL DIAL
Turn the dial to select the following air flow outlets:
MAXA/C Air flows from center and side vents with maximum cooling (air conditioning).
Air flows from the center and side vents.
Air flows from the center, side, and foot vents.
Air flows mainly from the foot vents.
Air flows from the defroster and foot vents.
Air flows mainly from the defroster vents.
DEFROSTING/DEFOGGING FRONT AND SIDE WINDOWS
Turn the air flow control dial to the front window defroster mode . The A/C
automatically turns on when the defroster mode is selected.
Turn the temperature control dial left or right to set the desired temperature.
To set the defroster on high, turn the fan speed dial all the way to the right.
DEFROSTING/DEFOGGING RE AR WINDOW AND OUTSIDE HE ATED
MIRROR (if so equipped)
Push the rear window defroster switch on. Push the switch again to manually turn
the defroster off. This function automatically turns off in approximately 15 minutes.
A /C ON/OFF BUTTON (if so equipped)
Press the A/C button to turn the A/C on or off.
A IR R ECIRCUL ATION BUTTON
(if so equipped)
Press the air recirculation button to recirculate air inside the vehicle.
Press the air recirculation button again to turn air recirculation off.
The air recirculation mode cannot be selected if the air flow control dial is in the
following positions: , , or .
Page 8 of 12
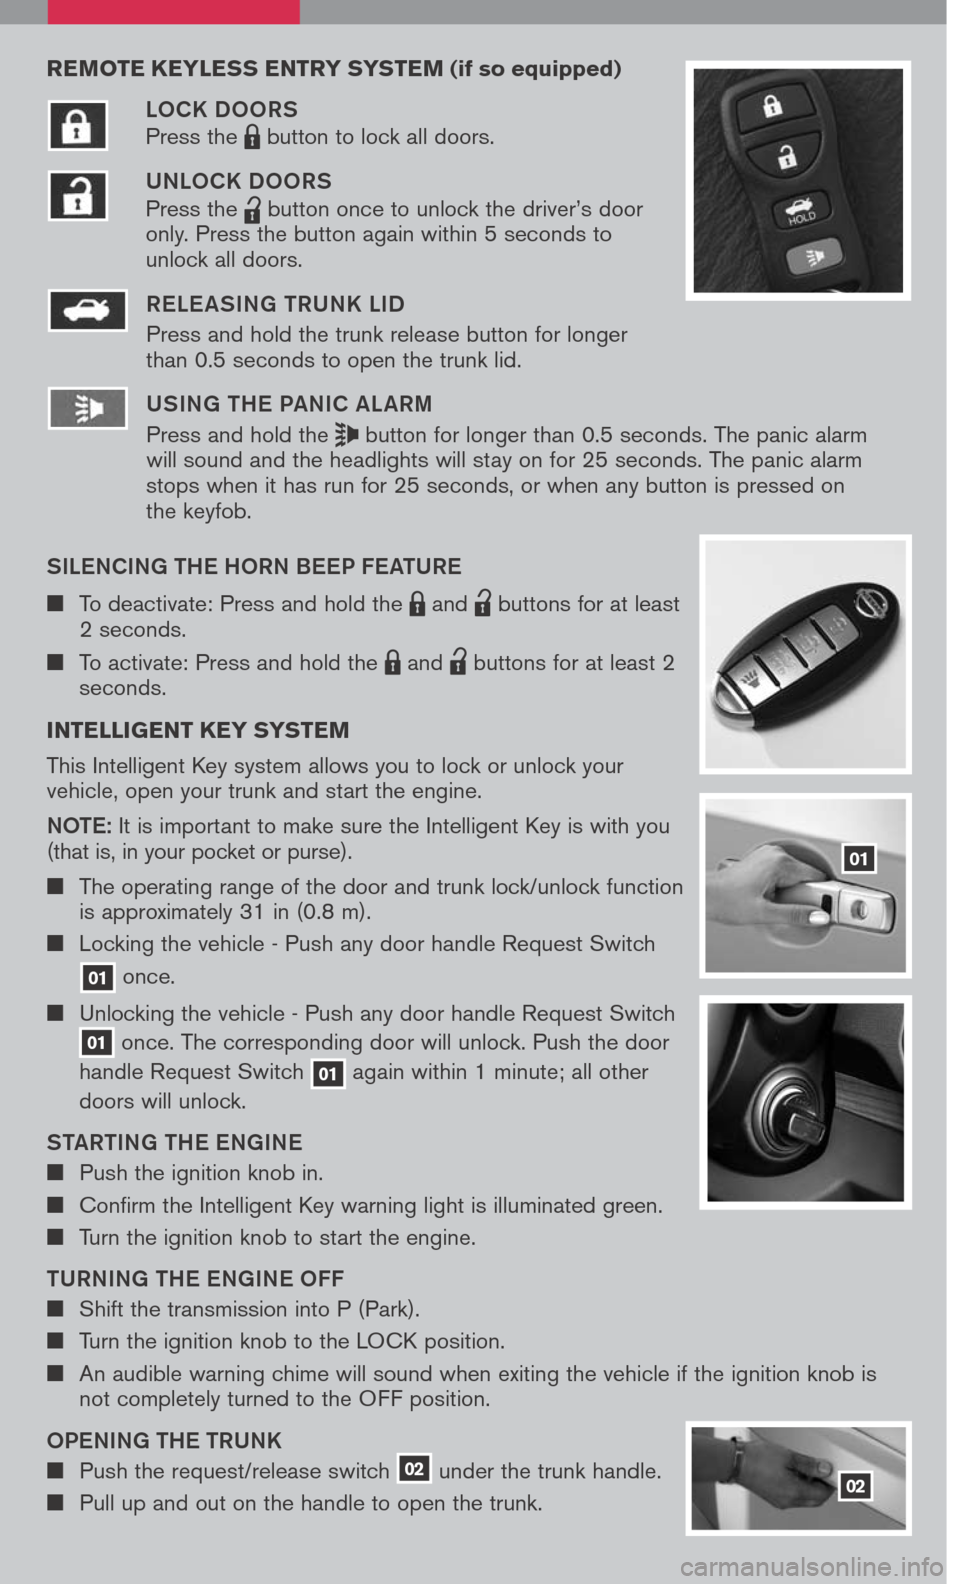
reMote keyless entry syste M (if so equipped)
LOCK DOORS
Press the LPD0150 button to lock all doors.
UNLOCK DOORS
Press the
lpd0151
button once to unlock the driver’s door only. Press the button again within 5 seconds to unlock all doors.
RELE ASING TRUNK LID
Press and hold the trunk release button for longer than 0.5 seconds to open the trunk lid.
USING THE PANIC AL ARM
Press and hold the button for longer than 0.5 seconds. The panic alarm will sound and the headlights will stay on for 25 seconds. The panic alarm stops when it has run for 25 seconds, or when any button is pressed on the keyfob.
SILENCING THE HORN BEEP FEATURE
To deactivate: Press and hold the LPD0150 and
lpd0151
buttons for at least 2 seconds.
To activate: Press and hold the LPD0150 and
lpd0151
buttons for at least 2 seconds.
i ntelligent key syste M
This Intelligent Key system allows you to lock or unlock your vehicle, open your trunk and start the engine.
NOTE
: It is important to make sure the Intelligent Key is with you (that is, in your pocket or purse).
The operating range of the door and trunk lock/unlock function is approximately 31 in (0.8 m).
Locking the vehicle - Push any door handle Request Switch
01 once.
Unlocking the vehicle - Push any door handle Request Switch 01 once. The corresponding door will unlock. Push the door
handle Request Switch 01 again within 1 minute; all other
doors will unlock.
STARTING THE ENGINE
Push the ignition knob in.
Confirm the Intelligent Key warning light is illuminated green.
Turn the ignition knob to start the engine.
TURNING THE ENGINE OFF
Shift the transmission into P (Park).
Turn the ignition knob to the LOCK position.
An audible warning chime will sound when exiting the vehicle if the ignition knob is not completely turned to the OFF position.
OPENING THE TRUNK
Push the request/release switch 02 under the trunk handle.
Pull up and out on the handle to open the trunk.
01
02
Page 9 of 12
xtronic continuously Varia Ble
trans Mission (c V t) (if so equipped)
The Xtronic CVT does not produce a gear change sensation like traditional automatic transmissions.
R (Reverse) speed for CVT vehicles is limited to 25 MPH (40 km/h).
STARTING THE ENGINE WITH CV T ( Intelligent Key models only)
Push the ignition knob in.
Confirm the Intelligent Key warning light is illuminated green.
Turn the ignition knob to start the engine.
TURNING THE ENGINE OFF WITH CV T ( Intelligent Key models only)
Shift the transmission into P (Park).
Turn the ignition knob to the LOCK position.
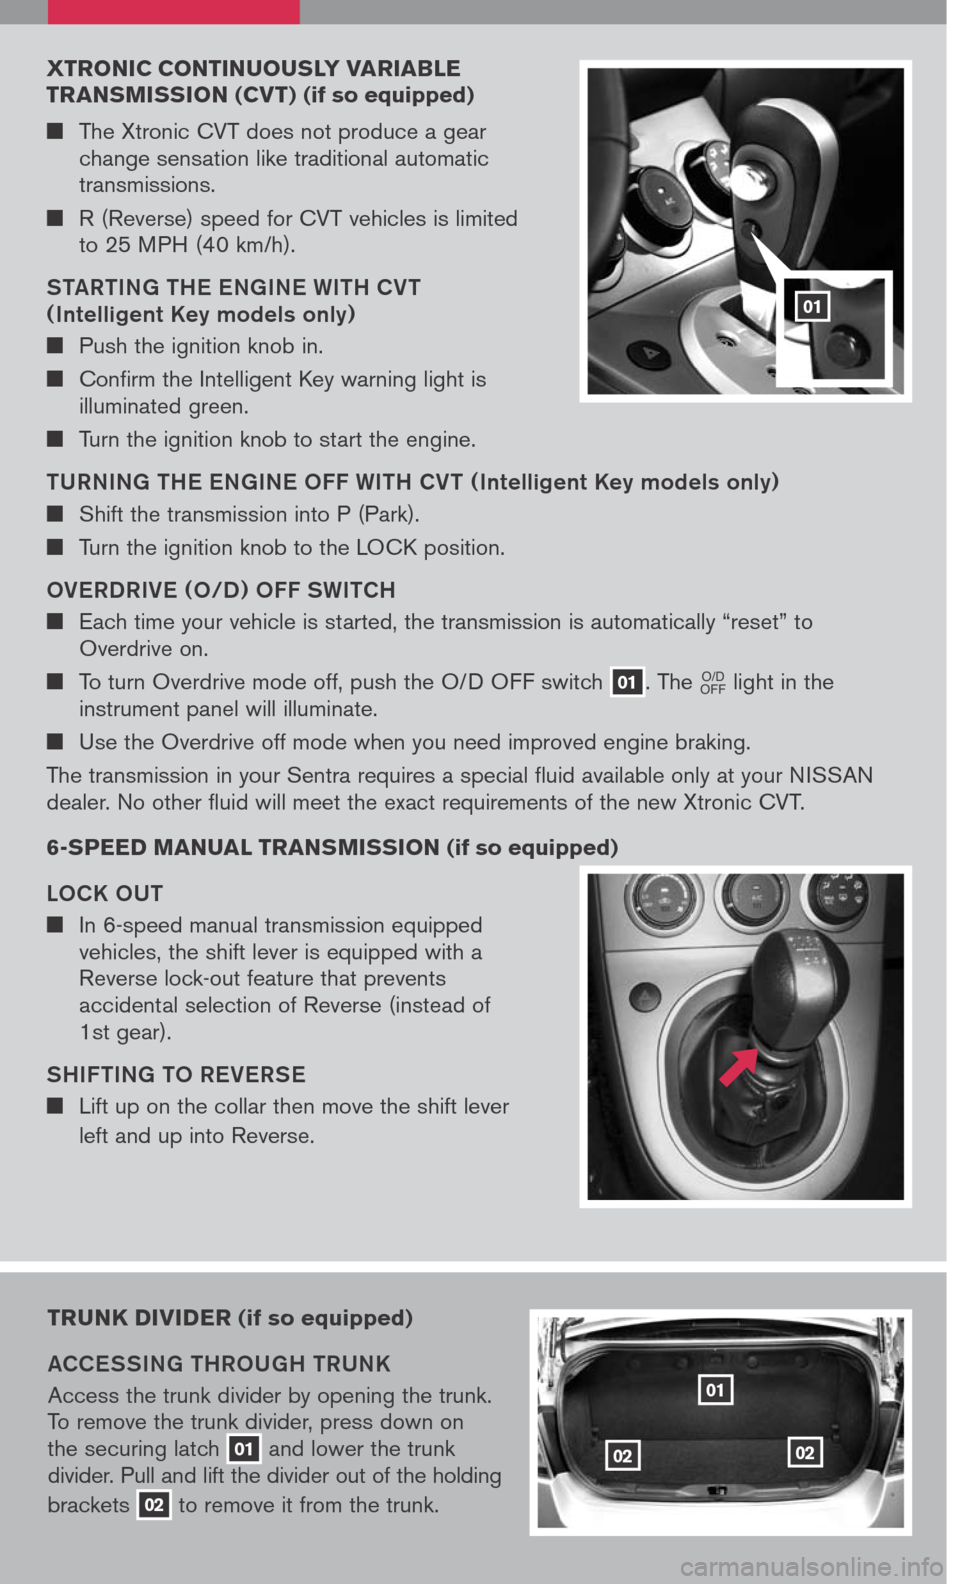
OVERDRIVE (O/D ) OFF SWITCH
Each time your vehicle is started, the transmission is automatically “reset” to Overdrive on.
To turn Overdrive mode off, push the O/D OFF switch 01. The
LCN0030
O/DOFF light in the instrument panel will illuminate.
Use the Overdrive off mode when you need improved engine braking.
The transmission in your Sentra requires a special fluid available only at your NISSAN dealer. No other fluid will meet the exact requirements of the new Xtronic CVT.
6- speed Manual trans Mission (if so equipped)
LOCK OUT
In 6-speed manual transmission equipped vehicles, the shift lever is equipped with a Reverse lock-out feature that prevents accidental selection of Reverse (instead of 1st gear).
SHIF TING TO REVERSE
Lift up on the collar then move the shift lever
left and up into Reverse.
trunk diVider (if so equipped)
ACCESSING THROUGH TRUNK
Access the trunk divider by opening the trunk. To remove the trunk divider, press down on the securing latch 01 and lower the trunk divider. Pull and lift the divider out of the holding
brackets 02 to remove it from the trunk.
01
0202
01
Page 10 of 12
01
rear Folding seat syste M (if so equipped)
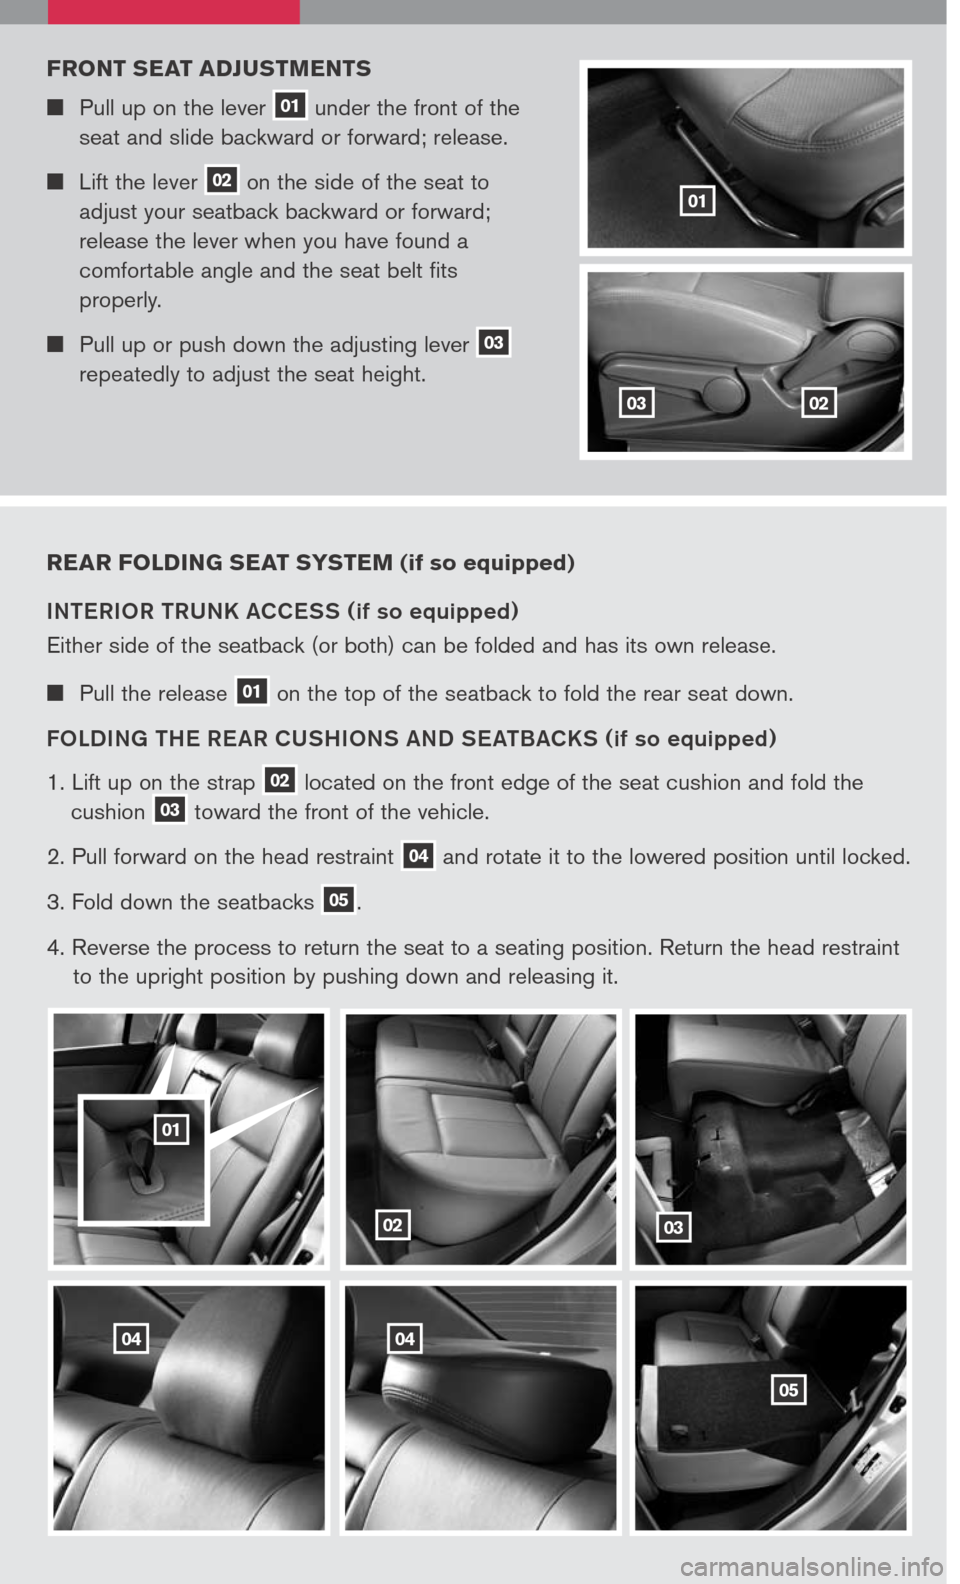
INTERIOR TRUNK ACCESS (if so equipped)
Either side of the seatback (or both) can be folded and has its own release.
Pull the release 01 on the top of the seatback to fold the rear seat down.
FOLDING THE RE AR CUSHIONS AND SE ATBACKS
(if so equipped)
1. Lift up on the strap 02 located on the front edge of the seat cushion and fold the
cushion 03 toward the front of the vehicle.
2. Pull forward on the head restraint 04 and rotate it to the lowered position until locked.
3. Fold down the seatbacks 05.
4. Reverse the process to return the seat to a seating position. Return the head restraint
to the upright position by pushing down and releasing it.
02
01
F ront seat adjust Ments
Pull up on the lever 01 under the front of the
seat and slide backward or forward; release.
Lift the lever 02 on the side of the seat to
adjust your seatback backward or forward;
release the lever when you have found a
comfortable angle and the seat belt fits
properly.
Pull up or push down the adjusting lever 03 repeatedly to adjust the seat height.
0203
0404
03
05