maintenance NISSAN SENTRA 2014 B17 / 7.G Quick Reference Guide
[x] Cancel search | Manufacturer: NISSAN, Model Year: 2014, Model line: SENTRA, Model: NISSAN SENTRA 2014 B17 / 7.GPages: 24, PDF Size: 3.14 MB
Page 5 of 24

3
TIRE PRESSURE MONITORING SYSTEM (TPMS) WITH
EASY FILL TIRE ALERT (if so equipped)
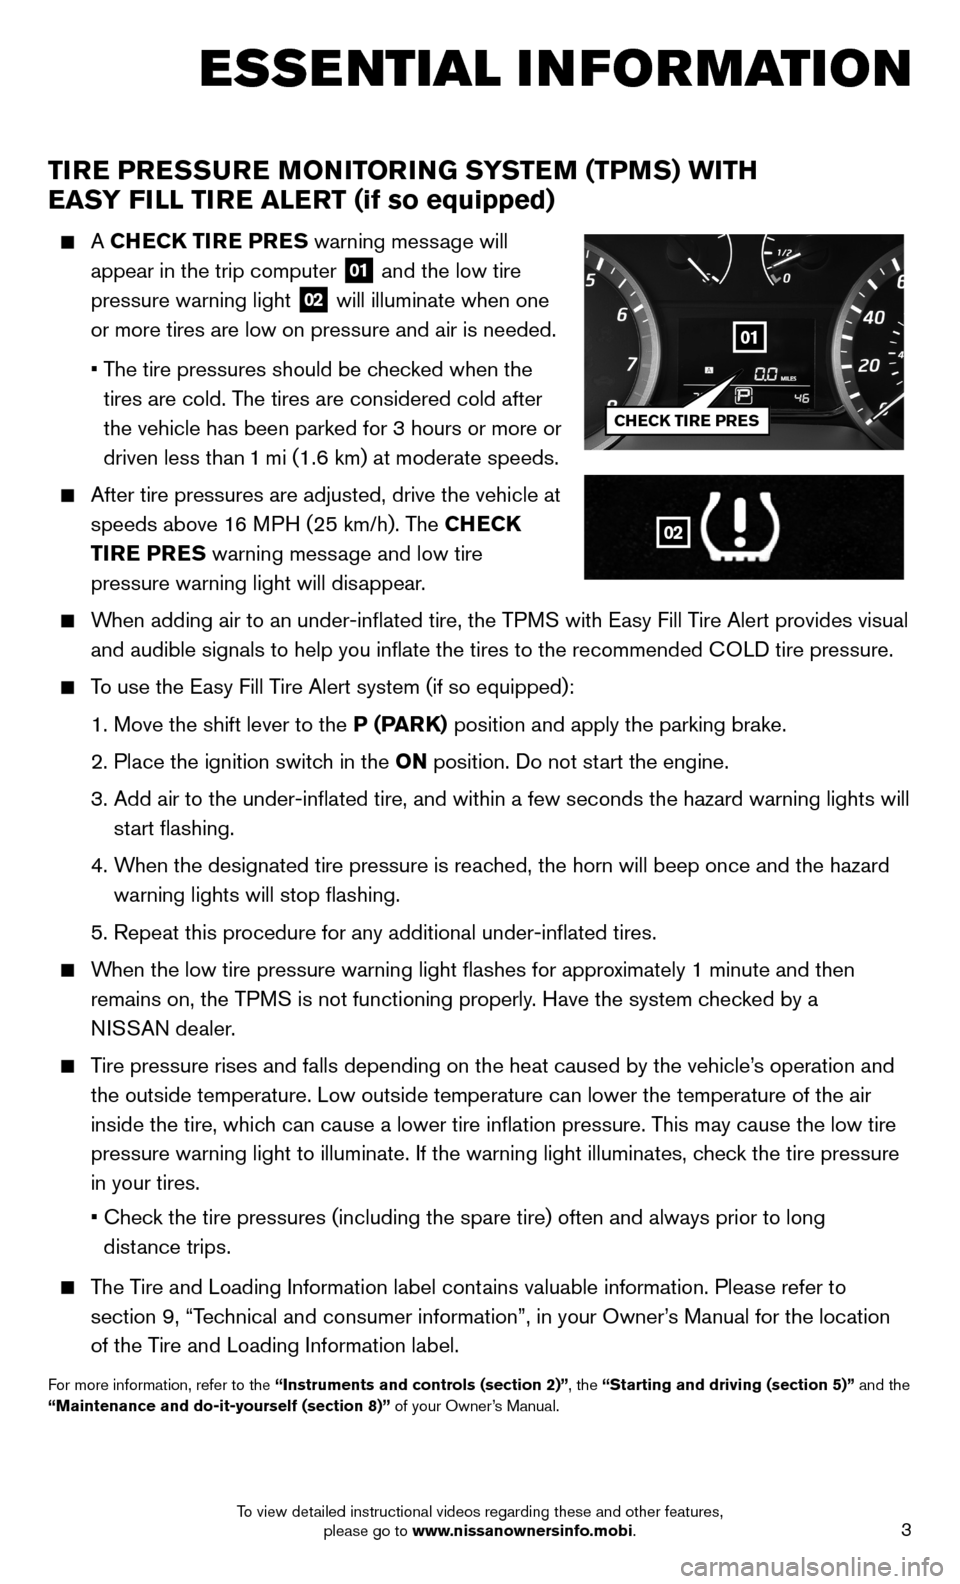
A CHECK TIRE PRES warning message will
appear in the trip computer
01 and the low tire
pressure warning light 02 will illuminate when one
or more tires are low on pressure and air is needed.
• The tire pressures should be checked when the
tires are cold. The tires are considered cold after
the vehicle has been parked for 3 hours or more or
driven less than 1 mi (1.6 km) at moderate speeds.
After tire pressures are adjusted, drive the vehicle at
speeds above 16 MPH (25 km/h). The CHECK
TIRE PRES warning message and low tire
pressure warning light will disappear.
When adding air to an under-inflated tire, the TPMS with Easy Fill Tire Alert provides visual
and audible signals to help you inflate the tires to the recommended C\
OLD tire pressure.
To use the Easy Fill Tire Alert system (if so equipped):
1. Move the shift lever to the P (PARK) position and apply the parking brake.
2. Place the ignition switch in the ON position. Do not start the engine.
3. Add air to the under-inflated tire, and within a few seconds the hazar\
d warning lights will
start flashing.
4. When the designated tire pressure is reached, the horn will beep once and the hazard
warning lights will stop flashing.
5. Repeat this procedure for any additional under-inflated tires.
When the low tire pressure warning light
flashes for approximately 1 minute and then
remains on, the TPMS is not functioning properly. Have the system checked by a
NISSAN dealer.
Tire pressure rises and falls depending on the heat caused by the vehicle\
’s operation and
the outside temperature. Low outside temperature can lower the temperatu\
re of the air
inside the tire, which can cause a lower tire inflation pressure. This may cause the low tire
pressure warning light to illuminate. If the warning light illuminates, \
check the tire pressure
in your tires.
• Check the tire pressures (including the spare tire) often and always prior\
to long
distance trips.
The Tire and Loading Information label contains valuable information. Please refer to
section 9, “Technical and consumer information”, in your Owner’s Manual for the location
of the Tire and Loading Information label.
For more information, refer to the “Instruments and controls (section 2)”, the “Starting and driving (section 5)” and the
“Maintenance and do-it-yourself (section 8)” of your Owner’s Manual.
ESSE NTIAL I N FOR MATION
02
01
CHECK TIRE PRES
To view detailed instructional videos regarding these and other features, please go to www.nissanownersinfo.mobi.
Page 11 of 24

9
WINDSHIELD WIPER AND WASHER SWITCH
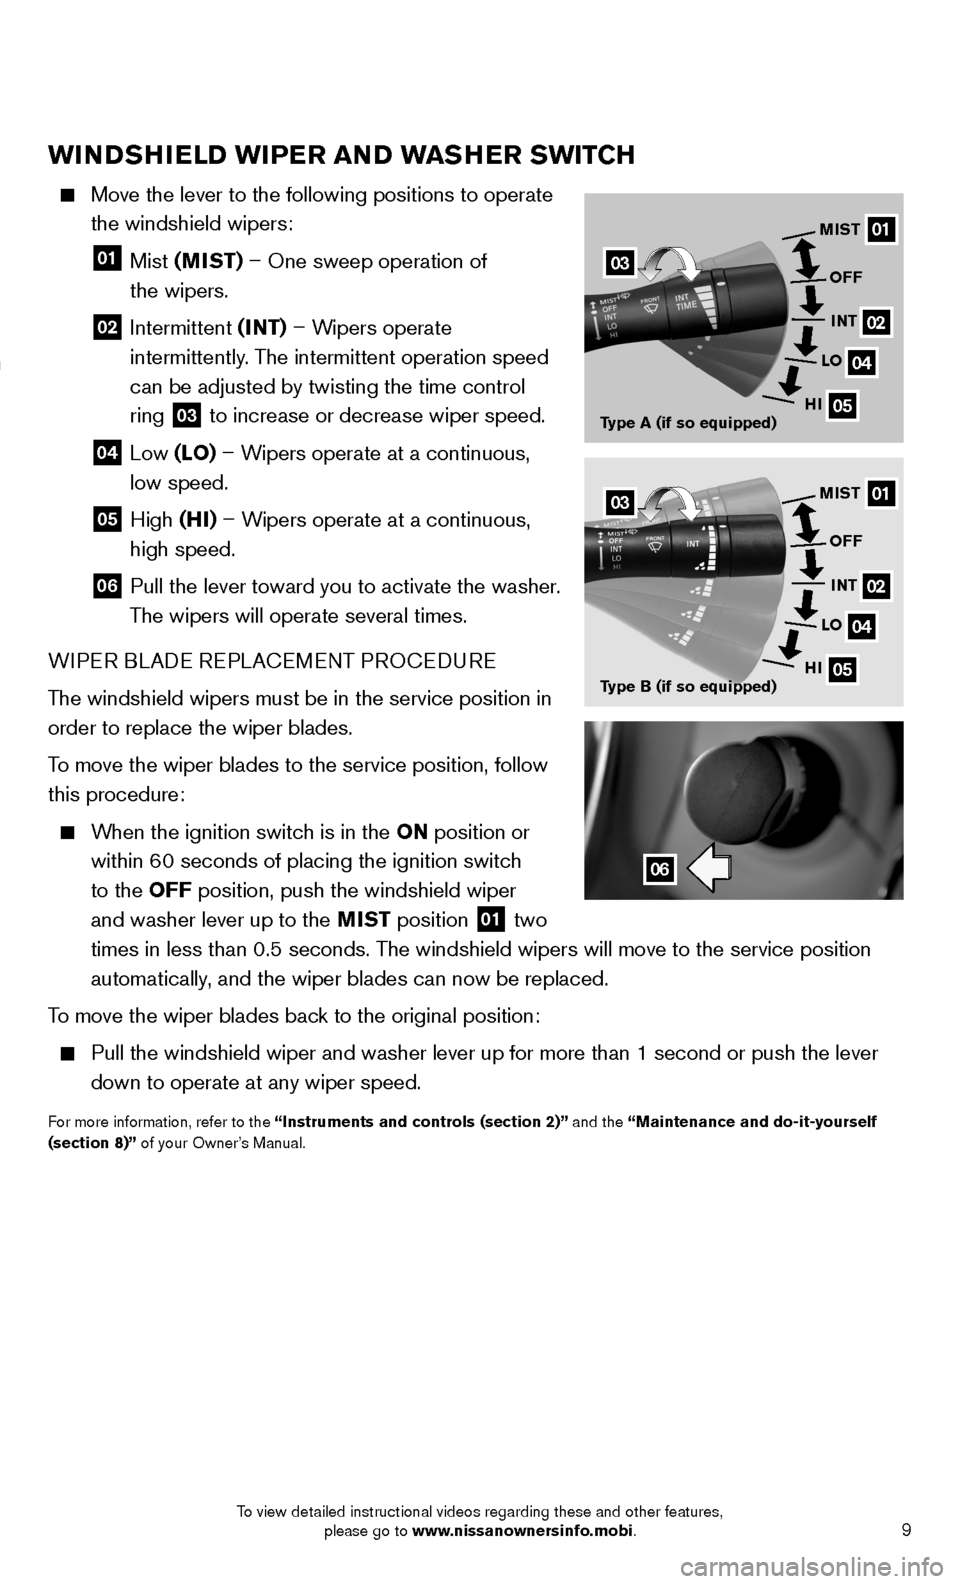
Move the lever to the following positions to operate
the windshield wipers:
01 Mist (MIST) – One sweep operation of
the wipers.
02 Intermittent (INT) – Wipers operate
intermittently. The intermittent operation speed
can be adjusted by twisting the time control
ring
03 to increase or decrease wiper speed.
04 Low (LO) – Wipers operate at a continuous,
low speed.
05 High (HI) – Wipers operate at a continuous,
high speed.
06 Pull the lever toward you to activate the washer.
The wipers will operate several times.
WIPER BLADE REPLACEMENT PROCEDURE
The windshield wipers must be in the service position in
order to replace the wiper blades.
To move the wiper blades to the service position, follow
this procedure:
When the ignition switch is in the ON position or
within 60 seconds of placing the ignition switch
to the OFF position, push the windshield wiper
and washer lever up to the MIST position
01 two
times in less than 0.5 seconds. The windshield wipers will move to the service position
automatically, and the wiper blades can now be replaced.
To move the wiper blades back to the original position:
Pull the windshield wiper and washer lever up for more than 1 second or \
push the lever
down to operate at any wiper speed.
For more information, refer to the “Instruments and controls (section 2)” and the “Maintenance and do-it-yourself
(section 8)” of your Owner’s Manual.
06
01
02
04
05
MIST
Type A (if so equipped) OFF
INT
LO
HI
03
01
02
04
05
MIST
Type B (if so equipped) OFF
INT
LO
HI03
To view detailed instructional videos regarding these and other features, please go to www.nissanownersinfo.mobi.
Page 24 of 24

Nissan, the Nissan Brand Symbol, Z and
Nissan model names are Nissan trademarks.
©
2014 Nissan North America, Inc.
QR14E 0B17U2
Printing: March 2014 (06)
To view detailed instructional videos,
go to www.nissanownersinfo.mobi/2014/sentra
or snap this barcode with an appropriate barcode reader.
This Quick Reference Guide is intended to provide an overview of some of the uniq\
ue features of your new vehicle. See your
Owner’s Manual, which contains important safety warnings and information about the operation and maintenance of yo\
ur vehicle,
for complete details. NISSAN North America, Inc. reserves the right to make changes, at any time, without prior notice, in prices,
colors, materials, equipment, specifications, and models and to discon\
tinue models or equipment. Due to continuous product
development and other pre- and post-production factors, actual vehicle, \
materials and specifications may vary. Some vehicles are
shown with optional equipment. See the actual vehicle for complete accur\
acy. Specifications, options and accessories may differ
in Hawaii, U.S. territories and other countries. For additional information on availability, options or accessories, see your NISSAN
dealer or contact NISSAN North America, Inc.