stop start NISSAN SENTRA 2020 Owner´s Manual
[x] Cancel search | Manufacturer: NISSAN, Model Year: 2020, Model line: SENTRA, Model: NISSAN SENTRA 2020Pages: 528, PDF Size: 3.56 MB
Page 269 of 528
When installing a CB, ham radio or car
phone in your vehicle, be sure to observe
the following precautions; otherwise, the
new equipment may adversely affect the
engine control system and other electronic
parts.
WARNING
• A cellular phone should not be used
for any purpose while driving so full
attention may be given to vehicle op-
eration. Some jurisdictions prohibit
the use of cellular phones while
driving.
• If you must make a call while your
vehicle is in motion, the hands free
cellular phone operational mode (if
so equipped) is highly recom-
mended. Exercise extreme caution at
all times so full attention may be
given to vehicle operation.
• If you are unable to devote full atten-
tion to vehicle operation while talk-
ing on the phone, pull off the road to
a safe location and stop your vehicle.
CAUTION
• Keep the antenna as far away as pos-
sible from the electronic control
modules.
• Keep the antenna wire more than 8 in
(20 cm) away from the electronic
control system harnesses. Do not
route the antenna wire next to any
harness.
• Adjust the antenna standing-wave
ratio as recommended by the
manufacturer.
• Connect the ground wire from the CB
radio chassis to the body.
• For additional information, it is rec-
ommended that you visit a NISSAN
dealer for this service.WARNING
• Use a phone af ter stopping your ve-
hicle in a safe location. If you have to
use a phone while driving, exercise
extreme caution at all times so full
attention may be given to vehicle
operation.
• If you are unable to devote full atten-
tion to vehicle operation while talk-
ing on the phone, pull off the road to
a safe location and stop your vehicle.
CAUTION
To avoid discharging the vehicle bat-
tery, use a phone af ter starting the en-
gine.
CAR PHONE OR CB RADIO BLUETOOTH® HANDS-FREE PHONE
SYSTEM
Monitor, climate, audio, phone and voice recognition systems4-67
Page 291 of 528
•Do not stop or park the vehicle over
flammable materials such as dry
grass, waste paper or rags. They may
ignite and cause a fire.
CAUTION
• Do not use leaded gasoline. Deposits
from leaded gasoline will seriously
reduce the three-way catalyst's abil-
ity to help reduce exhaust pollutants.
• Keep your engine tuned up. Malfunc-
tions in the ignition, fuel injection, or
electrical systems can cause overrich
fuel flow into the three-way catalyst,
causing it to overheat. Do not keep
driving if the engine misfires, or if no-
ticeable loss of performance or other
unusual operating conditions are de-
tected. Have the vehicle inspected
promptly. It is recommended that
you visit a NISSAN dealer for this
service.
• Avoid driving with an extremely low
fuel level. Running out of fuel could
cause the engine to misfire, damag-
ing the three-way catalyst.
• Do not race the engine while warm-
ing it up. •
Do not push or tow your vehicle to
start the engine.
TIRE PRESSURE MONITORING
SYSTEM (TPMS)
Each tire, including the spare (if provided),
should be checked monthly when cold and
inflated to the inflation pressure recom-
mended by the vehicle manufacturer on
the vehicle placard or tire inflation pressure
label. (If your vehicle has tires of a different
size than the size indicated on the vehicle
placard or tire inflation pressure label, you
should determine the proper tire inflation
pressure for those tires.)
As an added safety feature, your vehicle
has been equipped with a Tire Pressure
Monitoring System (TPMS) that illuminates
a low tire pressure telltale when one or
more of your tires is significantly under-
inflated. Accordingly, when the low tire
pressure telltale illuminates, you should
stop and check your tires as soon as pos-
sible, and inflate them to the proper pres-
sure. Driving on a significantly under-
inflated tire causes the tire to overheat and
can lead to tire failure. Under-inflation also
reduces fuel efficiency and tire tread life,
and may affect the vehicle’s handling and
stopping ability. Please note that the TPMS is not a substi-
tute for proper tire maintenance, and it is
the driver’s responsibility to maintain cor-
rect tire pressure, even if under-inflation
has not reached the level to trigger illumi-
nation of the TPMS low tire pressure telltale.
Your vehicle has also been equipped with a
TPMS malfunction indicator to indicate
when the system is not operating properly.
The TPMS malfunction indicator is com-
bined with the low tire pressure telltale.
When the system detects a malfunction,
the telltale will flash for approximately one
minute and then remain continuously illu-
minated. This sequence will continue upon
subsequent vehicle start-ups as long as
the malfunction exists. When the malfunc-
tion indicator is illuminated, the system
may not be able to detect or signal low tire
pressure as intended. TPMS malfunctions
may occur for a variety of reasons, includ-
ing the installation of replacement or alter-
nate tires or wheels on the vehicle that
prevent the TPMS from functioning prop-
erly. Always check the TPMS malfunction
telltale af ter replacing one or more tires or
wheels on your vehicle to ensure that the
replacement or alternate tires and wheels
allow the TPMS to continue to function
properly.
Starting and driving5-5
Page 293 of 528
•If the low tire pressure warning light
illuminates while driving, avoid sud-
den steering maneuvers or abrupt
braking, reduce vehicle speed, pull
off the road to a safe location and
stop the vehicle as soon as possible.
Driving with under-inflated tires may
permanently damage the tires and
increase the likelihood of tire failure.
Serious vehicle damage could occur
and may lead to an accident and
could result in serious personal in-
jury. Check the tire pressure for all
four tires. Adjust the tire pressure to
the recommended COLD tire pres-
sure shown on the Tire and Loading
Information label to turn the low tire
pressure warning light off. If you have
a flat tire, replace it with a spare tire
as soon as possible. (For additional
information on changing a flat tire,
refer to “Flat tire” in the “In case of
emergency ” section of this manual.) •
When replacing a wheel without the
TPMS such as the spare tire, when a
spare tire is mounted or a wheel is
replaced, the TPMS will not function
and the low tire pressure warning
light will flash for approximately 1
minute. The light will remain on af ter
1 minute. Have your tires replaced
and/or TPMS reset as soon as pos-
sible. It is recommended that you
visit a NISSAN dealer for this service.
• Replacing tires with those not origi-
nally specified by NISSAN could af-
fect the proper operation of the
TPMS.
• Do not inject any tire liquid or aerosol
tire sealant into the tires, as this may
cause a malfunction of the tire pres-
sure sensors.
CAUTION
Do not place metalized film or any
metal parts (antenna, etc.) on the win-
dows. This may cause poor reception of
the signals from the tire pressure sen-
sors, and the TPMS will not function
properly. Some devices and transmitters may tem-
porarily interfere with the operation of the
TPMS and cause the low tire pressure
warning light to illuminate.
Some examples are:
• Facilities or electric devices using similar
radio frequencies are near the vehicle.
• If a transmitter set to similar frequencies is being used in or near the vehicle.
• If a computer (or similar equipment) or a DC/AC converter is being used in or near
the vehicle.
The low tire pressure warning light may
illuminate in the following cases:
• If the vehicle is equipped with a wheel and tire without TPMS.
• If the TPMS has been replaced and the ID has not been registered.
• If the wheel is not originally specified by NISSAN.
FCC Notice:
For USA:
This device complies with Part 15 of the
FCC Rules. Operation is subject to the fol-
lowing two conditions: (1) This device
may not cause harmful interference, and
Starting and driving5-7
Page 294 of 528
(2) this device must accept any interfer-
ence received, including interference
that may cause undesired operation.
NOTE:
Changes or modifications not ex-
pressly approved by the party re-
sponsible for compliance could void
the user's authority to operate the
equipment.
For Canada:
This device complies with Industry
Canada licence-exempt RSS standard(s).
Operation is subject to the following two
conditions: (1) this device may not cause
interference, and (2) this device must ac-
cept any interference, including interfer-
ence that may cause undesired opera-
tion of the device.
TPMS with Easy-Fill Tire Alert
When adding air to an under-inflated tire,
the TPMS with Easy-Fill Tire Alert provides
visual and audible signals outside the ve-
hicle to help you inflate the tires to the rec-
ommended COLD tire pressure.
Vehicle set-up:
1. Park the vehicle in a safe and level place.2. Apply the parking brake and place the
shif t lever in the P (Park) position (if so
equipped).
3. Place the ignition switch in the ON posi- tion. Do not start the engine.
Operation:
1. Add air to the tire.
2. Af ter a few seconds, the hazard indica- tors will start flashing.
3. When the designated pressure is reached, the horn beeps once and the
hazard indicators stop flashing.
4. Perform the above steps for each tire. • If the tire is over-inflated more thanapproximately 4 psi (30 kPa), the horn
beeps and the hazard indicators flash
three times. To correct the pressure,
push the core of the valve stem on the
tire briefly to release pressure. When
the pressure reaches the designated
pressure, the horn beeps once.
• If the hazard indicator does not flash within approximately 15 seconds af ter
starting to inflate the tire, it indicates
that the Easy-Fill Tire Alert is not oper-
ating. • The TPMS will not activate the Easy-Fill
Tire Alert under the following condi-
tions:
– If there is interference from an ex- ternal device or transmitter.
– The air pressure from the inflation device is not sufficient to inflate the
tire.
– There is a malfunction in the TPMS system.
– There is a malfunction in the horn or hazard indicators.
– The identification code of the tire’s pressure sensor is not registered to
the system.
– The battery of the tire pressure sensor is low.
• If the Easy-Fill Tire Alert does not oper- ate due to TPMS interference, move
the vehicle about 3 f t (1 m) backward
or forward and try again.
If the Easy-Fill Tire Alert is not working, use a
tire pressure gauge.
5-8Starting and driving
Page 295 of 528
AVOIDING COLLISION AND
ROLLOVER
WARNING
Failure to operate this vehicle in a safe
and prudent manner may result in loss
of control or an accident.
Be alert and drive defensively at all times.
Obey all traffic regulations. Avoid excessive
speed, high speed cornering, or sudden
steering maneuvers, because these driving
practices could cause you to lose control of
your vehicle.
As with any vehicle, loss of control could
result in a collision with other vehicles or
objects or cause the vehicle to roll over,
particularly if the loss of control causes
the vehicle to slide sideways.
Be attentive at all times, and avoid driving
when tired. Never drive when under the in-
fluence of alcohol or drugs (including pre-
scription or over-the-counter drugs which
may cause drowsiness). Always wear your
seat belt as outlined in the “Safety – Seats,
seat belts and supplemental restraint sys-
tem” section of this manual, and also in-
struct your passengers to do so. Seat belts help reduce the risk of injury in
collisions and rollovers.
In a rollover crash,
an unbelted or improperly belted person
is significantly more likely to be injured
or killed than a person properly wearing
a seat belt.
OFF-ROAD RECOVERY
While driving, the right side or lef t side
wheels may unintentionally leave the road
surface. If this occurs, maintain control of
the vehicle by following the procedure be-
low. Please note that this procedure is only
a general guide. The vehicle must be driven
as appropriate based on the conditions of
the vehicle, road and traffic.
1. Remain calm and do not overreact.
2. Do not apply the brakes.
3. Maintain a firm grip on the steering wheel with both hands and try to hold a
straight course.
4. When appropriate, slowly release the ac- celerator pedal to gradually slow the
vehicle. 5. If there is nothing in the way, steer the
vehicle to follow the road while vehicle
speed is reduced. Do not attempt to
drive the vehicle back onto the road sur-
face until vehicle speed is reduced.
6. When it is safe to do so, gradually turn the steering wheel until both tires return
to the road surface. When all tires are on
the road surface, steer the vehicle to
stay in the appropriate driving lane.
• If you decide that it is not safe to return the vehicle to the road surface based
on vehicle, road or traffic conditions,
gradually slow the vehicle to a stop in
a safe place off the road.
RAPID AIR PRESSURE LOSS
Rapid air pressure loss or a “blow-out” can
occur if the tire is punctured or is damaged
due to hitting a curb or pothole. Rapid air
pressure loss can also be caused by driving
on under-inflated tires.
Rapid air pressure loss can affect the han-
dling and stability of the vehicle, especially
at highway speeds.
Starting and driving5-9
Page 296 of 528
Help prevent rapid air pressure loss by
maintaining the correct air pressure and
visually inspecting the tires for wear and
damage. For additional information, refer
to “Wheels and tires” in the “Do-it-yourself ”
section of this manual. If a tire rapidly loses
air pressure or “blows-out” while driving,
maintain control of the vehicle by following
the procedure below. Please note that this
procedure is only a general guide. The ve-
hicle must be driven as appropriate based
on the conditions of the vehicle, road and
traffic.
WARNING
If there is a sudden loss of tire air pres-
sure, the vehicle will generally move or
pull in the direction of the flat tire. In
this situation, losing control of the ve-
hicle may cause a collision and result in
personal injury.
To help avoid loss of control:
• Do not rapidly apply the brakes.
• Do not rapidly release the accelerator
pedal.
• Do not rapidly turn the steering
wheel. 1. Remain calm and do not overreact.
2. Maintain a firm grip on the steering
wheel with both hands and try to hold a
straight course.
3. When appropriate, slowly release the ac- celerator pedal to gradually slow the
vehicle.
4. Gradually steer the vehicle to a safe lo- cation off the road and away from traffic
if possible.
5. Lightly apply the brake pedal to gradu- ally stop the vehicle.
6. Turn on the hazard warning flashers and contact a roadside emergency service
to change the tire. For additional infor-
mation, refer to “Changing a flat tire” in
the “In case of emergency” section of
this manual.
DRINKING ALCOHOL/DRUGS AND
DRIVING
WARNING
Never drive under the influence of alco-
hol or drugs. Alcohol in the blood-
stream reduces coordination, delays
reaction time and impairs judgement.
Driving af ter drinking alcohol increases
the likelihood of being involved in an
accident injuring yourself and others.
Additionally, if you are injured in an ac-
cident, alcohol can increase the sever-
ity of the injury.
NISSAN is committed to safe driving. How-
ever, you must choose not to drive under the
influence of alcohol. Every year thousands of
people are injured or killed in alcohol-related
collisions. Although the local laws vary on
what is considered to be legally intoxicated,
the fact is that alcohol affects all people dif-
ferently and most people underestimate the
effects of alcohol.
Remember, drinking and driving don't mix!
That is true for drugs (over-the-counter,
prescription) and illegal drugs, too. Don't
drive if your ability to operate your vehicle is
impaired by alcohol, drugs, or some other
physical condition.
5-10Starting and driving
Page 297 of 528
WARNING
Do not operate the push-button igni-
tion switch while driving the vehicle ex-
cept in an emergency. (The engine will
stop when the ignition switch is pushed
three consecutive times in quick suc-
cession or the ignition switch is pushed
and held for more than 2 seconds.) If
the engine stops while the vehicle is
being driven, this could lead to a crash
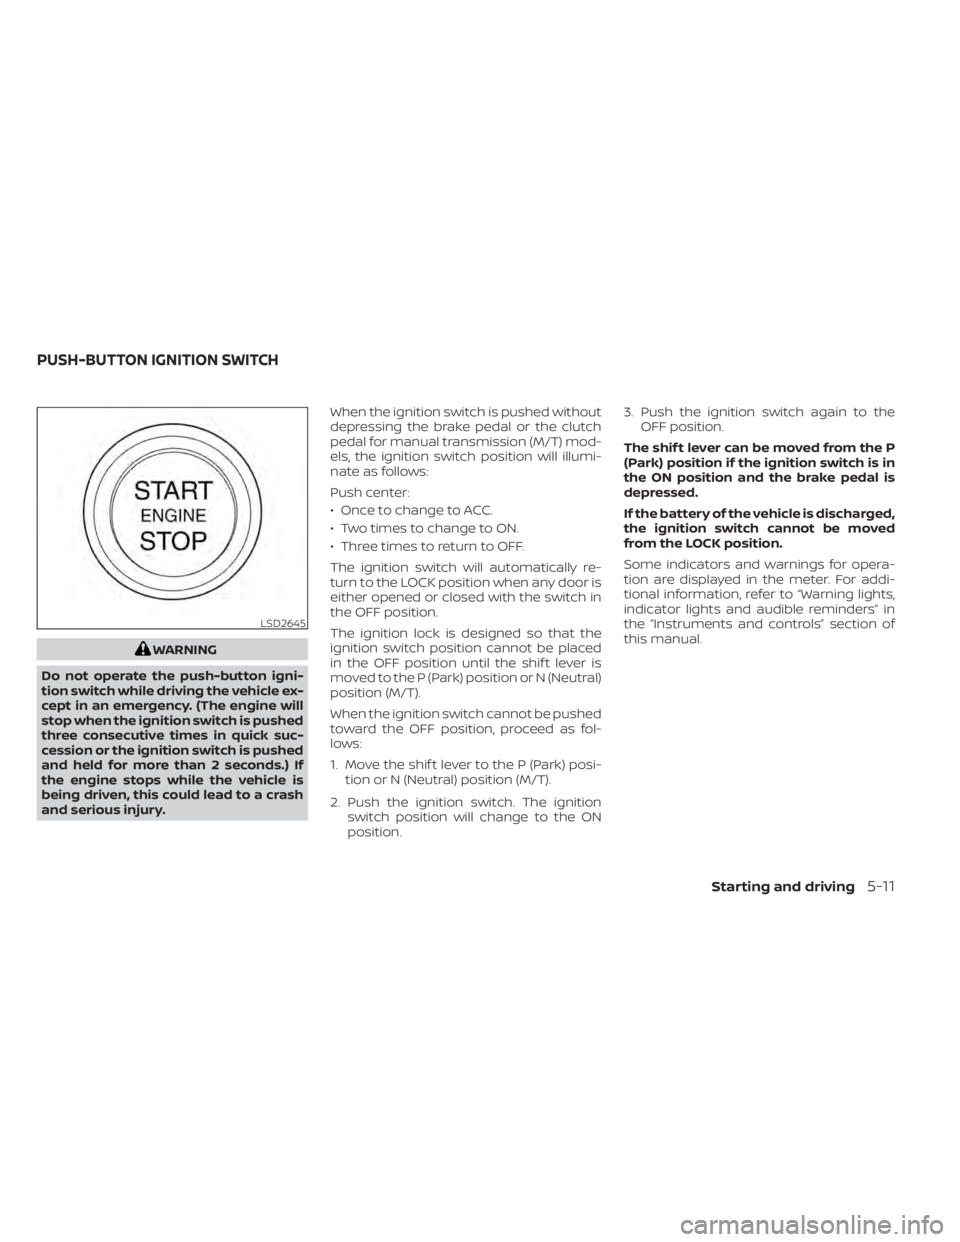
and serious injury. When the ignition switch is pushed without
depressing the brake pedal or the clutch
pedal for manual transmission (M/T) mod-
els, the ignition switch position will illumi-
nate as follows:
Push center:
• Once to change to ACC.
• Two times to change to ON.
• Three times to return to OFF.
The ignition switch will automatically re-
turn to the LOCK position when any door is
either opened or closed with the switch in
the OFF position.
The ignition lock is designed so that the
ignition switch position cannot be placed
in the OFF position until the shif t lever is
moved to the P (Park) position or N (Neutral)
position (M/T).
When the ignition switch cannot be pushed
toward the OFF position, proceed as fol-
lows:
1. Move the shif t lever to the P (Park) posi-
tion or N (Neutral) position (M/T).
2. Push the ignition switch. The ignition switch position will change to the ON
position. 3. Push the ignition switch again to the
OFF position.
The shif t lever can be moved from the P
(Park) position if the ignition switch is in
the ON position and the brake pedal is
depressed.
If the battery of the vehicle is discharged,
the ignition switch cannot be moved
from the LOCK position.
Some indicators and warnings for opera-
tion are displayed in the meter. For addi-
tional information, refer to “Warning lights,
indicator lights and audible reminders” in
the “Instruments and controls” section of
this manual.
LSD2645
PUSH-BUTTON IGNITION SWITCH
Starting and driving5-11
Page 301 of 528
floor) and while holding, crank the en-
gine. Release the accelerator pedal
when the engine starts.
• If the engine is very hard to start be- cause it is flooded, depress the accel-
erator pedal all the way to the floor
and hold it. Push the ignition switch to
the ON position to start cranking the
engine. Af ter 5 or 6 seconds, stop
cranking by pushing the ignition
switch to the LOCK position. Af ter
cranking the engine, release the accel-
erator pedal. Crank the engine with
your foot off the accelerator pedal by
depressing the brake pedal and push-
ing the ignition switch to start the en-
gine. If the engine starts, but fails to
run, repeat the above procedure.
CAUTION
Do not operate the starter for more
than 15 seconds at a time. If the engine
does not start, push the ignition switch
to the OFF position and wait 10 seconds
before cranking again, otherwise the
starter could be damaged. 4.
Warm-up
Allow the engine to idle for at least 30
seconds af ter starting. Do not race the
engine while warming it up. Drive at a
moderate speed for a short distance
first, especially in cold weather. In cold
weather, keep the engine running for a
minimum of2-3minutes before shut-
ting it off. Starting and stopping the en-
gine over a short period of time may
make the vehicle more difficult to start.
5. To stop the engine, move the shif t lever to the P (Park) position or to N (Neutral)
and apply the parking brake (M/T) and
push the ignition switch to the OFF
position.
NOTE:
Care should be taken to avoid situa-
tions that can lead to potential bat-
tery discharge and potential no-start
conditions such as:
1. Installation or extended use of elec- tronic accessories that consume bat-
tery power when the engine is not
running (phone chargers, GPS, DVD
players, etc.).
2. The vehicle is not driven regularly and/or only driven short distances. In these cases, the battery may need to
be charged to maintain battery health.
REMOTE ENGINE START (if so
equipped)
Vehicles started with the Remote Engine
Start require the ignition switch to be
placed in the ON position before the shif t
lever can be moved from the P (Park) posi-
tion. To place the ignition switch in the ON
position, follow these steps:
1. Make sure that the Intelligent Key is on
you.
2. Apply the brake.
3. Push the ignition switch once to the ON position.
For additional information, refer to “NISSAN
Intelligent Key®” in the “Pre-driving checks
and adjustments” section of this manual.
Starting and driving5-15
Page 302 of 528
CONTINUOUSLY VARIABLE
TRANSMISSION (CVT) (if so
equipped)
WARNING
• Do not depress the accelerator pedal
while shif ting from P (Park) or N (Neu-
tral) to R (Reverse), D (Drive) or L (Low)
(if so equipped). Always depress the
brake pedal until shif ting is com-
pleted. Failure to do so could cause
you to lose control and have an
accident.
• Cold engine idle speed is high, so use
caution when shif ting into a forward
or reverse gear before the engine has
warmed up.
• Do not downshif t abruptly on slip-
pery roads. This may cause a loss of
control.
• Never shif t to either the P (Park) or R
(Reverse) position while the vehicle is
moving forward and P (Park) or D
(Drive) position while the vehicle is
reversing. This could cause an acci-
dent or damage the transmission.
CAUTION
• Except in an emergency, do not shif t
to the N (Neutral) position while driv-
ing. Coasting with the transmission
in the N (Neutral) position may cause
serious damage to the transmission.
• To avoid possible damage to your ve-
hicle, when stopping the vehicle on
an uphill grade, do not hold the ve-
hicle by depressing the accelerator
pedal. The foot brake should be used
for this purpose.
The CVT in your vehicle is electronically
controlled to produce maximum power
and smooth operation.
The recommended operating procedures
for this transmission are shown on the fol-
lowing pages. Follow these procedures for
maximum vehicle performance and driv-
ing enjoyment.
NOTE:
Engine power may be automatically re-
duced to protect the CVT if the engine
speed increases quickly when driving on
slippery roads or while being tested on
some dynamometers.
Starting the vehicle
WARNING
• Do not depress the accelerator pedal
while shif ting from P (Park) or N (Neu-
tral) to R (Reverse), D (Drive) or L (Low)
(if so equipped). Always depress the
brake pedal until shif ting is com-
pleted. Failure to do so could cause
you to lose control and have an
accident.
• Cold engine idle speed is high, so use
caution when shif ting into a forward
or reverse gear before the engine has
warmed up.
• Do not downshif t abruptly on slip-
pery roads. This may cause a loss of
control.
• Never shif t to either the P (Park) or R
(Reverse) position while the vehicle is
moving forward and P (Park) or D
(Drive) position while the vehicle is
reversing. This could cause an acci-
dent or damage the transmission.
• Except in an emergency, do not shif t
to the N (Neutral) position while driv-
ing. Coasting with the transmission
in the N (Neutral) position may cause
serious damage to the transmission.
DRIVING THE VEHICLE
5-16Starting and driving
Page 303 of 528
CAUTION
To avoid possible damage to your ve-
hicle, when stopping the vehicle on an
uphill grade, do not hold the vehicle by
depressing the accelerator pedal. The
foot brake should be used for this pur-
pose.
1. Af ter starting the engine, fully depress the foot brake pedal before moving the
shif t lever out of the P (Park) position.
2. Keep the foot brake pedal depressed and move the shif t lever into a driving
gear.
3. Release the foot brake, then gradually start the vehicle in motion.
4. Stop the vehicle completely before mov- ing the shif t lever into the P (Park)
position.
The Continuously Variable Transmission
is designed so the foot brake pedal MUST
be depressed before shif ting from P
(Park) to any drive position while the ig-
nition switch is in the ON position.
The shif t lever cannot be moved out of P
(Park) and into any of the other gear po-
sitions if the ignition switch is placed in
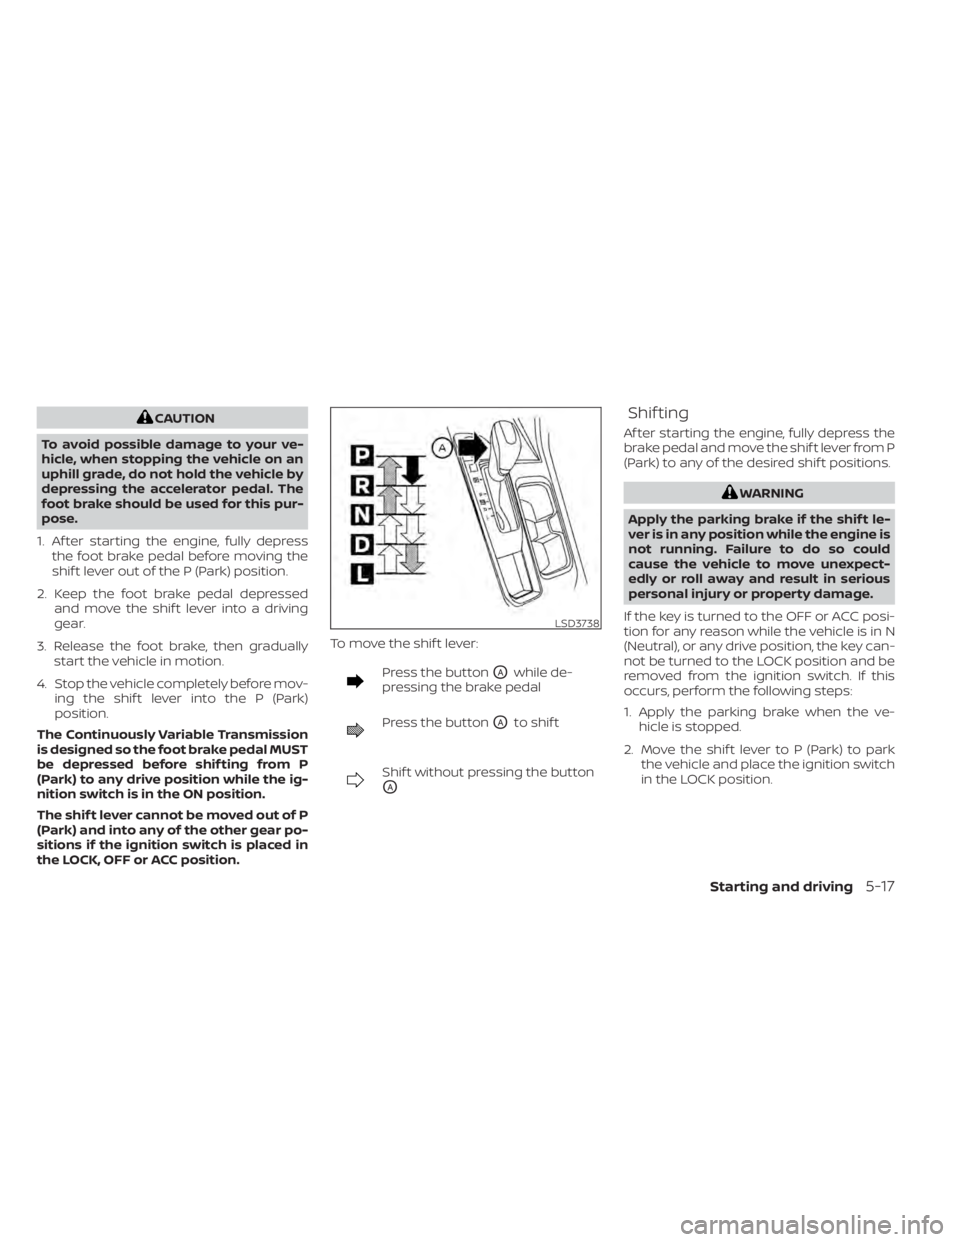
the LOCK, OFF or ACC position. To move the shif t lever:
Press the buttonOAwhile de-
pressing the brake pedal
Press the buttonOAto shif t
Shif t without pressing the button
OA
Shif ting
Af ter starting the engine, fully depress the
brake pedal and move the shif t lever from P
(Park) to any of the desired shif t positions.
WARNING
Apply the parking brake if the shif t le-
ver is in any position while the engine is
not running. Failure to do so could
cause the vehicle to move unexpect-
edly or roll away and result in serious
personal injury or property damage.
If the key is turned to the OFF or ACC posi-
tion for any reason while the vehicle is in N
(Neutral), or any drive position, the key can-
not be turned to the LOCK position and be
removed from the ignition switch. If this
occurs, perform the following steps:
1. Apply the parking brake when the ve- hicle is stopped.
2. Move the shif t lever to P (Park) to park the vehicle and place the ignition switch
in the LOCK position.
LSD3738
Starting and driving5-17