Int-30 NISSAN TEANA 2008 Service Manual
[x] Cancel search | Manufacturer: NISSAN, Model Year: 2008, Model line: TEANA, Model: NISSAN TEANA 2008Pages: 5121, PDF Size: 69.03 MB
Page 143 of 5121
SEAT MEMORY SWITCH
ADP-137
< ON-VEHICLE REPAIR >
C
D
E
F
G
H
I
K
L
MA
B
ADP
N
O
P
SEAT MEMORY SWITCH
Exploded ViewINFOID:0000000003759242
Refer to INT-30, "DRIVER SIDE : Exploded View".
Removal and InstallationINFOID:0000000003759243
REMOVAL
CAUTION:
When removing and installing, use shop cloths to protect parts from damage.
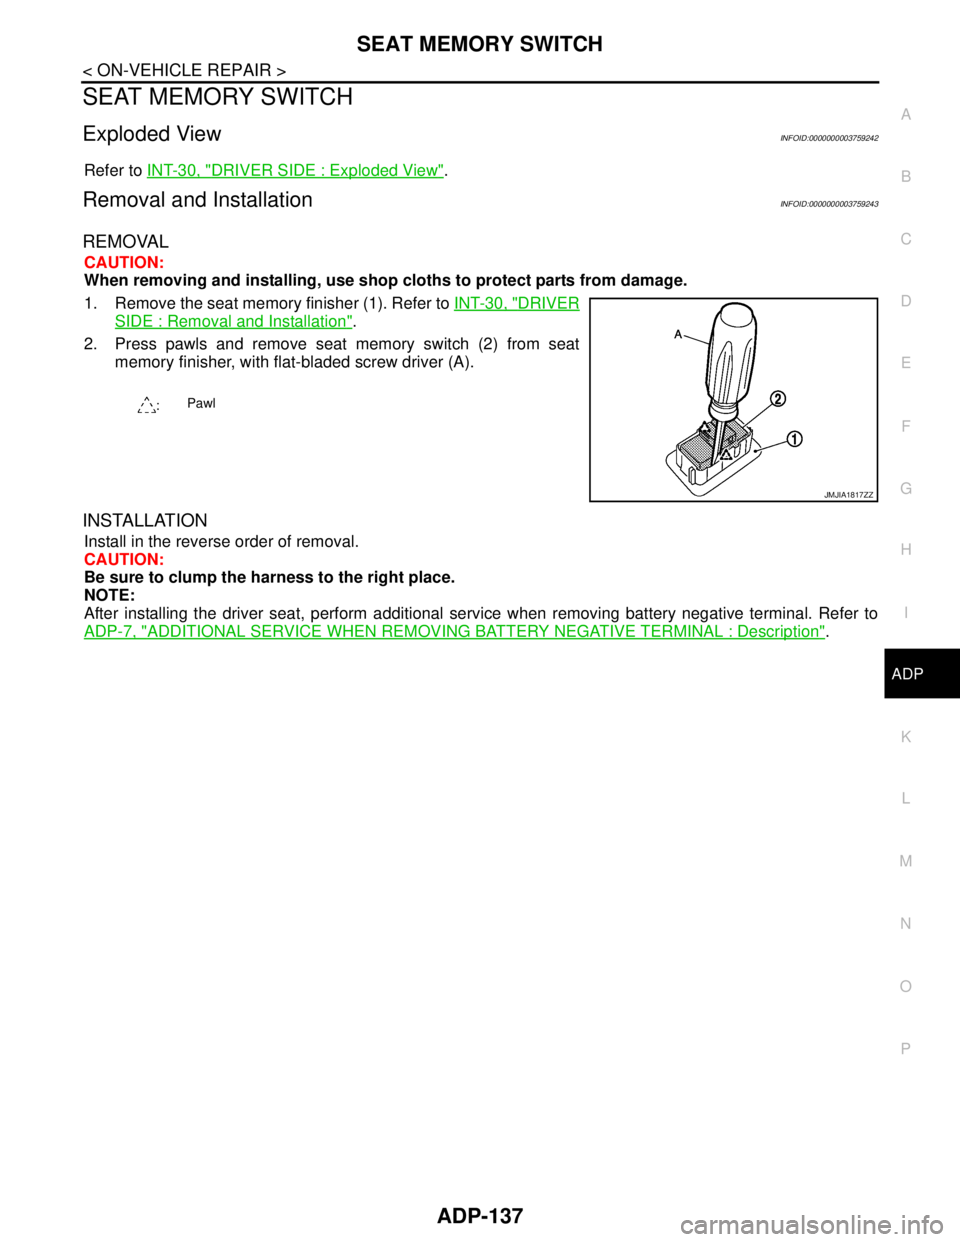
1. Remove the seat memory finisher (1). Refer to INT-30, "
DRIVER
SIDE : Removal and Installation".
2. Press pawls and remove seat memory switch (2) from seat
memory finisher, with flat-bladed screw driver (A).
INSTALLATION
Install in the reverse order of removal.
CAUTION:
Be sure to clump the harness to the right place.
NOTE:
After installing the driver seat, perform additional service when removing battery negative terminal. Refer to
ADP-7, "
ADDITIONAL SERVICE WHEN REMOVING BATTERY NEGATIVE TERMINAL : Description".
:Pawl
JMJIA1817ZZ
Page 183 of 5121
![NISSAN TEANA 2008 Service Manual AV
FRONT DOOR SPEAKER
AV-39
< ON-VEHICLE REPAIR >[AUDIO SYSTEM]
C
D
E
F
G
H
I
J
K
L
MB A
O
P
FRONT DOOR SPEAKER
Exploded ViewINFOID:0000000003765615
Removal and InstallationINFOID:0000000003765616
REM](/img/5/57391/w960_57391-182.png "NISSAN TEANA 2008 Service Manual AV
FRONT DOOR SPEAKER
AV-39
< ON-VEHICLE REPAIR >[AUDIO SYSTEM]
C
D
E
F
G
H
I
J
K
L
MB A
O
P
FRONT DOOR SPEAKER
Exploded ViewINFOID:0000000003765615
Removal and InstallationINFOID:0000000003765616
REM")
AV
FRONT DOOR SPEAKER
AV-39
< ON-VEHICLE REPAIR >[AUDIO SYSTEM]
C
D
E
F
G
H
I
J
K
L
MB A
O
P
FRONT DOOR SPEAKER
Exploded ViewINFOID:0000000003765615
Removal and InstallationINFOID:0000000003765616
REMOVAL
1. Remove front door finisher. Refer to INT-30, "DRIVER SIDE : Removal and Installation" (driver side) or
INT-33, "
PASSENGER SIDE : Removal and Installation" (passenger side).
2. Remove front door speaker screws, then disconnect front door speaker connector and remove front door
speaker.
INSTALLATION
Install in the reverse order of removal.
JPNIA1030ZZ
1. Front door speaker
Page 316 of 5121
![NISSAN TEANA 2008 Service Manual AV-172
< ON-VEHICLE REPAIR >[BASE AUDIO AND DISPLAY SYSTEM]
FRONT DOOR SPEAKER
FRONT DOOR SPEAKER
Exploded ViewINFOID:0000000003940158
Removal and InstallationINFOID:0000000003940159
REMOVAL
1. Remove](/img/5/57391/w960_57391-315.png "NISSAN TEANA 2008 Service Manual AV-172
< ON-VEHICLE REPAIR >[BASE AUDIO AND DISPLAY SYSTEM]
FRONT DOOR SPEAKER
FRONT DOOR SPEAKER
Exploded ViewINFOID:0000000003940158
Removal and InstallationINFOID:0000000003940159
REMOVAL
1. Remove")
AV-172
< ON-VEHICLE REPAIR >[BASE AUDIO AND DISPLAY SYSTEM]
FRONT DOOR SPEAKER
FRONT DOOR SPEAKER
Exploded ViewINFOID:0000000003940158
Removal and InstallationINFOID:0000000003940159
REMOVAL
1. Remove front door finisher. Refer to INT-30, "DRIVER SIDE : Removal and Installation" (driver side) or
INT-33, "
PASSENGER SIDE : Removal and Installation" (passenger side).
2. Remove front door speaker mounting bolts, disconnect the front door speaker connector.
3. Remove front door speaker.
INSTALLATION
Installation is the reverse order of removal.
JPNIA1036ZZ
1. Front door speaker
Page 524 of 5121
![NISSAN TEANA 2008 Service Manual AV-380
< ON-VEHICLE REPAIR >[BOSE AUDIO WITHOUT NAVIGATION]
FRONT DOOR SPEAKER
FRONT DOOR SPEAKER
Exploded ViewINFOID:0000000003838331
Removal and InstallationINFOID:0000000003838332
REMOVAL
1. Remove](/img/5/57391/w960_57391-523.png "NISSAN TEANA 2008 Service Manual AV-380
< ON-VEHICLE REPAIR >[BOSE AUDIO WITHOUT NAVIGATION]
FRONT DOOR SPEAKER
FRONT DOOR SPEAKER
Exploded ViewINFOID:0000000003838331
Removal and InstallationINFOID:0000000003838332
REMOVAL
1. Remove")
AV-380
< ON-VEHICLE REPAIR >[BOSE AUDIO WITHOUT NAVIGATION]
FRONT DOOR SPEAKER
FRONT DOOR SPEAKER
Exploded ViewINFOID:0000000003838331
Removal and InstallationINFOID:0000000003838332
REMOVAL
1. Remove front door finisher. Refer to INT-30, "DRIVER SIDE : Removal and Installation" (driver side) or
INT-33, "
PASSENGER SIDE : Removal and Installation" (passenger side).
2. Remove front door speaker mounting bolts, disconnect the front door speaker connector.
3. Remove front door speaker.
INSTALLATION
Installation is the reverse order of removal.
JPNIA1036ZZ
1. Front door speaker
Page 795 of 5121
![NISSAN TEANA 2008 Service Manual AV
FRONT DOOR SPEAKER
AV-651
< ON-VEHICLE REPAIR >[BOSE AUDIO WITH NAVIGATION]
C
D
E
F
G
H
I
J
K
L
MB A
O
P
FRONT DOOR SPEAKER
Exploded ViewINFOID:0000000003765987
Removal and InstallationINFOID:00000](/img/5/57391/w960_57391-794.png "NISSAN TEANA 2008 Service Manual AV
FRONT DOOR SPEAKER
AV-651
< ON-VEHICLE REPAIR >[BOSE AUDIO WITH NAVIGATION]
C
D
E
F
G
H
I
J
K
L
MB A
O
P
FRONT DOOR SPEAKER
Exploded ViewINFOID:0000000003765987
Removal and InstallationINFOID:00000")
AV
FRONT DOOR SPEAKER
AV-651
< ON-VEHICLE REPAIR >[BOSE AUDIO WITH NAVIGATION]
C
D
E
F
G
H
I
J
K
L
MB A
O
P
FRONT DOOR SPEAKER
Exploded ViewINFOID:0000000003765987
Removal and InstallationINFOID:0000000003765988
REMOVAL
1. Remove front door finisher. Refer to INT-30, "DRIVER SIDE : Removal and Installation" (driver side) or
INT-33, "
PASSENGER SIDE : Removal and Installation" (passenger side).
2. Remove front door speaker mounting bolts, disconnect the front door speaker connector.
3. Remove front door speaker.
INSTALLATION
Installation is the reverse order of removal.
JPNIA1036ZZ
1. Front door speaker
Page 1421 of 5121
![NISSAN TEANA 2008 Service Manual FRONT DOOR
DLK-205
< ON-VEHICLE REPAIR >[WITH INTELLIGENT KEY SYSTEM]
C
D
E
F
G
H
I
J
L
MA
B
DLK
N
O
P
3. Remove front door hinge mounting bolts, and then remove front door hinge.
INSTALLATION
Install](/img/5/57391/w960_57391-1420.png "NISSAN TEANA 2008 Service Manual FRONT DOOR
DLK-205
< ON-VEHICLE REPAIR >[WITH INTELLIGENT KEY SYSTEM]
C
D
E
F
G
H
I
J
L
MA
B
DLK
N
O
P
3. Remove front door hinge mounting bolts, and then remove front door hinge.
INSTALLATION
Install")
FRONT DOOR
DLK-205
< ON-VEHICLE REPAIR >[WITH INTELLIGENT KEY SYSTEM]
C
D
E
F
G
H
I
J
L
MA
B
DLK
N
O
P
3. Remove front door hinge mounting bolts, and then remove front door hinge.
INSTALLATION
Install in the reverse order of removal.
CAUTION:
Check front door open/close, lock/unlock operation after installation.
Check door hinge rotating part for poor lubrication. If necessary, apply body grease.
After installation, perform the fitting adjustment. Refer to DLK-203, "
DOOR ASSEMBLY : Adjust-
ment".
After installation, apply touch-up paint (the body color) onto the head of door hinge mounting nuts
and bolts.
DOOR CHECK LINK
DOOR CHECK LINK : Exploded ViewINFOID:0000000003819408
DOOR CHECK LINK : Removal and InstallationINFOID:0000000003813402
REMOVAL
1. Remove front door finisher. Refer to INT-30, "DRIVER SIDE : Removal and Installation" (driver side) or
INT-33, "
PASSENGER SIDE : Removal and Installation" (passenger side).
2. Fully close the front door window.
3. Remove front door speaker.
4. Remove mounting bolts of door check link on the vehicle.
5. Remove mounting bolts of door check link on door panel.
6. Take door check link out from the hole of door panel.
INSTALLATION
1. Front door panel 2. Grommet 3. Door striker
4. TORX bolt 5. Bumper rubber 6. Door check link
7. Door hinge (lower) 8. Door hinge (upper)
Refer to GI-4, "
Components" for symbols in the figure.
JMKIA2384ZZ
Page 1438 of 5121
![NISSAN TEANA 2008 Service Manual DLK-222
< ON-VEHICLE REPAIR >[WITH INTELLIGENT KEY SYSTEM]
FRONT DOOR LOCK
FRONT DOOR LOCK
DOOR LOCK
DOOR LOCK : Exploded ViewINFOID:0000000003813426
DOOR LOCK : Removal and InstallationINFOID:0000000](/img/5/57391/w960_57391-1437.png "NISSAN TEANA 2008 Service Manual DLK-222
< ON-VEHICLE REPAIR >[WITH INTELLIGENT KEY SYSTEM]
FRONT DOOR LOCK
FRONT DOOR LOCK
DOOR LOCK
DOOR LOCK : Exploded ViewINFOID:0000000003813426
DOOR LOCK : Removal and InstallationINFOID:0000000")
DLK-222
< ON-VEHICLE REPAIR >[WITH INTELLIGENT KEY SYSTEM]
FRONT DOOR LOCK
FRONT DOOR LOCK
DOOR LOCK
DOOR LOCK : Exploded ViewINFOID:0000000003813426
DOOR LOCK : Removal and InstallationINFOID:0000000003813427
REMOVAL
1. Remove front door finisher. Refer to INT-30, "DRIVER SIDE : Removal and Installation" (driver side) or
INT-33, "
PASSENGER SIDE : Removal and Installation" (passenger side).
2. Remove front door glass. Refer to GW-17, "
Removal and Installation".
3. Remove front door module assembly. Refer to GW-20, "
Removal and Installation".
4. Remove outside handle and outside handle bracket. Refer to DLK-224, "
OUTSIDE HANDLE : Removal
and Installation".
5. Remove door lock assembly TORX bolts.
6. Disconnect door lock actuator connector, and then remove door lock assembly.
7. Remove key rod from door lock assembly.
INSTALLATION
Install in the reverse order of removal.
1. Outside handle 2. Door key cylinder assembly (driver
side)
Outside handle escutcheon (passen-
ger side)3. Rear gasket
4. TORX bolt 5. Key rod (driver side) 6. Door lock assembly
7. Inside handle escutcheon 8. Inside handle 9. Seal
10. Outside handle bracket 11. Front gasket
: Vehicle front
Refer to GI-4, "
Components" for symbols in the figure.
JMKIA2386GB
Page 1439 of 5121
![NISSAN TEANA 2008 Service Manual FRONT DOOR LOCK
DLK-223
< ON-VEHICLE REPAIR >[WITH INTELLIGENT KEY SYSTEM]
C
D
E
F
G
H
I
J
L
MA
B
DLK
N
O
P
CAUTION:
When installing each rod, rotate rod holder until a click is felt.
Check door o](/img/5/57391/w960_57391-1438.png "NISSAN TEANA 2008 Service Manual FRONT DOOR LOCK
DLK-223
< ON-VEHICLE REPAIR >[WITH INTELLIGENT KEY SYSTEM]
C
D
E
F
G
H
I
J
L
MA
B
DLK
N
O
P
CAUTION:
When installing each rod, rotate rod holder until a click is felt.
Check door o")
FRONT DOOR LOCK
DLK-223
< ON-VEHICLE REPAIR >[WITH INTELLIGENT KEY SYSTEM]
C
D
E
F
G
H
I
J
L
MA
B
DLK
N
O
P
CAUTION:
When installing each rod, rotate rod holder until a click is felt.
Check door open/close, lock/unlock operation after installation.
INSIDE HANDLE
INSIDE HANDLE : Exploded ViewINFOID:0000000003817716
INSIDE HANDLE : Removal and InstallationINFOID:0000000003813429
REMOVAL
1. Remove front door finisher. Refer to INT-30, "DRIVER SIDE : Removal and Installation" (driver side) or
INT-33, "
PASSENGER SIDE : Removal and Installation" (passenger side).
2. Disconnect inside handle cable.
3. Remove inside handle mounting screws, and then remove the inside handle.
INSTALLATION
Install in the reverse order of removal.
CAUTION:
Check door open/close, lock/unlock operation after installation.
OUTSIDE HANDLE
1. Outside handle 2. Door key cylinder assembly (driver
side)
Outside handle escutcheon (passen-
ger side)3. Rear gasket
4. TORX bolt 5. Key rod (driver side) 6. Door lock assembly
7. Inside handle escutcheon 8. Inside handle 9. Seal
10. Outside handle bracket 11. Front gasket
: Vehicle front
Refer to GI-4, "
Components" for symbols in the figure.
JMKIA2386GB
Page 1440 of 5121
![NISSAN TEANA 2008 Service Manual DLK-224
< ON-VEHICLE REPAIR >[WITH INTELLIGENT KEY SYSTEM]
FRONT DOOR LOCK
OUTSIDE HANDLE : Exploded View
INFOID:0000000003817718
OUTSIDE HANDLE : Removal and InstallationINFOID:0000000003813431
REMOV](/img/5/57391/w960_57391-1439.png "NISSAN TEANA 2008 Service Manual DLK-224
< ON-VEHICLE REPAIR >[WITH INTELLIGENT KEY SYSTEM]
FRONT DOOR LOCK
OUTSIDE HANDLE : Exploded View
INFOID:0000000003817718
OUTSIDE HANDLE : Removal and InstallationINFOID:0000000003813431
REMOV")
DLK-224
< ON-VEHICLE REPAIR >[WITH INTELLIGENT KEY SYSTEM]
FRONT DOOR LOCK
OUTSIDE HANDLE : Exploded View
INFOID:0000000003817718
OUTSIDE HANDLE : Removal and InstallationINFOID:0000000003813431
REMOVAL
1. Remove front door finisher. Refer to INT-30, "DRIVER SIDE : Removal and Installation" (driver side) or
INT-33, "
PASSENGER SIDE : Removal and Installation" (passenger side).
2. Remove front door glass. Refer to GW-17, "
Removal and Installation".
3. Remove front door module assembly. Refer to GW-20, "
Removal and Installation".
4. Disconnect door antenna and door request switch connector and remove harness clamp (models with
Intelligent Key system) on outside handle bracket.
1. Outside handle 2. Door key cylinder assembly (driver
side)
Outside handle escutcheon (passen-
ger side)3. Rear gasket
4. TORX bolt 5. Key rod (driver side) 6. Door lock assembly
7. Inside handle escutcheon 8. Inside handle 9. Seal
10. Outside handle bracket 11. Front gasket
: Vehicle front
Refer to GI-4, "
Components" for symbols in the figure.
JMKIA2386GB
Page 2422 of 5121
DOOR OUTSIDE MOLDING
EXT-33
< ON-VEHICLE REPAIR >
C
D
E
F
G
H
I
J
L
MA
B
EXT
N
O
P
DOOR OUTSIDE MOLDING
Exploded ViewINFOID:0000000003819549
Removal and InstallationINFOID:0000000003819550
REMOVAL
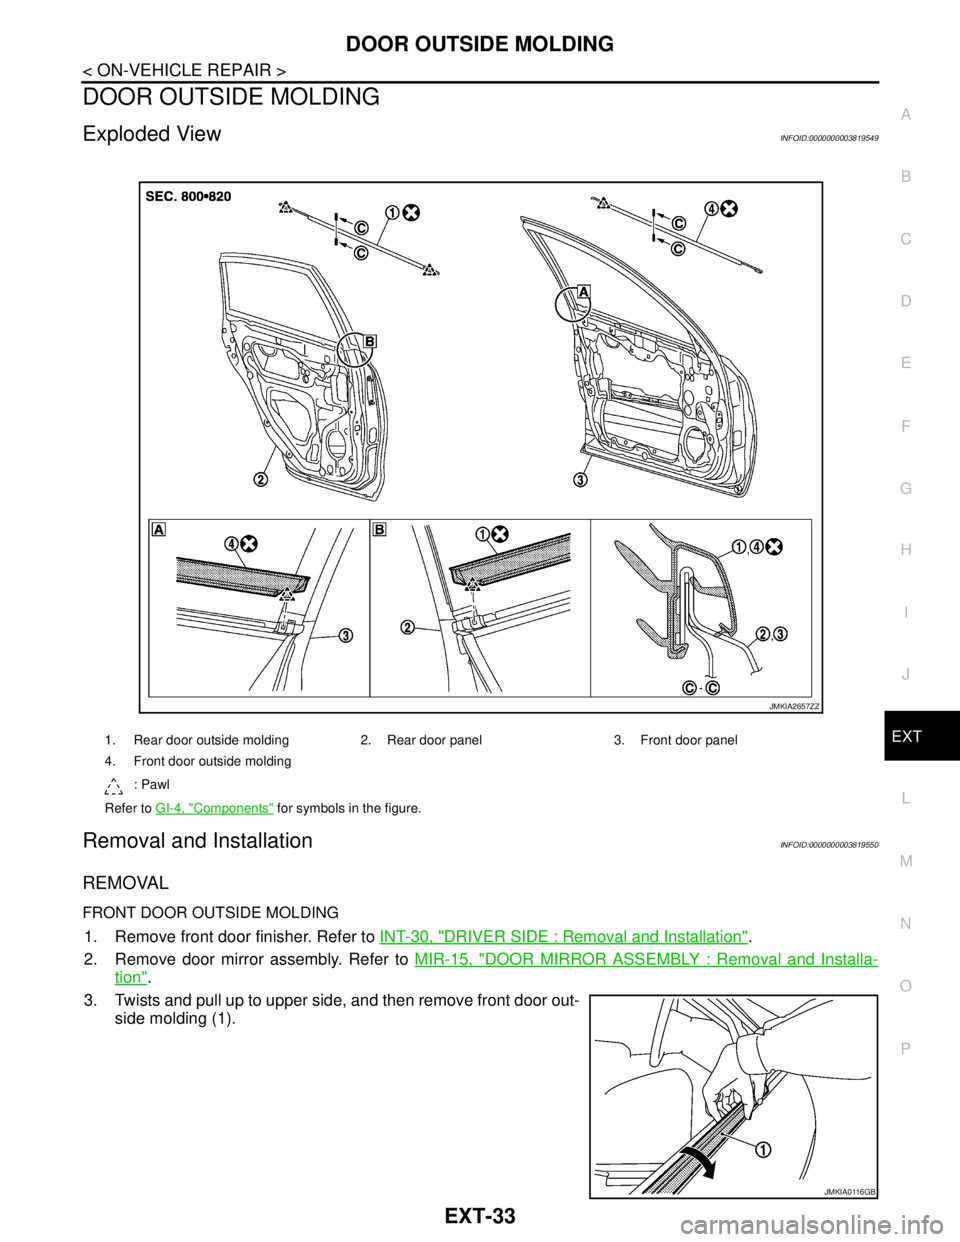
FRONT DOOR OUTSIDE MOLDING
1. Remove front door finisher. Refer to INT-30, "DRIVER SIDE : Removal and Installation".
2. Remove door mirror assembly. Refer to MIR-15, "
DOOR MIRROR ASSEMBLY : Removal and Installa-
tion".
3. Twists and pull up to upper side, and then remove front door out-
side molding (1).
1. Rear door outside molding 2. Rear door panel 3. Front door panel
4. Front door outside molding
: Pawl
Refer to GI-4, "
Components" for symbols in the figure.
JMKIA2657ZZ
JMKIA0116GB