wiring diagram NISSAN TEANA 2014 Service Manual
[x] Cancel search | Manufacturer: NISSAN, Model Year: 2014, Model line: TEANA, Model: NISSAN TEANA 2014Pages: 4801, PDF Size: 51.2 MB
Page 753 of 4801
DEF-28
< DTC/CIRCUIT DIAGNOSIS >
REAR WINDOW DEFOGGER POWER SUPPLY AND GROUND CIRCUIT
REAR WINDOW DEFOGGER POWER SUPPLY AND GROUND CIRCUIT
DescriptionINFOID:0000000009463041
Heats the heating wire with the power supply from the rear window defogger relay to prevent the rear window
from fogging up.
Component Function CheckINFOID:0000000009463042
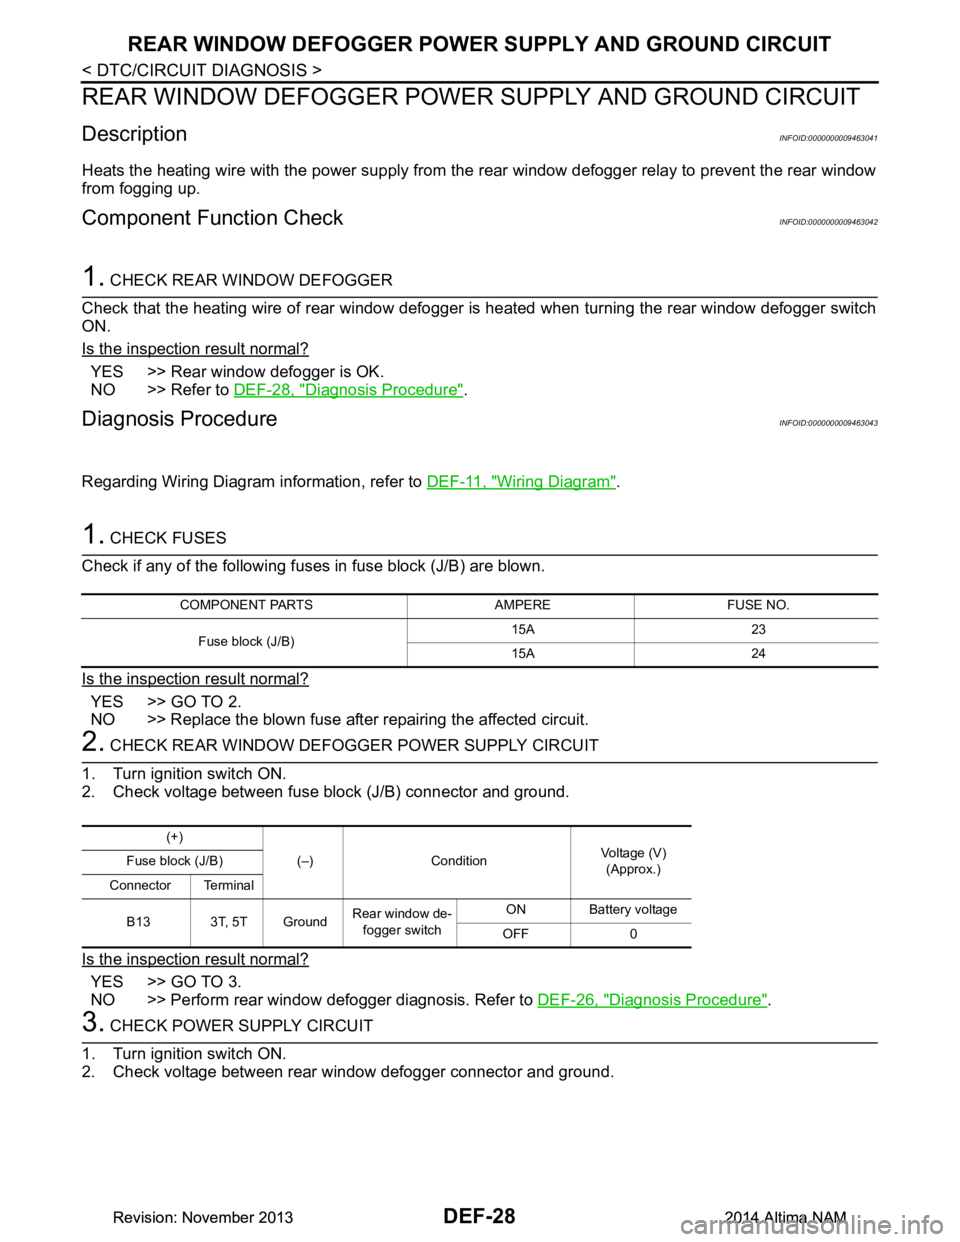
1. CHECK REAR WINDOW DEFOGGER
Check that the heating wire of rear window defogger is heated when turning the rear window defogger switch
ON.
Is the inspection result normal?
YES >> Rear window defogger is OK.
NO >> Refer to DEF-28, "Diagnosis Procedure"
.
Diagnosis ProcedureINFOID:0000000009463043
Regarding Wiring Diagram information, refer to DEF-11, "Wiring Diagram".
1. CHECK FUSES
Check if any of the following fuses in fuse block (J/B) are blown.
Is the inspection result normal?
YES >> GO TO 2.
NO >> Replace the blown fuse after repairing the affected circuit.
2. CHECK REAR WINDOW DEFOGGER POWER SUPPLY CIRCUIT
1. Turn ignition switch ON.
2. Check voltage between fuse block (J/B) connector and ground.
Is the inspection result normal?
YES >> GO TO 3.
NO >> Perform rear window defogger diagnosis. Refer to DEF-26, "Diagnosis Procedure"
.
3. CHECK POWER SUPPLY CIRCUIT
1. Turn ignition switch ON.
2. Check voltage between rear window defogger connector and ground.
COMPONENT PARTS AMPERE FUSE NO.
Fuse block (J/B) 15A 23
15A 24
(+) (–) Condition Voltage (V)
(Approx.)
Fuse block (J/B)
Connector Terminal
B13 3T, 5T Ground Rear window de-
fogger switch ON Battery voltage
OFF 0
Revision: November 20132014 Altima NAMRevision: November 20132014 Altima NAM
Page 755 of 4801
DEF-30
< DTC/CIRCUIT DIAGNOSIS >
DRIVER SIDE DOOR MIRROR DEFOGGER
DRIVER SIDE DOOR MIRROR DEFOGGER
DescriptionINFOID:0000000009463045
Heats the heating wire with the power supply from the rear window defogger relay to prevent the door mirror
from fogging up.
Component Function CheckINFOID:0000000009463046
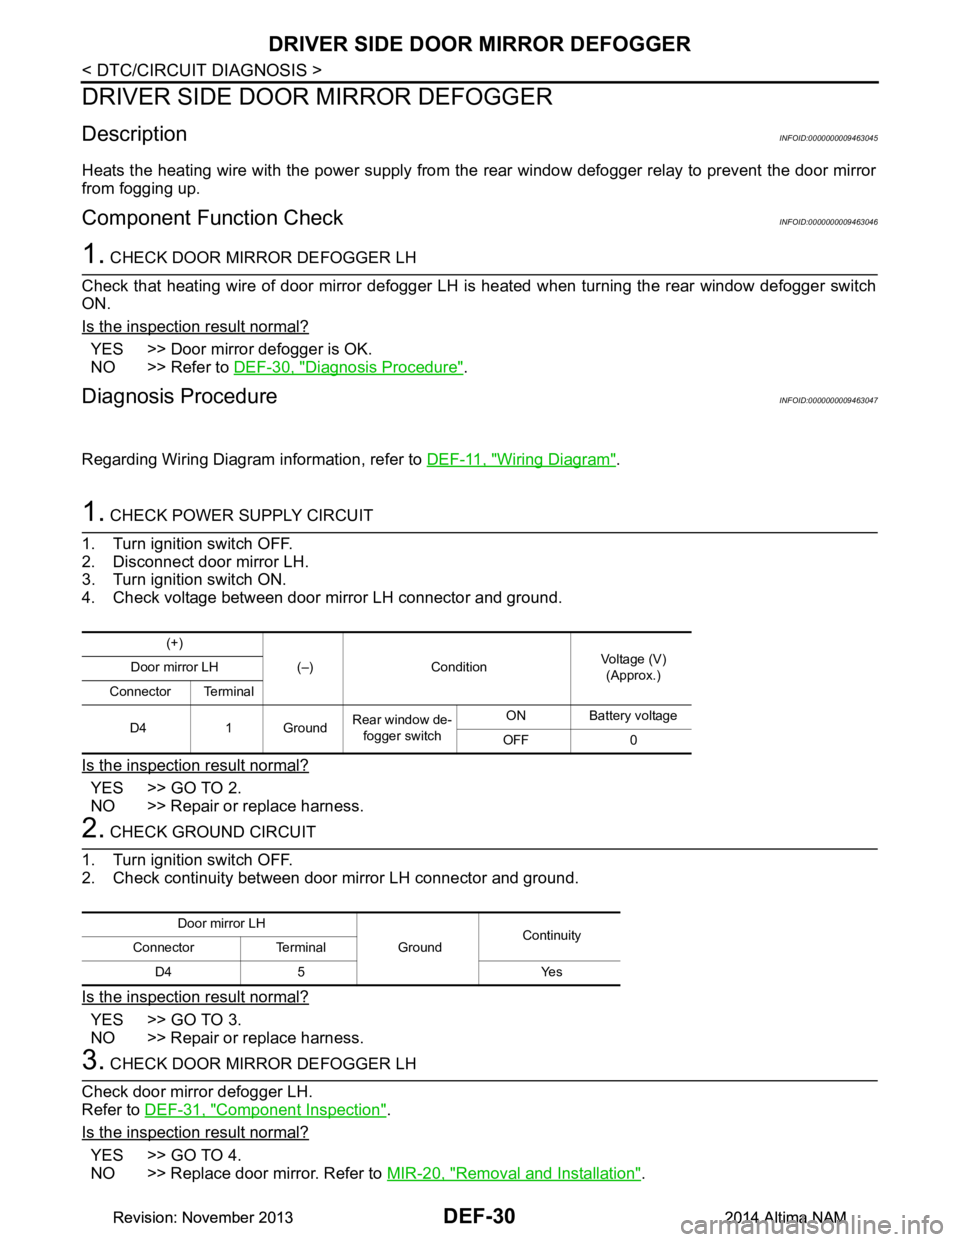
1. CHECK DOOR MIRROR DEFOGGER LH
Check that heating wire of door mirror defogger LH is heated when turning the rear window defogger switch
ON.
Is the inspection result normal?
YES >> Door mirror defogger is OK.
NO >> Refer to DEF-30, "Diagnosis Procedure"
.
Diagnosis ProcedureINFOID:0000000009463047
Regarding Wiring Diagram information, refer to DEF-11, "Wiring Diagram".
1. CHECK POWER SUPPLY CIRCUIT
1. Turn ignition switch OFF.
2. Disconnect door mirror LH.
3. Turn ignition switch ON.
4. Check voltage between door mirror LH connector and ground.
Is the inspection result normal?
YES >> GO TO 2.
NO >> Repair or replace harness.
2. CHECK GROUND CIRCUIT
1. Turn ignition switch OFF.
2. Check continuity between door mirror LH connector and ground.
Is the inspection result normal?
YES >> GO TO 3.
NO >> Repair or replace harness.
3. CHECK DOOR MIRROR DEFOGGER LH
Check door mirror defogger LH.
Refer to DEF-31, "Component Inspection"
.
Is the inspection result normal?
YES >> GO TO 4.
NO >> Replace door mirror. Refer to MIR-20, "Removal and Installation"
.
(+)
(–) Condition Voltage (V)
(Approx.)
Door mirror LH
Connector Terminal
D4 1 Ground Rear window de-
fogger switch ON Battery voltage
OFF 0
Door mirror LH GroundContinuity
Connector Terminal
D4 5 Yes
Revision: November 20132014 Altima NAMRevision: November 20132014 Altima NAM
Page 757 of 4801
DEF-32
< DTC/CIRCUIT DIAGNOSIS >
PASSENGER SIDE DOOR MIRROR DEFOGGER
PASSENGER SIDE DOOR MIRROR DEFOGGER
DescriptionINFOID:0000000009463049
Heats the heating wire with the power supply from the rear window defogger relay to prevent the door mirror
from fogging up.
Component Function CheckINFOID:0000000009463050
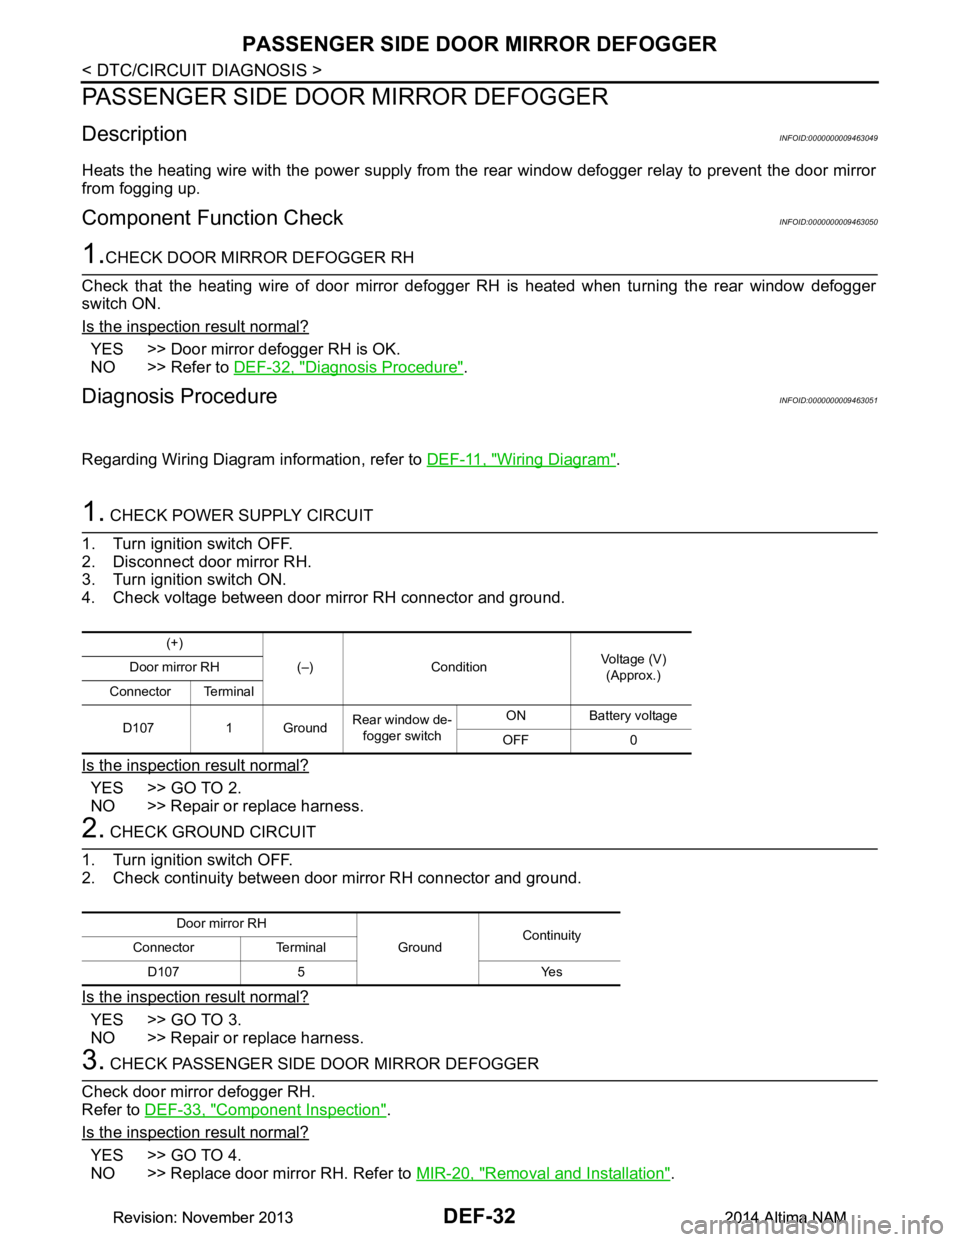
1.CHECK DOOR MIRROR DEFOGGER RH
Check that the heating wire of door mirror defogger RH is heated when turning the rear window defogger
switch ON.
Is the inspection result normal?
YES >> Door mirror defogger RH is OK.
NO >> Refer to DEF-32, "Diagnosis Procedure"
.
Diagnosis ProcedureINFOID:0000000009463051
Regarding Wiring Diagram information, refer to DEF-11, "Wiring Diagram".
1. CHECK POWER SUPPLY CIRCUIT
1. Turn ignition switch OFF.
2. Disconnect door mirror RH.
3. Turn ignition switch ON.
4. Check voltage between door mirror RH connector and ground.
Is the inspection result normal?
YES >> GO TO 2.
NO >> Repair or replace harness.
2. CHECK GROUND CIRCUIT
1. Turn ignition switch OFF.
2. Check continuity between door mirror RH connector and ground.
Is the inspection result normal?
YES >> GO TO 3.
NO >> Repair or replace harness.
3. CHECK PASSENGER SIDE DOOR MIRROR DEFOGGER
Check door mirror defogger RH.
Refer to DEF-33, "Component Inspection"
.
Is the inspection result normal?
YES >> GO TO 4.
NO >> Replace door mirror RH. Refer to MIR-20, "Removal and Installation"
.
(+)
(–) Condition Voltage (V)
(Approx.)
Door mirror RH
Connector Terminal
D107 1 Ground Rear window de-
fogger switch ON Battery voltage
OFF 0
Door mirror RH GroundContinuity
Connector Terminal
D107 5 Yes
Revision: November 20132014 Altima NAMRevision: November 20132014 Altima NAM
Page 760 of 4801
REAR WINDOW DEFOGGER AND DOOR MIRROR DEFOGGER DO NOT OPER-
ATE.
DEF-35
< SYMPTOM DIAGNOSIS >
C
D E
F
G H
I
J
K
M A
B
DEF
N
O P
REAR WINDOW DEFOGGER AND DO OR MIRROR DEFOGGER DO NOT
OPERATE.
Diagnosis ProcedureINFOID:0000000009463054
Regarding Wiring Diagram information, refer to DEF-11, "Wiring Diagram".
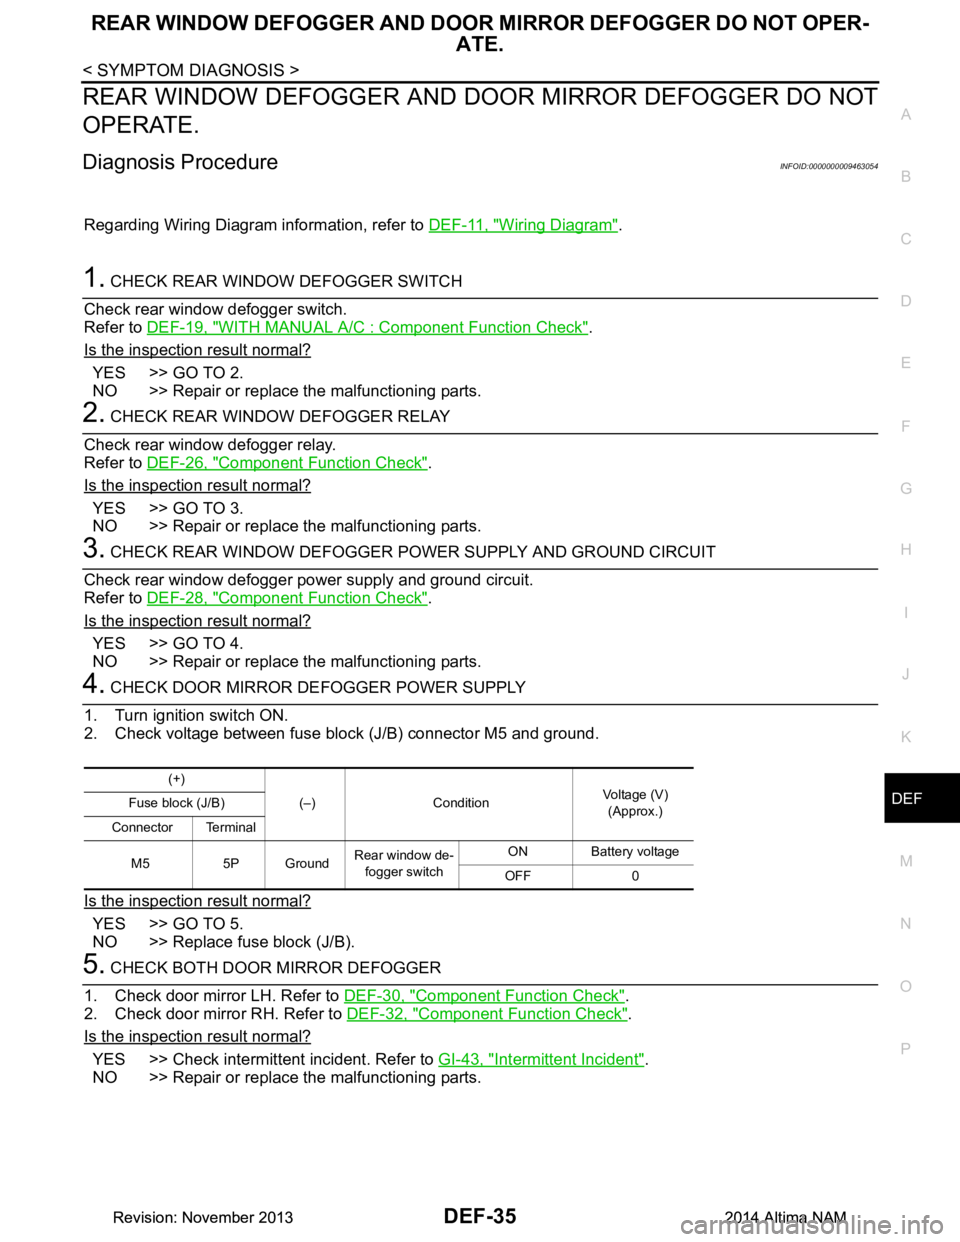
1. CHECK REAR WINDOW DEFOGGER SWITCH
Check rear window defogger switch.
Refer to DEF-19, "WITH MANUAL A/C : Component Function Check"
.
Is the inspection result normal?
YES >> GO TO 2.
NO >> Repair or replace the malfunctioning parts.
2. CHECK REAR WINDOW DEFOGGER RELAY
Check rear window defogger relay.
Refer to DEF-26, "Component Function Check"
.
Is the inspection result normal?
YES >> GO TO 3.
NO >> Repair or replace the malfunctioning parts.
3. CHECK REAR WINDOW DEFOGGER POWER SUPPLY AND GROUND CIRCUIT
Check rear window defogger power supply and ground circuit.
Refer to DEF-28, "Component Function Check"
.
Is the inspection result normal?
YES >> GO TO 4.
NO >> Repair or replace the malfunctioning parts.
4. CHECK DOOR MIRROR DEFOGGER POWER SUPPLY
1. Turn ignition switch ON.
2. Check voltage between fuse block (J/B) connector M5 and ground.
Is the inspection result normal?
YES >> GO TO 5.
NO >> Replace fuse block (J/B).
5. CHECK BOTH DOOR MIRROR DEFOGGER
1. Check door mirror LH. Refer to DEF-30, "Component Function Check"
.
2. Check door mirror RH. Refer to DEF-32, "Component Function Check"
.
Is the inspection result normal?
YES >> Check intermittent incident. Refer to GI-43, "Intermittent Incident".
NO >> Repair or replace the malfunctioning parts.
(+)
(–) Condition Voltage (V)
(Approx.)
Fuse block (J/B)
Connector Terminal
M5 5P Ground Rear window de-
fogger switch ON Battery voltage
OFF 0
Revision: November 20132014 Altima NAMRevision: November 20132014 Altima NAM
Page 762 of 4801
BOTH DOORS MIRROR DEFOGGER DON’T OPERATE BUT REAR WINDOW DEFOGGER OPERATES
DEF-37
< SYMPTOM DIAGNOSIS >
C
D E
F
G H
I
J
K
M A
B
DEF
N
O P
BOTH DOORS MIRROR DEFOGGER DON’T OPERATE BUT REAR WIN-
DOW DEFOGGER OPERATES
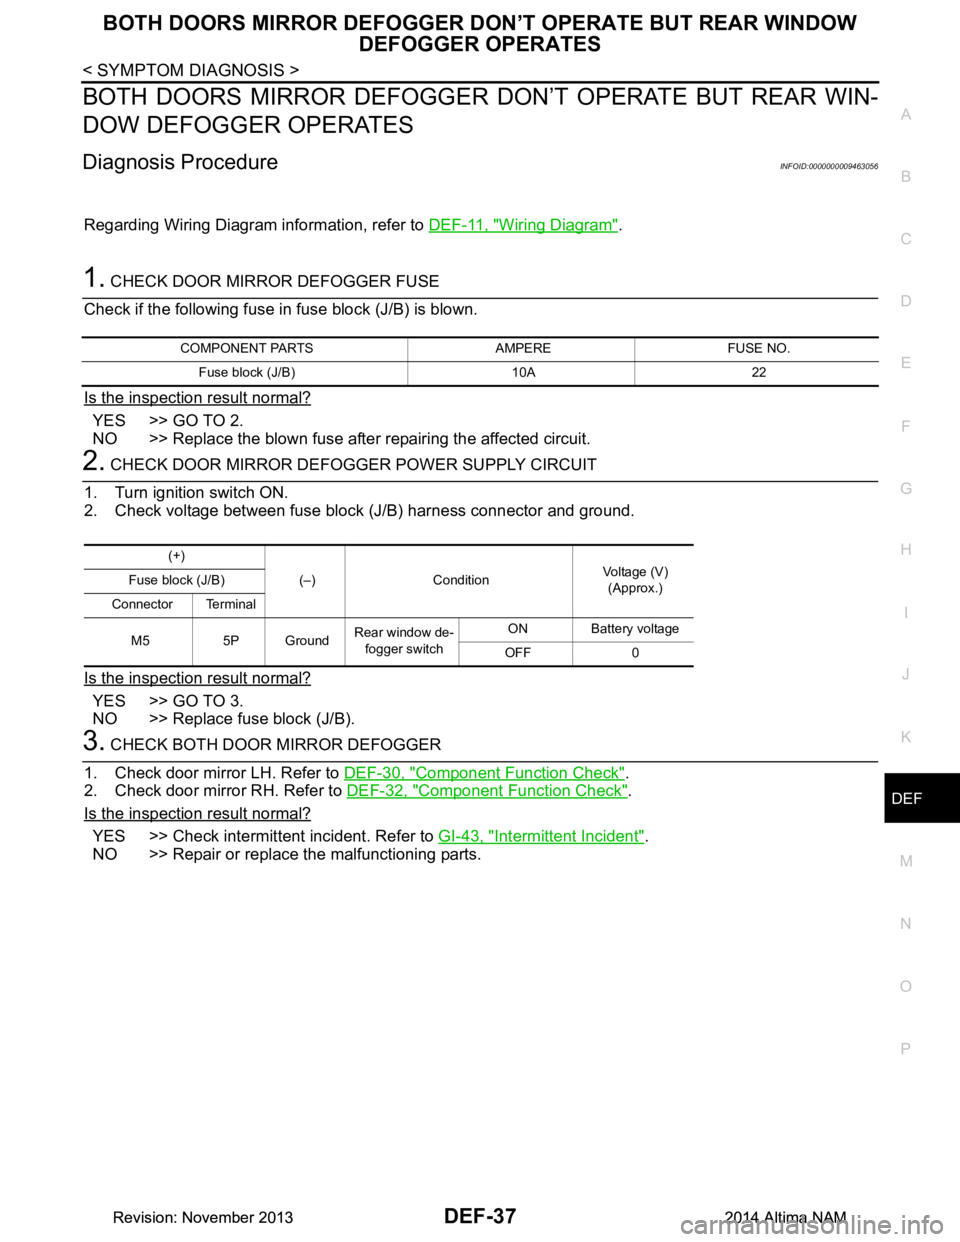
Diagnosis ProcedureINFOID:0000000009463056
Regarding Wiring Diagram information, refer to DEF-11, "Wiring Diagram".
1. CHECK DOOR MIRROR DEFOGGER FUSE
Check if the following fuse in fuse block (J/B) is blown.
Is the inspection result normal?
YES >> GO TO 2.
NO >> Replace the blown fuse after repairing the affected circuit.
2. CHECK DOOR MIRROR DEF OGGER POWER SUPPLY CIRCUIT
1. Turn ignition switch ON.
2. Check voltage between fuse block (J/B) harness connector and ground.
Is the inspection result normal?
YES >> GO TO 3.
NO >> Replace fuse block (J/B).
3. CHECK BOTH DOOR MIRROR DEFOGGER
1. Check door mirror LH. Refer to DEF-30, "Component Function Check"
.
2. Check door mirror RH. Refer to DEF-32, "Component Function Check"
.
Is the inspection result normal?
YES >> Check intermittent incident. Refer to GI-43, "Intermittent Incident".
NO >> Repair or replace the malfunctioning parts.
COMPONENT PARTS AMPERE FUSE NO.
Fuse block (J/B) 10A 22
(+) (–) Condition Voltage (V)
(Approx.)
Fuse block (J/B)
Connector Terminal
M5 5P Ground Rear window de-
fogger switch ON Battery voltage
OFF 0
Revision: November 20132014 Altima NAMRevision: November 20132014 Altima NAM
Page 770 of 4801

DLK-2
TRUNK LID OPENER SYSTEM ............................ ...36
TRUNK LID OPENER SYSTEM : System Dia-
gram .................................................................... ...
37
TRUNK LID OPENER SYSTEM : System De-
scription ............................................................... ...
37
SYSTEM (INTEGRATED HOMELINK
TRANSMITTER) ............................................. ...
40
System Description .............................................. ...40
SYSTEM (TRUNK LID OPENER SYSTEM) ......41
System Diagram .................................................. ...41
System Description .................................................41
DIAGNOSIS SYSTEM (BCM) ............................42
COMMON ITEM ..................................................... ...42
COMMON ITEM : CONSULT Function (BCM -
COMMON ITEM) ................................................. ...
42
DOOR LOCK .......................................................... ...43
DOOR LOCK : CONSULT Function (BCM -
DOOR LOCK) ...................................................... ...
43
INTELLIGENT KEY ................................................ ...44
INTELLIGENT KEY : CONSULT Function (BCM -
INTELLIGENT KEY) ........ .......................................
44
TRUNK ................................................................... ...47
TRUNK : CONSULT Function (BCM - TRUNK) .....47
ECU DIAGNOSIS INFORMATION ..............48
ECM, IPDM E/R, BCM .................................... ...48
List of ECU Reference ......................................... ...48
WIRING DIAGRAM .....................................49
HOMELINK UNIVERSAL TRANSCEIVER ..... ...49
Wiring Diagram .................................................... ...49
POWER DOOR LOCK SYSTEM .......................51
Wiring Diagram .................................................... ...51
INTELLIGENT KEY SYSTEM ............................61
Wiring Diagram .................................................... ...61
TRUNK LID OPENER ........................................77
Wiring Diagram .................................................... ...77
BASIC INSPECTION ...................................81
DIAGNOSIS AND REPAIR WORKFLOW ...... ...81
Work Flow ............................................................ ...81
INSPECTION AND ADJUSTMENT ...................84
ADDITIONAL SERVICE WHEN REPLACING
CONTROL UNIT ..................................................... ...
84
ADDITIONAL SERVICE WHEN REPLACING
CONTROL UNIT : Description ............................. ...
84
ADDITIONAL SERVICE WHEN REPLACING
CONTROL UNIT : Special Repair Requirement .....
84
DTC/CIRCUIT DIAGNOSIS ........................85
U1000 CAN COMM CIRCUIT ......................... ...85
Description ........................................................... ...85
DTC Logic ...............................................................85
Diagnosis Procedure ...............................................85
U1010 CONTROL UNIT (CAN) .........................86
DTC Logic ............................................................ ...86
Diagnosis Procedure ...............................................86
Special Repair Requirement ...................................86
B261B REMOTE ENGINE START ....................87
DTC Logic ............................................................ ...87
Diagnosis Procedure ...............................................87
B2621 INSIDE ANTENNA .............................. ...88
DTC Logic ............................................................ ...88
Diagnosis Procedure ...............................................88
B2622 INSIDE ANTENNA .............................. ...90
DTC Logic ............................................................ ...90
Diagnosis Procedure ...............................................90
B26FD SHIFT LOCK SOLENOID .....................92
DTC Logic ............................................................ ...92
Diagnosis Procedure ...............................................92
B26FE HOOD SWITCH .....................................95
DTC Logic ............................................................ ...95
Diagnosis Procedure ..............................................95
Component Inspection ............................................96
B26FF REMOTE KEYLESS ENTRY RECEIV-
ER ................................................................... ...
97
DTC Logic ............................................................ ...97
Diagnosis Procedure ...............................................97
POWER SUPPLY AND GROUND CIRCUIT .....99
Diagnosis Procedure ............................................ ...99
DOOR SWITCH ................................................100
Description ........................................................... .100
Component Function Check ................................100
Diagnosis Procedure .............................................100
Component Inspection ..........................................102
DOOR LOCK AND UNLOCK SWITCH ............103
DRIVER SIDE ......................................................... .103
DRIVER SIDE : Description ..................................103
DRIVER SIDE : Component Function Check ......103
DRIVER SIDE : Diagnosis Procedure (With LH
and RH Anti-Pinch) .............................................. .
103
DRIVER SIDE : Diagnosis Procedure (With LH
Anti-Pinch Only) ................................................... .
104
PASSENGER SIDE .................................................105
PASSENGER SIDE : Descripti on .........................105
PASSENGER SIDE :
Component Function Check ............................... .
106
Revision: November 20132014 Altima NAMRevision: November 20132014 Altima NAM
Page 817 of 4801
HOMELINK UNIVERSAL TRANSCEIVERDLK-49
< WIRING DIAGRAM >
C
D E
F
G H
I
J
L
M A
B
DLK
N
O P
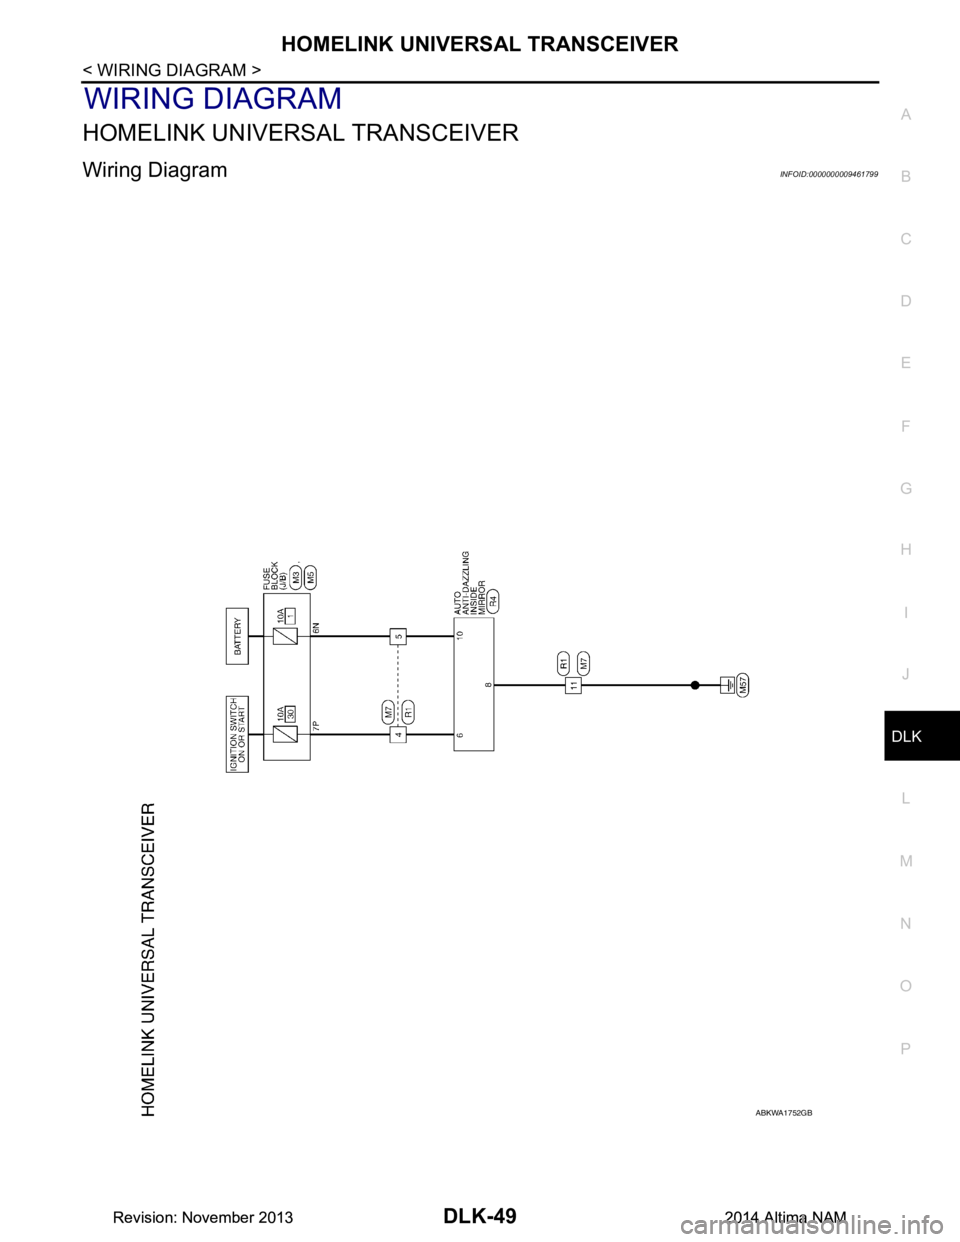
WIRING DIAGRAM
HOMELINK UNIVERSAL TRANSCEIVER
Wiring DiagramINFOID:0000000009461799
ABKWA1752GB
Revision: November 20132014 Altima NAMRevision: November 20132014 Altima NAM
Page 818 of 4801
DLK-50
< WIRING DIAGRAM >
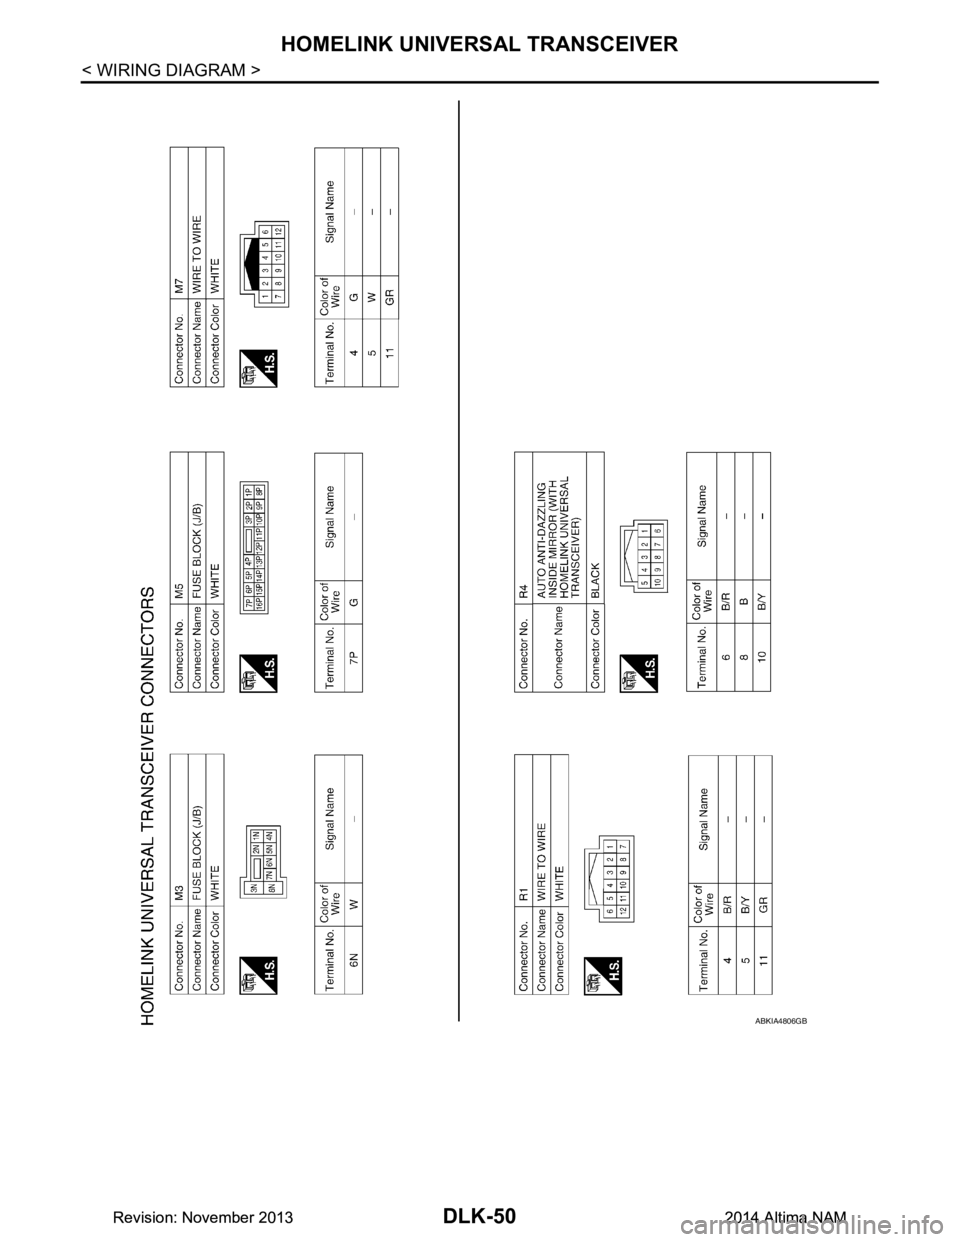
HOMELINK UNIVERSAL TRANSCEIVER
ABKIA4806GB
Revision: November 20132014 Altima NAMRevision: November 20132014 Altima NAM
Page 819 of 4801
POWER DOOR LOCK SYSTEMDLK-51
< WIRING DIAGRAM >
C
D E
F
G H
I
J
L
M A
B
DLK
N
O P
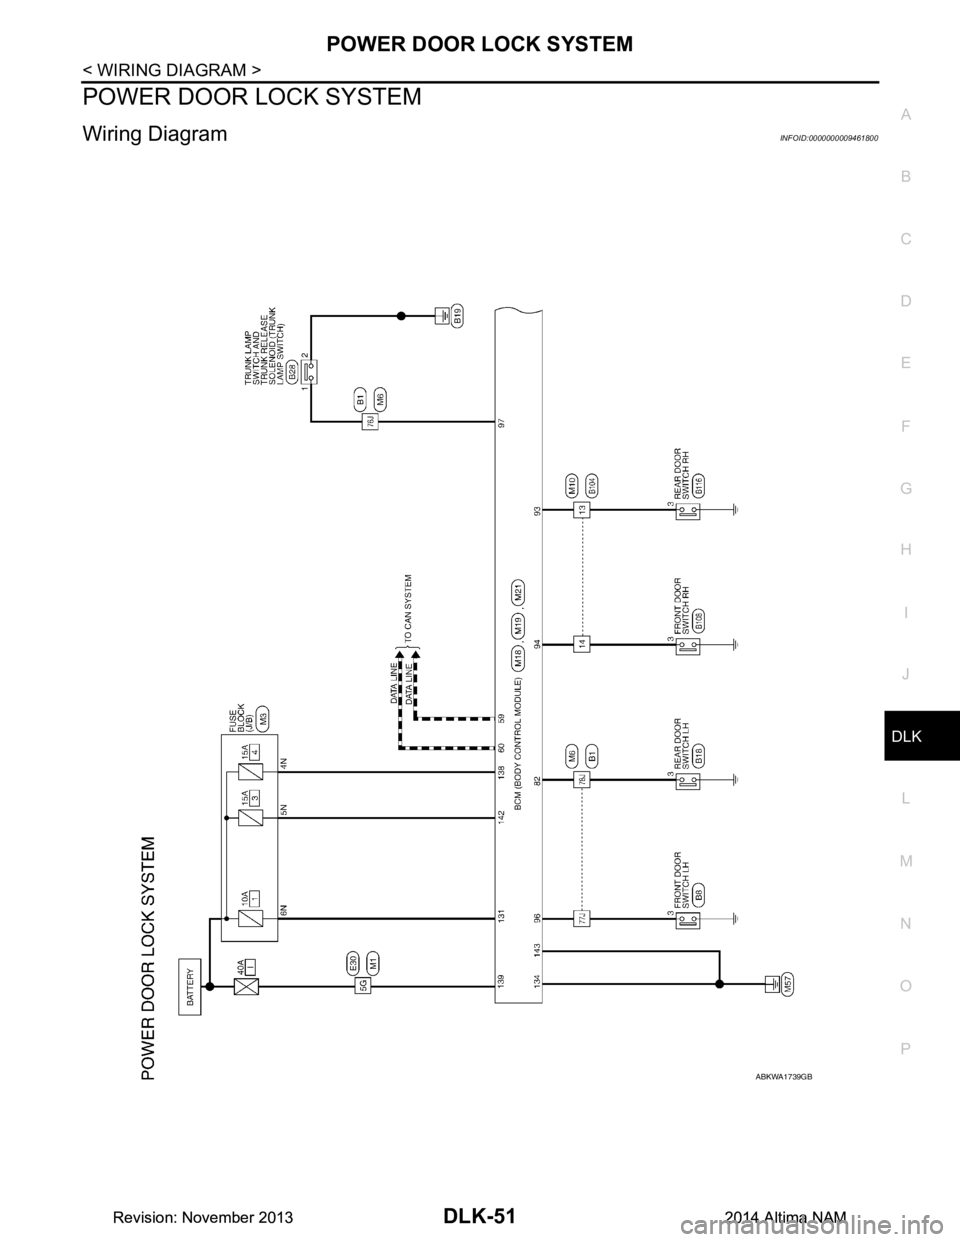
POWER DOOR LOCK SYSTEM
Wiring DiagramINFOID:0000000009461800
ABKWA1739GB
Revision: November 20132014 Altima NAMRevision: November 20132014 Altima NAM
Page 820 of 4801
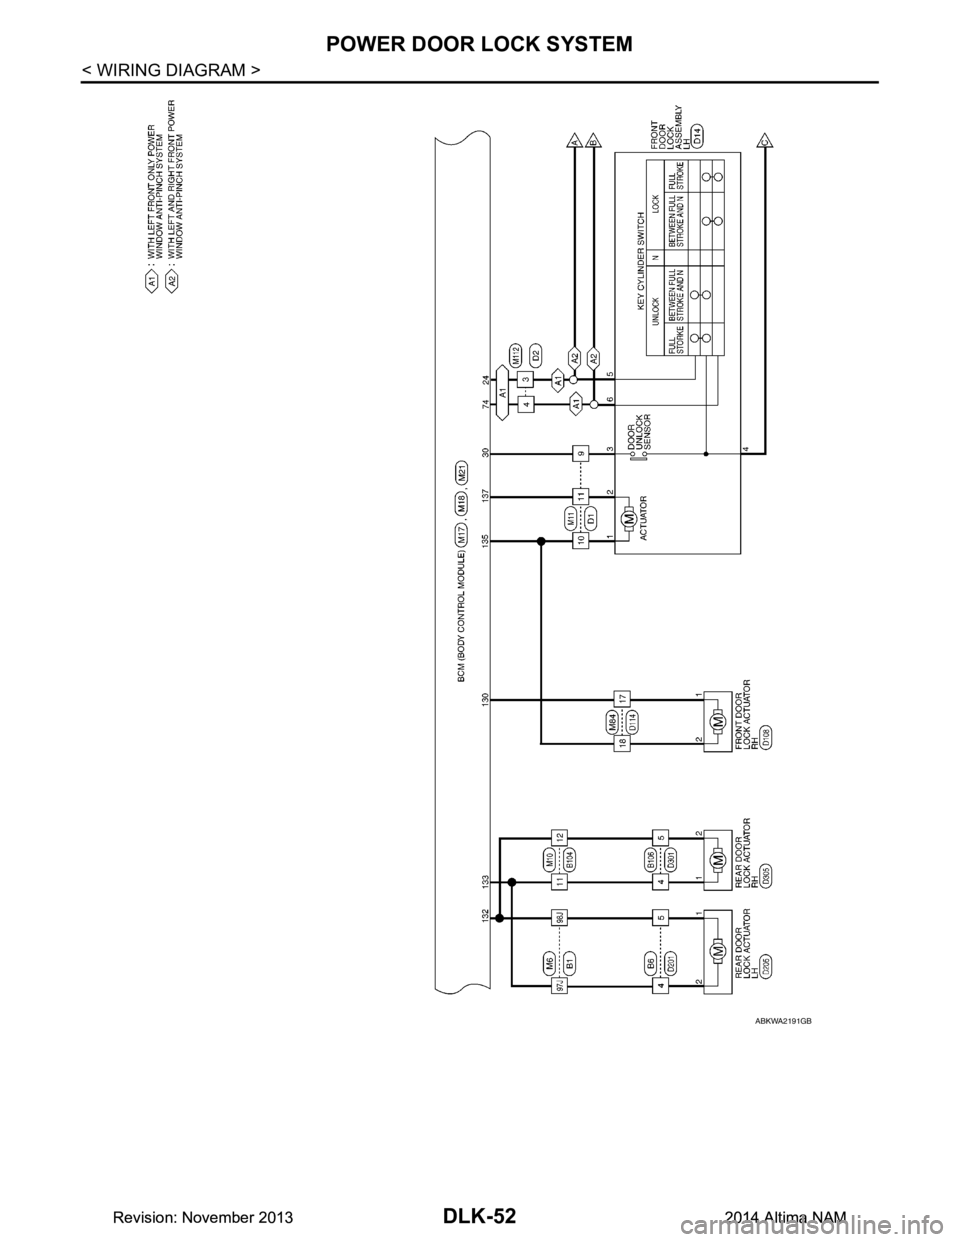
DLK-52
< WIRING DIAGRAM >
POWER DOOR LOCK SYSTEM
ABKWA2191GB
Revision: November 20132014 Altima NAMRevision: November 20132014 Altima NAM