tow bar NISSAN TEANA 2014 User Guide
[x] Cancel search | Manufacturer: NISSAN, Model Year: 2014, Model line: TEANA, Model: NISSAN TEANA 2014Pages: 4801, PDF Size: 51.2 MB
Page 2641 of 4801

COOLER PIPE AND HOSEHA-35
< REMOVAL AND INSTALLATION >
C
D E
F
G H
J
K L
M A
B
HA
N
O P
Installation is in the reverse order of removal.
CAUTION:
• Do not reuse O-rings.
• Apply A/C oil to the new O-rings.
• After charging refrigerant, check for leaks. Refer to HA-21, "Leak Test"
.
HIGH-PRESSURE FLEXIBLE HOSE
HIGH-PRESSURE FLEXIBLE HOSE : Removal and InstallationINFOID:0000000009463941
REMOVAL
1. Discharge the refrigerant. Refer to HA-23, "Recycle Refrigerant".
2. Remove the bolt (A) that retains the high-pressure flexible hose to the condenser pipe.
CAUTION:
Cap or wrap the joint of the ho se with suitable material such
as vinyl tape to avoid the entry of air.
3. Disconnect the high-pressure flex ible hose from the compressor.
4. Remove the high-pressure flexible hose.
INSTALLATION
Installation is in the reverse order of removal.
CAUTION:
• Do not reuse O-rings.
• Apply A/C oil to new O-rings.
• After charging refrigerant, check for leaks. Refer to HA-21, "Leak Test"
.
LOW-PRESSURE PIPE
LOW-PRESSURE PIPE : Re moval and InstallationINFOID:0000000009463942
REMOVAL
1. Discharge the refrigerant. Refer to HA-23, "Recycle Refrigerant".
2. Drain the power steering fluid. Refer to ST-30, "Draining and Refilling"
.
3. Remove the bolt (A) that retains the low-pressure pipe to the expansion valve.
CAUTION:
Cap or wrap the joint of the pi pe with suitable material such
as vinyl tape to avoid the entry of air.
4. Remove the strut tower bar (VQ35DE only). Refer to FSU-19, "Exploded View"
.
5. Remove the high pressure piping upper and low pressure piping upper from the power steering pump assembly. Refer to ST-40, "Exploded View"
.
ALIIA0630ZZ
ALIIA0629ZZ
Revision: November 20132014 Altima NAM
Page 2642 of 4801

HA-36
< REMOVAL AND INSTALLATION >
COOLER PIPE AND HOSE
6. Remove the bolt (A) that retains the low-pressure pipe to thelow-pressure flexible hose.
7. Remove the low-pressure pipe.
INSTALLATION
Installation is in the reverse order of removal.
CAUTION:
• Do not reuse O-rings.
• Apply A/C oil to new O-rings.
• After charging refrigerant, check for leaks. Refer to HA-21, "Leak Test"
.
HIGH-PRESSURE PIPE
HIGH-PRESSURE PIPE : Removal and InstallationINFOID:0000000009463943
REMOVAL
1. Discharge the refrigerant. Refer to HA-23, "Recycle Refrigerant".
2. Remove the power steering pump assembly. Refer to ST-38, "Removal and Installation"
.
3. Remove the strut tower bar. Refer to FSU-19, "Exploded View"
.
4. Remove the coolant overflow reservoir tube (A).
5. Remove the coolant overflow reservoir bolt (B).
6. Remove the coolant overflow reservoir (1).
ALIIA0627ZZ
ALIIA0621ZZ
Revision: November 20132014 Altima NAM
Page 4799 of 4801
WW-64
< REMOVAL AND INSTALLATION >
FRONT WIPER DRIVE ASSEMBLY
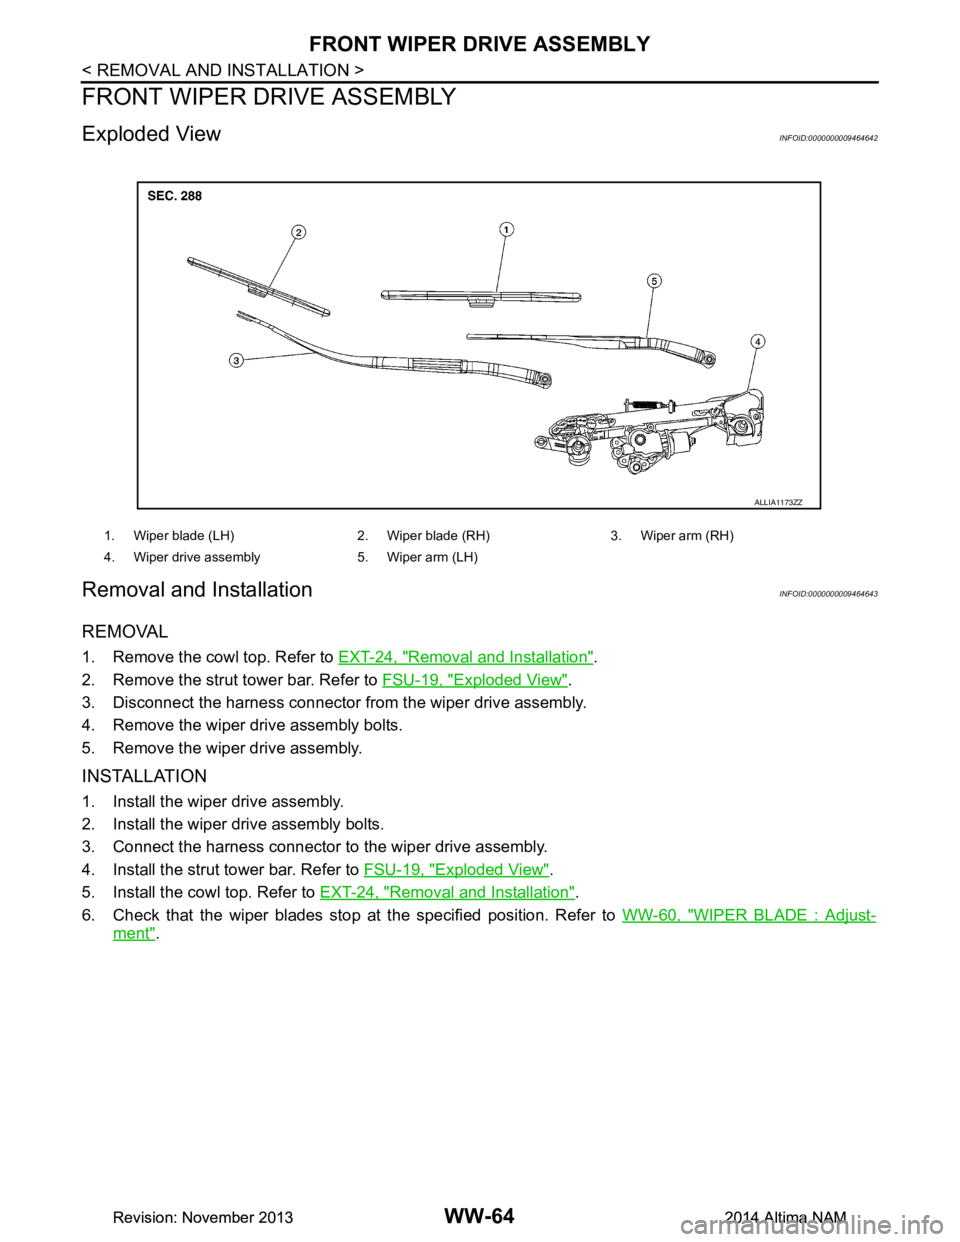
FRONT WIPER DRIVE ASSEMBLY
Exploded ViewINFOID:0000000009464642
Removal and InstallationINFOID:0000000009464643
REMOVAL
1. Remove the cowl top. Refer to EXT-24, "Removal and Installation".
2. Remove the strut tower bar. Refer to FSU-19, "Exploded View"
.
3. Disconnect the harness connector from the wiper drive assembly.
4. Remove the wiper drive assembly bolts.
5. Remove the wiper drive assembly.
INSTALLATION
1. Install the wiper drive assembly.
2. Install the wiper drive assembly bolts.
3. Connect the harness connector to the wiper drive assembly.
4. Install the strut tower bar. Refer to FSU-19, "Exploded View"
.
5. Install the cowl top. Refer to EXT-24, "Removal and Installation"
.
6. Check that the wiper blades stop at the specified position. Refer to WW-60, "WIPER BLADE : Adjust-
ment".
1. Wiper blade (LH) 2. Wiper blade (RH) 3. Wiper arm (RH)
4. Wiper drive assembly 5. Wiper arm (LH)
ALLIA1173ZZ
Revision: November 20132014 Altima NAMRevision: November 20132014 Altima NAM