Altima NISSAN TEANA 2014 Service Manual
[x] Cancel search | Manufacturer: NISSAN, Model Year: 2014, Model line: TEANA, Model: NISSAN TEANA 2014Pages: 4801, PDF Size: 51.2 MB
Page 283 of 4801
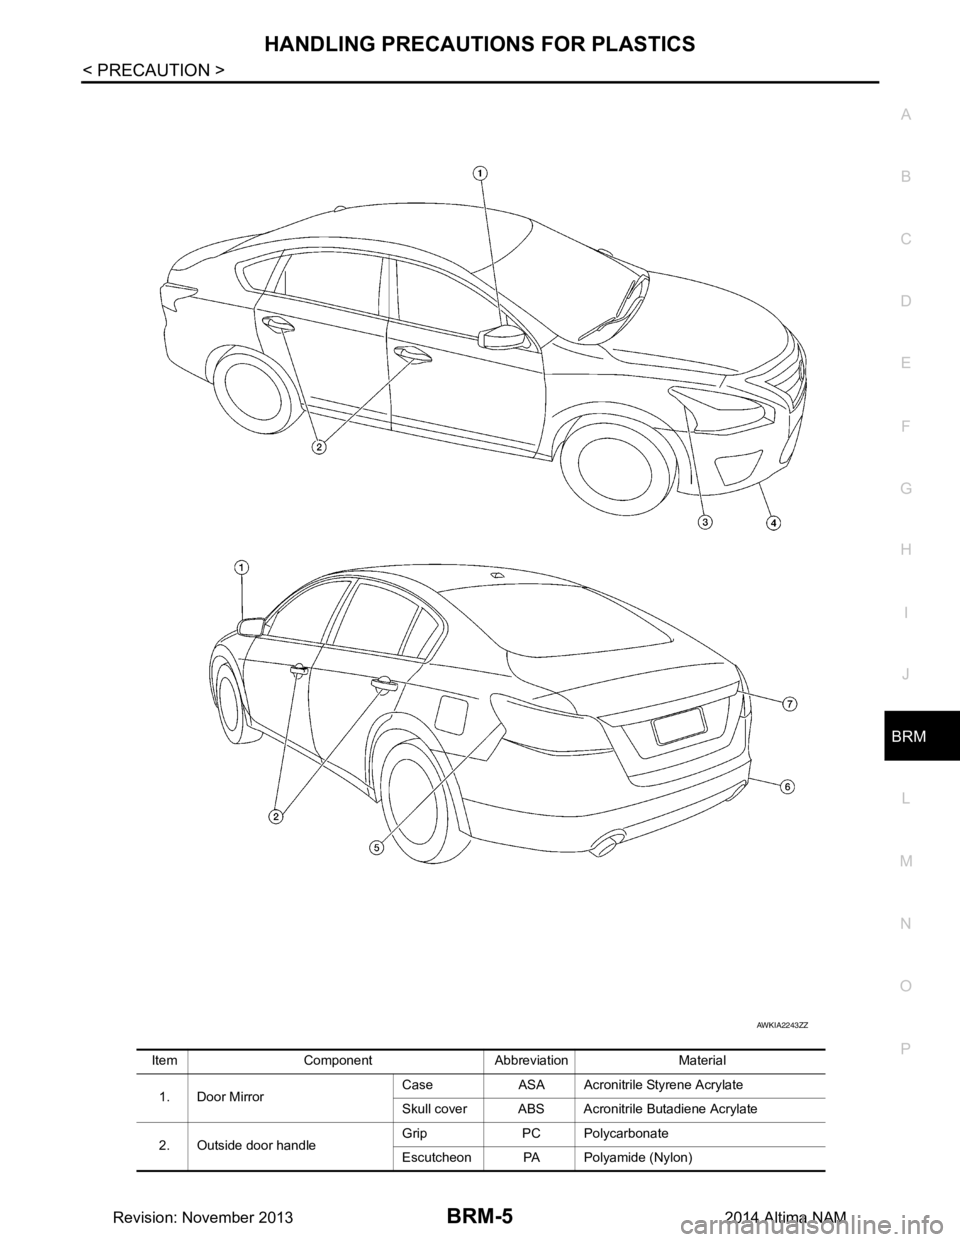
HANDLING PRECAUTIONS FOR PLASTICSBRM-5
< PRECAUTION >
C
D E
F
G H
I
J
L
M A
B
BRM
N
O P
Item Component Abbreviation Material 1. Door Mirror Case ASA Acronitrile Styrene Acrylate
Skull cover ABS Acronitr ile Butadiene Acrylate
2. Outside door handle Grip PC Polycarbonate
Escutcheon PA Polyamide (Nylon)
AWKIA2243ZZ
Revision: November 20132014 Altima NAM
Page 284 of 4801
BRM-6
< PRECAUTION >
HANDLING PRECAUTIONS FOR PLASTICS
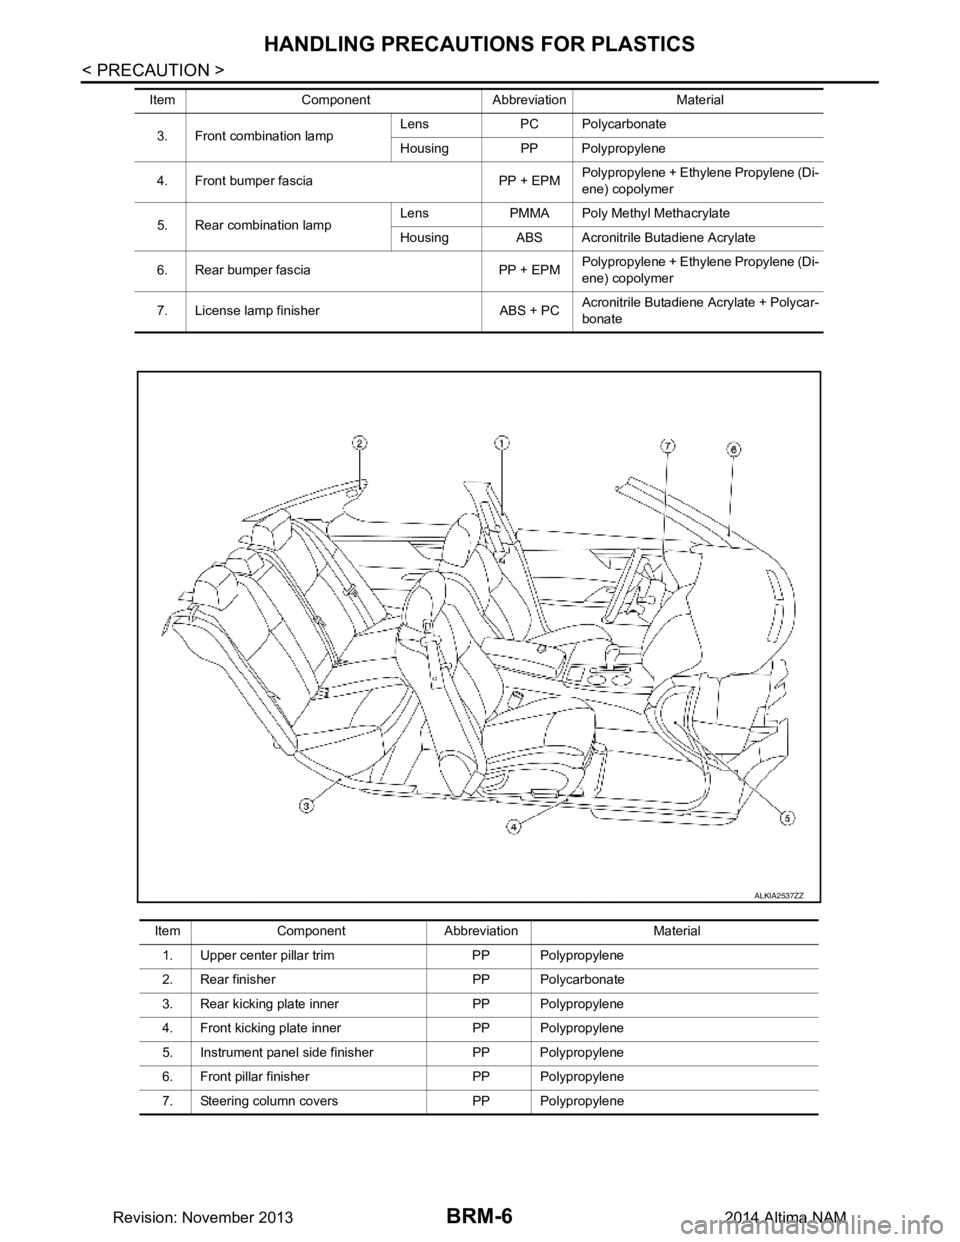
3. Front combination lampLens PC Polycarbonate
Housing PP Polypropylene
4. Front bumper fascia PP + EPM Polypropylene + Ethylene Propylene (Di-
ene) copolymer
5. Rear combination lamp Lens PMMA Poly Methyl Methacrylate
Housing ABS Acronitrile Butadiene Acrylate
6. Rear bumper fascia PP + EPM Polypropylene + Ethylene Propylene (Di-
ene) copolymer
7. License lamp finisher ABS + PC Acronitrile Butadiene Acrylate + Polycar-
bonate
Item Component Abbreviation Material
Item Component Abbreviation Material
1. Upper center pillar trim PP Polypropylene
2. Rear finisher PP Polycarbonate
3. Rear kicking plate inner PP Polypropylene
4. Front kicking plate inner PP Polypropylene
5. Instrument panel side finisher PP Polypropylene
6. Front pillar finisher PP Polypropylene
7. Steering column covers PP Polypropylene
ALKIA2537ZZ
Revision: November 20132014 Altima NAM
Page 285 of 4801
PRECAUTIONS IN REPAIRING HIGH STRENGTH STEELBRM-7
< PRECAUTION >
C
D E
F
G H
I
J
L
M A
B
BRM
N
O P
PRECAUTIONS IN REPAIRIN G HIGH STRENGTH STEEL
High Strength Steel (HSS)INFOID:0000000009464964
High strength steel is used for body panel s in order to reduce vehicle weight.
Accordingly, precautions in repairing automotive bodies made of high strength steel are described below:
SP130 is the most commonly used HSS.
Read the following precautions when repairing HSS.
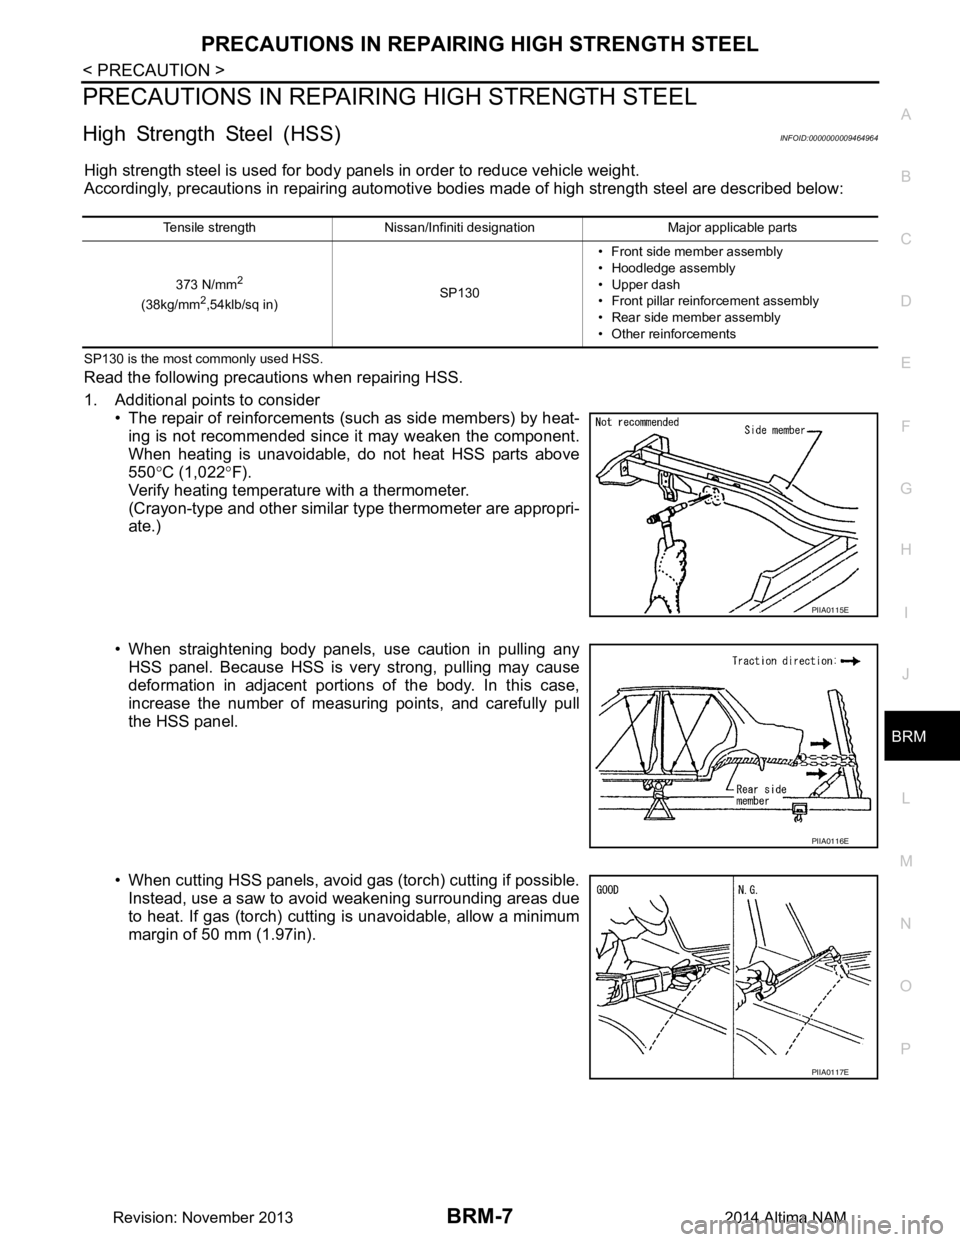
1. Additional points to consider • The repair of reinforcements (such as side members) by heat-
ing is not recommended since it may weaken the component.
When heating is unavoidable, do not heat HSS parts above
550 °C (1,022 °F).
Verify heating temperature with a thermometer.
(Crayon-type and other similar type thermometer are appropri-
ate.)
• When straightening body panels, use caution in pulling any HSS panel. Because HSS is very strong, pulling may cause
deformation in adjacent portions of the body. In this case,
increase the number of measuring points, and carefully pull
the HSS panel.
• When cutting HSS panels, avoid gas (torch) cutting if possible. Instead, use a saw to avoid weakening surrounding areas due
to heat. If gas (torch) cutting is unavoidable, allow a minimum
margin of 50 mm (1.97in).
Tensile strength Nissan/Infiniti designation Major applicable parts
373 N/mm
2
(38kg/mm2,54klb/sq in) SP130• Front side member assembly
• Hoodledge assembly
• Upper dash
• Front pillar reinforcement assembly
• Rear side member assembly
• Other reinforcements
PIIA0115E
PIIA0116E
PIIA0117E
Revision: November 20132014 Altima NAM
Page 286 of 4801
BRM-8
< PRECAUTION >
PRECAUTIONS IN REPAIRING HIGH STRENGTH STEEL
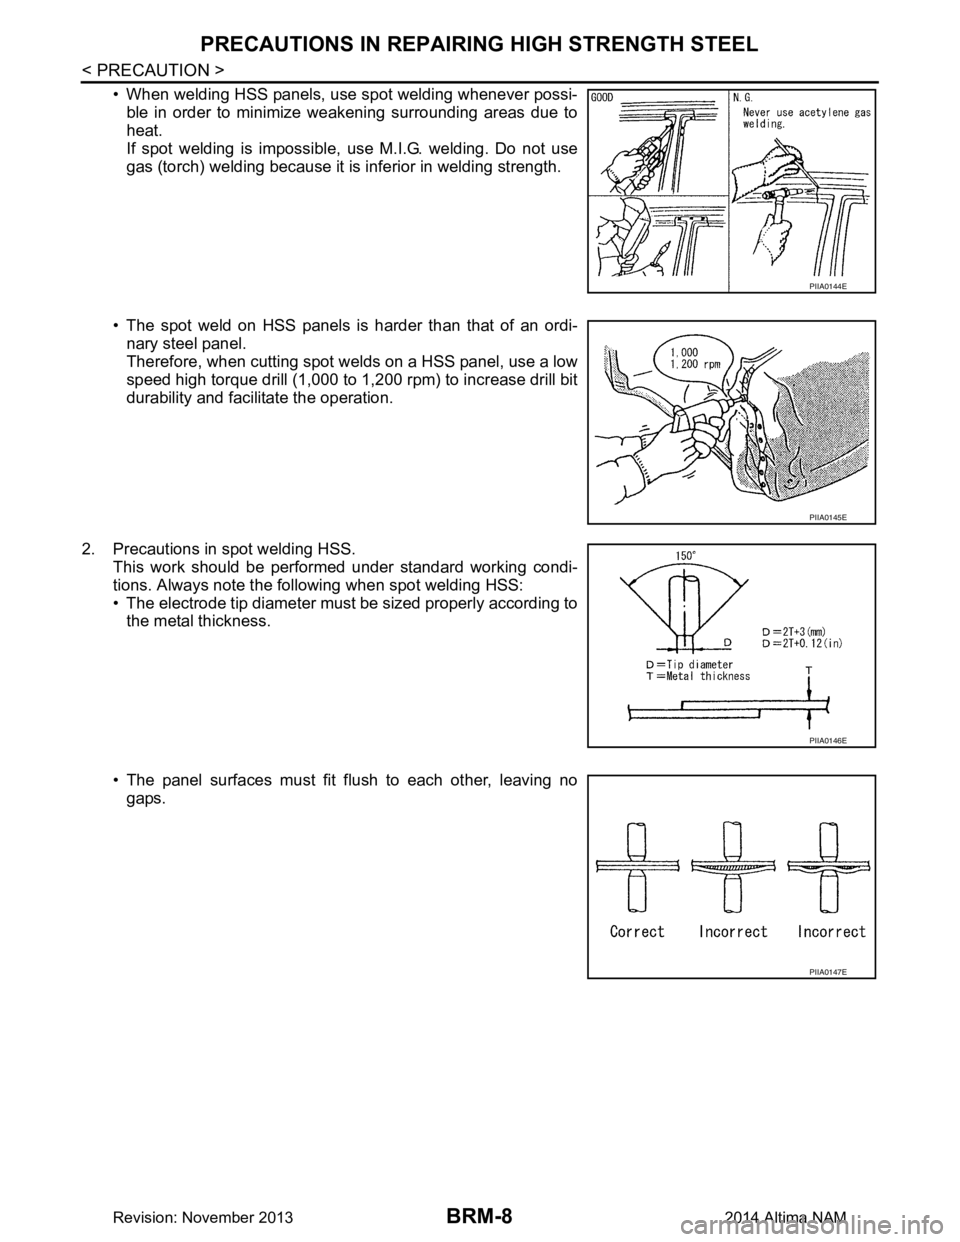
• When welding HSS panels, use spot welding whenever possi-ble in order to minimize weakening surrounding areas due to
heat.
If spot welding is impossible, use M.I.G. welding. Do not use
gas (torch) welding because it is inferior in welding strength.
• The spot weld on HSS panels is harder than that of an ordi- nary steel panel.
Therefore, when cutting spot welds on a HSS panel, use a low
speed high torque drill (1,000 to 1,200 rpm) to increase drill bit
durability and facilitate the operation.
2. Precautions in spot welding HSS. This work should be performed under standard working condi-
tions. Always note the following when spot welding HSS:
• The electrode tip diameter must be sized properly according to the metal thickness.
• The panel surfaces must fit flush to each other, leaving no gaps.
PIIA0144E
PIIA0145E
PIIA0146E
PIIA0147E
Revision: November 20132014 Altima NAM
Page 287 of 4801
PRECAUTIONS IN REPAIRING HIGH STRENGTH STEELBRM-9
< PRECAUTION >
C
D E
F
G H
I
J
L
M A
B
BRM
N
O P
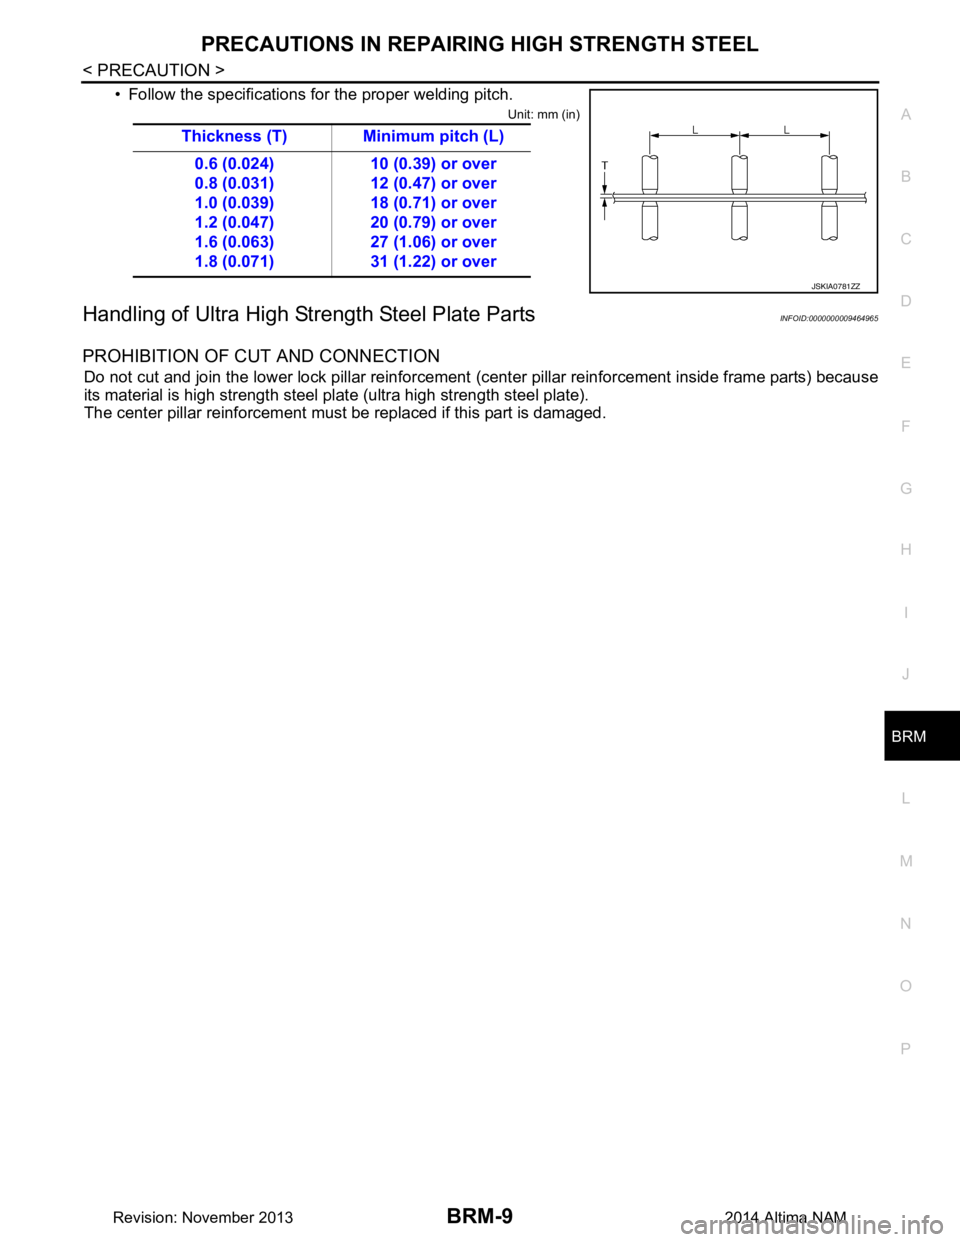
• Follow the specifications for the proper welding pitch.
Unit: mm (in)
Handling of Ultra High Str ength Steel Plate PartsINFOID:0000000009464965
PROHIBITION OF CUT AND CONNECTION
Do not cut and join the lower lock pillar reinforcement (center pillar reinforcement inside frame parts) because
its material is high strength steel pl ate (ultra high strength steel plate).
The center pillar reinforcement must be replaced if this part is damaged. Thickness (T) Minimum pitch (L)
0.6 (0.024)
0.8 (0.031)
1.0 (0.039)
1.2 (0.047)
1.6 (0.063)
1.8 (0.071) 10 (0.39) or over
12 (0.47) or over
18 (0.71) or over
20 (0.79) or over
27 (1.06) or over
31 (1.22) or over
JSKIA0781ZZ
Revision: November 20132014 Altima NAM
Page 288 of 4801
BRM-10
< PREPARATION >
REPAIRING MATERIAL
PREPARATION
REPAIRING MATERIAL
Foam RepairINFOID:0000000009464966
During factory assembly, foam insulators are installed in certain body panels and locations around the vehicle.
Use the following procedure(s) to replace any factory-installed foam insulators.
URETHANE FOAM APPLICATIONS
Use commercially available Urethane foam for sealant (foam material) repair of material used on vehicle.
Read instructions on product for fill procedures.
FILL PROCEDURES
Example of foaming agent filling operation procedure:
1. Fill procedures after installation of service part.
a. Eliminate foam material remaining on vehicle side.
b. Clean area after eliminating form insulator and foam material.
c. Install service part.
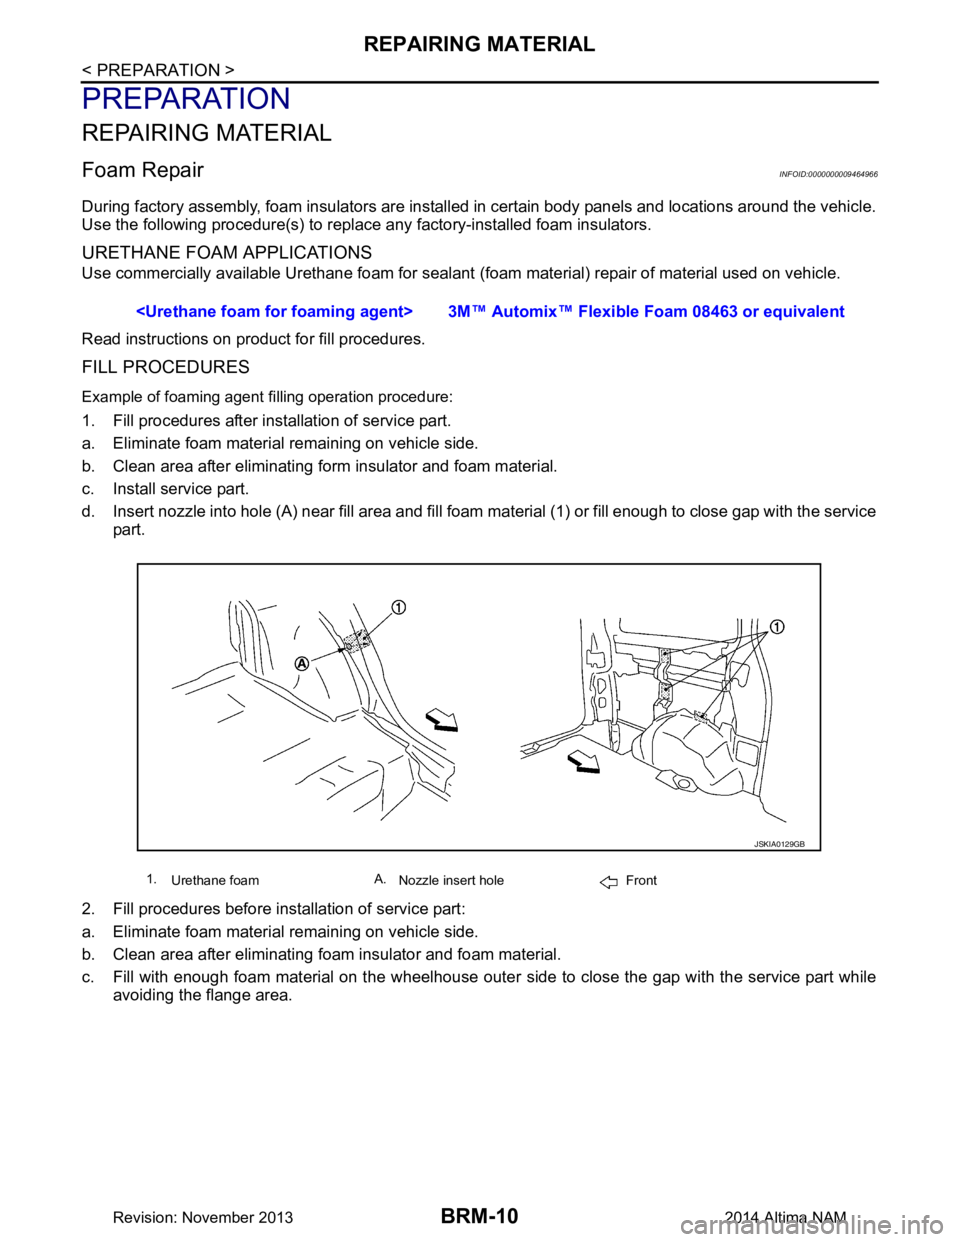
d. Insert nozzle into hole (A) near fill area and fill foam material (1) or fill enough to close gap with the service
part.
2. Fill procedures before installation of service part:
a. Eliminate foam material remaining on vehicle side.
b. Clean area after eliminating foam insulator and foam material.
c. Fill with enough foam material on the wheelhouse outer side to close the gap with the service part while
avoiding the flange area.
tomix™ Flexible Foam 08463 or equivalent
1.
Urethane foam A.
Nozzle insert hole Front
JSKIA0129GB
Revision: November 20132014 Altima NAM
Page 289 of 4801
REPAIRING MATERIALBRM-11
< PREPARATION >
C
D E
F
G H
I
J
L
M A
B
BRM
N
O P
d. Install service part. NOTE:
Refer to the label on the urethane foam container for information
on working times.
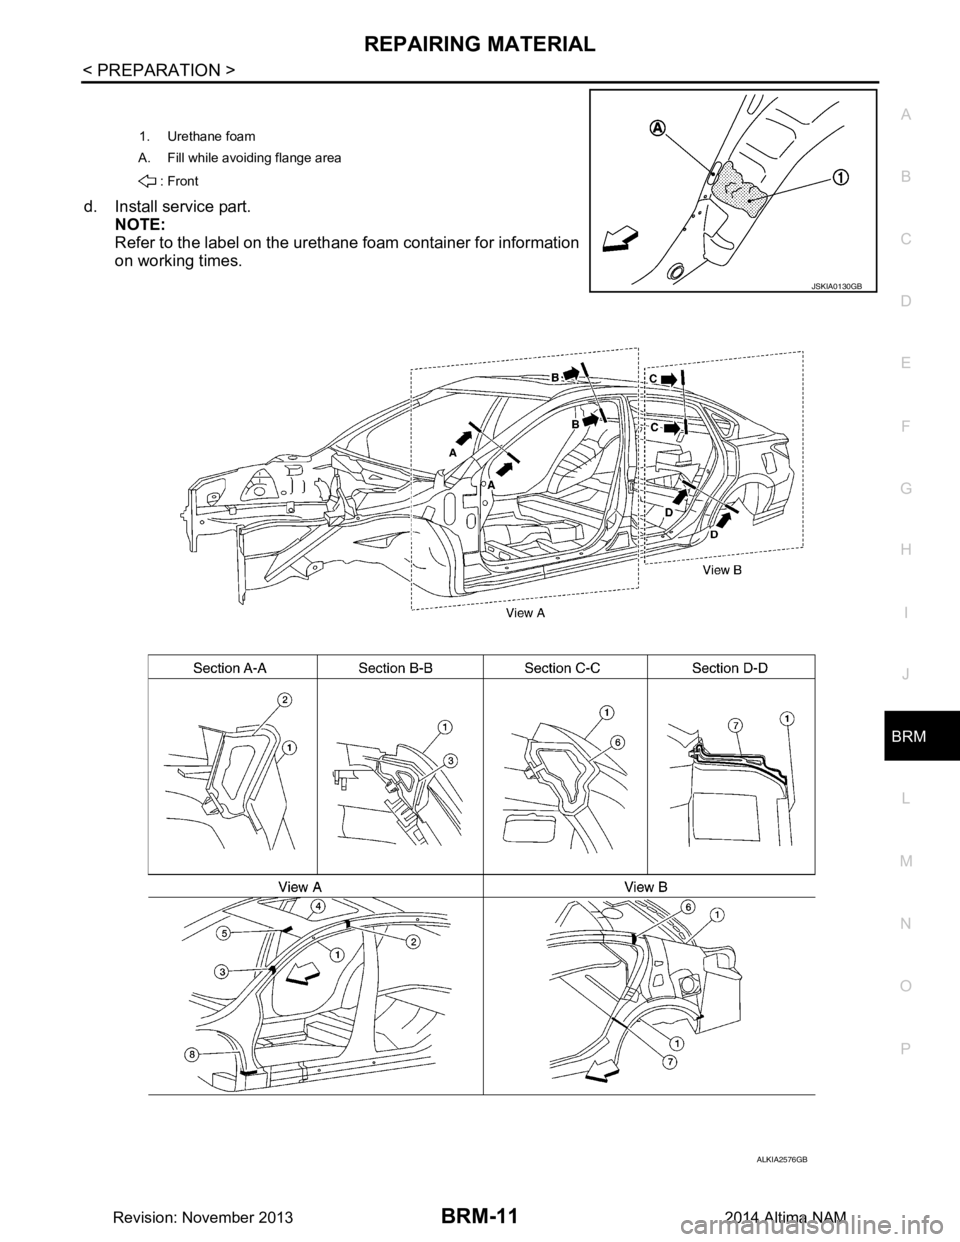
1. Urethane foam
A. Fill while avoiding flange area
: Front
JSKIA0130GB
ALKIA2576GB
Revision: November 20132014 Altima NAM
Page 290 of 4801

BRM-12
< PREPARATION >
REPAIRING MATERIAL
1. Body side outer 2. Body side insulation (foam) front pillar3. Body side insulation (foam) roof
side rail
4. Roof panel assembly 5. Body side insulation (foam) rear pillar6. Body side insulation (foam) rear
pillar lower
7. Body side insulation strip, front pillar lower re inforcement Front
Revision: November 20132014 Altima NAM
Page 291 of 4801
BODY COMPONENT PARTSBRM-13
< PREPARATION >
C
D E
F
G H
I
J
L
M A
B
BRM
N
O P
BODY COMPONENT PARTS
Underbody Component PartsINFOID:0000000009464967
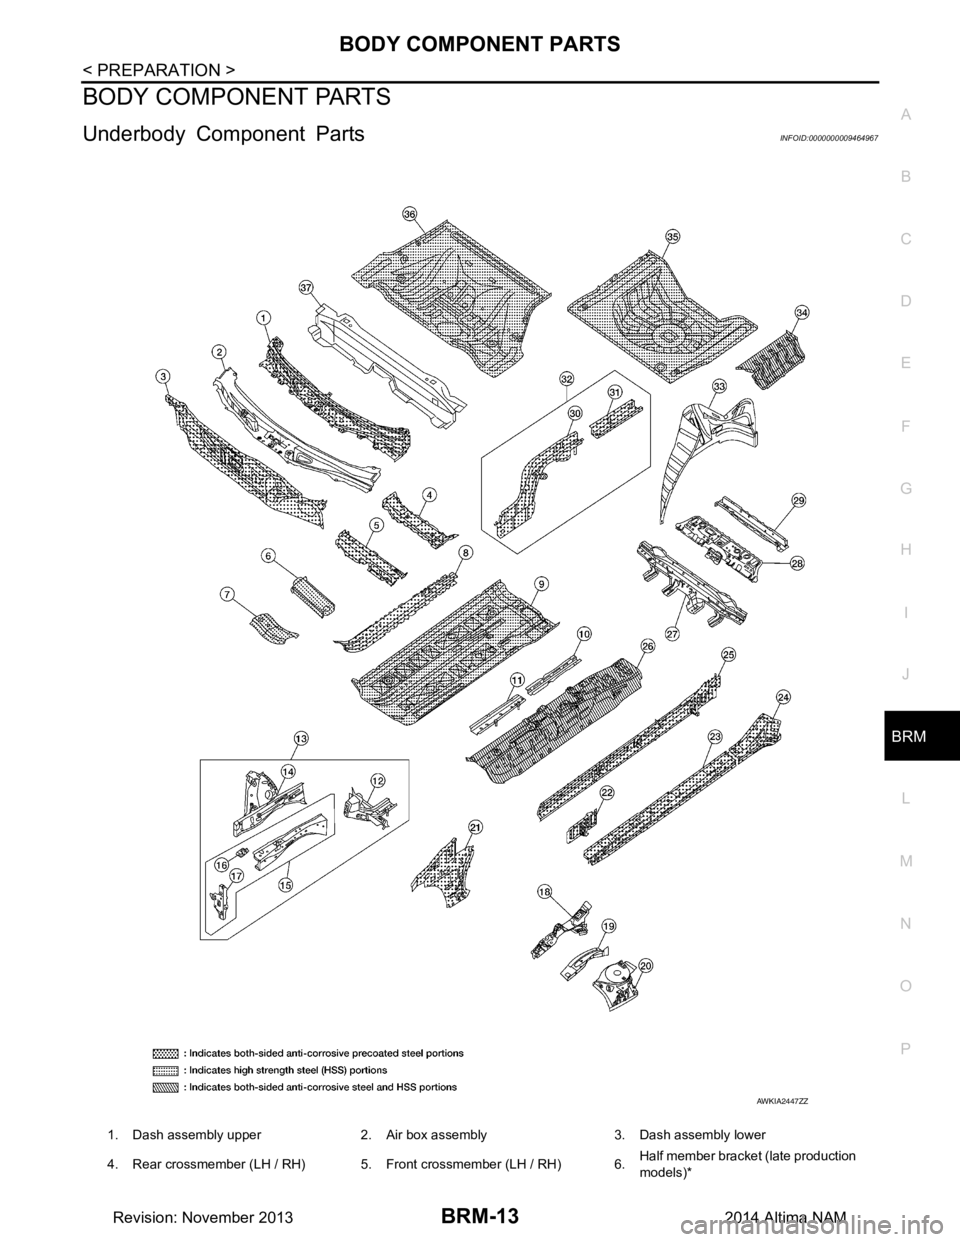
1. Dash assembly upper 2. Air box assembly 3. Dash assembly lower
4. Rear crossmember (LH / RH) 5 . Front crossmember (LH / RH) 6. Half member bracket (late production
models)*
AWKIA2447ZZ
Revision: November 20132014 Altima NAM
Page 292 of 4801

BRM-14
< PREPARATION >
BODY COMPONENT PARTS
*: Late Production Models
7.Reinforcement bracket (late produc-
tion models)* 8.
Front side member reinforcement
upper (LH / RH) 9. Front floor assembly (LH / RH)
10. Front side member center extension
(LH / RH) 11 .Front side member reinforcement
lower (LH / RH) 12.Front side member rear extension
(LH / RH)
13. Front side member assembly (LH /
RH) 14. Closing plate assembly (LH / RH) 15. Front side member sub-assembly (LH
/ RH)
16. Front suspension mounting bracket
(LH / RH) 17. Radiator core side support (LH / RH) 18.
Hoodledge reinforcement assembly
(LH / RH)
19. Hoodledge upper (LH / RH) 20. Hoodledge assembly lower rear 21. Dash side (LH / RH)
22. Outer floor member
reinforcement
(LH / RH) (late production models)* 23.
Inner floor member reinforcement
(LH / RH) (late production models)* 24. Outer sill support bracket (LH / RH)
25. Outer sill (LH / RH) 26. Rear sill outer reinforcement (LH /
RH) 27. Inner sill (LH / RH)
28. Front floor center 29. Rear seat crossmember assembly 30. Rear seat lower crossmember
31. Rear center crossmember 32. Rear side member assembly (LH /
RH) 33. Rear side member (LH / RH)
34. Rear side member extension (LH /
RH) 35. Rear wheel housing outer (LH / RH) 36 Rear floor rear side (LH / RH)
37. Rear floor rear 38. Rear floor front 39. Rear center crossmember
Manufacturing Plant Smyrna: built on 10/25/2012 or later
Canton: built on 11/07/2012 or later
Revision: November 20132014 Altima NAM