NISSAN TIIDA 2008 Service Repair Manual
Manufacturer: NISSAN, Model Year: 2008, Model line: TIIDA, Model: NISSAN TIIDA 2008Pages: 2771, PDF Size: 60.61 MB
Page 411 of 2771
AV-52
< SERVICE INFORMATION >
TELEPHONE
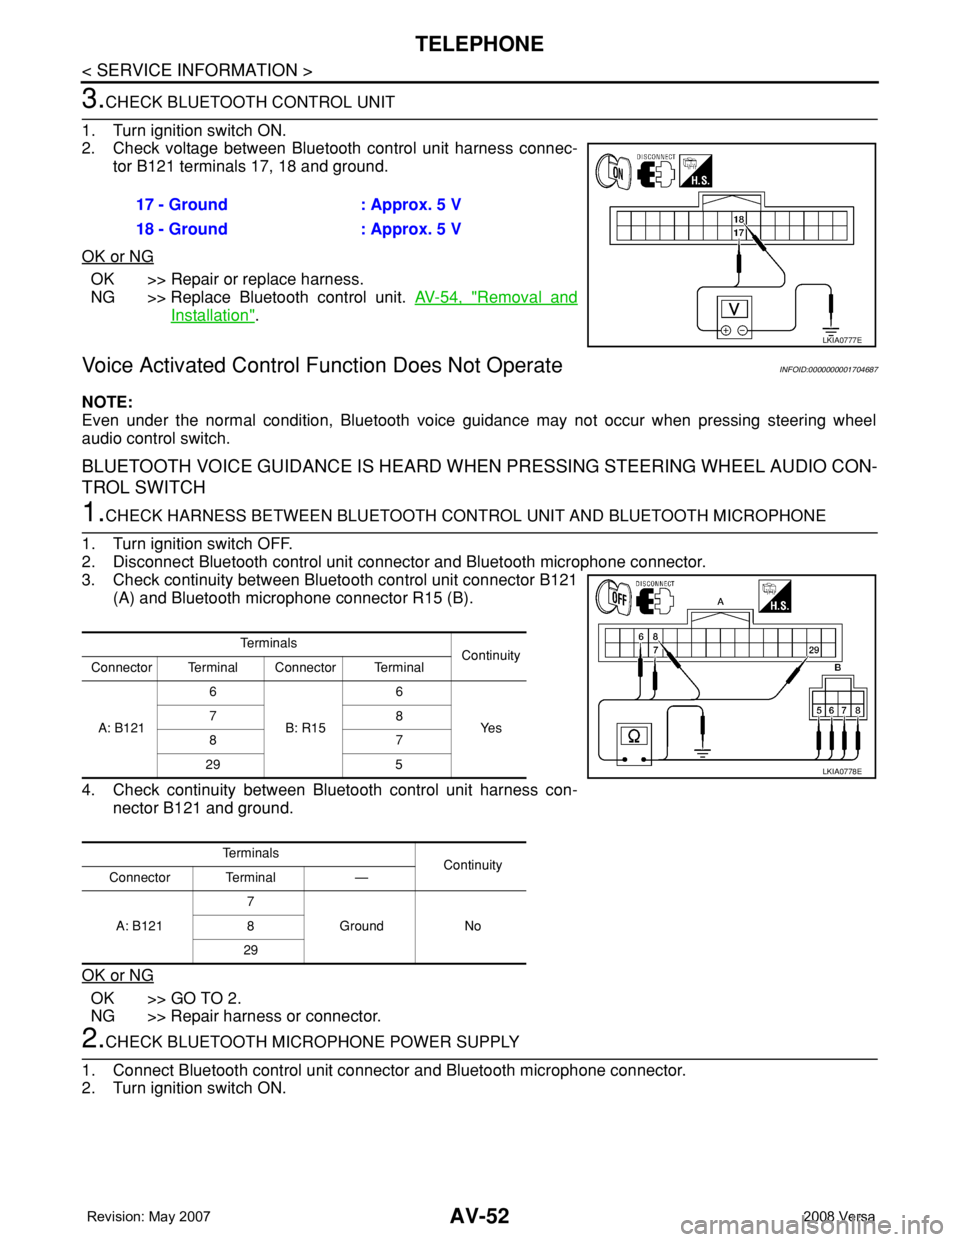
3.CHECK BLUETOOTH CONTROL UNIT
1. Turn ignition switch ON.
2. Check voltage between Bluetooth control unit harness connec-
tor B121 terminals 17, 18 and ground.
OK or NG
OK >> Repair or replace harness.
NG >> Replace Bluetooth control unit. AV-54, "
Removal and
Installation".
Voice Activated Control Function Does Not OperateINFOID:0000000001704687
NOTE:
Even under the normal condition, Bluetooth voice guidance may not occur when pressing steering wheel
audio control switch.
BLUETOOTH VOICE GUIDANCE IS HEARD WHEN PRESSING STEERING WHEEL AUDIO CON-
TROL SWITCH
1.CHECK HARNESS BETWEEN BLUETOOTH CONTROL UNIT AND BLUETOOTH MICROPHONE
1. Turn ignition switch OFF.
2. Disconnect Bluetooth control unit connector and Bluetooth microphone connector.
3. Check continuity between Bluetooth control unit connector B121
(A) and Bluetooth microphone connector R15 (B).
4. Check continuity between Bluetooth control unit harness con-
nector B121 and ground.
OK or NG
OK >> GO TO 2.
NG >> Repair harness or connector.
2.CHECK BLUETOOTH MICROPHONE POWER SUPPLY
1. Connect Bluetooth control unit connector and Bluetooth microphone connector.
2. Turn ignition switch ON.17 - Ground : Approx. 5 V
18 - Ground : Approx. 5 V
LKIA0777E
Te r m i n a l s
Continuity
Connector Terminal Connector Terminal
A: B1216
B: R156
Ye s 78
87
29 5
Te r m i n a l s
Continuity
Connector Terminal —
A: B1217
Ground No 8
29
LKIA0778E
Page 412 of 2771
TELEPHONE
AV-53
< SERVICE INFORMATION >
C
D
E
F
G
H
I
J
L
MA
B
AV
N
O
P
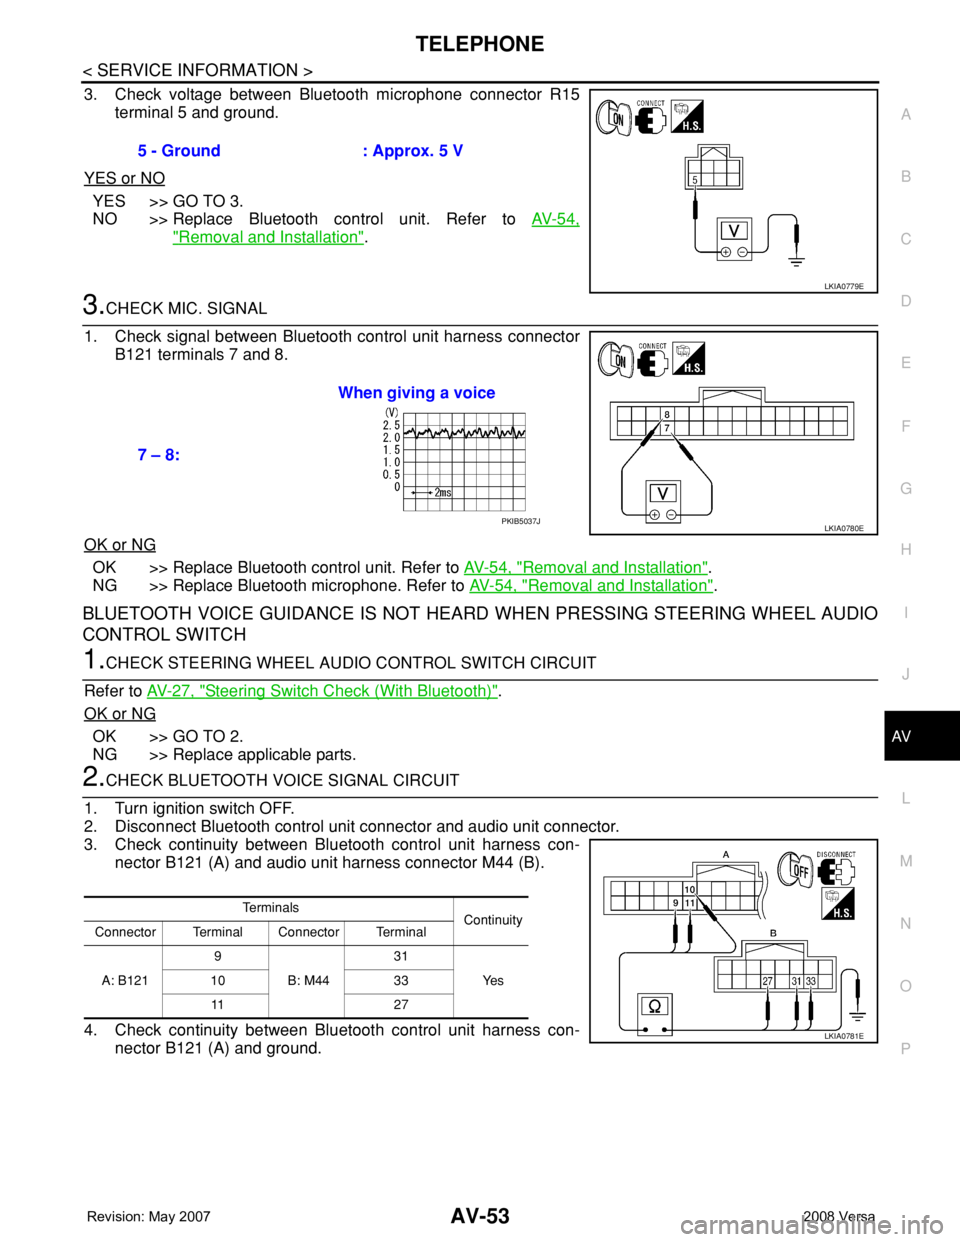
3. Check voltage between Bluetooth microphone connector R15
terminal 5 and ground.
YES or NO
YES >> GO TO 3.
NO >> Replace Bluetooth control unit. Refer to AV-54,
"Removal and Installation".
3.CHECK MIC. SIGNAL
1. Check signal between Bluetooth control unit harness connector
B121 terminals 7 and 8.
OK or NG
OK >> Replace Bluetooth control unit. Refer to AV-54, "Removal and Installation".
NG >> Replace Bluetooth microphone. Refer to AV-54, "
Removal and Installation".
BLUETOOTH VOICE GUIDANCE IS NOT HEARD WHEN PRESSING STEERING WHEEL AUDIO
CONTROL SWITCH
1.CHECK STEERING WHEEL AUDIO CONTROL SWITCH CIRCUIT
Refer to AV-27, "
Steering Switch Check (With Bluetooth)".
OK or NG
OK >> GO TO 2.
NG >> Replace applicable parts.
2.CHECK BLUETOOTH VOICE SIGNAL CIRCUIT
1. Turn ignition switch OFF.
2. Disconnect Bluetooth control unit connector and audio unit connector.
3. Check continuity between Bluetooth control unit harness con-
nector B121 (A) and audio unit harness connector M44 (B).
4. Check continuity between Bluetooth control unit harness con-
nector B121 (A) and ground.5 - Ground : Approx. 5 V
LKIA0779E
7 – 8:When giving a voice
LKIA0780EPKIB5037J
Te r m i n a l s
Continuity
Connector Terminal Connector Terminal
A: B1219
B: M4431
Ye s 10 33
11 2 7
LKIA0781E
Page 413 of 2771
AV-54
< SERVICE INFORMATION >
TELEPHONE
OK or NG
OK >> GO TO 3.
NG >> Repair harness or connector.
3.CHECK MUTE SIGNAL
1. Connect Bluetooth control unit connector and audio unit connector.
2. Turn ignition switch ON.
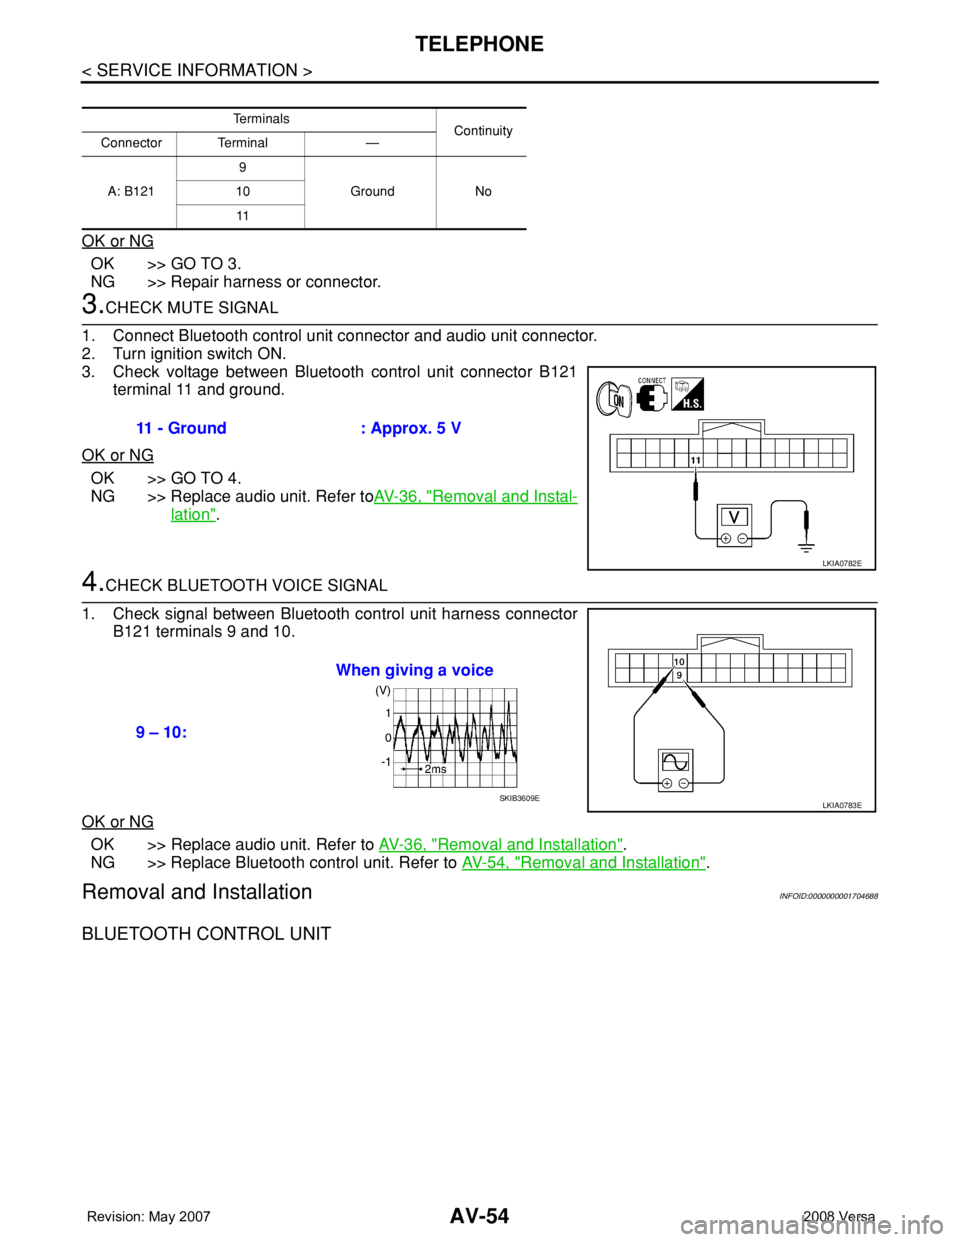
3. Check voltage between Bluetooth control unit connector B121
terminal 11 and ground.
OK or NG
OK >> GO TO 4.
NG >> Replace audio unit. Refer toAV-36, "
Removal and Instal-
lation".
4.CHECK BLUETOOTH VOICE SIGNAL
1. Check signal between Bluetooth control unit harness connector
B121 terminals 9 and 10.
OK or NG
OK >> Replace audio unit. Refer to AV-36, "Removal and Installation".
NG >> Replace Bluetooth control unit. Refer to AV-54, "
Removal and Installation".
Removal and InstallationINFOID:0000000001704688
BLUETOOTH CONTROL UNIT
Te r m i n a l s
Continuity
Connector Terminal —
A: B1219
Ground No 10
11
11 - Ground : Approx. 5 V
LKIA0782E
9 – 10:When giving a voice
LKIA0783ESKIB3609E
Page 414 of 2771
TELEPHONE
AV-55
< SERVICE INFORMATION >
C
D
E
F
G
H
I
J
L
MA
B
AV
N
O
P
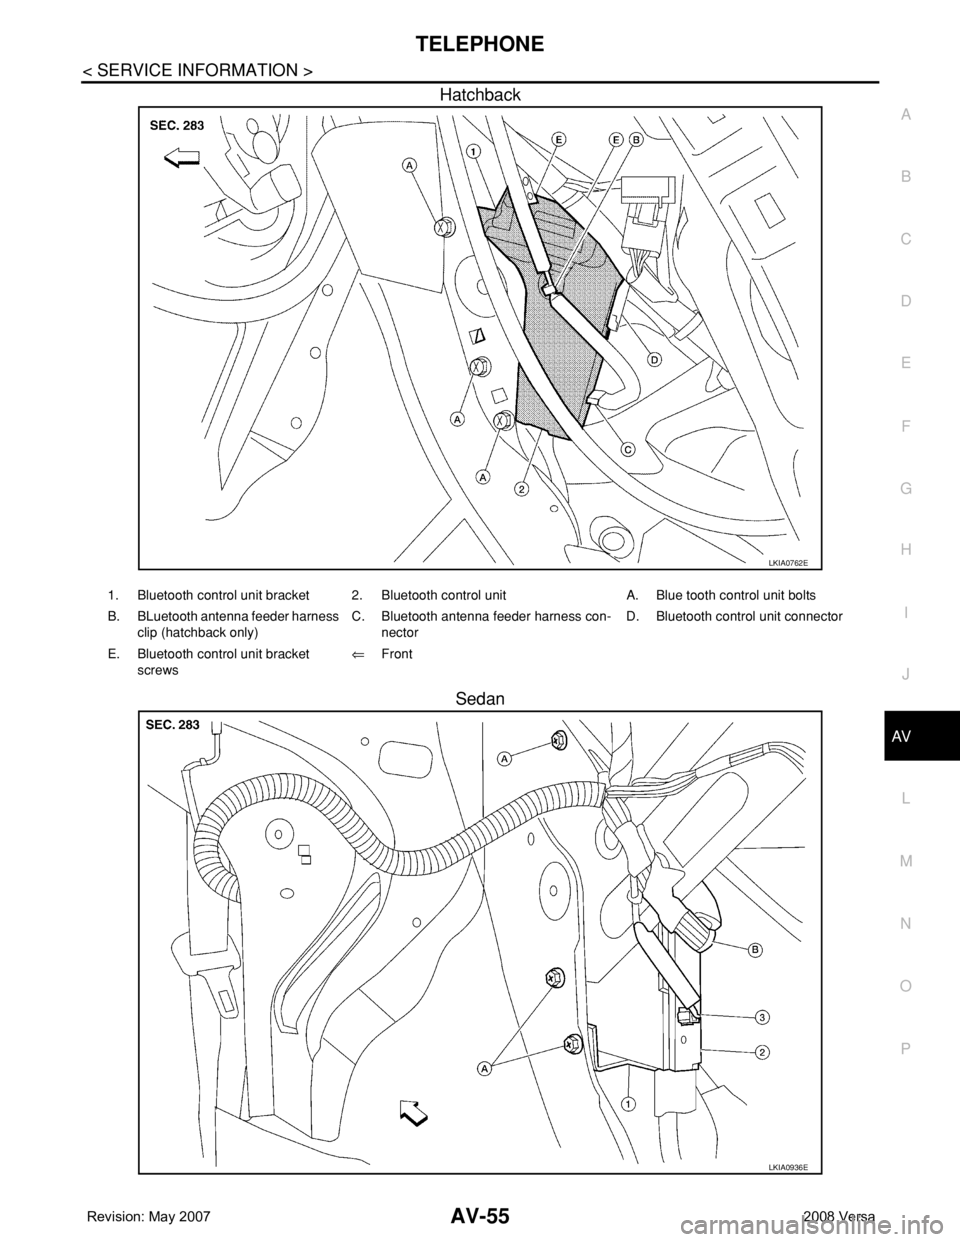
Hatchback
Sedan
LKIA0762E
1. Bluetooth control unit bracket 2. Bluetooth control unit A. Blue tooth control unit bolts
B. BLuetooth antenna feeder harness
clip (hatchback only)C. Bluetooth antenna feeder harness con-
nectorD. Bluetooth control unit connector
E. Bluetooth control unit bracket
screws⇐Front
LKIA0936E
Page 415 of 2771
AV-56
< SERVICE INFORMATION >
TELEPHONE
Removal
1. For hatchback, remove luggage side lower finish (RH). Refer to EI-51, "Removal and Installation".
• Disconnect Bluetooth antenna harness clip.
2. For sedan, remove the trunk room side finisher (RH). Refer to EI-53, "
Removal and Installation".
• Disconnect the Bluetooth antenna harness connector.
3. Disconnect the Bluetooth control unit harness connector.
4. Remove the Bluetooth control unit upper and lower bracket bolts.
5. Unhook the Bluetooth control unit upper and lower brackets and remove Bluetooth control unit.
6. Remove Bluetooth control unit bracket screws and remove the upper and lower brackets from unit.
Installation
Installation is in the reverse order of removal.
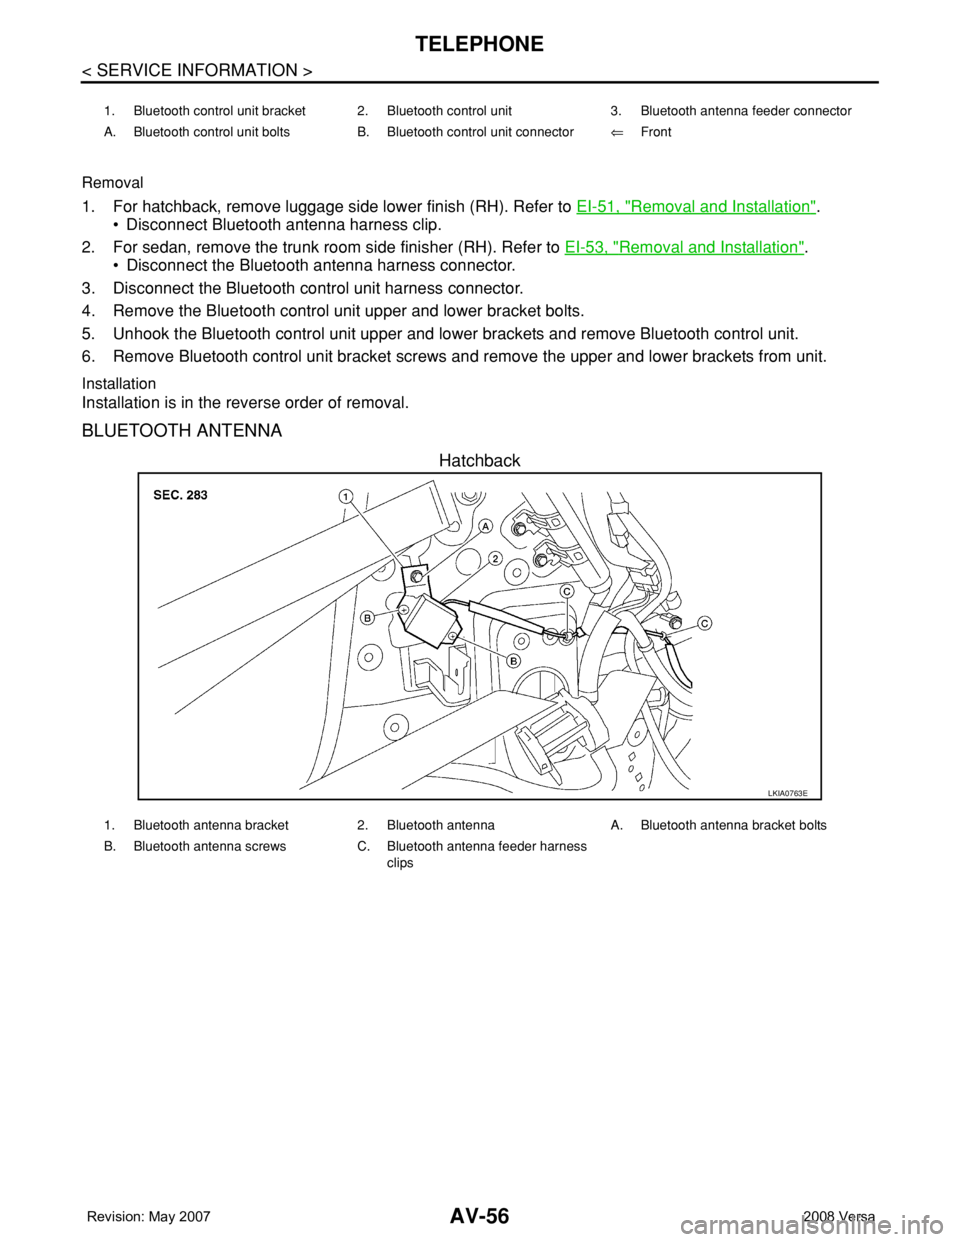
BLUETOOTH ANTENNA
Hatchback
1. Bluetooth control unit bracket 2. Bluetooth control unit 3. Bluetooth antenna feeder connector
A. Bluetooth control unit bolts B. Bluetooth control unit connector⇐Front
LKIA0763E
1. Bluetooth antenna bracket 2. Bluetooth antenna A. Bluetooth antenna bracket bolts
B. Bluetooth antenna screws C. Bluetooth antenna feeder harness
clips
Page 416 of 2771
TELEPHONE
AV-57
< SERVICE INFORMATION >
C
D
E
F
G
H
I
J
L
MA
B
AV
N
O
P
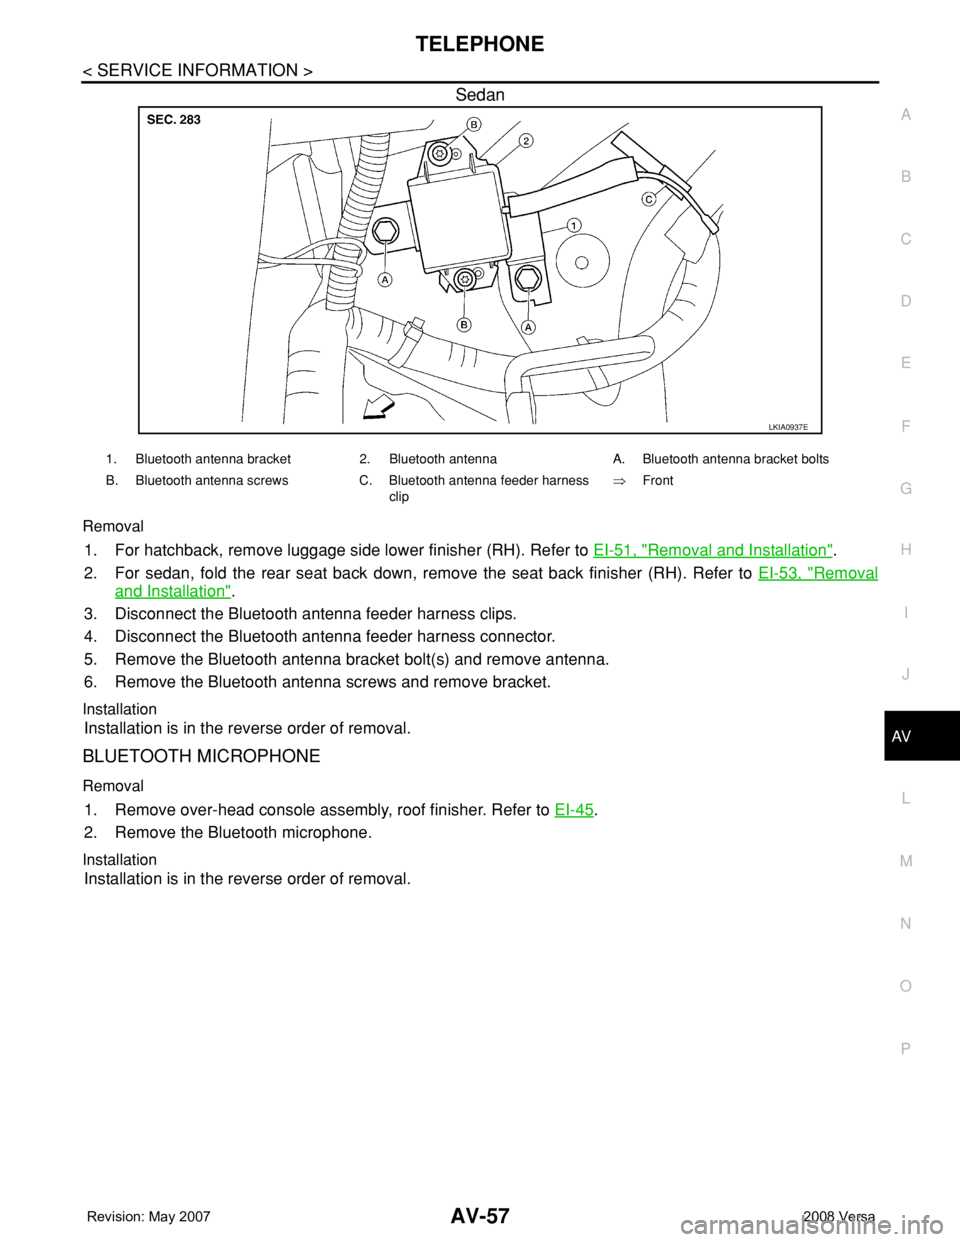
Sedan
Removal
1. For hatchback, remove luggage side lower finisher (RH). Refer to EI-51, "Removal and Installation".
2. For sedan, fold the rear seat back down, remove the seat back finisher (RH). Refer to EI-53, "
Removal
and Installation".
3. Disconnect the Bluetooth antenna feeder harness clips.
4. Disconnect the Bluetooth antenna feeder harness connector.
5. Remove the Bluetooth antenna bracket bolt(s) and remove antenna.
6. Remove the Bluetooth antenna screws and remove bracket.
Installation
Installation is in the reverse order of removal.
BLUETOOTH MICROPHONE
Removal
1. Remove over-head console assembly, roof finisher. Refer to EI-45.
2. Remove the Bluetooth microphone.
Installation
Installation is in the reverse order of removal.
LKIA0937E
1. Bluetooth antenna bracket 2. Bluetooth antenna A. Bluetooth antenna bracket bolts
B. Bluetooth antenna screws C. Bluetooth antenna feeder harness
clip⇒Front
Page 417 of 2771

BCS-1
ELECTRICAL
C
D
E
F
G
H
I
J
L
M
SECTION BCS
A
B
BCS
N
O
P
CONTENTS
BODY CONTROL SYSTEM
SERVICE INFORMATION ............................2
PRECAUTIONS ...................................................2
Precaution for Supplemental Restraint System
(SRS) "AIR BAG" and "SEAT BELT PRE-TEN-
SIONER" ...................................................................
2
BCM (BODY CONTROL MODULE) ....................3
System Description ...................................................3
CAN Communication System Description .................7
Schematic .................................................................8
BCM Terminal Arrangement ....................................10
Terminal and Reference Value for BCM ..................11
BCM Power Supply and Ground Circuit Inspection
....
15
CONSULT-III Function (BCM) .................................16
CAN Communication Inspection Using CON-
SULT-III (Self-Diagnosis) .........................................
17
Configuration ...........................................................17
Removal and Installation of BCM ............................18
Page 418 of 2771

BCS-2
< SERVICE INFORMATION >
PRECAUTIONS
SERVICE INFORMATION
PRECAUTIONS
Precaution for Supplemental Restraint System (SRS) "AIR BAG" and "SEAT BELT
PRE-TENSIONER"
INFOID:0000000001704583
The Supplemental Restraint System such as “AIR BAG” and “SEAT BELT PRE-TENSIONER”, used along
with a front seat belt, helps to reduce the risk or severity of injury to the driver and front passenger for certain
types of collision. This system includes seat belt switch inputs and dual stage front air bag modules. The SRS
system uses the seat belt switches to determine the front air bag deployment, and may only deploy one front
air bag, depending on the severity of a collision and whether the front occupants are belted or unbelted.
Information necessary to service the system safely is included in the SR and SB section of this Service Man-
ual.
WARNING:
• To avoid rendering the SRS inoperative, which could increase the risk of personal injury or death in
the event of a collision which would result in air bag inflation, all maintenance must be performed by
an authorized NISSAN/INFINITI dealer.
• Improper maintenance, including incorrect removal and installation of the SRS, can lead to personal
injury caused by unintentional activation of the system. For removal of Spiral Cable and Air Bag
Module, see the SR section.
• Do not use electrical test equipment on any circuit related to the SRS unless instructed to in this
Service Manual. SRS wiring harnesses can be identified by yellow and/or orange harnesses or har-
ness connectors.
Page 419 of 2771
BCM (BODY CONTROL MODULE)
BCS-3
< SERVICE INFORMATION >
C
D
E
F
G
H
I
J
L
MA
B
BCS
N
O
P
BCM (BODY CONTROL MODULE)
System DescriptionINFOID:0000000001704584
BCM (body control module) controls the operation of various electrical units installed on the vehicle.
BCM FUNCTION
BCM has a combination switch reading function for reading the operation of combination switches (light, wiper,
washer, turn signal) in addition to the function for controlling the operation of various electrical components.
Also, it functions as an interface that receives signals from the front air control, and sends signals to ECM
using CAN communication.
COMBINATION SWITCH READING FUNCTION
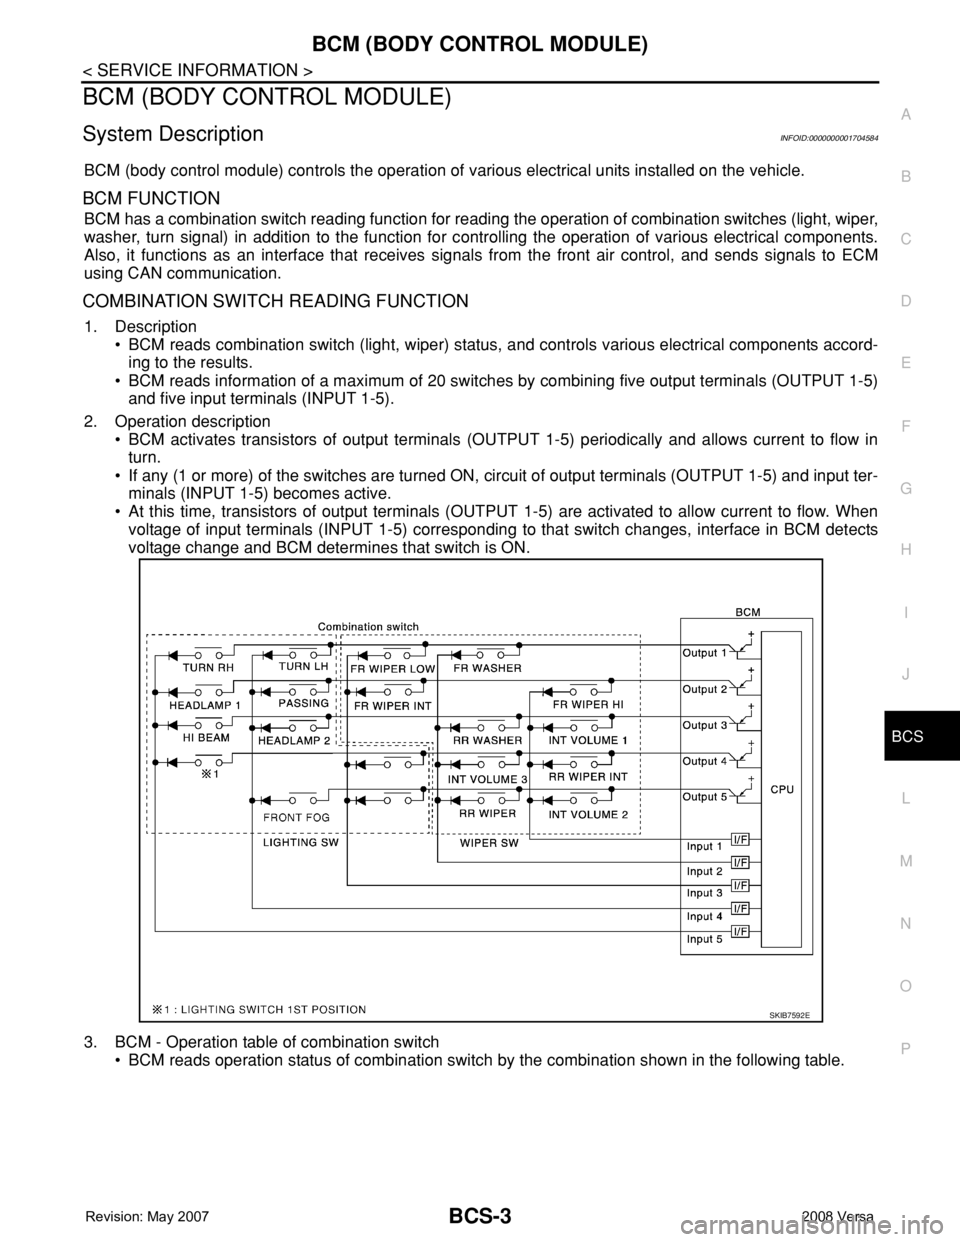
1. Description
• BCM reads combination switch (light, wiper) status, and controls various electrical components accord-
ing to the results.
• BCM reads information of a maximum of 20 switches by combining five output terminals (OUTPUT 1-5)
and five input terminals (INPUT 1-5).
2. Operation description
• BCM activates transistors of output terminals (OUTPUT 1-5) periodically and allows current to flow in
turn.
• If any (1 or more) of the switches are turned ON, circuit of output terminals (OUTPUT 1-5) and input ter-
minals (INPUT 1-5) becomes active.
• At this time, transistors of output terminals (OUTPUT 1-5) are activated to allow current to flow. When
voltage of input terminals (INPUT 1-5) corresponding to that switch changes, interface in BCM detects
voltage change and BCM determines that switch is ON.
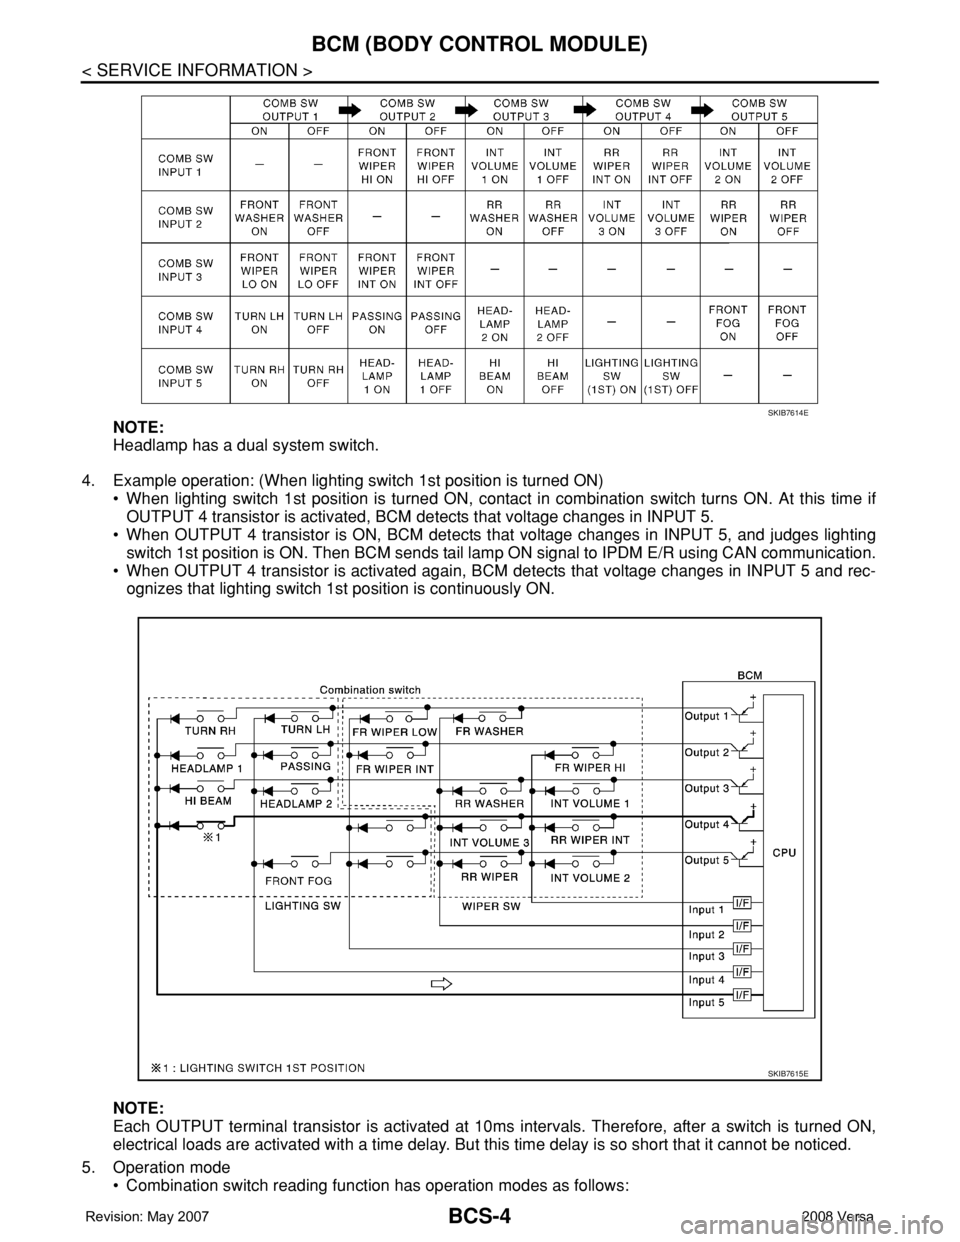
3. BCM - Operation table of combination switch
• BCM reads operation status of combination switch by the combination shown in the following table.
SKIB7592E
Page 420 of 2771
BCS-4
< SERVICE INFORMATION >
BCM (BODY CONTROL MODULE)
NOTE:
Headlamp has a dual system switch.
4. Example operation: (When lighting switch 1st position is turned ON)
• When lighting switch 1st position is turned ON, contact in combination switch turns ON. At this time if
OUTPUT 4 transistor is activated, BCM detects that voltage changes in INPUT 5.
• When OUTPUT 4 transistor is ON, BCM detects that voltage changes in INPUT 5, and judges lighting
switch 1st position is ON. Then BCM sends tail lamp ON signal to IPDM E/R using CAN communication.
• When OUTPUT 4 transistor is activated again, BCM detects that voltage changes in INPUT 5 and rec-
ognizes that lighting switch 1st position is continuously ON.
NOTE:
Each OUTPUT terminal transistor is activated at 10ms intervals. Therefore, after a switch is turned ON,
electrical loads are activated with a time delay. But this time delay is so short that it cannot be noticed.
5. Operation mode
• Combination switch reading function has operation modes as follows:
SKIB7614E
SKIB7615E