cooling NISSAN TIIDA 2010 Service Manual Online
[x] Cancel search | Manufacturer: NISSAN, Model Year: 2010, Model line: TIIDA, Model: NISSAN TIIDA 2010Pages: 3745, PDF Size: 73.67 MB
Page 2177 of 3745
EC-912
< SERVICE INFORMATION >[MR18DE]
DTC P1217 ENGINE OVER TEMPERATURE
Never remove the radiator cap when the engine is
hot. Serious burns could be caused by high pres-
sure fluid escaping from the reser voir tank or the radiator.
Wrap a thick cloth around cap. Carefully remove the cap by turning it a quarter turn to allow built-up
pressure to escape. Then turn the cap all the way off.
WITH CONSULT-III
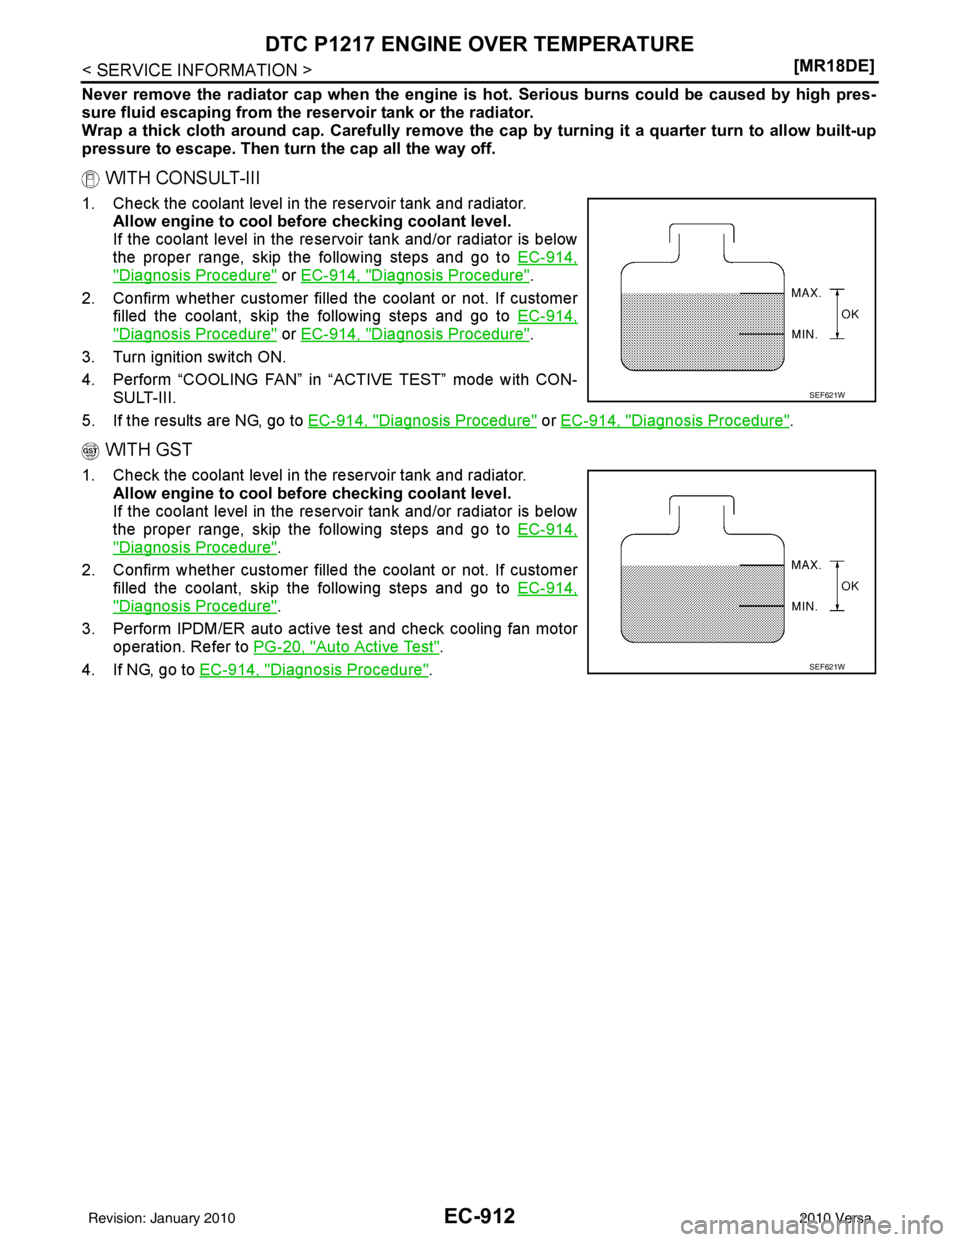
1. Check the coolant level in the reservoir tank and radiator. Allow engine to cool before checking coolant level.
If the coolant level in the reservoir tank and/or radiator is below
the proper range, skip the following steps and go to EC-914,
"Diagnosis Procedure" or EC-914, "Diagnosis Procedure".
2. Confirm whether customer filled the coolant or not. If customer
filled the coolant, skip the following steps and go to EC-914,
"Diagnosis Procedure" or EC-914, "Diagnosis Procedure".
3. Turn ignition switch ON.
4. Perform “COOLING FAN” in “ACTIVE TEST” mode with CON- SULT-III.
5. If the results are NG, go to EC-914, "
Diagnosis Procedure" or EC-914, "Diagnosis Procedure".
WITH GST
1. Check the coolant level in the reservoir tank and radiator.
Allow engine to cool before checking coolant level.
If the coolant level in the reservoir tank and/or radiator is below
the proper range, skip the following steps and go to EC-914,
"Diagnosis Procedure".
2. Confirm whether customer filled the coolant or not. If customer
filled the coolant, skip the following steps and go to EC-914,
"Diagnosis Procedure".
3. Perform IPDM/ER auto active te st and check cooling fan motor
operation. Refer to PG-20, "
Auto Active Test".
4. If NG, go to EC-914, "
Diagnosis Procedure".
SEF621W
SEF621W
Revision: January 20102010 Versa
Page 2180 of 3745
DTC P1217 ENGINE OVER TEMPERATUREEC-915
< SERVICE INFORMATION > [MR18DE]
C
D
E
F
G H
I
J
K L
M A
EC
NP
O
2.CHECK COOLING FAN OPERATION
With CONSULT-III
1. Turn ignition switch ON.
2. Perform “COOLING FAN” in “ACTIVE TEST” mode with CONSULT-III.
3. Make sure that cooling fan operates at each speed.
OK or NG
OK >> GO TO 4.
NG >> GO TO 8.
3.CHECK COOLING FAN OPERATION
Without CONSULT-III
1. Perform IPDM E/R auto active test and check cooling fan operation. Refer to PG-20, "
Auto Active Test".
2. Make sure that cooling fan operates at each speed.
OK or NG
OK >> GO TO 4.
NG >> GO TO 8.
4.CHECK COOLING SYSTEM FOR LEAK
Refer to CO-36, "
Inspection".
OK or NG
OK >> GO TO 5.
NG >> Check the following for leak. Refer to CO-36, "
Inspection".
•Hose
• Radiator
• Water pump
5.CHECK RADIATOR CAP
Refer to CO-39, "
Checking Radiator Cap".
OK or NG
OK >> GO TO 6.
NG >> Replace radiator cap.
6.CHECK COMPONENT PARTS
Check the following.
• Thermostat. (Refer to CO-46
.)
• Water control valve. (Refer to CO-48
.)
• Engine coolant temperature sensor. (Refer to EC-684
.)
OK or NG
OK >> GO TO 7.
NG >> Replace malfunctioning component.
7.CHECK MAIN 13 CAUSES
If the cause cannot be isolated, go to EC-917, "
Main 13 Causes of Overheating".
>> INSPECTION END
8.CHECK IPDM E/R POWER SUPPLY CIRCUIT
1. Turn ignition switch OFF.
2. Disconnect IPDM E/R harness connector E44.
Revision: January 20102010 Versa
Page 2181 of 3745
EC-916
< SERVICE INFORMATION >[MR18DE]
DTC P1217 ENGINE OVER TEMPERATURE
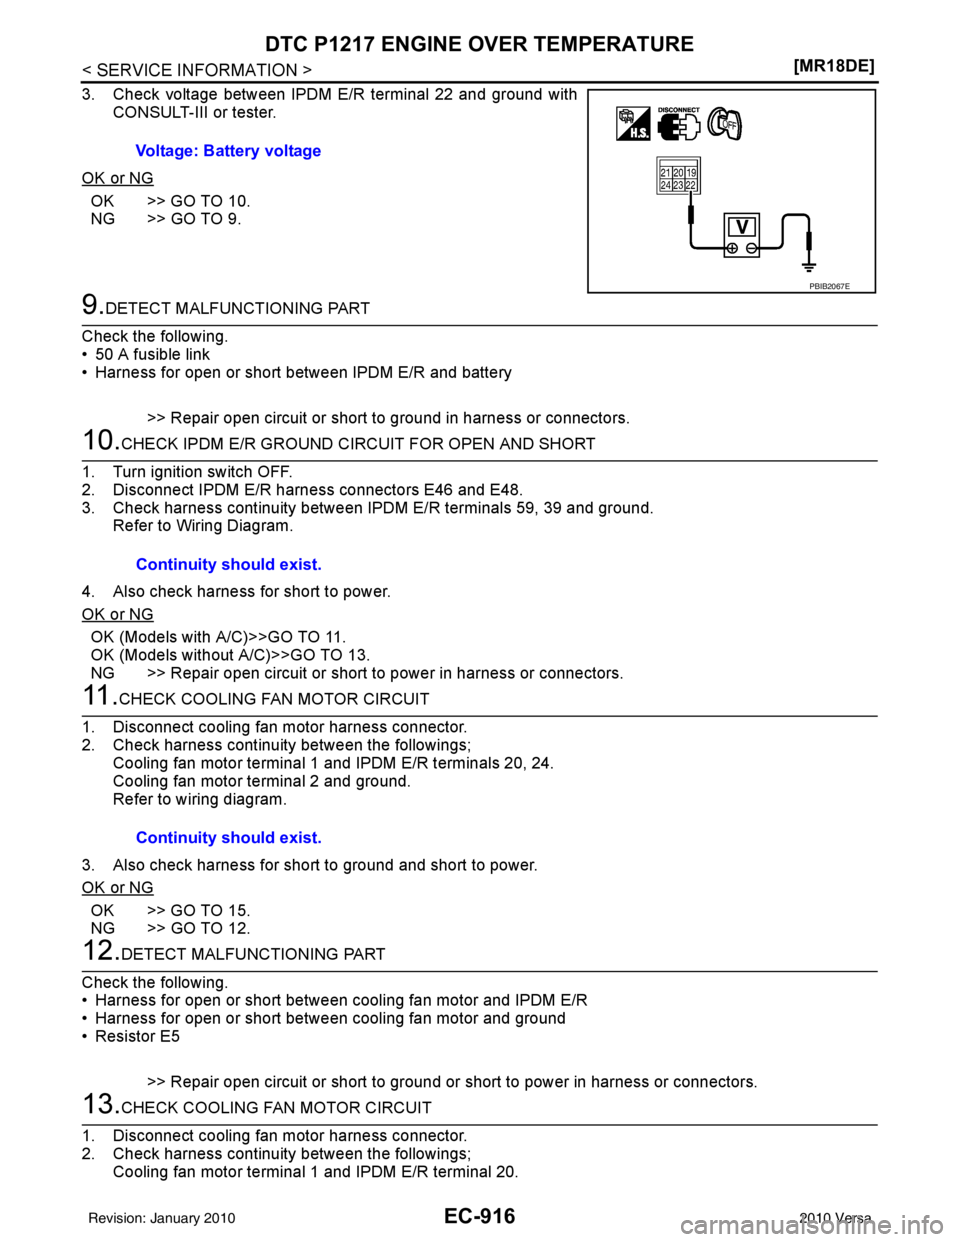
3. Check voltage between IPDM E/R terminal 22 and ground with
CONSULT-III or tester.
OK or NG
OK >> GO TO 10.
NG >> GO TO 9.
9.DETECT MALFUNCTIONING PART
Check the following.
• 50 A fusible link
• Harness for open or short between IPDM E/R and battery
>> Repair open circuit or short to ground in harness or connectors.
10.CHECK IPDM E/R GROUND CIRCUIT FOR OPEN AND SHORT
1. Turn ignition switch OFF.
2. Disconnect IPDM E/R harness connectors E46 and E48.
3. Check harness continuity between IPDM E/R terminals 59, 39 and ground. Refer to Wiring Diagram.
4. Also check harness for short to power.
OK or NG
OK (Models with A/C)>>GO TO 11.
OK (Models without A/C)>>GO TO 13.
NG >> Repair open circuit or short to power in harness or connectors.
11 .CHECK COOLING FAN MOTOR CIRCUIT
1. Disconnect cooling fan motor harness connector.
2. Check harness continuity between the followings; Cooling fan motor terminal 1 and IPDM E/R terminals 20, 24.
Cooling fan motor terminal 2 and ground.
Refer to wiring diagram.
3. Also check harness for short to ground and short to power.
OK or NG
OK >> GO TO 15.
NG >> GO TO 12.
12.DETECT MALFUNCTIONING PART
Check the following.
• Harness for open or short between cooling fan motor and IPDM E/R
• Harness for open or short between cooling fan motor and ground
•Resistor E5
>> Repair open circuit or short to ground or short to power in harness or connectors.
13.CHECK COOLING FAN MOTOR CIRCUIT
1. Disconnect cooling fan motor harness connector.
2. Check harness continuity between the followings; Cooling fan motor terminal 1 and IPDM E/R terminal 20.Voltage: Battery voltage
PBIB2067E
Continuity should exist.
Continuity should exist.
Revision: January 20102010 Versa
Page 2182 of 3745
DTC P1217 ENGINE OVER TEMPERATUREEC-917
< SERVICE INFORMATION > [MR18DE]
C
D
E
F
G H
I
J
K L
M A
EC
NP
O
Cooling fan motor terminal 2 and IPDM E/R terminal 24.
Cooling fan motor terminal 3 and IPDM E/R terminal 23.
Cooling fan motor terminal 4 and ground.
Refer to wiring diagram.
3. Also check harness for short to ground and short to power.
OK or NG
OK >> GO TO 15.
NG >> GO TO 14.
14.DETECT MALFUNCTIONING PART
Check the following.
• Harness for open or short between cooling fan motor and IPDM E/R
• Harness for open or short between cooling fan motor and ground
>> Repair open circuit or short to ground or short to power in harness or connectors.
15.CHECK COOLING FAN MOTOR
Refer to EC-918, "
Component Inspection".
OK or NG
OK >> GO TO 16.
NG >> Replace cooling fan motor.
16.CHECK INTERMITTENT INCIDENT
Perform EC-632
.
OK or NG
OK >> Replace IPDM E/R. Refer to PG-28, "Removal and Installation of IPDM E/R".
NG >> Repair or replace harness or connector.
Main 13 Causes of OverheatingINFOID:0000000005532780
Continuity should exist.
Engine Step Inspection item EquipmentStandardReference
OFF 1
• Blocked radiator
• Blocked condenser
• Blocked radiator grille
• Blocked bumper • Visual
No blocking —
2 • Coolant mixture • Coolant tester See MA-15, "
Anti-freeze Coolant Mixture Ratio".
3 • Coolant level • VisualCoolant up to MAX level in
reservoir tank and radiator
filler neck
See
CO-36, "
Inspection".
4 • Radiator cap • Pressure tester See CO-39, "
Checking Radiator Cap".
ON*
25 • Coolant leaks • VisualNo leaks See CO-36, "Inspection".
ON*
26 • Thermostat • Touch the upper and
lower radiator hoses Both hoses should be hot See CO-46, and
CO-48
ON*17 • Cooling fan • CONSULT-IIIOperating See trouble diagnosis for
DTC P1217 (
EC-914, "Di-
agnosis Procedure").
OFF 8 • Combustion gas leak • Color checker chemical
tester 4 Gas analyzer Negative
—
ON*
39 • Coolant temperature
gauge •Visual
Gauge less than 3/4 when
driving —
• Coolant overflow to res- ervoir tank •Visual No overflow during driving
and idling See
CO-36, "Changing
Engine Coolant".
Revision: January 20102010 Versa
Page 2183 of 3745
EC-918
< SERVICE INFORMATION >[MR18DE]
DTC P1217 ENGINE OVER TEMPERATURE
*1: Turn the ignition switch ON.
*2: Engine running at 3,000 rpm for 10 minutes.
*3: Drive at 90 km/h (55 MPH) for 30 minutes and then let idle for 10 minutes.
*4: After 60 minutes of cool down time.
For more informat
ion, refer to CO-33
.
Component InspectionINFOID:0000000005532781
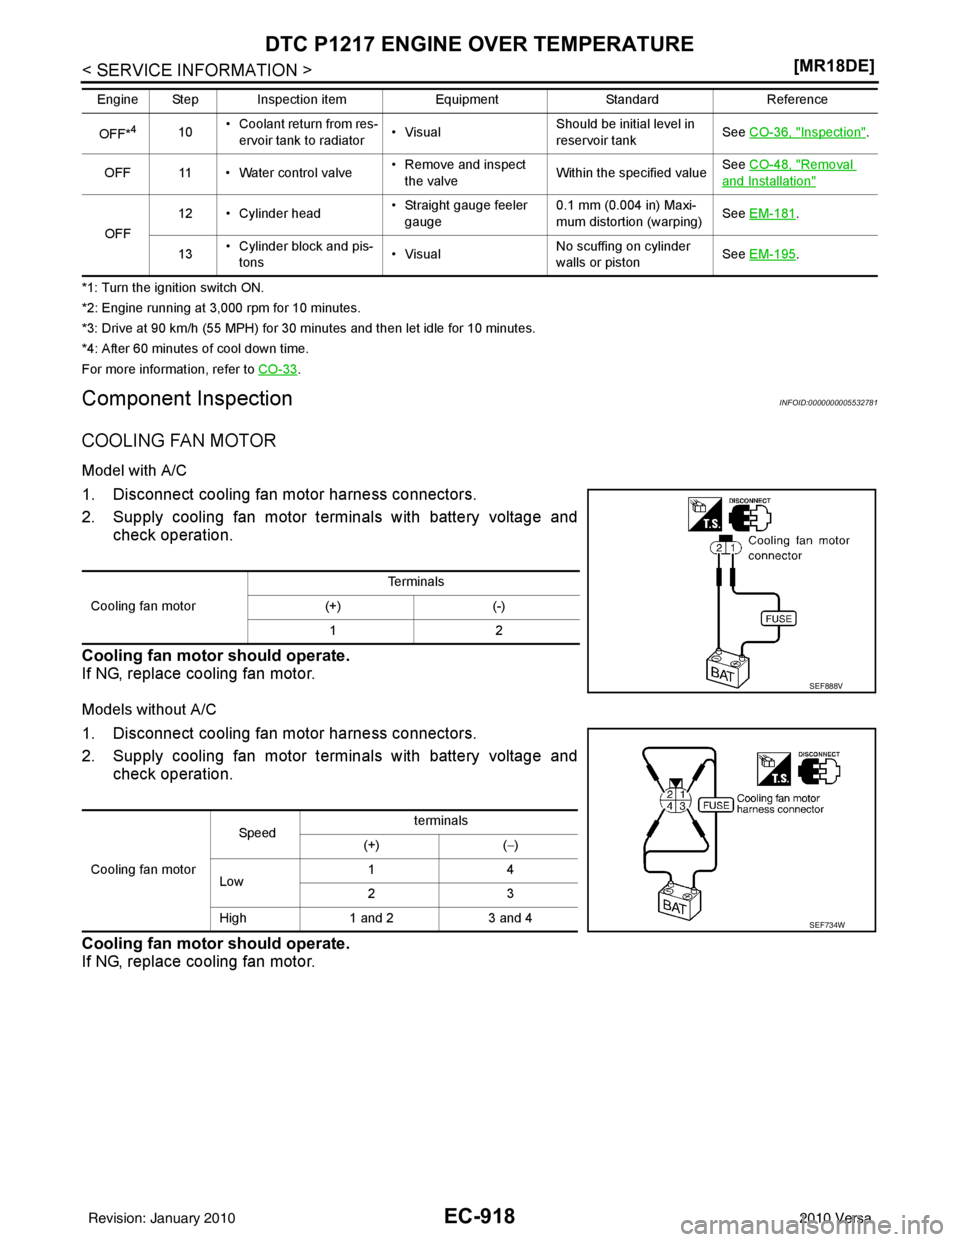
COOLING FAN MOTOR
Model with A/C
1. Disconnect cooling fan motor harness connectors.
2. Supply cooling fan motor terminals with battery voltage and
check operation.
Cooling fan motor should operate.
If NG, replace cooling fan motor.
Models without A/C
1. Disconnect cooling fan motor harness connectors.
2. Supply cooling fan motor terminals with battery voltage and check operation.
Cooling fan motor should operate.
If NG, replace cooling fan motor.
OFF*410 •Coolant retu
rn from res-
ervoir tank to radiator •Visual Should be initial level in
reservoir tank See
CO-36, "Inspection".
OFF 11 • Water control valve • Remove and inspect
the valve Within the specified value See
CO-48, "
Removal
and Installation"
OFF 12 • Cylinder head
• Straight gauge feeler
gauge 0.1 mm (0.004 in) Maxi-
mum distortion (warping)
See
EM-181
.
13 • Cylinder block and pis-
tons •Visual No scuffing on cylinder
walls or piston See
EM-195
.
Engine Step Inspection item
EquipmentStandardReference
Cooling fan motor Te r m i n a l s
(+) (-) 12
SEF888V
Cooling fan motor Speed
terminals
(+) (− )
Low 14
23
High 1 and 2 3 and 4
SEF734W
Revision: January 20102010 Versa
Page 2293 of 3745
EC-1028
< SERVICE INFORMATION >[MR18DE]
REFRIGERANT PRESSURE SENSOR
REFRIGERANT PRESSURE SENSOR
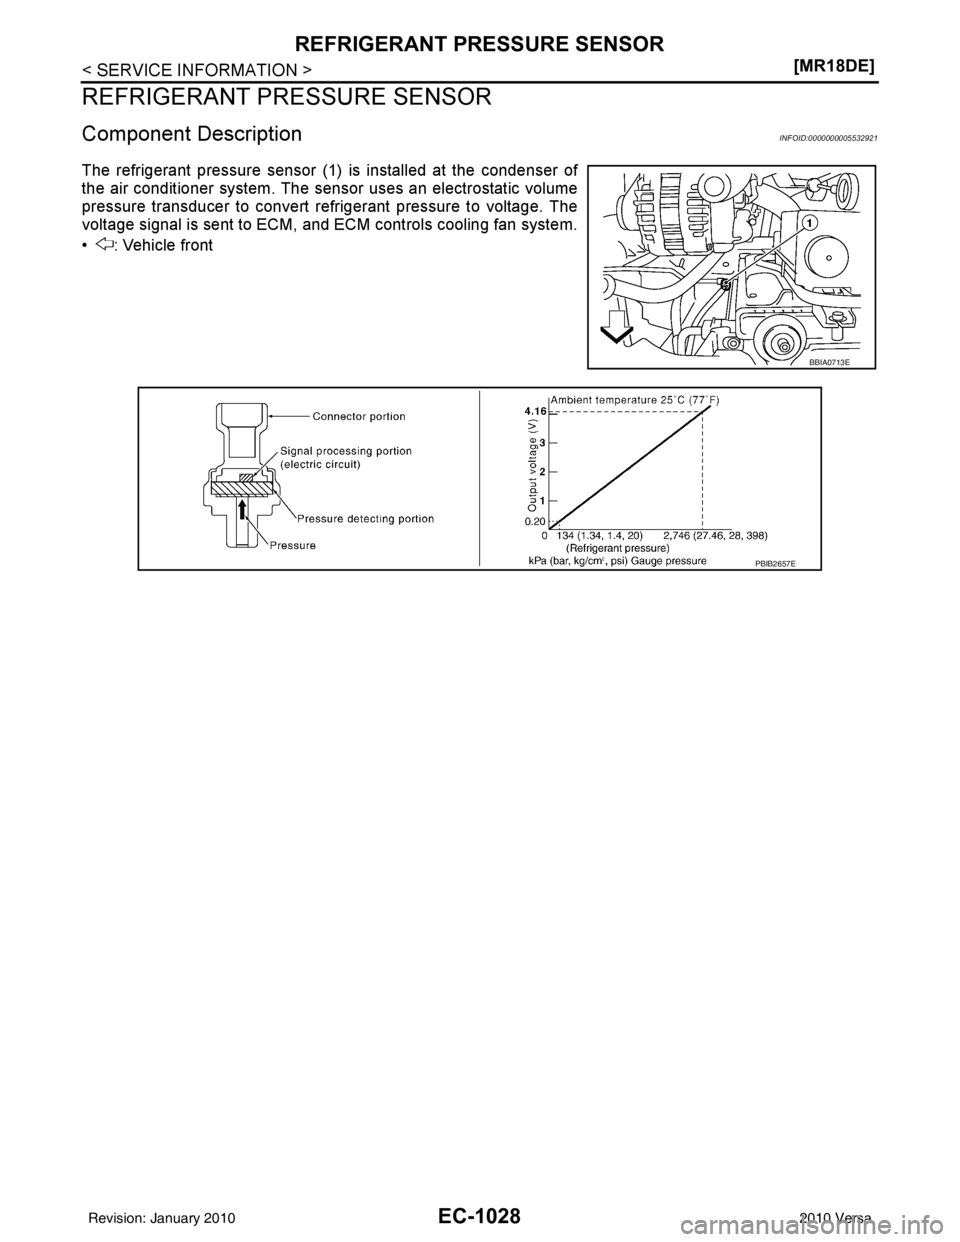
Component DescriptionINFOID:0000000005532921
The refrigerant pressure sensor (1) is installed at the condenser of
the air conditioner system. The sensor uses an electrostatic volume
pressure transducer to convert refrigerant pressure to voltage. The
voltage signal is sent to ECM, and ECM controls cooling fan system.
• : Vehicle front
BBIA0713E
PBIB2657E
Revision: January 20102010 Versa
Page 2417 of 3745
EM-58
< ON-VEHICLE REPAIR >[HR16DE]
TIMING CHAIN
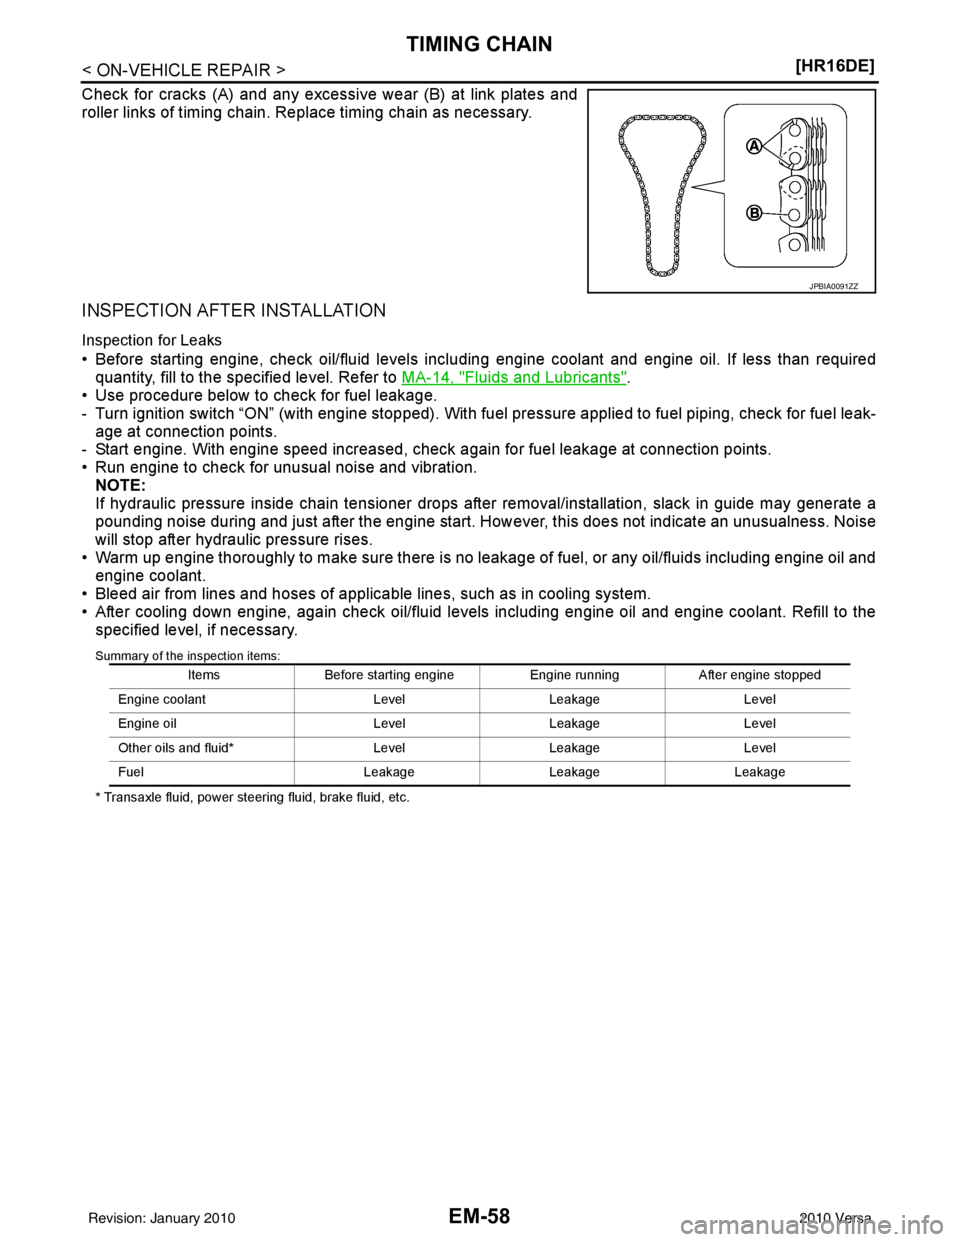
Check for cracks (A) and any excessive wear (B) at link plates and
roller links of timing chain. Replace timing chain as necessary.
INSPECTION AFTER INSTALLATION
Inspection for Leaks
• Before starting engine, check oil/fluid levels incl
uding engine coolant and engine oil. If less than required
quantity, fill to the specified level. Refer to MA-14, "
Fluids and Lubricants".
• Use procedure below to check for fuel leakage.
- Turn ignition switch “ON” (with engine stopped). With fuel pressure applied to fuel piping, check for fuel leak-
age at connection points.
- Start engine. With engine speed increased, che ck again for fuel leakage at connection points.
• Run engine to check for unusual noise and vibration. NOTE:
If hydraulic pressure inside chain tensioner drops af ter removal/installation, slack in guide may generate a
pounding noise during and just after the engine start. However, this does not indicate an unusualness. Noise
will stop after hydraulic pressure rises.
• Warm up engine thoroughly to make sure there is no leakage of fuel, or any oil/fluids including engine oil and
engine coolant.
• Bleed air from lines and hoses of applicable lines, such as in cooling system.
• After cooling down engine, again check oil/fluid levels including engine oil and engine coolant. Refill to the specified level, if necessary.
Summary of the inspection items:
* Transaxle fluid, power steering fluid, brake fluid, etc.
JPBIA0091ZZ
Items Before starting engine Engine runningAfter engine stopped
Engine coolant LevelLeakage Level
Engine oil LevelLeakage Level
Other oils and fluid* LevelLeakage Level
Fuel LeakageLeakageLeakage
Revision: January 20102010 Versa
Page 2427 of 3745
EM-68
< ON-VEHICLE REPAIR >[HR16DE]
CAMSHAFT
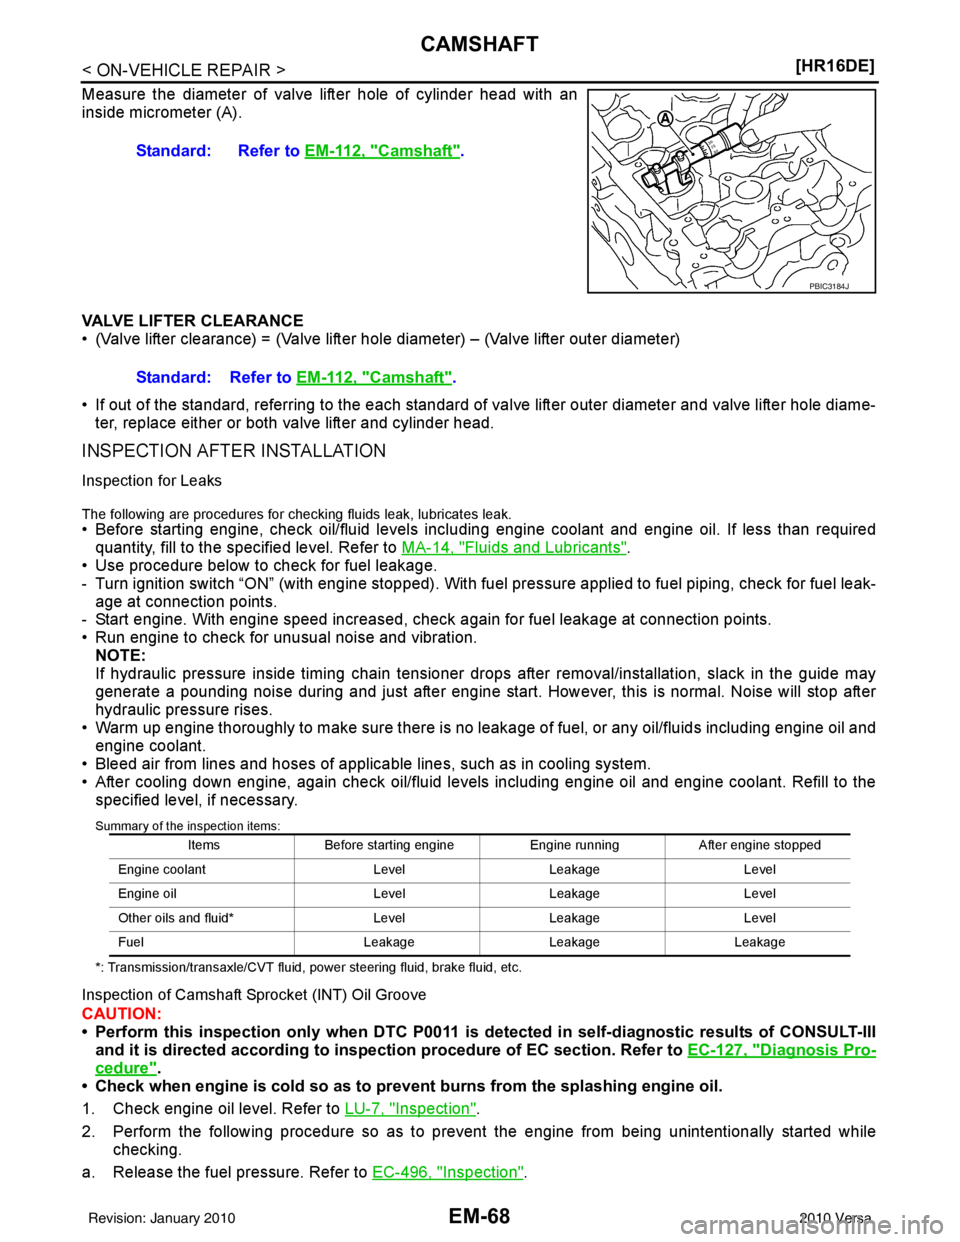
Measure the diameter of valve lifter hole of cylinder head with an
inside micrometer (A).
VALVE LIFTER CLEARANCE
• (Valve lifter clearance) = (Valve lifter hole diameter) – (Valve lifter outer diameter)
• If out of the standard, referring to the each standard of va
lve lifter outer diameter and valve lifter hole diame-
ter, replace either or both valve lifter and cylinder head.
INSPECTION AFTER INSTALLATION
Inspection for Leaks
The following are procedures for checking fluids leak, lubricates leak.
• Before starting engine, check oil/fluid levels incl uding engine coolant and engine oil. If less than required
quantity, fill to the specified level. Refer to MA-14, "
Fluids and Lubricants".
• Use procedure below to check for fuel leakage.
- Turn ignition switch “ON” (with engine stopped). With fuel pressure applied to fuel piping, check for fuel leak-
age at connection points.
- Start engine. With engine speed increased, che ck again for fuel leakage at connection points.
• Run engine to check for unusual noise and vibration. NOTE:
If hydraulic pressure inside timing chain tensioner drops after removal/installation, slack in the guide may
generate a pounding noise during and just after engine start. However, this is normal. Noise will stop after
hydraulic pressure rises.
• Warm up engine thoroughly to make sure there is no leakage of fuel, or any oil/fluids including engine oil and
engine coolant.
• Bleed air from lines and hoses of applicable lines, such as in cooling system.
• After cooling down engine, again check oil/fluid levels including engine oil and engine coolant. Refill to the specified level, if necessary.
Summary of the inspection items:
*: Transmission/transaxle/CVT fluid, power steering fluid, brake fluid, etc.
Inspection of Camshaft Sprocket (INT) Oil Groove
CAUTION:
• Perform this inspection only when DTC P0011 is de tected in self-diagnostic results of CONSULT-III
and it is directed according to inspect ion procedure of EC section. Refer to EC-127, "
Diagnosis Pro-
cedure".
• Check when engine is cold so as to pr event burns from the splashing engine oil.
1. Check engine oil level. Refer to LU-7, "
Inspection".
2. Perform the following procedure so as to prevent the engine from being unintentionally started while
checking.
a. Release the fuel pressure. Refer to EC-496, "
Inspection".
Standard: Refer to
EM-112, "
Camshaft".
PBIC3184J
Standard: Refer to EM-112, "Camshaft".
Items Before starting engine Engine runningAfter engine stopped
Engine coolant LevelLeakage Level
Engine oil LevelLeakage Level
Other oils and fluid* LevelLeakage Level
Fuel LeakageLeakageLeakage
Revision: January 20102010 Versa
Page 2435 of 3745
EM-76
< ON-VEHICLE REPAIR >[HR16DE]
CYLINDER HEAD
• Use procedure below to check for fuel leakage.
- Turn ignition switch “ON” (with engine stopped). With fuel
pressure applied to fuel piping, check for fuel leak-
age at connection points.
- Start engine. With engine speed increased, che ck again for fuel leakage at connection points.
• Run engine to check for unusual noise and vibration.
• Warm up engine thoroughly to make sure there is no leakage of fuel, exhaust gases, or any oil/fluids includ- ing engine oil and engine coolant.
• Bleed air from lines and hoses of applicable lines, such as in cooling system.
• After cooling down engine, again check oil/fluid levels including engine oil and engine coolant. Refill to the specified level, if necessary.
Summary of the inspection items:
*: Transaxle fluid, power steering fluid, brake fluid, etc.
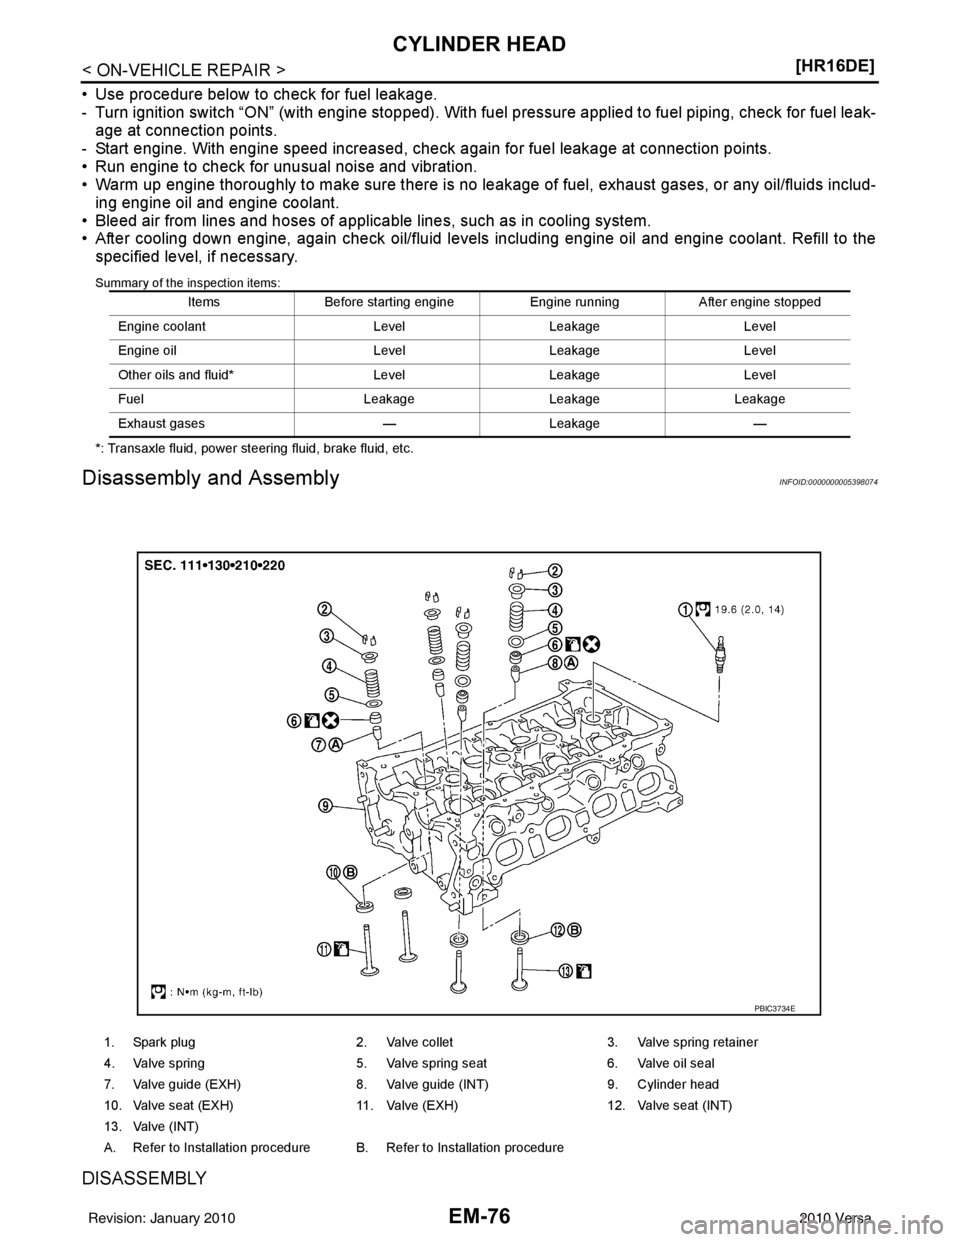
Disassembly and AssemblyINFOID:0000000005398074
DISASSEMBLY
Items Before starting engine Engine runningAfter engine stopped
Engine coolant LevelLeakage Level
Engine oil LevelLeakage Level
Other oils and fluid* LevelLeakage Level
Fuel LeakageLeakageLeakage
Exhaust gases —Leakage —
1. Spark plug 2. Valve collet3. Valve spring retainer
4. Valve spring 5. Valve spring seat6. Valve oil seal
7. Valve guide (EXH) 8. Valve guide (INT)9. Cylinder head
10. Valve seat (EXH) 11. Valve (EXH)12. Valve seat (INT)
13. Valve (INT)
A. Refer to Installation procedure B. Refer to Installation procedure
PBIC3734E
Revision: January 20102010 Versa
Page 2442 of 3745
ENGINE ASSEMBLYEM-83
< REMOVAL AND INSTALLATION > [HR16DE]
C
D
E
F
G H
I
J
K L
M A
EM
NP
O
• If items or work required are not covered by the engine section, follow the procedures in the applica-
ble sections.
• Always use the support poin t specified for lifting.
• Use either 2-pole lift type or separate type lift as best you can. If board-on type is used for unavoid-
able reasons, support at the rear axle jacking point with a transmission jack or similar tool before
starting work, in preparation for the backward shif t of center of gravity.
• For supporting points fo r lifting and jacking point at rear axle, refer to GI-38, "
Garage Jack and
Safety Stand and 2-Pole Lift".
REMOVAL
Outline
Remove the engine and the transaxle assembly from t he vehicle downward. Separate the engine and the tran-
saxle.
Preparation
1. Remove the hood assembly. Refer to BL-14, "Removal and Installation".
2. Remove the cowl top cover and cowl top extension assembly. Refer to EI-22, "
Removal and Installation".
3. Release fuel pressure. Refer to EC-496, "
Inspection".
4. Drain engine coolant from radiator. Refer to CO-12, "
Changing Engine Coolant".
CAUTION:
• Perform this step when the engine is cold.
• Never spill engine coolant on drive belt.
5. Drain the transmission fluid. Refer to MT-11, "
Draining" (M/T).
6. Remove the following parts. • Engine under cover. Refer to EI-15, "
Removal and Installation".
• Front road wheels and tires. Refer to WT-7, "
Adjustment".
• Front fender protector (RH and LH). Refer to EI-24, "
Removal and Installation".
• Battery and battery tray. Refer to SC-7, "
Removal and Installation".
• Drive belt. Refer to EM-15, "
Removal and Installation".
• Air duct and air cleaner case assembly. Refer to EM-26, "
Exploded View".
• Radiator hose (upper and lower). Refer to CO-17, "
Component".
• Disconnect cooling fan controller wiring harness.
• Remove coolant reservoir tank.
• Remove fan shroud and cooling fan assembly. Refer to CO-19, "
Component (Models with A/C)" or CO-
19, "Component (Models without A/C)".
Engine Room LH
1. Disconnect all connections of engine harness around the engine mounting insulator (LH), and then tem-
porarily secure the engine harness into the engine side.
CAUTION:
Protect connectors using a resin bag against foreign materials.
2. Remove ground cable at transaxle side.
3. Disconnect fuel feed hose at engine side. Refer to EM-34, "
Exploded View".
4. Disconnect EVAP purge hose and brake booster vacuum hose.
5. Disconnect heater hoses, and install plugs them to prevent engine coolant from draining. Refer to CO-17,
"Component".
6. Disconnect control linkage from transaxle. Refer to AT-213, "
A/T Shift Selector Removal and Installation"
(A/T), MT-14, "Exploded View" (M/T).
7. Disconnect the clutch tube at tr ansmission side (if equipped). Refer to CL-15, "
Removal and Installation".
Engine Room RH
1. Remove ground cable between front cover and vehicle.
2. Remove generator and generator br acket (A/C models). Refer to SC-25, "
Removal and Installation".
3. Remove A/C compressor with piping connected from t he engine. Temporarily secure it on the vehicle side
with a rope to avoid putting load on it (if equipped). Refer to MTC-79, "
Removal and Installation of Com-
pressor - HR16DE".
Vehicle Underbody
Revision: January 20102010 Versa