ECU NISSAN TITAN 2008 1.G Quick Reference Guide
[x] Cancel search | Manufacturer: NISSAN, Model Year: 2008, Model line: TITAN, Model: NISSAN TITAN 2008 1.GPages: 36, PDF Size: 2.4 MB
Page 15 of 36

13
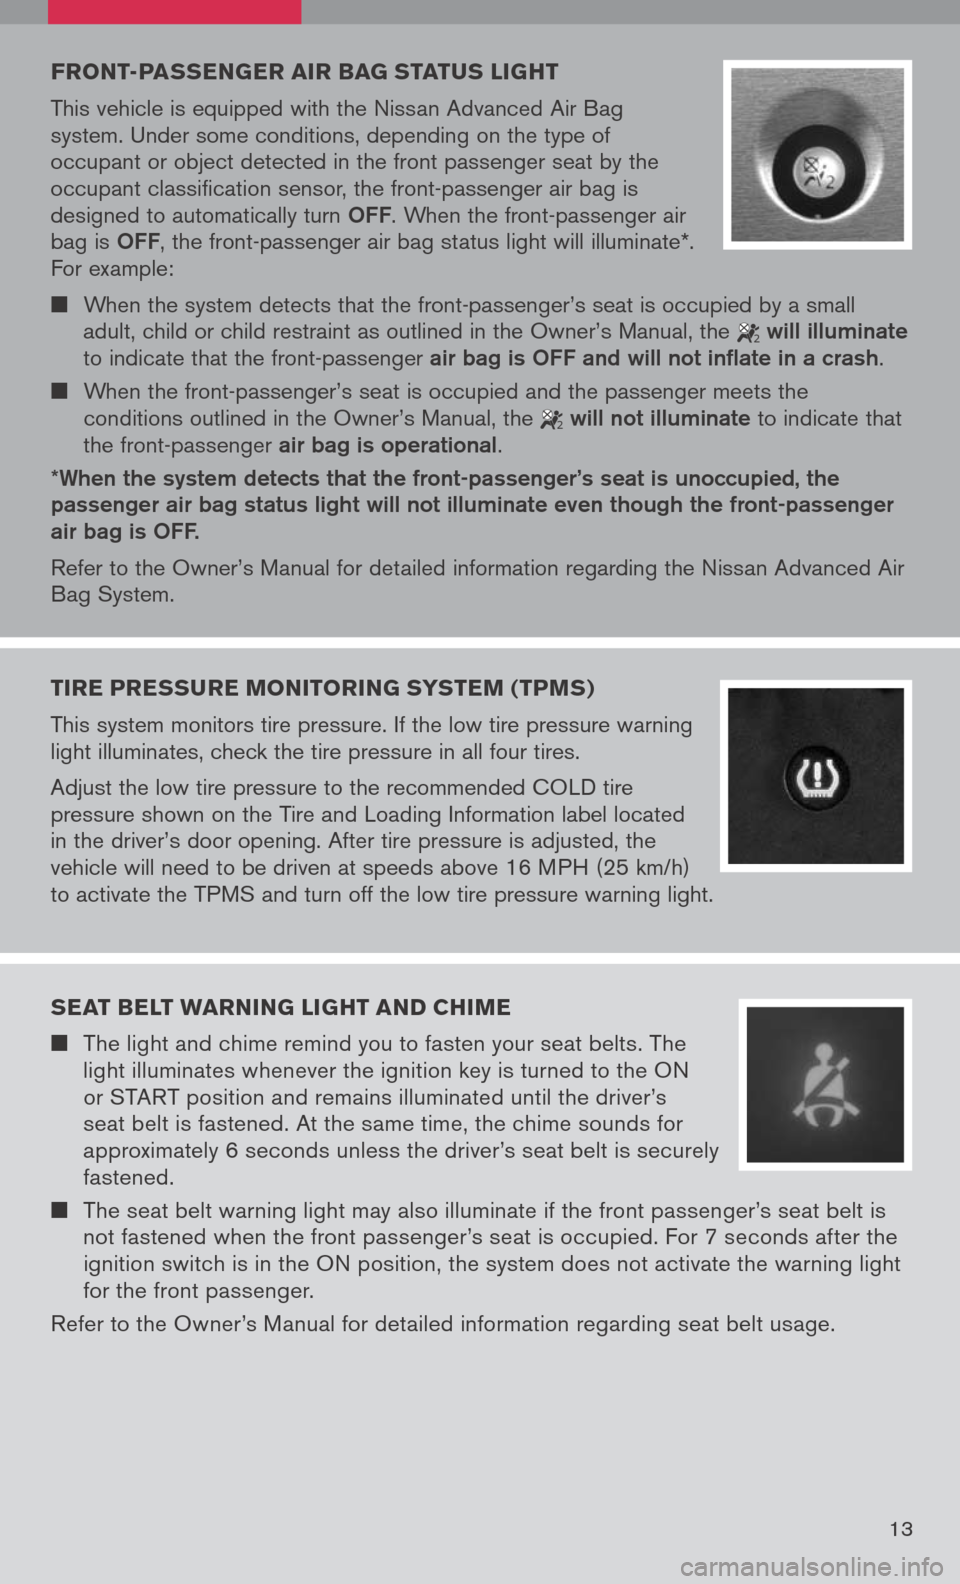
FRONT-PAssEN gER AIR BA g sTAT us LI gHT
This vehicle is equipped with the Nissan Advanced Air Bag
system. Under some conditions, depending on the type of
occupant or object detected in the front passenger seat by the
occupant classification sensor, the front-passenger air bag is
designed to automatically turn
OFF. When the front-passenger air
bag is OFF, the front-passenger air bag status light will illuminate*.
For example:
When the system detects that the front-passenger’s seat is occupied by a small
adult, child or child restraint as outlined in the Owner’s Manual, the
2 will illuminate
to indicate that the front-passenger air bag is OFF and will not inflate in a crash.
When the front-passenger’s seat is occupied and the passenger meets the
conditions outlined in the Owner’s Manual, the
2 will not illuminate to indicate that
the front-passenger air bag is operational.
*When the system detects that the front-passenger’s seat is unoccupied, the passenger air bag status light will not illuminate even though the front-passenger air bag is OFF.
Refer to the Owner’s Manual for detailed information regarding the Nissan Advanced Air
Bag System.
TIRE PRE ssuRE MONITORIN g sY s TEM (TPM s)
This system monitors tire pressure. If the low tire pressure warning
light illuminates, check the tire pressure in all four tires.
Adjust the low tire pressure to the recommended COLD tire
pressure shown on the Tire and Loading Information label located
in the driver’s door opening. After tire pressure is adjusted, the
vehicle will need to be driven at speeds above 16 MPH (25 km/h)
to activate the TPMS and turn off the low tire pressure warning light.
sEAT BELT wARNIN g LIgHT AND CHIME
The light and chime remind you to fasten your seat belts. The
light illuminates whenever the ignition key is turned to the ON
or START position and remains illuminated until the driver’s
seat belt is fastened. At the same time, the chime sounds for
approximately 6 seconds unless the driver’s seat belt is securely
fastened.
The seat belt warning light may also illuminate if the front passenger’s seat belt is
not fastened when the front passenger’s seat is occupied. For 7 seconds after the
ignition switch is in the ON position, the system does not activate the warning light
for the front passenger.
Refer to the Owner’s Manual for detailed information regarding seat belt usage.
Page 17 of 36

HIg H uTILITY BED AND uTILI -TRACK™
CHANNEL sYs TEM
(if so equipped)
The Utili-track
™ channel system allows you to move
tie-down clamps in the bed to the best location to
secure a load.
The tie-down cleats must be installed so the
clamp is properly seated in the notches in the
rail. If the tie-down cleat is not seated in the
notches, it will not be flush with the rail and cannot be properly tightened. The bolt in
the center of the cleat must be tightened hand tight (20 – 40 inch pounds).
Check the tightness of the tie-down cleat periodically during a trip to make sure the
center bolt has not become loose.
The channel end stoppers can be used to help prevent cargo from sliding or shifting
off the end of the truck bed. They must be installed so they are properly seated in
the detents in the channel.
Refer to your Owner’s Manual for loading limits and tie-down recommendations.
15
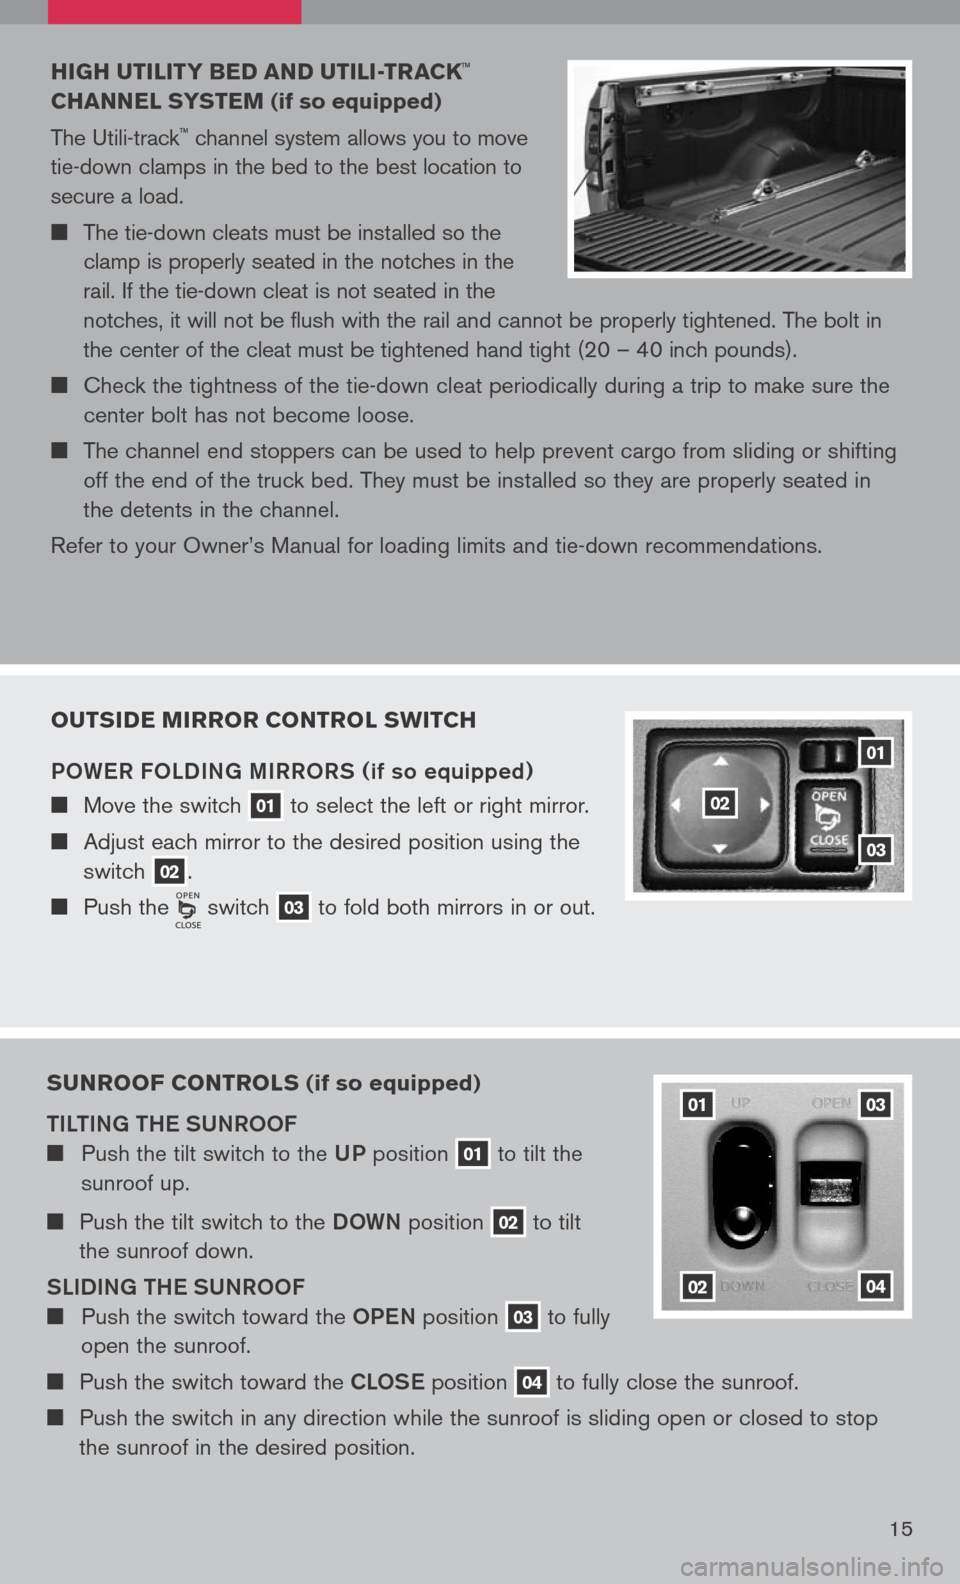
OuTs IDE MIRROR CONTROL swITCH
POW eR FOLDIN g MIRRORS
(if so equipped)
Move the switch 01 to
select the left or right mirror.
Adjust each mirror to the desired position using the
switch 02.
Push the switch 03 to
fold both mirrors in or out.
01
02
03
su NROOF CONTROL s (if so equipped)
TILTIN g TH e SUNROOF
Push the tilt switch to the UP position 01 to
tilt the
sunroof up.
Push the tilt switch to the DOWN position 02 to
tilt
the sunroof down.
SLIDIN g TH e SUNROOF
Push the switch toward the OPeN position 03 to
fully
open the sunroof.
Push the switch toward the CLOS e position 04 to
fully close the sunroof.
Push the switch in any direction while the sunroof is sliding open or closed to stop
the sunroof in the desired position.
01
02
03
04
Page 18 of 36

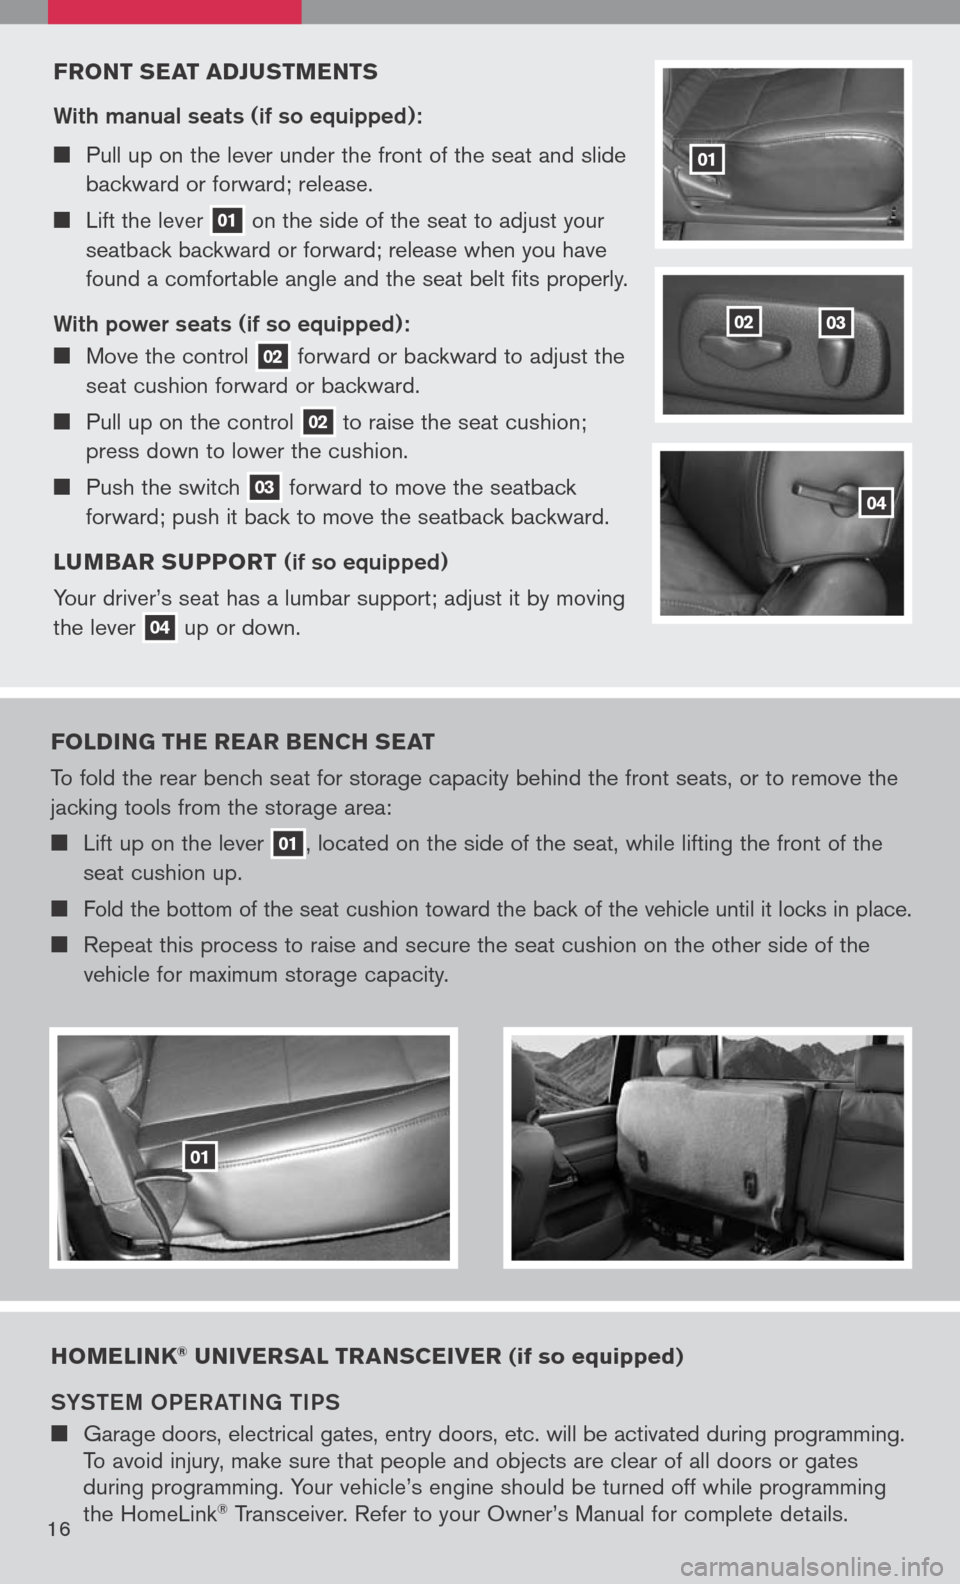
FRONT sEAT ADJ usTMENT s
With manual seats (if so equipped):
Pull up on the lever under the front of the seat and slide
backward or forward; release.
Lift the lever 01 on
the side of the seat to adjust your
seatback backward or forward; release when you have
found a comfortable angle and the seat belt fits properly.
With power seats (if so equipped):
Move the control 02 forward
or backward to adjust the
seat cushion forward or backward.
Pull up on the control 02 to
raise the seat cushion;
press down to lower the cushion.
Push the switch 03 forward
to move the seatback
forward; push it back to move the seatback backward.
L u MBAR suPPORT
(if so equipped)
Your driver’s seat has a lumbar support; adjust it by moving
the lever
04 up
or down.
0302
01
04
FOLDIN g THE REAR BENCH sEAT
To fold the rear bench seat for storage capacity behind the front seats, or to remove the
jacking tools from the storage area:
Lift up on the lever 01, located on the side of the seat, while lifting the front of the
seat cushion up.
Fold the bottom of the seat cushion toward the back of the vehicle until it locks in place.
Repeat this process to raise and secure the seat cushion on the other side of the
vehicle for maximum storage capacity.
01
HOMELINK® u NIVER sAL TRAN sCEIVER (if so equipped)
SYST eM OP eR aTIN g TIPS
Garage doors, electrical gates, entry doors, etc. will be activated during programming.
To avoid injury, make sure that people and objects are clear of all doors or gates
during programming. Your vehicle’s engine should be turned off while programming
the HomeLink
® Transceiver. Refer to your Owner’s Manual for complete details.16