stop start NISSAN TITAN 2016 2.G User Guide
[x] Cancel search | Manufacturer: NISSAN, Model Year: 2016, Model line: TITAN, Model: NISSAN TITAN 2016 2.GPages: 636, PDF Size: 7.17 MB
Page 144 of 636
The E-Lock system can help provide added trac-
tion if the vehicle is stuck or becoming stuck.
To activate the E-Lock system:● the 4WD switch must be in the 4LO position
(4-wheel drive vehicles) ,
● the vehicle must be stopped or moving at
4 mph (7 km/h) or less, and
● the E-Lock system switch must be turned
ON. When the E-Lock system switch is turned ON,
the indicator light will flash until the system en-
gages. However, if all operation conditions listed
above are not met or the system becomes disen-
gaged, the indicator light will continue to flash.
The Anti-Lock Brake (ABS) system is disabled
and the ABS light illuminates when the E-Lock
system is ON. Also, the Vehicle Dynamic Control
(VDC) system is disabled and the VDC light
illuminates when the E-Lock system is ON.
For additional information, refer to “Electronic
locking rear differential (E-Lock) system” in the
“Starting and driving” section of this manual for
further explanation and system limitations.
WARNING
●
Never leave the E-Lock system ON when
driving on paved or hard-surfaced
roads. Turning the vehicle may result in
the rear wheels slipping and result in an
accident and personal injury. After us-
ing the E-Lock system to free the ve-
hicle, turn the system OFF. ●
Use the rear differential lock only in an
emergency when it is not possible to
free a stuck vehicle even using 4LO.
Never use the E-Lock system on a slip-
pery road surface such as snow or ice
surface. Using the E-Lock system when
driving in these road conditions may
cause unexpected movement of the ve-
hicle during engine braking, accelerat-
ing or turning, which may result in an
accident and serious personal injury.
● Avoid quick starts while the E-Lock sys-
tem is in operation. Otherwise the
power train system parts could be
damaged.
● Observe the above warnings. Other-
wise, loss of normal steering control
may result This may result in an acci-
dent and serious personal injury.
LIC3157
ELECTRONIC LOCKING REAR
DIFFERENTIAL (E-Lock) SYSTEM
SWITCH (if so equipped)
Instruments and controls2-63
Page 163 of 636
Automatic operation
To fully open a window equipped with automatic
operation, press the window switch down to the
second detent and release it; it need not be held.
The window automatically opens all the way. To
stop the window, lift the switch up while the
window is opening.
To fully close a window equipped with automatic
operation, pull the switch up to the second detent
and release it; it need not be held. To stop the
window, press the switch down while the window
is closing.
Auto-reverse function
The auto-reverse function can be activated when
a window is closed by automatic operation.
Depending on the environment or driving
conditions, the auto-reverse function may
be activated if an impact or load similar to
something being caught in the window oc-
curs.
WARNING
There are some small distances immedi-
ately before the closed position which
cannot be detected. Make sure that all
passengers have their hands, etc., inside
the vehicle before closing the window.
If the vehicle’s battery is disconnected, replaced,
or jump started, the power window auto-reverse
function may not operate properly. If this occurs,
please contact the dealer to re-initialize the
power window auto-reverse system.
If the control unit detects something caught in a
window equipped with automatic operation, as it
is closing, the window will be immediately low-
ered.
REAR SLIDING WINDOW (if so
equipped)
WARNING
● You must ensure all occupants and ob-
jects are free of the rear window area
prior to and during operation. Failure to
do so may result in injury and/or dam-
age to the rear window system.
● The rear window is not designed to
carry long items through it.
LIC0410LIC3488
2-82Instruments and controls
Page 189 of 636
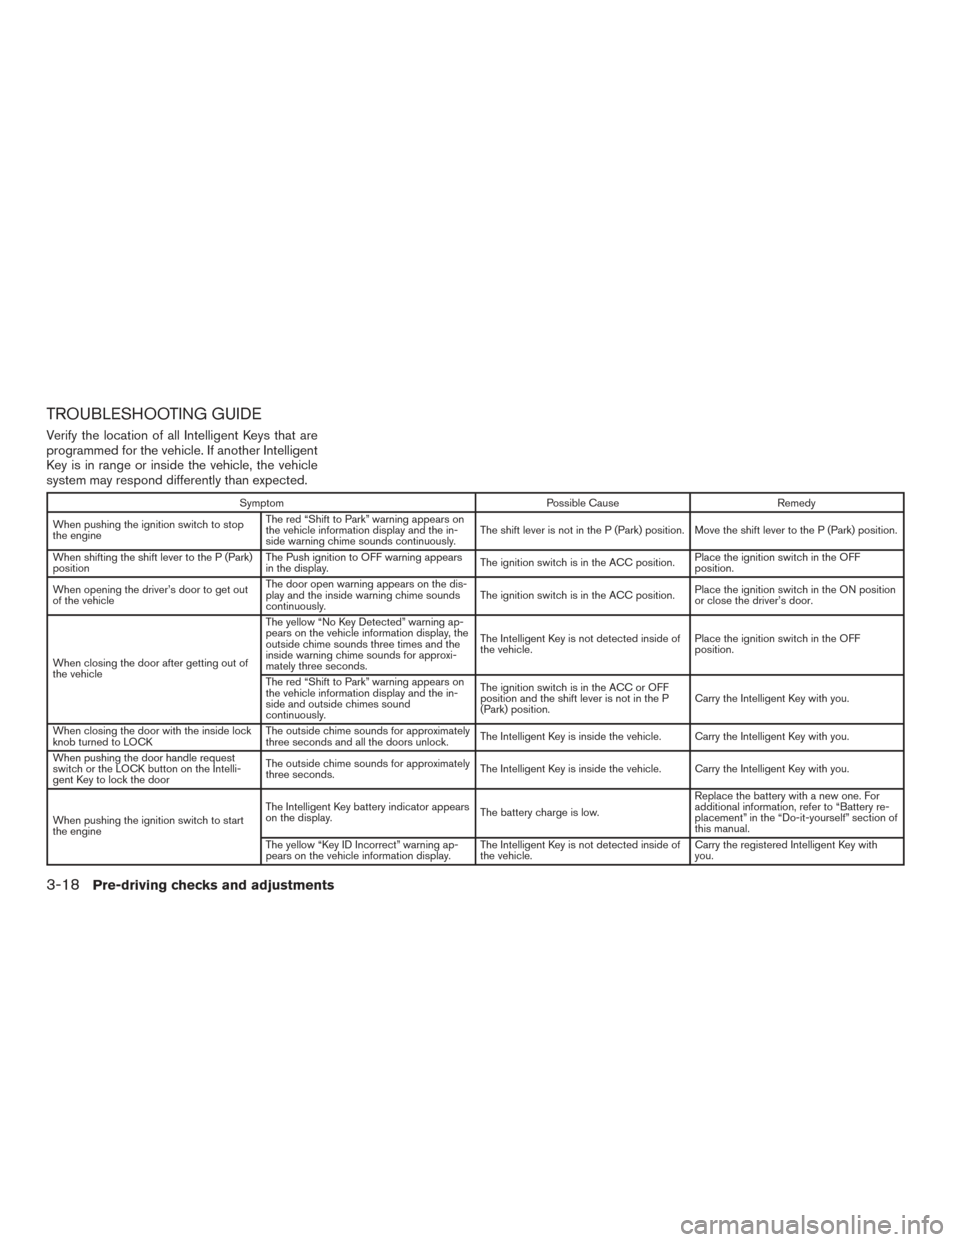
TROUBLESHOOTING GUIDE
Verify the location of all Intelligent Keys that are
programmed for the vehicle. If another Intelligent
Key is in range or inside the vehicle, the vehicle
system may respond differently than expected.
SymptomPossible CauseRemedy
When pushing the ignition switch to stop
the engine The red “Shift to Park” warning appears on
the vehicle information display and the in-
side warning chime sounds continuously.
The shift lever is not in the P (Park) position. Move the shift lever to the P (Park) position.
When shifting the shift lever to the P (Park)
position The Push ignition to OFF warning appears
in the display.
The ignition switch is in the ACC position.Place the ignition switch in the OFF
position.
When opening the driver’s door to get out
of the vehicle The door open warning appears on the dis-
play and the inside warning chime sounds
continuously.
The ignition switch is in the ACC position.
Place the ignition switch in the ON position
or close the driver’s door.
When closing the door after getting out of
the vehicle The yellow “No Key Detected” warning ap-
pears on the vehicle information display, the
outside chime sounds three times and the
inside warning chime sounds for approxi-
mately three seconds.
The Intelligent Key is not detected inside of
the vehicle.
Place the ignition switch in the OFF
position.
The red “Shift to Park” warning appears on
the vehicle information display and the in-
side and outside chimes sound
continuously. The ignition switch is in the ACC or OFF
position and the shift lever is not in the P
(Park) position.
Carry the Intelligent Key with you.
When closing the door with the inside lock
knob turned to LOCK The outside chime sounds for approximately
three seconds and all the doors unlock.
The Intelligent Key is inside the vehicle. Carry the Intelligent Key with you.
When pushing the door handle request
switch or the LOCK button on the Intelli-
gent Key to lock the door The outside chime sounds for approximately
three seconds.
The Intelligent Key is inside the vehicle. Carry the Intelligent Key with you.
When pushing the ignition switch to start
the engine The Intelligent Key battery indicator appears
on the display.
The battery charge is low.Replace the battery with a new one. For
additional information, refer to “Battery re-
placement” in the “Do-it-yourself” section of
this manual.
The yellow “Key ID Incorrect” warning ap-
pears on the vehicle information display. The Intelligent Key is not detected inside of
the vehicle.Carry the registered Intelligent Key with
you.
3-18Pre-driving checks and adjustments
Page 191 of 636
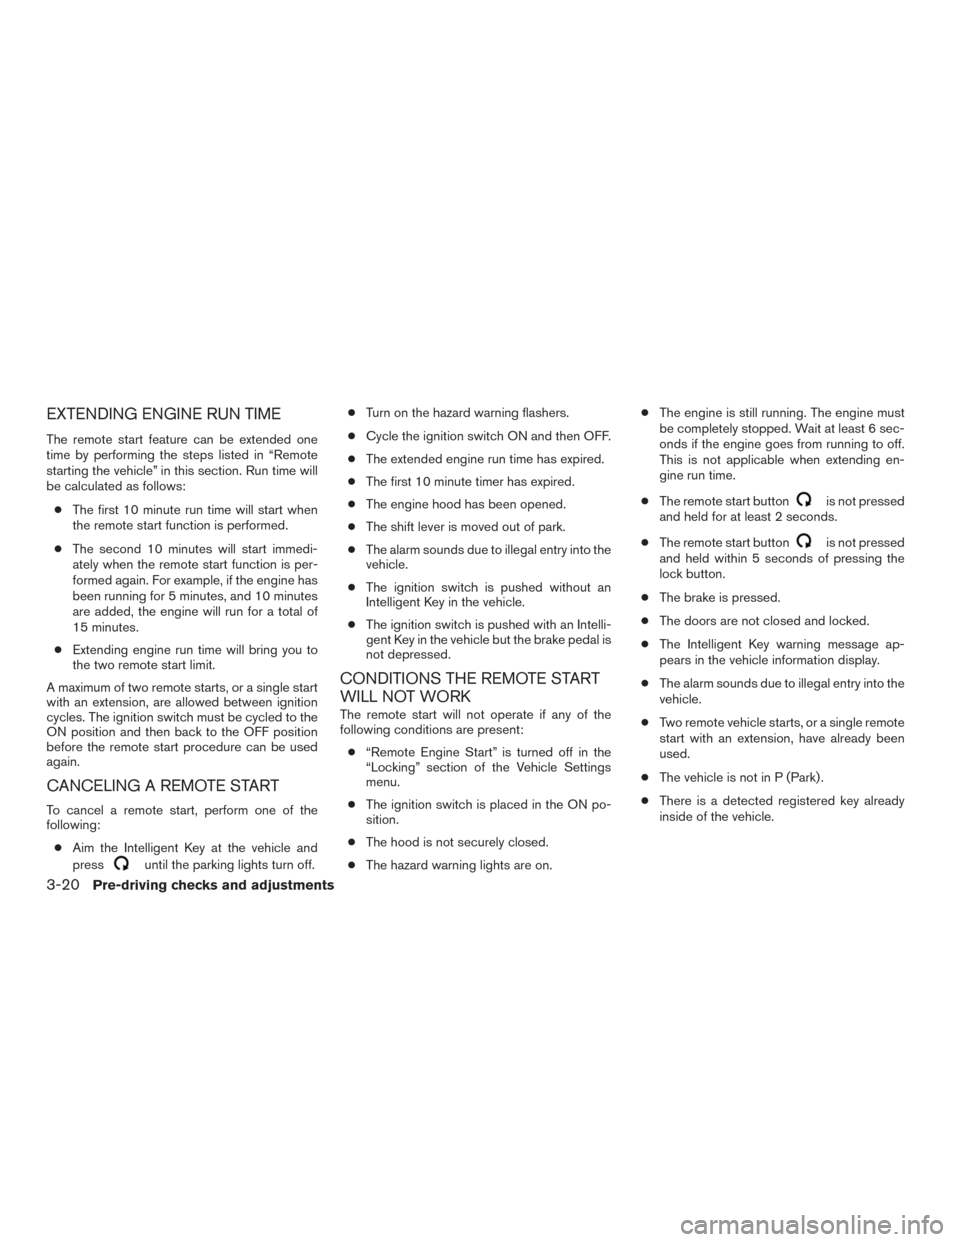
EXTENDING ENGINE RUN TIME
The remote start feature can be extended one
time by performing the steps listed in “Remote
starting the vehicle” in this section. Run time will
be calculated as follows:● The first 10 minute run time will start when
the remote start function is performed.
● The second 10 minutes will start immedi-
ately when the remote start function is per-
formed again. For example, if the engine has
been running for 5 minutes, and 10 minutes
are added, the engine will run for a total of
15 minutes.
● Extending engine run time will bring you to
the two remote start limit.
A maximum of two remote starts, or a single start
with an extension, are allowed between ignition
cycles. The ignition switch must be cycled to the
ON position and then back to the OFF position
before the remote start procedure can be used
again.
CANCELING A REMOTE START
To cancel a remote start, perform one of the
following: ● Aim the Intelligent Key at the vehicle and
press
until the parking lights turn off. ●
Turn on the hazard warning flashers.
● Cycle the ignition switch ON and then OFF.
● The extended engine run time has expired.
● The first 10 minute timer has expired.
● The engine hood has been opened.
● The shift lever is moved out of park.
● The alarm sounds due to illegal entry into the
vehicle.
● The ignition switch is pushed without an
Intelligent Key in the vehicle.
● The ignition switch is pushed with an Intelli-
gent Key in the vehicle but the brake pedal is
not depressed.
CONDITIONS THE REMOTE START
WILL NOT WORK
The remote start will not operate if any of the
following conditions are present:
● “Remote Engine Start” is turned off in the
“Locking” section of the Vehicle Settings
menu.
● The ignition switch is placed in the ON po-
sition.
● The hood is not securely closed.
● The hazard warning lights are on. ●
The engine is still running. The engine must
be completely stopped. Wait at least 6 sec-
onds if the engine goes from running to off.
This is not applicable when extending en-
gine run time.
● The remote start button
is not pressed
and held for at least 2 seconds.
● The remote start button
is not pressed
and held within 5 seconds of pressing the
lock button.
● The brake is pressed.
● The doors are not closed and locked.
● The Intelligent Key warning message ap-
pears in the vehicle information display.
● The alarm sounds due to illegal entry into the
vehicle.
● Two remote vehicle starts, or a single remote
start with an extension, have already been
used.
● The vehicle is not in P (Park) .
● There is a detected registered key already
inside of the vehicle.
3-20Pre-driving checks and adjustments
Page 193 of 636
DIESEL FUEL ENGINES
For additional information, refer to the separate
Titan Diesel Owners Manual.
GASOLINE FUEL ENGINES
WARNING
●Gasoline is extremely flammable and
highly explosive under certain condi-
tions. You could be burned or seriously
injured if it is misused or mishandled.
Always stop the engine and do not
smoke or allow open flames or sparks
near the vehicle when refueling. ●
Do not attempt to top off the fuel tank
after the fuel pump nozzle shuts off
automatically. Continued refueling may
cause fuel overflow, resulting in fuel
spray and possibly a fire.
● Use only an original equipment type
fuel-filler cap as a replacement. It has a
built-in safety valve needed for proper
operation of the fuel system and emis-
sion control system. An incorrect cap
can result in a serious malfunction and
possible injury. It could also cause
the
Malfunction Indicator Light
(MIL) to come on.
● Never pour fuel into the throttle body to
attempt to start your vehicle.
● Do not fill a portable fuel container in
the vehicle or trailer. Static electricity
can cause an explosion of flammable
liquid, vapor or gas in any vehicle or
trailer. To reduce the risk of serious
injury or death when filling portable fuel
containers:
– Always place the container on the ground when filling.
– Do not use electronic devices when filling.
LPD2434
FUEL-FILLER DOOR
3-22Pre-driving checks and adjustments
Page 209 of 636
ENTRY/EXIT FUNCTION
This system is designed so that the driver’s seat
and automatic operation steering column will au-
tomatically move when the shift lever is in the P
(Park) position. This allows the driver to get into
and out of the driver’s seat more easily.
The driver’s seat will slide backward and the
steering column will move up:● When the driver’s door is opened with the
ignition switch placed in the OFF position.
● When the ignition switch is changed from
ACC to OFF with the driver’s door open.
The driver’s seat and steering wheel will return to
the previous position: ● When the ignition switch is changed from
ACC or ON while the shift lever is in the P
(Park) position.
The entry/exit function can be adjusted or can-
celed through the Vehicle Settings in the vehicle
information display by performing the following: ● Switch the Exit Seat Slide from ON to OFF.
● Switch the Exit Steering UP from ON to
OFF.
Restarting the entry/exit function
If the battery cable is disconnected, or if the fuse
opens, the stored memory positions will be lost
and some of the functions will be restricted:
1. Drive the vehicle over 25 mph (40 km/h).
OR 2. Open and close the driver’s door more than two times with the ignition switch in the OFF
position.
The entry/exit function should now work properly.
SYSTEM OPERATION
The automatic drive positioner system will not
work or will stop operating under the following
conditions: ● When the vehicle speed is above 4 mph
(7 km/h).
● When any of the memory switches are
pushed while the automatic drive positioner
is operating.
● When the adjusting switch for the driver’s
seat is turned on while the automatic drive
positioner is operating. ●
When the seat has already been moved to
the memorized position.
● When no seat position is stored in the
memory switch.
● When the shift lever is moved from P (Park)
to any other position.
3-38Pre-driving checks and adjustments
Page 307 of 636
3D button
Press this button to select between several audio
effects. DVD mode: Concert, Living Room, Hall,
Bathroom, Cave, Arena, Church, and Off.
PBC (Video CD only) button
Press this button to run the playback control on or
off.
ZOOM button
Press this button to zoom in or out when display-
ing images or playing DVDs. The zoom range for
images is from 50% to 200%. The zoom range
for DVDs is from 1/4 size to 4x the original size.
NEXT button
Press this button to select the next chapter, track,
or file.
PREV button
Press this button to select the previous chapter,
track, or file.
FF (Fast foward) button
Press this button to search media forwards.
FR (Fast rewind) button
Press this button to search media backwards.
STOP button
Press this button once to stop playback (press
play to resume playback) . Press this button twice
to perform a full stop (press play to start playback
from the beginning) .
PLAY/PAUSE button
Press this button to begin media playback. Press
this button again to pause media playback.
Number Keys
0—9
SUBTITLE button
Press this button to select and display subtitles
(this function only applies to DVD titles that sup-
port subtitles) .
TITLE button
Press this button to navigate the title menu if
included on the disc.
CH- SEARCH/SKIP button
Non-functioning.
AUTO MEMORY button
Non-functioning.
DOWN button
Press this button to navigate down when display-
ing a menu or file list.
RETURN button
Press this button to return to a previous menu
screen.
LEFT button
Press this button to navigate left when displaying
a menu or file list.
UP button
Press this button to navigate up when displaying
a menu or file list.
MENU button
Press this button to go to the root menu if in-
cluded on the disc.
MUTE button
Press this button to mute the audio when playing
discs or playing files from a USB device. Press
this button again to resume audio.
SOUND AROUND ON/OFF
Turns the FM transmitter ON/OFF.
4-96Monitor, climate, audio, phone and voice recognition systems
Page 325 of 636
CAUTION
●Keep the antenna as far away as pos-
sible from the electronic control
modules.
● Keep the antenna wire more than 8 in
(20 cm) away from the electronic control
system harnesses. Do not route the an-
tenna wire next to any harness.
● Adjust the antenna standing-wave ratio
as recommended by the manufacturer.
● Connect the ground wire from the CB
radio chassis to the body.
● For details, it is recommended that you
visit a NISSAN dealer for this service.
WARNING
● Use a phone after stopping your vehicle
in a safe location. If you have to use a
phone while driving, exercise extreme
caution at all times so full attention may
be given to vehicle operation.
● If you are unable to devote full attention
to vehicle operation while talking on
the phone, pull off the road to a safe
location and stop your vehicle.
CAUTION
To avoid discharging the vehicle battery,
use a phone after starting the engine.
BLUETOOTH® HANDS-FREE PHONE
SYSTEM WITHOUT NAVIGATION
SYSTEM (if so equipped)
4-114Monitor, climate, audio, phone and voice recognition systems
Page 338 of 636
WARNING
●Use a phone after stopping your vehicle
in a safe location. If you have to use a
phone while driving, exercise extreme
caution at all times so full attention may
be given to vehicle operation.
● If you are unable to devote full attention
to vehicle operation while talking on
the phone, pull off the road to a safe
location and stop your vehicle.
CAUTION
To avoid discharging the vehicle battery,
use a phone after starting the engine.
Your NISSAN is equipped with the Bluetooth®
Hands-Free Phone System. If you have a com-
patible Bluetooth® enabled cellular phone, you
can set up the wireless connection between your
cellular phone and the in-vehicle phone module.
With Bluetooth® wireless technology, you can make or receive a hands-free telephone call with
your cellular phone in the vehicle.
Once your cellular phone is connected to the
in-vehicle phone module, no other phone con-
necting procedure is required. Your phone is
automatically reconnected with the in-vehicle
LHA3782
BLUETOOTH® HANDS-FREE PHONE
SYSTEM WITH NAVIGATION SYSTEM
(if so equipped)
Monitor, climate, audio, phone and voice recognition systems4-127
Page 340 of 636
REGULATORY INFORMATION
FCC Regulatory information
– CAUTION: To maintain compliance withFCC’s RF exposure guidelines, use only the
supplied antenna. Unauthorized antenna,
modification, or attachments could damage
the transmitter and may violate FCC regula-
tions.
– Operation is subject to the following two con- ditions:
1. This device may not cause interference and
2. this device must accept any interference, including interference that may cause unde-
sired operation of the device.
IC Regulatory information
– Operation is subject to the following two con- ditions: (1) this device may not cause interfer-
ence, and (2) this device must accept any
interference, including interference that may
cause undesired operation of the device.
– This Class B digital apparatus meets all re- quirements of the Canadian Interference-
Causing Equipment Regulations.
BLUETOOTH® is a
trademark owned by
Bluetooth SIG, Inc.
and licensed to
Bosch.
VOICE COMMANDS
You can use voice commands to operate various
Bluetooth® Hands-Free Phone System features
using the NISSAN Voice Recognition system. For
additional information, refer to “NISSAN Voice
Recognition System” in this section.
Voice Prompt Interrupt
While using the Voice Recognition system, the
system voice can be interrupted to allow the user
to speak commands. While the system is speak-
ing, press the
button on the steering
wheel. The system voice will stop and a tone will
be heard. After the tone, speak desired command
(displayed on the touch-screen) .
One Shot Call
To use the system faster, you may speak the
second level commands with the main menu
command on the main menu. For example, press
the
button and after the tone say, “Call
Redial”.
CONNECTING PROCEDURE
NOTE:
The connecting procedure must be per-
formed when the vehicle is stationary. If the
vehicle starts moving during the procedure,
the procedure will be cancelled.
1. Press the [
] button on the control
panel.
2. Touch the “Settings” key.
3. Touch the “Phone & Bluetooth” key.
4. Touch the “Connect New Device” key.
LHA3712
Monitor, climate, audio, phone and voice recognition systems4-129