NISSAN TITAN 2017 2.G Owners Manual
Manufacturer: NISSAN, Model Year: 2017, Model line: TITAN, Model: NISSAN TITAN 2017 2.GPages: 671, PDF Size: 7.96 MB
Page 341 of 671
OptionDescrip-
tion Range Default
Sharpness Adjust to
soften or sharpen the
picture. 0 — 100 50
IR Head- phone Select on
or off to
turn the IR head-
phone
audio out- put on or off. ON or
OFF ON
Language Set lan-
guage of
the moni- tor OSD menu. English,
French,
Spanish, Portu-guese English
Reset Resets the
monitorOSD
menu set- tings todefault
values. Press Up
or Down; “OK” will be
displayed.
PLAYING A CD
Insert a disc into the unit with label facing the rear
of vehicle and select monitor A mode (if using
monitor A) or monitor B mode (if using monitor B)
using the front controls or the remote control.
When playing an audio CD, the information
screen appears automatically. It can display the
current track number along with the amount of
time the track has been playing, the amount of
time remaining for the track playing, the total
amount of time elapsed so far, or the total amount
of time remaining.
Display
Press the DISPLAY button on the remote control
to select the desired type of display setting. The
single elapsed time of the current track is dis-
played by default.
Press DISPLAY (1x)
“Single Remain” is displayed along with the cur-
rent track playing and the amount of time remain-
ing for the current track.
Press DISPLAY (2x)
“Total Elapsed” is displayed along with the cur-
rent track playing and the total amount of elapsed
time.
Press DISPLAY (3x)
“Total Remain” is displayed along with the current
track playing and the total amount of time remain-
ing.
Press the DISPLAY button again to display the
elapsed time of the current track.
Skipping Tracks
Press the NEXT button on the remote control to
select to the next track. Press the PREV button
one time to select the beginning of the current
track. Press the PREV button two times to select
the previous track.
LHA3864
4-104Monitor, climate, audio, phone and voice recognition systems
Page 342 of 671
Repeat Modes
To access the repeat mode options, press the
REPEAT button on the remote control. The re-
peat mode options are as follows:●
REPEAT ALL: Repeat the entire disc
(default) .
●
REPEAT ONE: Repeat the current
track.
● REPEAT OFF: Playback stops after the disc
in its entirety.
Random Mode
You can choose what order the tracks will be
played. To access the random play mode, press
the RANDOM button on the remote control. All
tracks on the disc will playback in random order.
Press RANDOM again to cancel random mode.
Direct Track Access
Press the number keys on the remote control
(0–9) to access a track directly. For example, to
go to track 14, press “1”,”4”, then ENTER on the
remote control.
PLAYING AUDIO FILES
MP3 and WMA are formats for storing digital
audio. A CD quality song can be compressed into
the MP3 or WMA format with very little loss of
quality, while talking up much less storage space.
Encoded discs and USB devices that include
MP3 or WMA audio files can be played on this
system.
Insert a disc or USB device into the unit and
select monitor A mode (if using monitor A) or
monitor B (if using monitor B) using the front
panel controls or the remote control.
Using a USB Device
Insert a USB device into the USB connection
port. When inserting a USB device, the top side
of the devices should face upwards.
When an MP3/WMA encoded disc or USB de-
vice is inserted, the information screen appears
automatically and playback will begin.
Display
During audio file playback, press the DISPLAY
button on the remote control to select between
the file list and currently playing file.
Selecting Files
1. To change files when a file is playing, press
the
orbuttons on the re-
mote control to display the file list, and then
press the
orbuttons to
select the desired file.
2. Once the desired file is highlighted, press the ENTER button on the remote control to
select it.
LHA3865
Monitor, climate, audio, phone and voice recognition systems4-105
Page 343 of 671
Selecting Folders
1. To select folders when a file is playing, pressthe
button on the remote control
to display the list. Press the
orbuttons to select the desired
folder.
2. Press the
button to access the
previous level (go up one level) or, press
the
button to access the next level
(go down one level) .
3. Once the desired folder is highlighted, press the ENTER button on the remote control to
select it.
Skipping Files
Press the NEXT button on the remote control to
select to the next file. Press the PREV button one
time to select the beginning of the current file.
Press the PREV button two times to select the
previous file.
Repeat Modes
To access the repeat mode options, press the
REPEAT button on the remote control. The re-
peat mode options are as follows:
●
REPEAT ALL: Repeat the entire disc
or USB device (default) . ●
REPEAT FOLDER: Repeat the cur-
rent folder
●
REPEAT ONE: Repeat the current
file.
● REPEAT OFF: Playback stops after the disc
or USB device is played in its entirety.
Random Mode
You can choose what order the files will be
played. To access the random play mode, press
the RANDOM button on the remote control. The
files in the current folder will playback in random
order. Press RANDOM again to cancel random
mode.
Direct File Access
Press the number keys on the remote control
(0–9) to access a file directly. For example, to go
to track 14, press “1”,”4”, then ENTER on the
remote control.
PLAYING IMAGE FILES
Insert a disc or USB device into the unit and
select monitor A mode (if using monitor A) or
monitor B (if using monitor B) using the front
panel controls or the remote control.
Using a USB Device
Insert a USB device into the USB connection
port. When inserting a USB device, the top side
of the devices should face upwards.
When a disc or USB device with JPG files is
inserted, the slideshow will begin automatically.
LHA3866
4-106Monitor, climate, audio, phone and voice recognition systems
Page 344 of 671
When a disc or USB device with mixed
audio/video/image files is inserted, the file list
screen may appear first.
Selecting Files
1. To select files during the slideshow, pressthe MENU button remote control to access
the file list. Press the
orbuttons on the remote control to select the
desired file.
2. Once the desired file is highlighted, press the ENTER button on the remote control to
select it.
Selecting Folders
1. To select folders during the slideshow, pressthe MENU button on the remote control to
access the list.
2. Press the
button to access the
previous level (go up one level) or, press
the
button to access the next level
(go down one level) .
3. Once the desired folder is highlighted, press the ENTER button on the remote control to
select it.
Repeat Modes
To access the repeat mode options, press the
REPEAT button on the remote control. The re-
peat mode options are as follows:
●
REPEAT ALL: Repeat the entire disc
or USB device (default) .
●
REPEAT FOLDER: Repeat the cur-
rent folder
●
REPEAT ONE: Repeat the current
file.
● REPEAT OFF: Playback stops after the disc
or USB device is played in its entirety.
Thumbnail Views
1. Press the STOP button on the remote con- trol during the slideshow to display images
in thumbnail mode. Press the
orand theorbuttons on the remote control to select the
desired language.
2. Once the desired image is highlighted, press the ENTER button on the remote con-
trol to select it.
Rotating Images
During the slideshow, press thebutton
on the remote control to rotate the image 90°
clockwise. Press the
button to rotate
the image 90° counter-clockwise.
Inverting Images
During the slideshow, press thebutton
on the remote control to invert the image (Up-
Down) .
Mirroring Images
During the slideshow, press thebutton
on the remote control to mirror the image (Left-
Right) .
Direct File Access
Press the number keys on the remote control
(0–9) to access a file directly. For example, to go
to track 14, press “1”,”4”, then ENTER on the
remote control.
Monitor, climate, audio, phone and voice recognition systems4-107
Page 345 of 671
PLAYING VIDEO FILES
Insert a disc or USB device into the unit and
select monitor A mode (if using monitor A) or
monitor B (if using monitor B) using the front
panel controls or the remote control.
Using a USB Device
Insert a USB device into the USB connection
port. When inserting a USB device, the top side
of the device should face upwards.
When a disc or USB device with video files is
inserted, playback will begin automatically. Whena disc or USB device with mixed
audio/video/image files is inserted, the file list
screen may appear first.
Selecting Files
1. To select files during the video playback,
press the MENU button on the remote con-
trol to access the file list. Press the
orbuttons on the remote control to
select the desired file.
2. Once the desired file is highlighted, press the ENTER button on the remote control to
select it.
Selecting Folders
1. To select folders during video playback,press the MENU button on the remote con-
trol to access the list.
2. Press the
button to access the
previous level (go up one level) or, press
the
button to access the next level
(go down one level) .
3. Once the desired folder is highlighted, press the ENTER button on the remote control to
select it.
Skipping Files
Press the NEXT button on the remote control to
select to the next file. Press the PREV button one
time to select the beginning of the current file.
Press the PREV button two times to select the
previous file.
Repeat Modes
To access the repeat mode options, press the
REPEAT button on the remote control. The re-
peat mode options are as follows:
●
REPEAT ALL: Repeat the entire disc
or USB device (default) .
●
REPEAT FOLDER: Repeat the cur-
rent folder
●
REPEAT ONE: Repeat the current
file.
● REPEAT OFF: Playback stops after the disc
or USB device is played in its entirety.
Direct File Access
Press the number keys on the remote control
(0–9) to access a file directly. For example, to go
to track 14, press “1”,”4”, then ENTER on the
remote control.
LHA3867
4-108Monitor, climate, audio, phone and voice recognition systems
Page 346 of 671
CHARGING A USB DEVICE
Plug the USB cable (not supplied) into the USB
connection port and then connect the other end
to the USB device.
NOTE:
Depending on the device, it may or may not
charge when connected to the USB port.
Not all devices are able to charge when
connected to the USB port.
CONNECTING AN EXTERNAL
AUXILIARY A/V SOURCE — INPUT
An external A/V source such as a media player,
video game, or other audio/video device may be
connected to the RCA type jacks on the front of
the monitor. Connect the external audio/video
source to the RCA type input jacks on the front of
the monitor using RCA type connectors (sold
separately) .
Yellow: Video input
Red: Audio-right channel input
White: Audio-left channel input
The system will automatically select the auxiliary
input mode when the RCA type connectors are
inserted into the input jacks. The auxiliary input
connection overrides disc and USB playback.The system provides priority for each of the fol-
lowing device inputs:
1. External RCA A/V input
2. USB port
3. Disc playback
For example if a disc is playing and a USB device
is plugged in, the USB device will take priority
over disc playback. The external RCA A/V input
connections have priority over both USB port and
disc playback.
CONNECTING AN EXTERNAL A/V
MONITOR — OUTPUT
An external audio/video monitor may be con-
nected to the 3.5mm A/V connector (sold sepa-
rately) .
NOTE:
Use the 3.5mm A/V cable made specifically
for the device. An optional adapter (sold
separately) may be used to convert the
3.5mm A/V output to the standard RCA
jacks.
SELECTING MONITOR A OR B AS
THE SOURCE
It is possible to select monitor B as the source
from monitor A and vice versa. This will allow
content that is playing on monitor B to be dis-
played on monitor A.
Monitor A:
To select monitor B as the source for monitor A,
press the source button on the front panel or the
remote control until “MONITOR B” is displayed.
Monitor B:
To select monitor A as the source for monitor B,
press the source button on the front panel or the
remote control until “MONITOR A” is displayed.
Monitor, climate, audio, phone and voice recognition systems4-109
Page 347 of 671
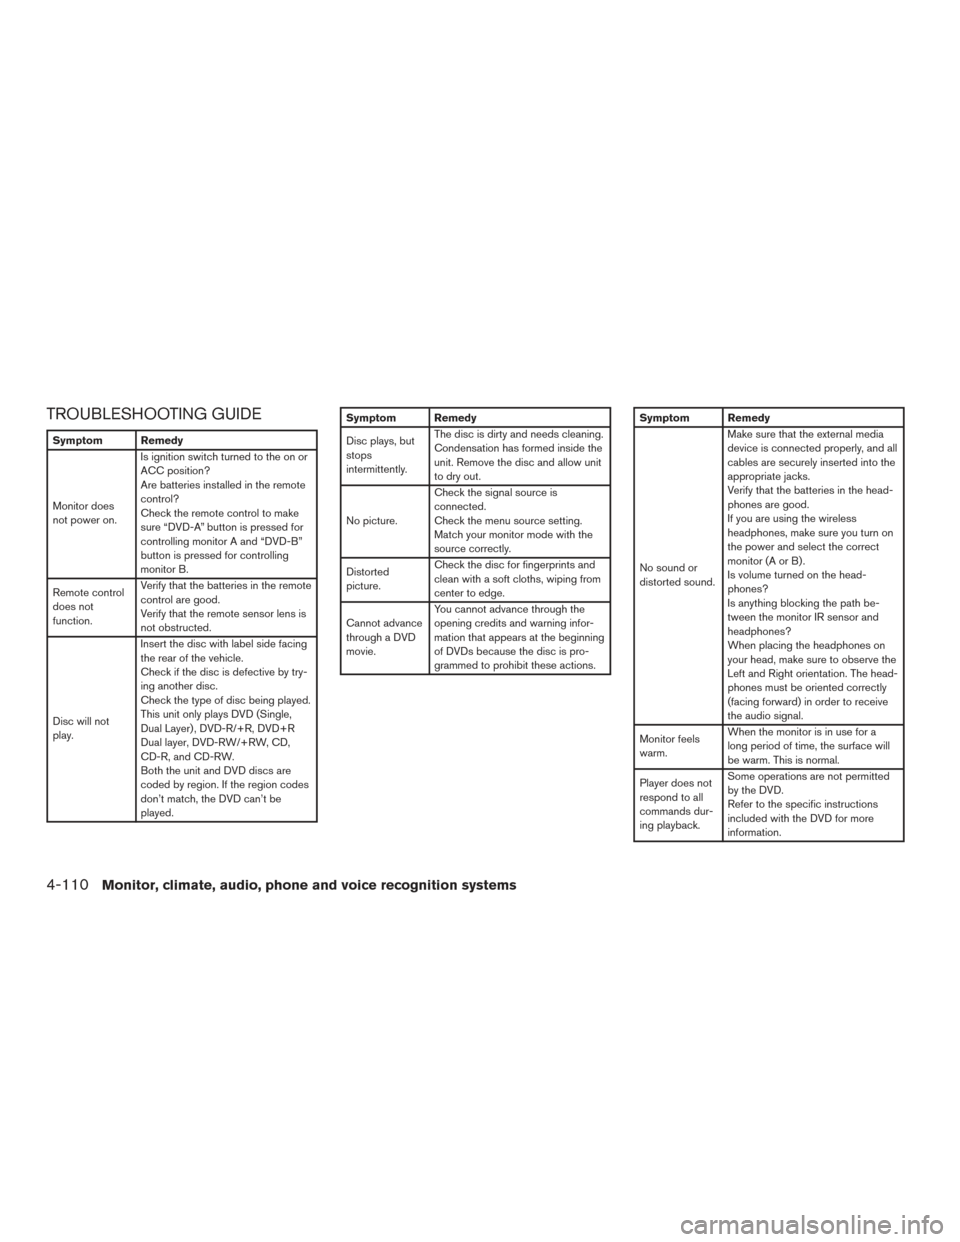
TROUBLESHOOTING GUIDE
Symptom Remedy
Monitor does
not power on.Is ignition switch turned to the on or
ACC position?
Are batteries installed in the remote
control?
Check the remote control to make
sure “DVD-A” button is pressed for
controlling monitor A and “DVD-B”
button is pressed for controlling
monitor B.
Remote control
does not
function. Verify that the batteries in the remote
control are good.
Verify that the remote sensor lens is
not obstructed.
Disc will not
play. Insert the disc with label side facing
the rear of the vehicle.
Check if the disc is defective by try-
ing another disc.
Check the type of disc being played.
This unit only plays DVD (Single,
Dual Layer) , DVD-R/+R, DVD+R
Dual layer, DVD-RW/+RW, CD,
CD-R, and CD-RW.
Both the unit and DVD discs are
coded by region. If the region codes
don’t match, the DVD can’t be
played.
Symptom Remedy
Disc plays, but
stops
intermittently.
The disc is dirty and needs cleaning.
Condensation has formed inside the
unit. Remove the disc and allow unit
to dry out.
No picture. Check the signal source is
connected.
Check the menu source setting.
Match your monitor mode with the
source correctly.
Distorted
picture. Check the disc for fingerprints and
clean with a soft cloths, wiping from
center to edge.
Cannot advance
through a DVD
movie. You cannot advance through the
opening credits and warning infor-
mation that appears at the beginning
of DVDs because the disc is pro-
grammed to prohibit these actions.Symptom Remedy
No sound or
distorted sound.Make sure that the external media
device is connected properly, and all
cables are securely inserted into the
appropriate jacks.
Verify that the batteries in the head-
phones are good.
If you are using the wireless
headphones, make sure you turn on
the power and select the correct
monitor(AorB).
Is volume turned on the head-
phones?
Is anything blocking the path be-
tween the monitor IR sensor and
headphones?
When placing the headphones on
your head, make sure to observe the
Left and Right orientation. The head-
phones must be oriented correctly
(facing forward) in order to receive
the audio signal.
Monitor feels
warm. When the monitor is in use for a
long period of time, the surface will
be warm. This is normal.
Player does not
respond to all
commands dur-
ing playback. Some operations are not permitted
by the DVD.
Refer to the specific instructions
included with the DVD for more
information.
4-110Monitor, climate, audio, phone and voice recognition systems
Page 348 of 671
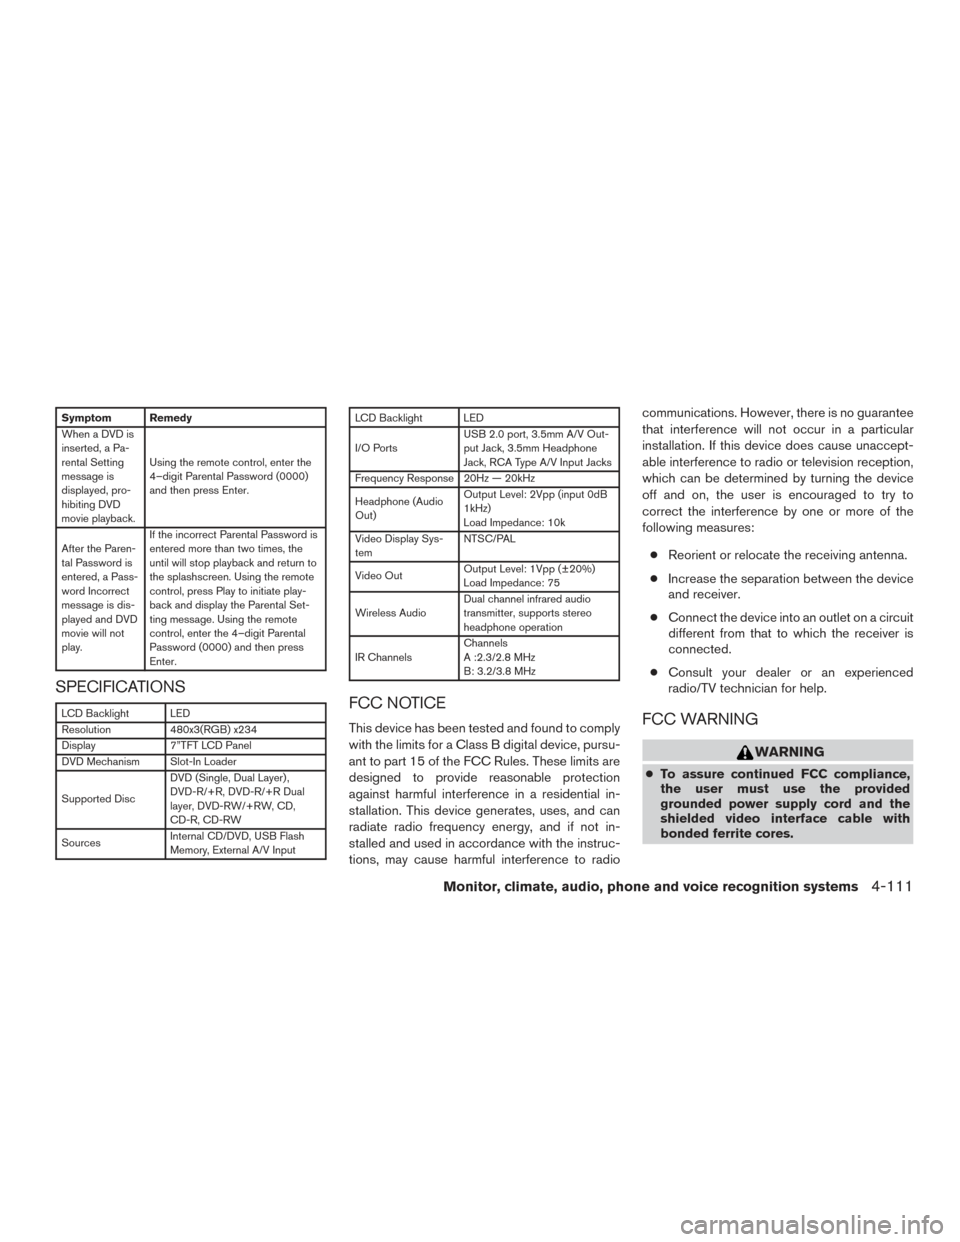
Symptom Remedy
When a DVD is
inserted, a Pa-
rental Setting
message is
displayed, pro-
hibiting DVD
movie playback.Using the remote control, enter the
4–digit Parental Password (0000)
and then press Enter.
After the Paren-
tal Password is
entered, a Pass-
word Incorrect
message is dis-
played and DVD
movie will not
play. If the incorrect Parental Password is
entered more than two times, the
until will stop playback and return to
the splashscreen. Using the remote
control, press Play to initiate play-
back and display the Parental Set-
ting message. Using the remote
control, enter the 4–digit Parental
Password (0000) and then press
Enter.
SPECIFICATIONS
LCD Backlight LED
Resolution
480x3(RGB) x234
Display 7”TFT LCD Panel
DVD Mechanism Slot-In Loader
Supported Disc DVD (Single, Dual Layer) ,
DVD-R/+R, DVD-R/+R Dual
layer, DVD-RW/+RW, CD,
CD-R, CD-RW
Sources Internal CD/DVD, USB Flash
Memory, External A/V Input
LCD Backlight LED
I/O PortsUSB 2.0 port, 3.5mm A/V Out-
put Jack, 3.5mm Headphone
Jack, RCA Type A/V Input Jacks
Frequency Response 20Hz — 20kHz
Headphone (Audio
Out) Output Level: 2Vpp (input 0dB
1kHz)
Load Impedance: 10k
Video Display Sys-
tem NTSC/PAL
Video Out Output Level: 1Vpp (±20%)
Load Impedance: 75
Wireless Audio Dual channel infrared audio
transmitter, supports stereo
headphone operation
IR Channels Channels
A :2.3/2.8 MHz
B: 3.2/3.8 MHz
FCC NOTICE
This device has been tested and found to comply
with the limits for a Class B digital device, pursu-
ant to part 15 of the FCC Rules. These limits are
designed to provide reasonable protection
against harmful interference in a residential in-
stallation. This device generates, uses, and can
radiate radio frequency energy, and if not in-
stalled and used in accordance with the instruc-
tions, may cause harmful interference to radio communications. However, there is no guarantee
that interference will not occur in a particular
installation. If this device does cause unaccept-
able interference to radio or television reception,
which can be determined by turning the device
off and on, the user is encouraged to try to
correct the interference by one or more of the
following measures:
● Reorient or relocate the receiving antenna.
● Increase the separation between the device
and receiver.
● Connect the device into an outlet on a circuit
different from that to which the receiver is
connected.
● Consult your dealer or an experienced
radio/TV technician for help.FCC WARNING
WARNING
● To assure continued FCC compliance,
the user must use the provided
grounded power supply cord and the
shielded video interface cable with
bonded ferrite cores.
Monitor, climate, audio, phone and voice recognition systems4-111
Page 349 of 671
●Any unauthorized change or modifica-
tions to this device would void the us-
er’s authority to operate this device.
ITE NOTICE
This Class B digital apparatus complies with
Canadian ICES-003.
This device complies with Industry Canada license-
exempt RSS standard(s) . Operation is subject to
the following two conditions: (1) this device may not
cause interference, and (2) this device must accept
any interference, including interference that may
cause undesired operation of the device.
This device and its antenna(s) must not be co-
located or operation in conjunction with any other
antenna or transmitter.
Under Industry Canada regulations, this radio
transmitter may only operate using an antenna or
a type and maximum (or lesser) gain approved for
the transmitter by Industry Canada. To reduce
potential radio interference to other users, the
antenna type and its gain should be so chosen
that the equivalent isotropically radiated power
(e.i.r.p) is not more than that necessary for suc-
cessful communication.
WEEE NOTICE
Disposal of Old Electrical & Electronic Equip-
ment (Applicable in the European Union and
other European countries with separate collec-
tion systems) .
This symbol on the product or on its packaging
indicates that the device shall not be treated as
household waste. Instead, it shall be handed over
to the applicable collection point for the recycling
of electrical and electronic equipment By ensur-
ing this device is disposed of correctly, you will
help prevent potential negative consequences
for the environment and human health, which
could otherwise be caused by inappropriate waste handling of this device. The recycling of
material will help to conserve natural resources.
For additional information about recycling of this
device, please contact your local city office, your
household waste disposal service or the shop
where you purchased the device. Applicable ac-
cessory: remote control.
MACROVISION NOTICE
This product incorporates copyright protection
technology that is protected by method claims of
certain U.S. patents and other intellectual prop-
erty rights owned by Macrovision Corporation
and other rights owners. Use of this copyright
protection technology must be authorized by
Macrovision Corporation, and is intended for
home and other limited viewing used only unless
otherwise authorized by Macrovision
Corporation. Reverse engineering or disassem-
bly is prohibited.
LHA3869
4-112Monitor, climate, audio, phone and voice recognition systems
Page 350 of 671
DOLBY DIGITAL
Manufactured under license from Dolby Labora-
tories.
Dolby and the double-D symbol are registered
trademarks of Dolby Laboratories.When installing a CB, ham radio or car phone in
your vehicle, be sure to observe the following
precautions; otherwise, the new equipment may
adversely affect the engine control system and
other electronic parts.
WARNING
●
A cellular phone should not be used for
any purpose while driving so full atten-
tion may be given to vehicle operation.
Some jurisdictions prohibit the use of
cellular phones while driving.
● If you must make a call while your ve-
hicle is in motion, the hands free cellu-
lar phone operational mode (if so
equipped) is highly recommended. Ex-
ercise extreme caution at all times so
full attention may be given to vehicle
operation.
● If you are unable to devote full attention
to vehicle operation while talking on
the phone, pull off the road to a safe
location and stop your vehicle.
CAUTION
● Keep the antenna as far away as pos-
sible from the electronic control
modules.
● Keep the antenna wire more than 8 in
(20 cm) away from the electronic control
system harnesses. Do not route the an-
tenna wire next to any harness.
● Adjust the antenna standing-wave ratio
as recommended by the manufacturer.
● Connect the ground wire from the CB
radio chassis to the body.
● For additional information, it is recom-
mended that you visit a NISSAN dealer
for this service.
LHA3870
CAR PHONE OR CB RADIO
Monitor, climate, audio, phone and voice recognition systems4-113