brake rotor NISSAN X-TRAIL 2001 Service User Guide
[x] Cancel search | Manufacturer: NISSAN, Model Year: 2001, Model line: X-TRAIL, Model: NISSAN X-TRAIL 2001Pages: 3833, PDF Size: 39.49 MB
Page 2768 of 3833

BR-28
REAR DISC BRAKE
Caliper Removal and Installation
EFS00180
REMOVAL
1. Connect a vinyl tube to the air bleeder.
2. Drain brake fluid gradually from air bleeder while depressing
brake pedal.
3. Remove brake hose connected to caliper assembly and union
bolts. Remove brake hose from caliper assembly.
4. Remove union bolts and torque member mounting bolts, and
remove caliper assembly.
5. Remove disc rotor.
INSTALLATION
CAUTION:
●Refill with new brake fluid “DOT 3 or DOT 4”.
●Never reuse drained brake fluid.
1. Install disc rotor.
2. Install caliper assembly. Tighten mounting bolts to the specified torque.
CAUTION:
Wipe oil and grease on axle assembly washer seats and caliper assembly mounting surface.
Install caliper assembly.
3. Connect brake hose to caliper assembly and tighten union bolts to the specified torque.
CAUTION:
●Do not reuse the copper washer for union bolts.
●Securely assemble brake hose to protrusions on cylinder body.
4. Bleed air. Refer to BR-10, "
Bleeding Brake System" .
Caliper Disassembly and AssemblyEFS00181
DISASSEMBLY
WARNING:
Be careful not to pinch your fingers in the piston.
CAUTION:
Be careful not to damage the cylinder inner wall.
1. Remove caliper assembly from vehicle.
2. Remove sliding pin from cylinder body. Then remove pads, shims, shim covers, and pad retainers from
caliper assembly.
3. Remove sliding pin boots from torque member.
4. Using flat-bladed screwdriver (as shown in the figure), remove
retaining ring.
SFIA0143E
SBR028A
Page 2769 of 3833

REAR DISC BRAKE
BR-29
C
D
E
G
H
I
J
K
L
MA
B
BR
5. Place a wooden block as shown in the figure. Blow air into union
bolt mounting hole to remove pistons and piston boots.
6. Using flat-bladed screwdriver, remove piston seals.
INSPECTION AFTER DISASSEMBLY
Cylinder Body
CAUTION:
Use new brake fluid to clean. Never use mineral oils such as gasoline or kerosene.
●Check cylinder inner wall for corrosion, wear and damage. If corrosion, wear or damage is detected,
replace the cylinder body.
●Minor flaws caused by corrosion or foreign material can be removed by polishing the surface with fine
sandpaper. Replace the cylinder body, if necessary.
Torque Member
Check for wear, cracks and damage. If wear, cracks or damage is detected, replace the applicable part.
Piston
CAUTION:
The piston sliding surface is plated. Do not polish with sandpaper.
Check piston surface for corrosion, wear and damage. If corrosion, wear or damage is detected, replace the
applicable part.
Sliding Pin, Pin Bolt and Pin Boot
Check sliding pin and sliding pin boot for wear, damage and cracks. If corrosion, wear or damage is detected,
replace the applicable part.
DISC ROTOR INSPECTION
Visual Inspection
Check surface of the disc rotor for uneven wear, cracks and serious damage. If uneven wear, cracks or seri-
ous damage is detected, replace it.
Run Out Inspection
1. Using wheel nuts, fix the disc rotor to the wheels hub. (2 or more positions)
BRD0041D
SFIA0340E
Page 2770 of 3833

BR-30
REAR DISC BRAKE
2. Using a dial indicator, check run out.
CAUTION:
Before measuring, make sure that the axle endplay is 0 mm
(0 in).
3. If the run out is outside the limit, find the minimum run out point
by shifting the mounting positions of the disc rotor and wheel hub by one hole.
Thickness Inspection
Using a micrometer, check thickness of the disc rotor. If the thick-
ness is outside the standard, replace the disc rotor.
ASSEMBLY
CAUTION:
When assembling, do not use rubber grease.
1. Apply rubber lubricant to piston seals, and install them to cylin-
der body.
CAUTION:
Do not reuse piston seals.
2. Apply brake fluid to piston boots. Cover piston end with piston
boot. Install cylinder side lip on piston boot properly into groove
on cylinder body.
CAUTION:
Do not reuse piston boot.
3. Press piston into cylinder body by hand. Assemble piston side
lip on piston boot properly into groove on the piston.
CAUTION:
Press piston evenly and change pressing point to prevent
cylinder inner wall from being rubbed.Measurement point:
At a point 10 mm (0.39 in) from the outer
edge of the disc.
Run out limit:
0.07 mm (0.0028 in) or less
BRA0013D
Standard thickness : 16.0 mm (0.630 in)
Wear limit : 14.0 mm (0.551 in)
Maximum uneven wear (measured at 8 positions):
0.02 mm (0.0008 in) or less
SBR020B
SFIA0156E
SFIA0157E
Page 2772 of 3833

BR-32
SERVICE DATA AND SPECIFICATIONS (SDS)
SERVICE DATA AND SPECIFICATIONS (SDS)
PFP:00030
General SpecificationsEFS000CQ
Unit: mm (in)
Brake PedalEFS000CR
Check ValveEFS000CS
Brake BoosterEFS000CT
Vacuum type
Front Disc BrakeEFS000CU
Front brakeBrake model AD31VD
Cylinder bore diameter 44.4 × 2 (1.748 × 0.08)
Pad
Length x width x thickness132.0 × 52.5 × 11.0
(5.20 × 2.067 × 0.433)
Rotor outer diameter x thickness 280 × 28 (11.02 × 1.10)
Rear brakeBrake model AD9VA
Cylinder bore diameter 34.9 (1.374)
Pad
Length x width x thickness83.0 × 33.0 × 8.5
(3.268 × 1.299 × 0.335)
Rotor outer diameter x thickness 292 × 16 (11.50 × 0.63)
Master cylinder Cylinder bore diameter 25.4 (1)
Control valve Valve model Electronic control type
Brake boosterBooster model C215T
Diaphragm diameterPrimary 230 (9.06)
Secondary 205 (8.07)
Recommended brake fluid DOT 3 or DOT 4
Free play (at pedal top surface) 3 - 11 mm (0.12 - 0.43 in)
Looseness at clevis pin 1 - 3 mm (0.04 - 0.12 in)
Brake pedal height (from dash panel top surface)M/T model 156 - 166 mm (6.14 - 6.54 in)
A/T model 164 - 174 mm (6.46 - 6.85 in)
Depressed pedal height under force of 490 N (50 kg,110.6 lb)
(from dash panel top surface)M/T model 80 mm (3.15 in) or more
A/T model 85 mm (3.35 in) or more
Clearance between threaded end of stop lamp switch and pedal stopper 0.74 - 1.96 mm (0.0291 - 0.0772 in)
Vacuum leakage [at vacuum of 66.7 kPa (-500 mmHg, -19.69
inHg)]Within 1.3 kPa (10 mmHg, 0.39 inHg) of vacuum for 15 sec-
onds
Vacuum leakage [at vacuum of -66.7 kPa (-500 mmHg, -19.69
inHg)]Within 3.3 kPa (25 mmHg, 0.98 inHg) of vacuum for 15 sec-
onds
Input rod installation standard dimension 125 mm (4.92 in)
Brake typeAD31VD
Brake padStandard thickness (new) 11 mm (0.43 in)
Repair limit thickness 2.0 mm (0.07 in)
Disc rotorStandard thickness (new) 28 mm (1.10 in)
Repair limit thickness 26 mm (1.02 in)
Runout limit 0.04 mm (0.0016 in)
Page 2773 of 3833
SERVICE DATA AND SPECIFICATIONS (SDS)
BR-33
C
D
E
G
H
I
J
K
L
MA
B
BR
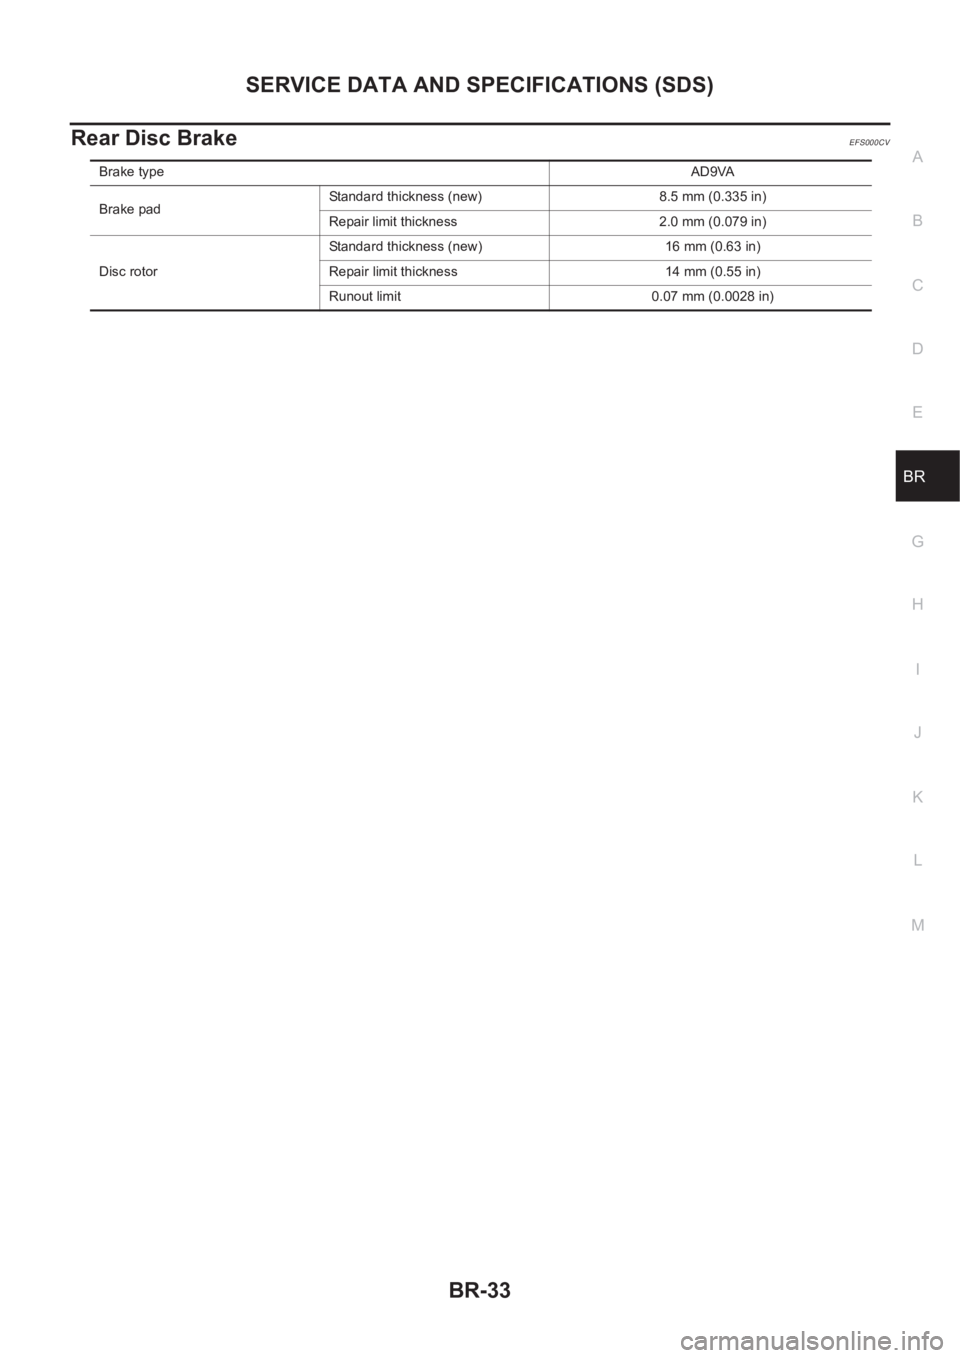
Rear Disc BrakeEFS000CV
Brake typeAD9VA
Brake padStandard thickness (new) 8.5 mm (0.335 in)
Repair limit thickness 2.0 mm (0.079 in)
Disc rotorStandard thickness (new) 16 mm (0.63 in)
Repair limit thickness 14 mm (0.55 in)
Runout limit 0.07 mm (0.0028 in)
Page 2776 of 3833
PB-2
NOISE, VIBRATION, AND HARSHNESS (NVH) TROUBLESHOOTING
NOISE, VIBRATION, AND HARSHNESS (NVH) TROUBLESHOOTING
PFP:00003
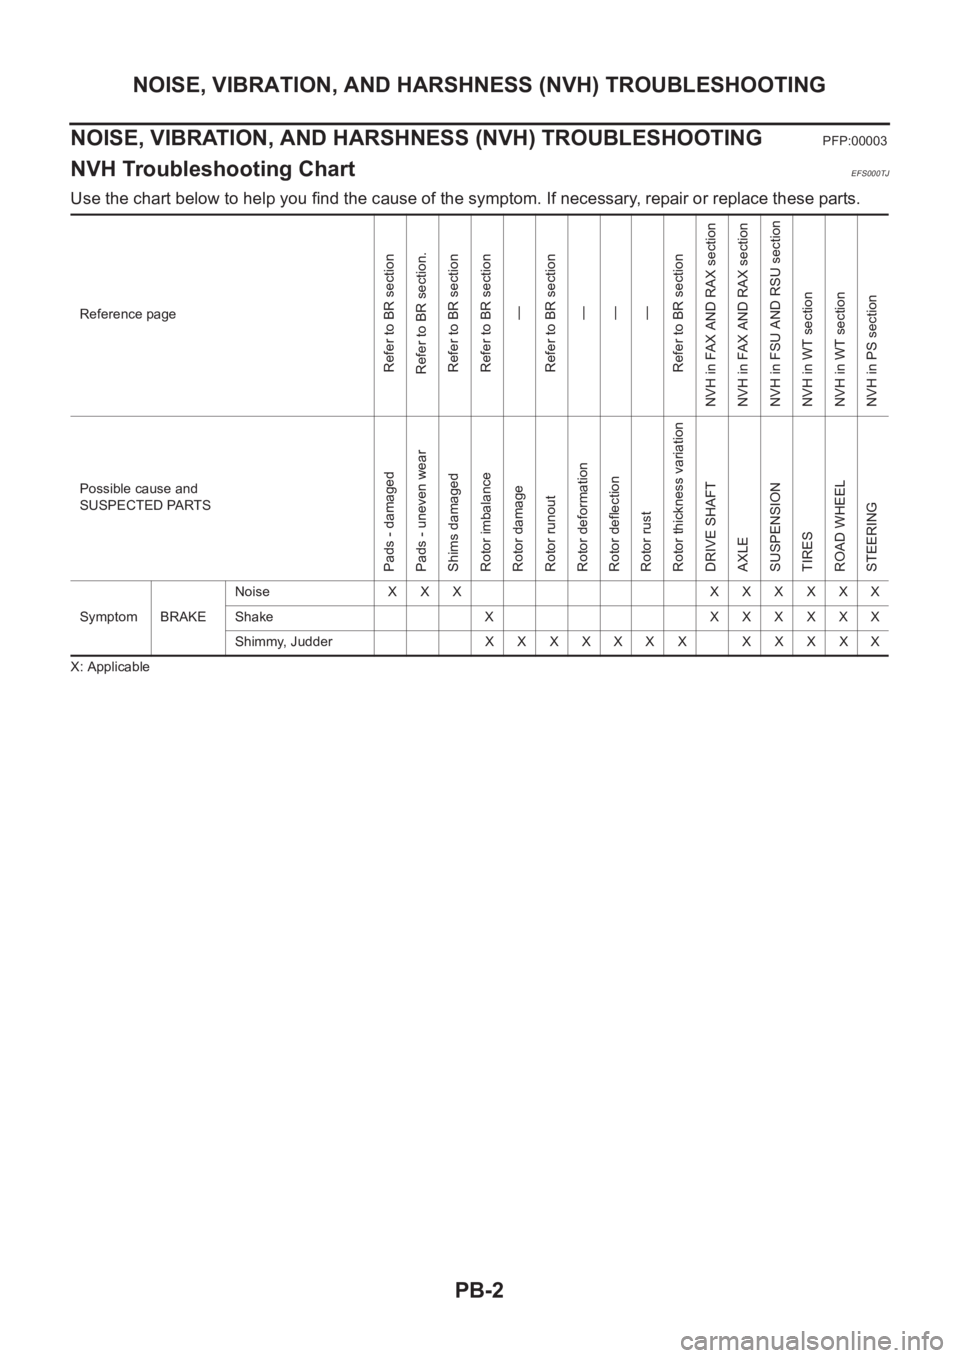
NVH Troubleshooting ChartEFS000TJ
Use the chart below to help you find the cause of the symptom. If necessary, repair or replace these parts.
X: ApplicableReference page
Refer to BR section
Refer to BR section.
Refer to BR section
Refer to BR section
—
Refer to BR section
—
—
—
Refer to BR section
NVH in FAX AND RAX section
NVH in FAX AND RAX section
NVH in FSU AND RSU section
NVH in WT section
NVH in WT section
NVH in PS section
Possible cause and
SUSPECTED PARTS
Pads - damaged
Pads - uneven wear
Shims damaged
Rotor imbalance
Rotor damage
Rotor runout
Rotor deformation
Rotor deflection
Rotor rust
Rotor thickness variation
DRIVE SHAFT
AXLE
SUSPENSION
TIRES
ROAD WHEEL
STEERING
Symptom BRAKENoise XXX XXXXXX
Shake X XXXXXX
Shimmy, JudderXXXXXXX XXXXX
Page 2780 of 3833
PB-6
PARKING BRAKE SHOE
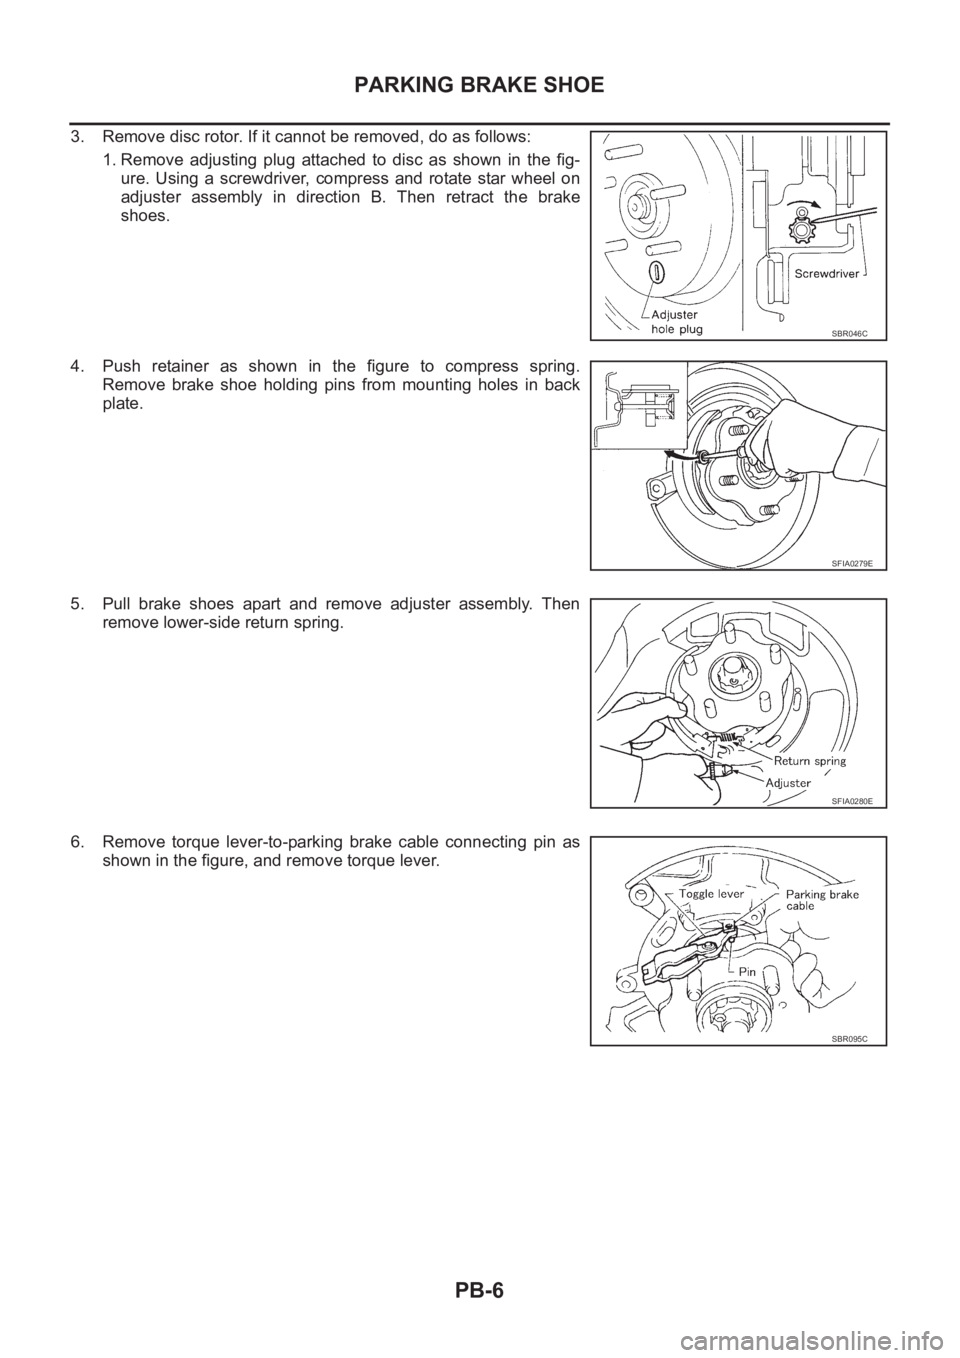
3. Remove disc rotor. If it cannot be removed, do as follows:
1. Remove adjusting plug attached to disc as shown in the fig-
ure. Using a screwdriver, compress and rotate star wheel on
adjuster assembly in direction B. Then retract the brake
shoes.
4. Push retainer as shown in the figure to compress spring.
Remove brake shoe holding pins from mounting holes in back
plate.
5. Pull brake shoes apart and remove adjuster assembly. Then
remove lower-side return spring.
6. Remove torque lever-to-parking brake cable connecting pin as
shown in the figure, and remove torque lever.
SBR046C
SFIA0279E
SFIA0280E
SBR095C
Page 2783 of 3833

PARKING BRAKE SHOE
PB-9
C
D
E
G
H
I
J
K
L
MA
B
PB
5. After assembly, be sure that each part is installed properly.
6. Fix disc rotor with wheel nut, and adjust brake shoe clearance.
Remove adjusting hole plug. Turn star wheel on adjuster in
direction A (for both wheels) until disc rotor locks. Then turn star
wheel in the opposite direction for 6 notches.
7. Rotate disc rotor to be sure that there is no drag. Then install
adjusting hole plug.
8. Adjust parking brake cable.
CAUTION:
If brake shoes were replaced with new ones. Carry out break-in
operation.
SBR048C
SBR097CA
Page 2786 of 3833

BRC-2
4WD ACTUATOR RELAY (4WD SOLENOID
A C T U AT O R R E L AY ) T U R N S O N / O F F F R E -
QUENTLY ............................................................ 42
ABS Warning Lamp Does Not Illuminate. (ABS
Warning Lamp Does Not Come On When The Igni-
tion Switch Is Turned ON.) ...................................... 42
ABS Warning Lamp Illuminates With Ignition ON,
But Does Not Illuminates After A Few Seconds.
(ABS Warning Lamp Has Illuminated.) ................... 42
4WD Warning Lamp Does Not Illuminate With Igni-
tion ON. .................................................................. 43
4WD Warning Lamp Does Not Go Out Several Sec-
onds After Engine Is Started. (Drive Mode Indicator
Lamp Goes Out.) .................................................... 43
Heavy Tight-corner Braking Symptom Occurs
When The Vehicle Is Driven In Auto Mode And The
Steering Wheel Is Turned Fully To Either Side After
The Engine Is Started. ............................................ 44
Drive Modes Cannot Be Switched After Engine Is
Started. ................................................................... 45
Wheel Driving, 4WD Warning Lamp Flashes Rap-
idly. (When It Flashes For Approx. One Minute, Then
Does Not Illuminate.) .............................................. 45
Wheel Driving, 4WD Warning Lamp Flashes Slowly.
(When It Continues To Illuminate Until Engine Turns
OFF.) ....................................................................... 45
Vehicle Does Not Enter 4WD Mode Even Though
4WD Warning Lamp Is OFF. ................................... 46
Tight-corner Braking Symptom Occurs When The
Vehicle Is Started In Auto Mode (4WD Warning
Lamp Remain OFF). ............................................... 46
E-TS Actuator Relay (4WD Solenoid Actuator
Relay) Turns ON/OFF Frequently. .......................... 46
Inspection Of Drive Mode Change-over Switch Path ... 47
4WD/ABS CONTROL UNIT ...................................... 48
Removal and Installation ........................................ 48
REMOVAL ........................................................... 48
INSTALLATION .................................................... 48
WHEEL SENSORS ................................................... 49
Removal and Installation ........................................ 49
G-SENSOR (4WD MODEL ONLY) ............................ 50
Removal and Installation ........................................ 50
SENSOR ROTOR ................................................... ... 51
Removal and Installation ........................................ 51
REMOVAL ........................................................... 51
INSTALLATION .................................................... 51
ACTUATOR ............................................................... 52
Removal and Installation ........................................ 52
REMOVAL ........................................................... 53
INSTALLATION .................................................... 53
ESP/TCS/ABS
PRECAUTIONS ......................................................... 54
Precautions for Brake System ................................ 54
Precautions for Brake Control ................................ 54
Precautions for CAN System .................................. 54
FOR INSPECTION .............................................. 54
FOR HARNESS REPAIR .................................... 55PREPARATION ......................................................... 56
Special Service Tool ................................................ 56
Commercial Service Tool ........................................ 56
ON-VEHICLE SERVICE ............................................ 57
Adjustment of Neutral Position of Steering Wheel
Angle Sensor .......................................................... 57
GENERAL INFORMATION ....................................... 59
Fail-Safe .................................................................. 59
ABS SYSTEM ...................................................... 59
ESP/TCS SYSTEM .............................................. 59
Hydraulic Circuit ...................................................... 59
ABS Functions ........................................................ 59
TCS Functions ........................................................ 60
ESP Functions ........................................................ 60
System Diagram ..................................................... 61
CAN COMMUNICATION ........................................... 62
System Description ................................................. 62
FOR A/T MODELS ............................................... 62
FOR M/T MODELS .............................................. 62
TROUBLE DIAGNOSIS ............................................ 64
How to Perform Trouble Diagnoses for Quick and
Accurate Repair ...................................................... 64
INTRODUCTION ................................................. 64
WORK FLOW ...................................................... 65
ASKING COMPLAINTS ....................................... 66
EXAMPLE OF DIAGNOSIS SHEET .................... 66
Component Parts and Harness Connector Location ... 67
Schematic ............................................................... 68
Wiring Diagram —ESP/TCS/ABS— ..................... 69
Control Unit Input/Output Signal Standard .............. 75
STANDARDS USING A CIRCUIT TESTER AND
OSCILLOSCOPE ................................................. 75
STANDARDS WITH CONSULT-II ........................ 78
Functions of CONSULT-II ....................................... 80
CONSULT-II MAINLY FUNCTION APPLICA-
TION TO ESP/TCS/ABS ...................................... 80
SELF-DIAGNOSIS ............................................... 81
DATA MONITOR .................................................. 83
ACTIVE TEST ...................................................... 87
For Correct and Quick Diagnosis ............................ 90
PRECAUTIONS FOR TROUBLE DIAGNOSIS ... 90
Basic Inspection ...................................................... 91
PRELIMINARY CHECK 1: (BRAKE FLUID
LEVEL AND LEAK INSPECTION) ....................... 91
PRELIMINARY CHECK 2: (INSPECTION FOR
LOOSE POWER SUPPLY TERMINAL) ............... 92
PRELIMINARY CHECK 3: (INSPECTION FOR
ABS WARNING LAMP, ESP OFF INDICATOR
LAMP, AND SLIP INDICATOR LAMP) ................. 92
Inspection 1 Wheel Sensor and Circuit ................... 92
Inspection 2 Engine System ................................... 94
Inspection 3 ESP/TCS/ABS Control Unit System ... 94
Inspection 4 Pressure Sensor and the Circuit
between Pressure Sensor and ESP/TCS/ABS Con-
trol Unit. ................................................................... 95
Inspection 5 Steering wheel Angle Sensor and the
Circuit between Steering Wheel Angle Sensor and
ESP/TCS/ABS Control Unit. ................................... 96
Inspection 6 Yaw Rate Sensor and Side G sensor
Page 2787 of 3833

BRC-3
C
D
E
G
H
I
J
K
L
MA
B
BRC and the Circuit between Yaw Rate Sensor and Side
G sensor and ESP/TCS/ABS Control Unit. ............ 98
Inspection 7 Solenoid Valve, ESP Switch-over Sole-
noid Valve and Circuit ......................................... ... 99
Inspection 8 Actuator Motor, Motor Relay and Circuit
. 102
Inspection 9 Actuator Relay and Circuit ............... 104
Inspection 10 Stop Lamp Switch and Circuit ........ 106
Inspection 11 ESP/TCS/ABS Control Unit Power
Supply Circuit ....................................................... 106
Inspection 12 When “EMERGENCY BRAKE” is
indicated in the Self-Diagnosis Results ................ 108
Inspection 13 When “ST ANG SEN SIGNAL” is Indi-
cated in the Self-Diagnosis Results .....................108
Inspection 14 Brake Fluid Level of Reservoir Tank,
Communication Circuit between ESP/TCS/ABS
Control Unit and Brake Fluid Level Warning Switch . 109
Inspection 15 CAN Communication Circuit, ESP/
TCS/ABS Control Unit and Steering Wheel Angle
Sensor ................................................................... 110
Component Check ............................................... . 111
ESP OFF SWITCH ............................................ . 111
ESP RELAY BOX .............................................. . 111
ESP ACTUATOR ............................................... 112
Symptom 1: ABS Works Frequently. ..................... 114
Symptom 2: Unexpected Pedal Action .................. 114
Symptom 3: Longer Stopping Distance ................. 115
Symptom 4: ABS Does Not Work. ........................ 116Symptom 5: Pedal Vibration and Noise ................116
Symptom 6: ESP OFF Indicator Lamp Does Not Illu-
minate ...................................................................117
Symptom 7: SLIP Indicator Lamp Does Not Illumi-
nate .......................................................................118
Symptom 8: During ESP/TCS/ABS Control, Vehicle
Behavior is Jerky. .................................................118
ESP/TCS/ABS CONTROL UNIT ............................120
Removal and Installation ......................................120
REMOVAL .........................................................120
INSTALLATION .................................................120
WHEEL SPEED SENSORS ....................................121
Removal and Installation ......................................121
SENSOR ROTOR ...................................................122
Removal and Installation ......................................122
REMOVAL .........................................................122
INSTALLATION .................................................122
ESP/TCS/ABS ACTUATOR AND RELAY BOX .....123
Removal and Installation ......................................123
YAW RATE/SIDE G SENSOR .................................124
Removal and Installation ......................................124
REMOVAL .........................................................124
INSTALLATION .................................................124
ESP OFF SWITCH ................................................. .125
Removal and Installation ......................................125
REMOVAL .........................................................125
INSTALLATION .................................................125