set clock NISSAN X-TRAIL 2001 Service User Guide
[x] Cancel search | Manufacturer: NISSAN, Model Year: 2001, Model line: X-TRAIL, Model: NISSAN X-TRAIL 2001Pages: 3833, PDF Size: 39.49 MB
Page 1495 of 3833
![NISSAN X-TRAIL 2001 Service User Guide ON BOARD DIAGNOSTIC (OBD) SYSTEM
EC-1145
[QR20(WITHOUT EURO-OBD)]
C
D
E
F
G
H
I
J
K
L
MA
EC
4. 1st trip freeze frame data
5. Others
HOW TO SWITCH DIAGNOSTIC TEST MODE
NOTE:
●It is better to count th NISSAN X-TRAIL 2001 Service User Guide ON BOARD DIAGNOSTIC (OBD) SYSTEM
EC-1145
[QR20(WITHOUT EURO-OBD)]
C
D
E
F
G
H
I
J
K
L
MA
EC
4. 1st trip freeze frame data
5. Others
HOW TO SWITCH DIAGNOSTIC TEST MODE
NOTE:
●It is better to count th](/img/5/57405/w960_57405-1494.png)
ON BOARD DIAGNOSTIC (OBD) SYSTEM
EC-1145
[QR20(WITHOUT EURO-OBD)]
C
D
E
F
G
H
I
J
K
L
MA
EC
4. 1st trip freeze frame data
5. Others
HOW TO SWITCH DIAGNOSTIC TEST MODE
NOTE:
●It is better to count the time accurately with a clock.
●It is impossible to switch the diagnostic mode when an accelerator pedal position sensor circuit
has a malfunction.
●Always ECM returns to Diagnostic Test Mode I after ignition switch is turned “OFF”.
How to Set Diagnostic Test Mode II (Self-diagnostic Results)
1. Confirm that accelerator pedal is fully released, turn ignition switch “ON” and wait 3 seconds.
2. Repeat the following procedure quickly five times within 5 seconds.
a. Fully depress the accelerator pedal.
b. Fully release the accelerator pedal.
3. Wait 7 seconds, fully depress the accelerator pedal and keep it for approx. 10 seconds until the MI starts
blinking.
4. Fully release the accelerator pedal.
ECM has entered to Diagnostic Test Mode II (Self-diagnostic results).
How to Set Diagnostic Test Mode II (Heated Oxygen Sensor 1 Monitor)
1. Set the ECM in Diagnostic Test Mode II (Self-diagnostic results). Refer to EC-1145, "How to Set Diagnos-
tic Test Mode II (Self-diagnostic Results)" .
2. Start Engine.
ECM has entered to Diagnostic Test Mode II (Heated oxygen sensor 1 monitor).
How to Erase Diagnostic Test Mode II (Self-diagnostic Results)
1. Set ECM in Diagnostic Test Mode II (Self-diagnostic results). Refer to EC-1145, "How to Set Diagnostic
Test Mode II (Self-diagnostic Results)" .
2. Fully depress the accelerator pedal and keep it for more than 10 seconds.
The emission-related diagnostic information has been erased from the backup memory in the ECM.
3. Fully release the accelerator pedal, and confirm the DTC 0000 is displayed.
DIAGNOSTIC TEST MODE I — BULB CHECK
In this mode, the MI on the instrument panel should stay ON. If it remains OFF, check the bulb. Refer to DI-43,
"WARNING LAMPS" or see EC-1265 .
DIAGNOSTIC TEST MODE I — MALFUNCTION WARNING
●These DTC numbers are clarified in Diagnostic Test Mode II (SELF-DIAGNOSTIC RESULTS)
DIAGNOSTIC TEST MODE II — SELF-DIAGNOSTIC RESULTS
In this mode, the DTC and 1st trip DTC are indicated by the number of blinks of the MI as shown below.
The DTC and 1st trip DTC are displayed at the same time. If the MI does not illuminate in diagnostic test mode
I (Malfunction warning), all displayed items are 1st trip DTCs. If only one code is displayed when the MI illumi-
PBIB0092E
MI Condition
ON When the malfunction is detected or the ECM's CPU is malfunctioning.
OFF No malfunction.
Page 2746 of 3833
BR-6
BRAKE PEDAL
BRAKE PEDAL
PFP:46501
On-Vehicle Inspection and AdjustmentEFS000C1
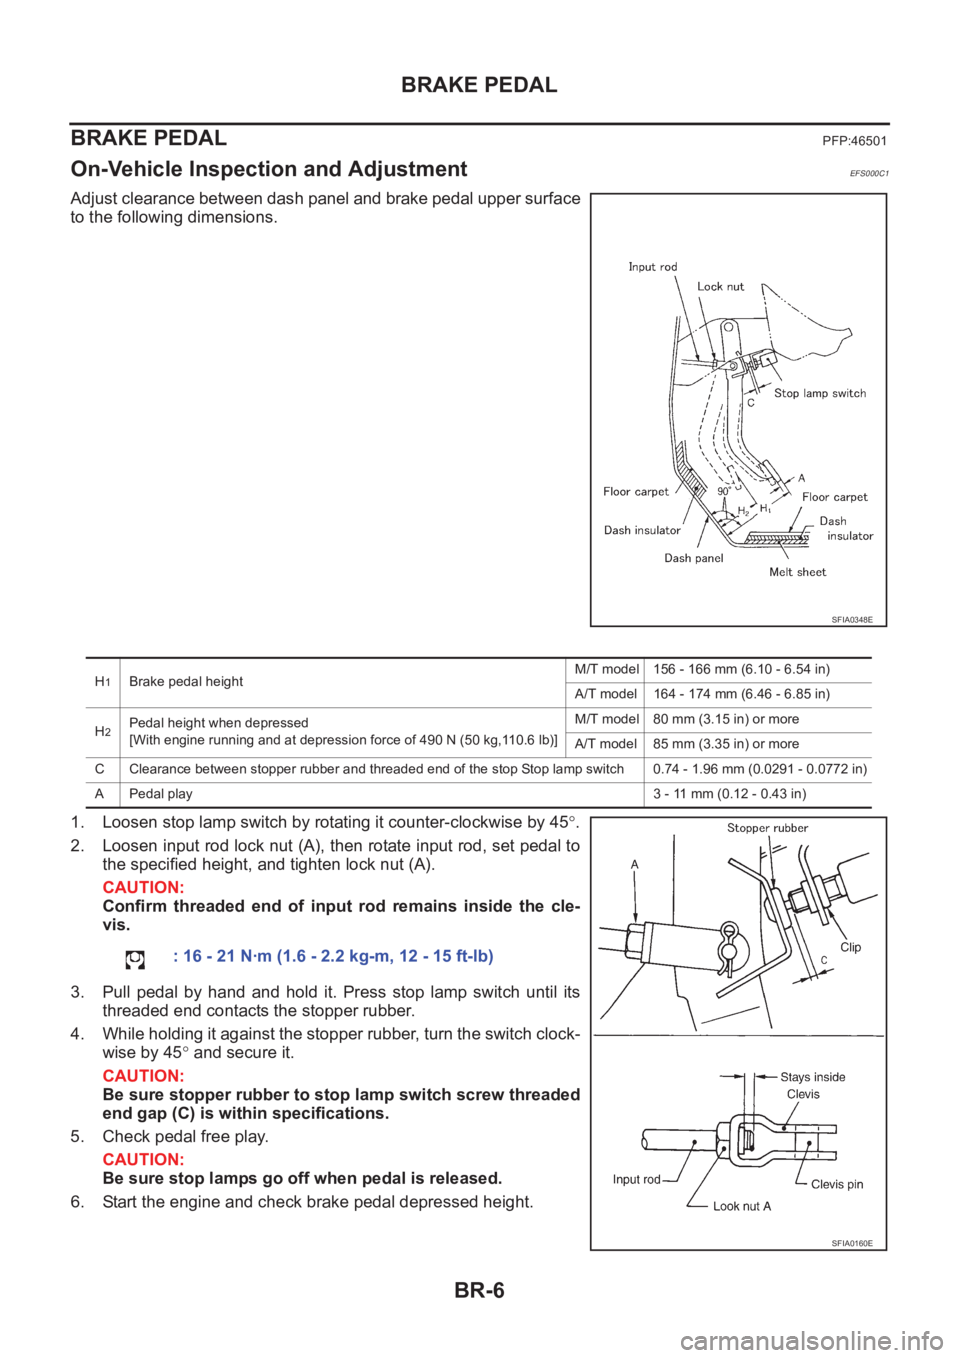
Adjust clearance between dash panel and brake pedal upper surface
to the following dimensions.
1. Loosen stop lamp switch by rotating it counter-clockwise by 45°.
2. Loosen input rod lock nut (A), then rotate input rod, set pedal to
the specified height, and tighten lock nut (A).
CAUTION:
Confirm threaded end of input rod remains inside the cle-
vis.
3. Pull pedal by hand and hold it. Press stop lamp switch until its
threaded end contacts the stopper rubber.
4. While holding it against the stopper rubber, turn the switch clock-
wise by 45° and secure it.
CAUTION:
Be sure stopper rubber to stop lamp switch screw threaded
end gap (C) is within specifications.
5. Check pedal free play.
CAUTION:
Be sure stop lamps go off when pedal is released.
6. Start the engine and check brake pedal depressed height.
SFIA0348E
H1Brake pedal heightM/T model 156 - 166 mm (6.10 - 6.54 in)
A/T model 164 - 174 mm (6.46 - 6.85 in)
H
2Pedal height when depressed
[With engine running and at depression force of 490 N (50 kg,110.6 lb)]M/T model 80 mm (3.15 in) or more
A/T model 85 mm (3.35 in) or more
C Clearance between stopper rubber and threaded end of the stop Stop lamp switch 0.74 - 1.96 mm (0.0291 - 0.0772 in)
A Pedal play3 - 11 mm (0.12 - 0.43 in)
: 16 - 21 N·m (1.6 - 2.2 kg-m, 12 - 15 ft-lb)
SFIA0160E
Page 2916 of 3833
PS-6
STEERING WHEEL
STEERING WHEEL
PFP:48430
On-Vehicle Inspection and ServiceEGS0004E
PLAY INSPECTION
1. Turn steering wheel to straight-ahead position. Start engine and lightly turn steering wheel clockwise and
counter clockwise until front wheels start moving. Measure travel to starting point on circumference of
steering wheel.
2. If play is outside specifications, check following parts for proper installation: steering gear assembly, front
suspension, axles, and steering column
●Check steering wheel for vertical, horizontal, or axial play.
●Lift vehicle and check steering gear mounting bolts and nuts for looseness.
NEUTRAL POSITION INSPECTION
●After the wheel alignment inspection, carry out the neutral position inspection. Refer to FSU-6, "Wheel
Alignment" .
●Before removing steering wheel, check steering gear neutral position.
1. Set vehicle to straight-ahead position, and check that steering wheel is in neutral position.
2. If it is not in neutral position, remove steering wheel, and install again in properly.
3. If it is not adjusted within two teeth from center of gear, loosen tie rod lock nut. Then turn it to opposite
direction to adjust until amount of left and right becomes equal.
STEERING TORQUE CHECK
1. Stop vehicle on a dry flat paved road and apply parking brake.
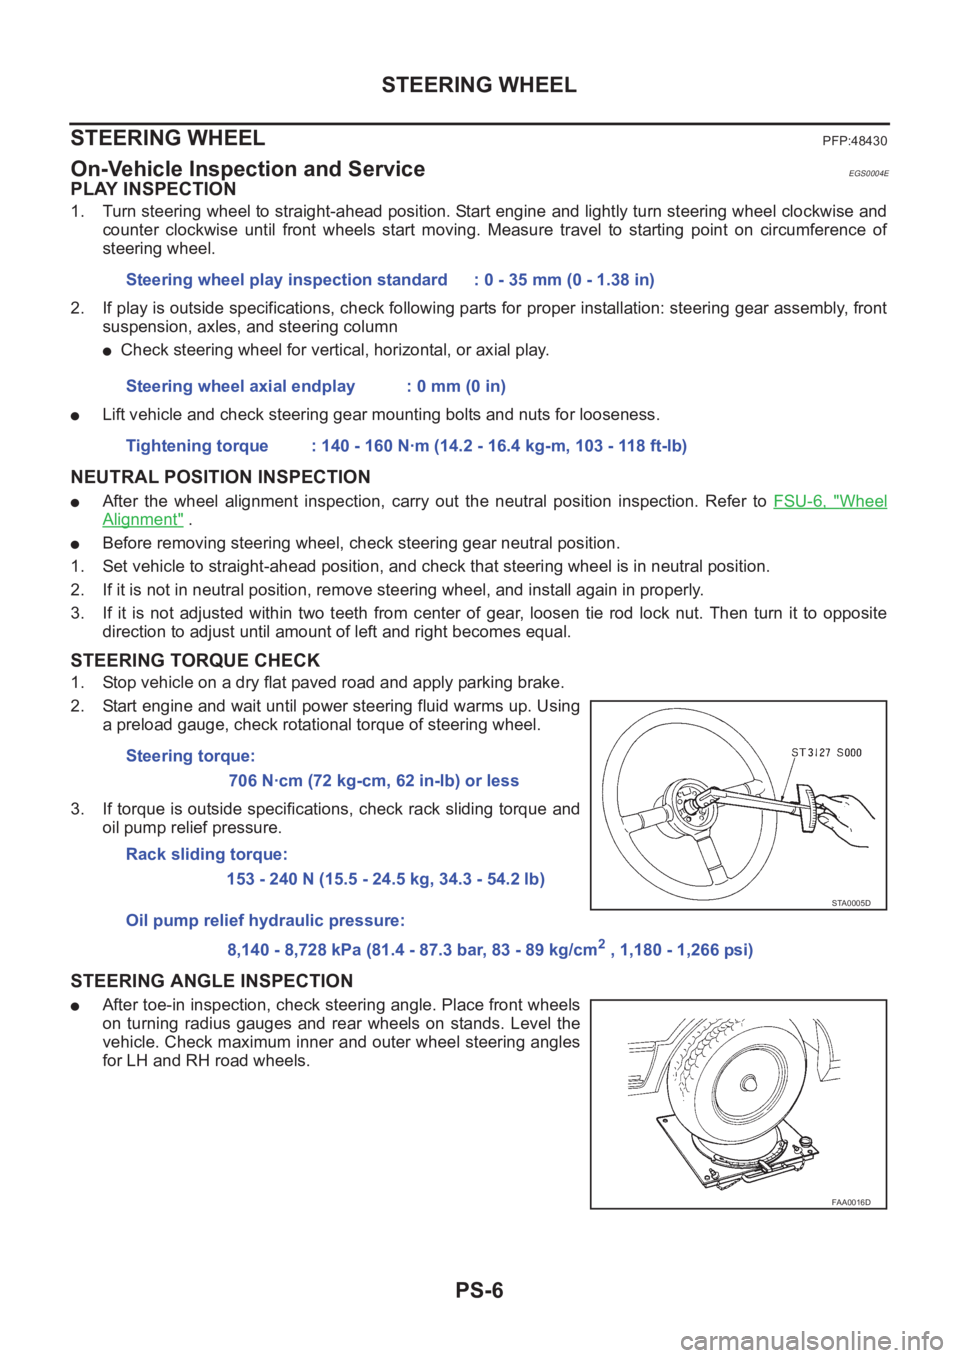
2. Start engine and wait until power steering fluid warms up. Using
a preload gauge, check rotational torque of steering wheel.
3. If torque is outside specifications, check rack sliding torque and
oil pump relief pressure.
STEERING ANGLE INSPECTION
●After toe-in inspection, check steering angle. Place front wheels
on turning radius gauges and rear wheels on stands. Level the
vehicle. Check maximum inner and outer wheel steering angles
for LH and RH road wheels.Steering wheel play inspection standard : 0 - 35 mm (0 - 1.38 in)
Steering wheel axial endplay : 0 mm (0 in)
Tightening torque : 140 - 160 N·m (14.2 - 16.4 kg-m, 103 - 118 ft-lb)
Steering torque:
706 N·cm (72 kg-cm, 62 in-lb) or less
Rack sliding torque:
153 - 240 N (15.5 - 24.5 kg, 34.3 - 54.2 lb)
Oil pump relief hydraulic pressure:
8,140 - 8,728 kPa (81.4 - 87.3 bar, 83 - 89 kg/cm
2 , 1,180 - 1,266 psi)
STA0005D
FAA0016D
Page 2917 of 3833
STEERING WHEEL
PS-7
C
D
E
F
H
I
J
K
L
MA
B
PS
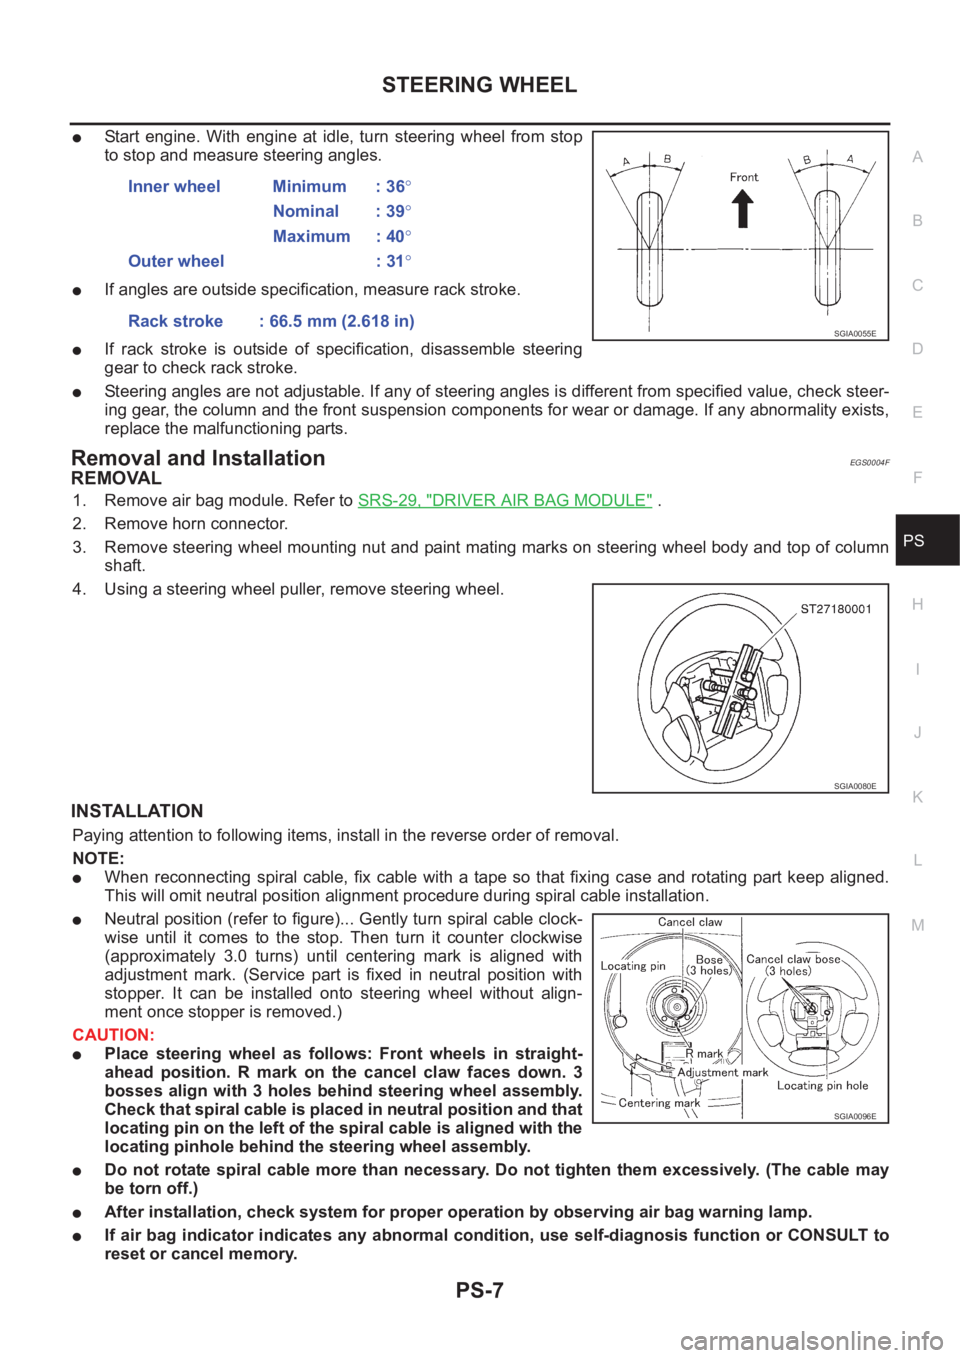
●Start engine. With engine at idle, turn steering wheel from stop
to stop and measure steering angles.
●If angles are outside specification, measure rack stroke.
●If rack stroke is outside of specification, disassemble steering
gear to check rack stroke.
●Steering angles are not adjustable. If any of steering angles is different from specified value, check steer-
ing gear, the column and the front suspension components for wear or damage. If any abnormality exists,
replace the malfunctioning parts.
Removal and InstallationEGS0004F
REMOVAL
1. Remove air bag module. Refer to SRS-29, "DRIVER AIR BAG MODULE" .
2. Remove horn connector.
3. Remove steering wheel mounting nut and paint mating marks on steering wheel body and top of column
shaft.
4. Using a steering wheel puller, remove steering wheel.
INSTALLATION
Paying attention to following items, install in the reverse order of removal.
NOTE:
●When reconnecting spiral cable, fix cable with a tape so that fixing case and rotating part keep aligned.
This will omit neutral position alignment procedure during spiral cable installation.
●Neutral position (refer to figure)... Gently turn spiral cable clock-
wise until it comes to the stop. Then turn it counter clockwise
(approximately 3.0 turns) until centering mark is aligned with
adjustment mark. (Service part is fixed in neutral position with
stopper. It can be installed onto steering wheel without align-
ment once stopper is removed.)
CAUTION:
●Place steering wheel as follows: Front wheels in straight-
ahead position. R mark on the cancel claw faces down. 3
bosses align with 3 holes behind steering wheel assembly.
Check that spiral cable is placed in neutral position and that
locating pin on the left of the spiral cable is aligned with the
locating pinhole behind the steering wheel assembly.
●Do not rotate spiral cable more than necessary. Do not tighten them excessively. (The cable may
be torn off.)
●After installation, check system for proper operation by observing air bag warning lamp.
●If air bag indicator indicates any abnormal condition, use self-diagnosis function or CONSULT to
reset or cancel memory.Inner wheel Minimum : 36°
Nominal : 39°
Maximum : 40°
Outer wheel : 31°
Rack stroke : 66.5 mm (2.618 in)
SGIA0055E
SGIA0080E
SGIA0096E
Page 2931 of 3833
POWER STEERING GEAR AND LINKAGE
PS-21
C
D
E
F
H
I
J
K
L
MA
B
PS
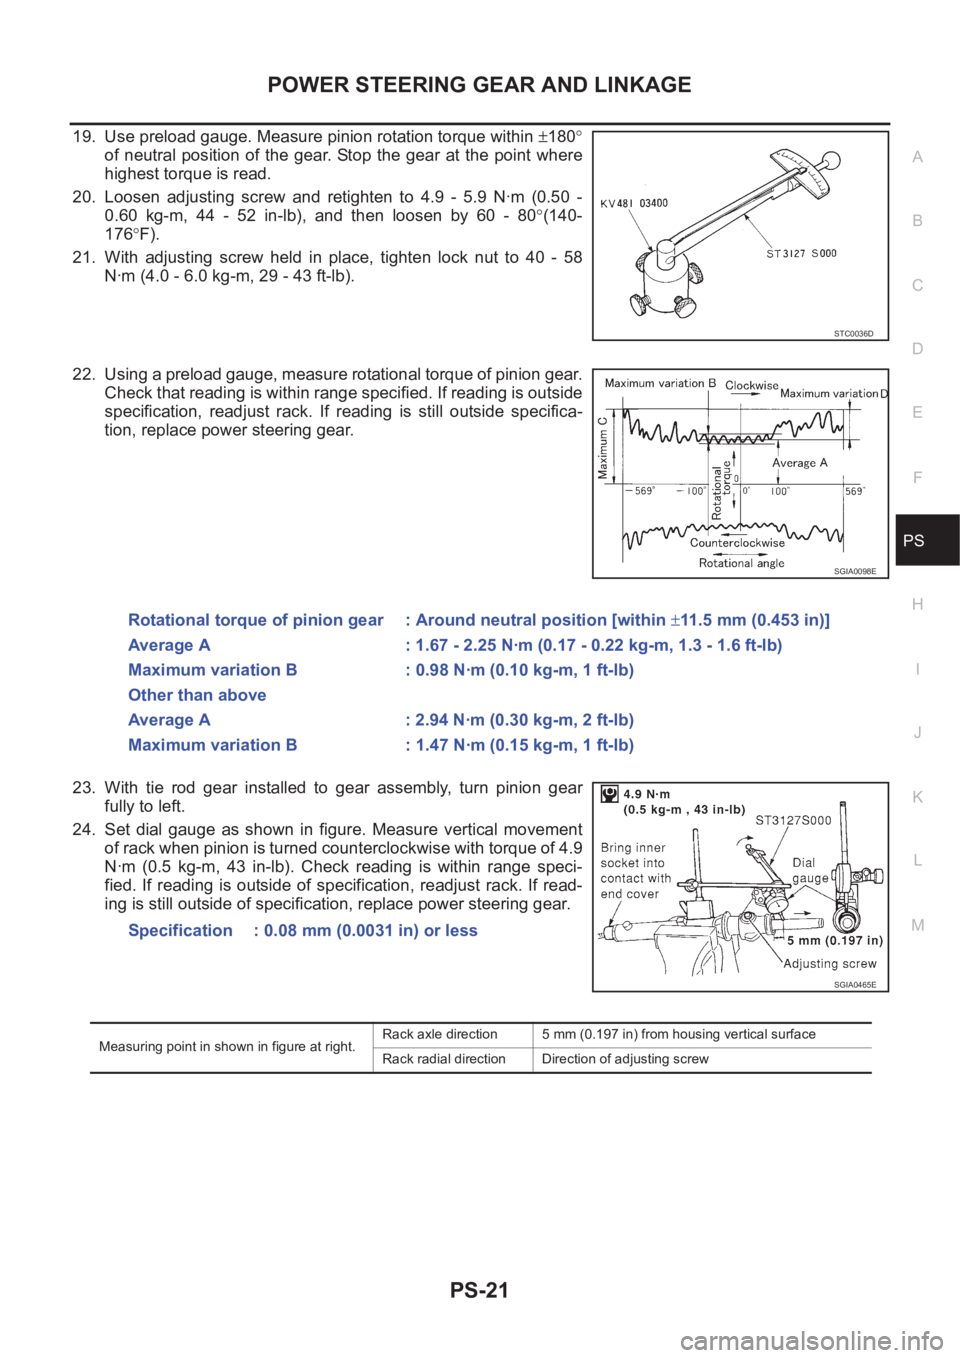
19. Use preload gauge. Measure pinion rotation torque within ±180°
of neutral position of the gear. Stop the gear at the point where
highest torque is read.
20. Loosen adjusting screw and retighten to 4.9 - 5.9 N·m (0.50 -
0.60 kg-m, 44 - 52 in-lb), and then loosen by 60 - 80°(140-
176°F).
21. With adjusting screw held in place, tighten lock nut to 40 - 58
N·m (4.0 - 6.0 kg-m, 29 - 43 ft-lb).
22. Using a preload gauge, measure rotational torque of pinion gear.
Check that reading is within range specified. If reading is outside
specification, readjust rack. If reading is still outside specifica-
tion, replace power steering gear.
23. With tie rod gear installed to gear assembly, turn pinion gear
fully to left.
24. Set dial gauge as shown in figure. Measure vertical movement
of rack when pinion is turned counterclockwise with torque of 4.9
N·m (0.5 kg-m, 43 in-lb). Check reading is within range speci-
fied. If reading is outside of specification, readjust rack. If read-
ing is still outside of specification, replace power steering gear.
STC0036D
SGIA0098E
Rotational torque of pinion gear : Around neutral position [within ±11.5 mm (0.453 in)]
Average A : 1.67 - 2.25 N·m (0.17 - 0.22 kg-m, 1.3 - 1.6 ft-lb)
Maximum variation B : 0.98 N·m (0.10 kg-m, 1 ft-lb)
Other than above
Average A : 2.94 N·m (0.30 kg-m, 2 ft-lb)
Maximum variation B : 1.47 N·m (0.15 kg-m, 1 ft-lb)
Specification : 0.08 mm (0.0031 in) or less
SGIA0465E
Measuring point in shown in figure at right.Rack axle direction 5 mm (0.197 in) from housing vertical surface
Rack radial direction Direction of adjusting screw
Page 3287 of 3833
PRECAUTIONS
ATC-11
C
D
E
F
G
H
I
K
L
MA
B
AT C
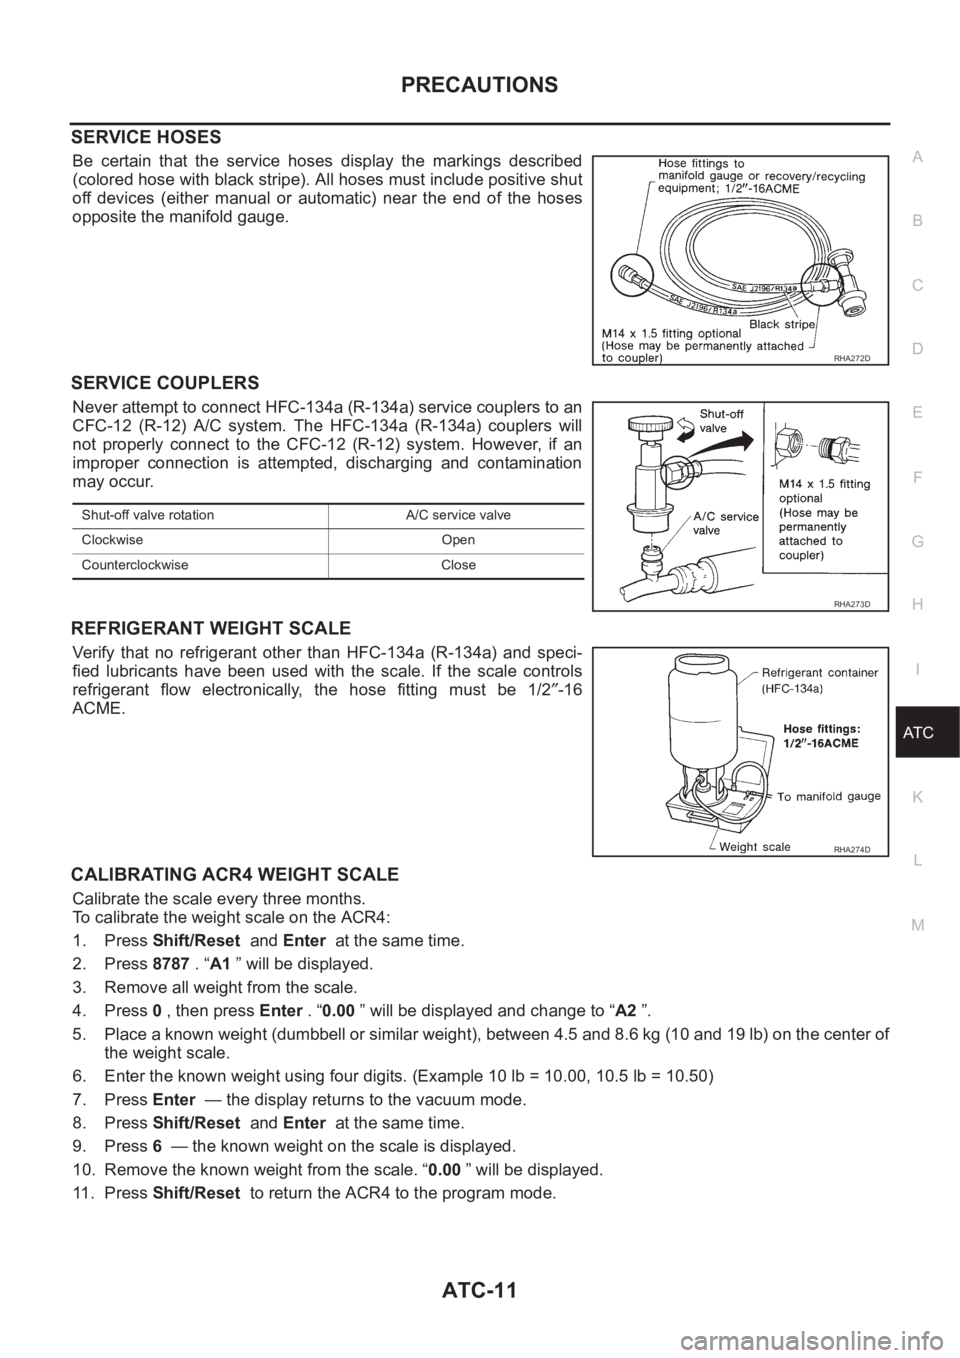
SERVICE HOSES
Be certain that the service hoses display the markings described
(colored hose with black stripe). All hoses must include positive shut
off devices (either manual or automatic) near the end of the hoses
opposite the manifold gauge.
SERVICE COUPLERS
Never attempt to connect HFC-134a (R-134a) service couplers to an
CFC-12 (R-12) A/C system. The HFC-134a (R-134a) couplers will
not properly connect to the CFC-12 (R-12) system. However, if an
improper connection is attempted, discharging and contamination
may occur.
REFRIGERANT WEIGHT SCALE
Verify that no refrigerant other than HFC-134a (R-134a) and speci-
fied lubricants have been used with the scale. If the scale controls
refrigerant flow electronically, the hose fitting must be 1/2″-16
ACME.
CALIBRATING ACR4 WEIGHT SCALE
Calibrate the scale every three months.
To calibrate the weight scale on the ACR4:
1. Press Shift/Reset and Enter at the same time.
2. Press 8787 . “A1 ” will be displayed.
3. Remove all weight from the scale.
4. Press 0 , then press Enter . “0.00 ” will be displayed and change to “A2 ”.
5. Place a known weight (dumbbell or similar weight), between 4.5 and 8.6 kg (10 and 19 lb) on the center of
the weight scale.
6. Enter the known weight using four digits. (Example 10 lb = 10.00, 10.5 lb = 10.50)
7. Press Enter — the display returns to the vacuum mode.
8. Press Shift/Reset and Enter at the same time.
9. Press 6 — the known weight on the scale is displayed.
10. Remove the known weight from the scale. “0.00 ” will be displayed.
11 . P r e s s Shift/Reset to return the ACR4 to the program mode.
RHA272D
Shut-off valve rotation A/C service valve
Clockwise Open
Counterclockwise Close
RHA273D
RHA274D
Page 3323 of 3833
TROUBLE DIAGNOSIS
ATC-47
C
D
E
F
G
H
I
K
L
MA
B
AT C
PROCEDURE
1.SET IN SELF-DIAGNOSTIC MODE
1. Turn ignition switch ON.
2. Set in self-diagnostic mode as follows. Within 10 seconds after starting engine (ignition switch is turned
ON.), press OFF switch for at least 5 seconds.
>> GO TO 2.
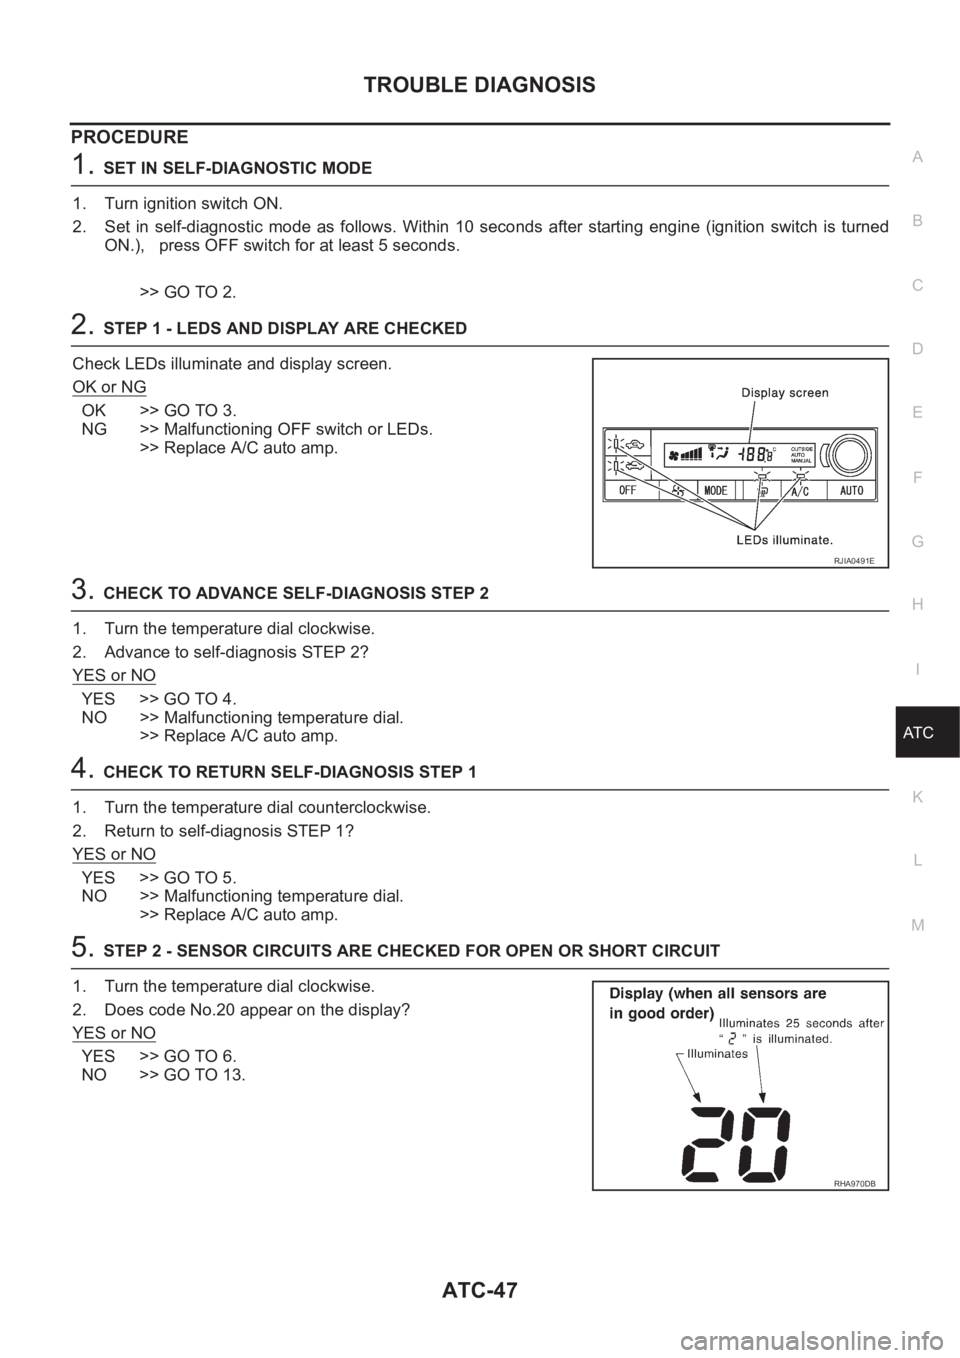
2.STEP 1 - LEDS AND DISPLAY ARE CHECKED
Check LEDs illuminate and display screen.
OK or NG
OK >> GO TO 3.
NG >> Malfunctioning OFF switch or LEDs.
>> Replace A/C auto amp.
3.CHECK TO ADVANCE SELF-DIAGNOSIS STEP 2
1. Turn the temperature dial clockwise.
2. Advance to self-diagnosis STEP 2?
YES or NO
YES >> GO TO 4.
NO >> Malfunctioning temperature dial.
>> Replace A/C auto amp.
4.CHECK TO RETURN SELF-DIAGNOSIS STEP 1
1. Turn the temperature dial counterclockwise.
2. Return to self-diagnosis STEP 1?
YES or NO
YES >> GO TO 5.
NO >> Malfunctioning temperature dial.
>> Replace A/C auto amp.
5.STEP 2 - SENSOR CIRCUITS ARE CHECKED FOR OPEN OR SHORT CIRCUIT
1. Turn the temperature dial clockwise.
2. Does code No.20 appear on the display?
YES or NO
YES >> GO TO 6.
NO >> GO TO 13.
RJIA0491E
RHA970DB