lock NISSAN X-TRAIL 2001 Service Manual PDF
[x] Cancel search | Manufacturer: NISSAN, Model Year: 2001, Model line: X-TRAIL, Model: NISSAN X-TRAIL 2001Pages: 3833, PDF Size: 39.49 MB
Page 213 of 3833
CAMSHAFT
EM-163
[YD22DDTi]
C
D
E
F
G
H
I
J
K
L
MA
EM
Va l v e C l e a r a n c eEBS00LRS
INSPECTION
●When the camshaft or parts in connection with valves are
removed or replaced, and a malfunction has occurred (poor
starting, idling, or other malfunction) due to the misadjustment of
the valve clearance, inspect as follows.
●Inspect and adjust when the engine is cool (at normal tempera-
ture).
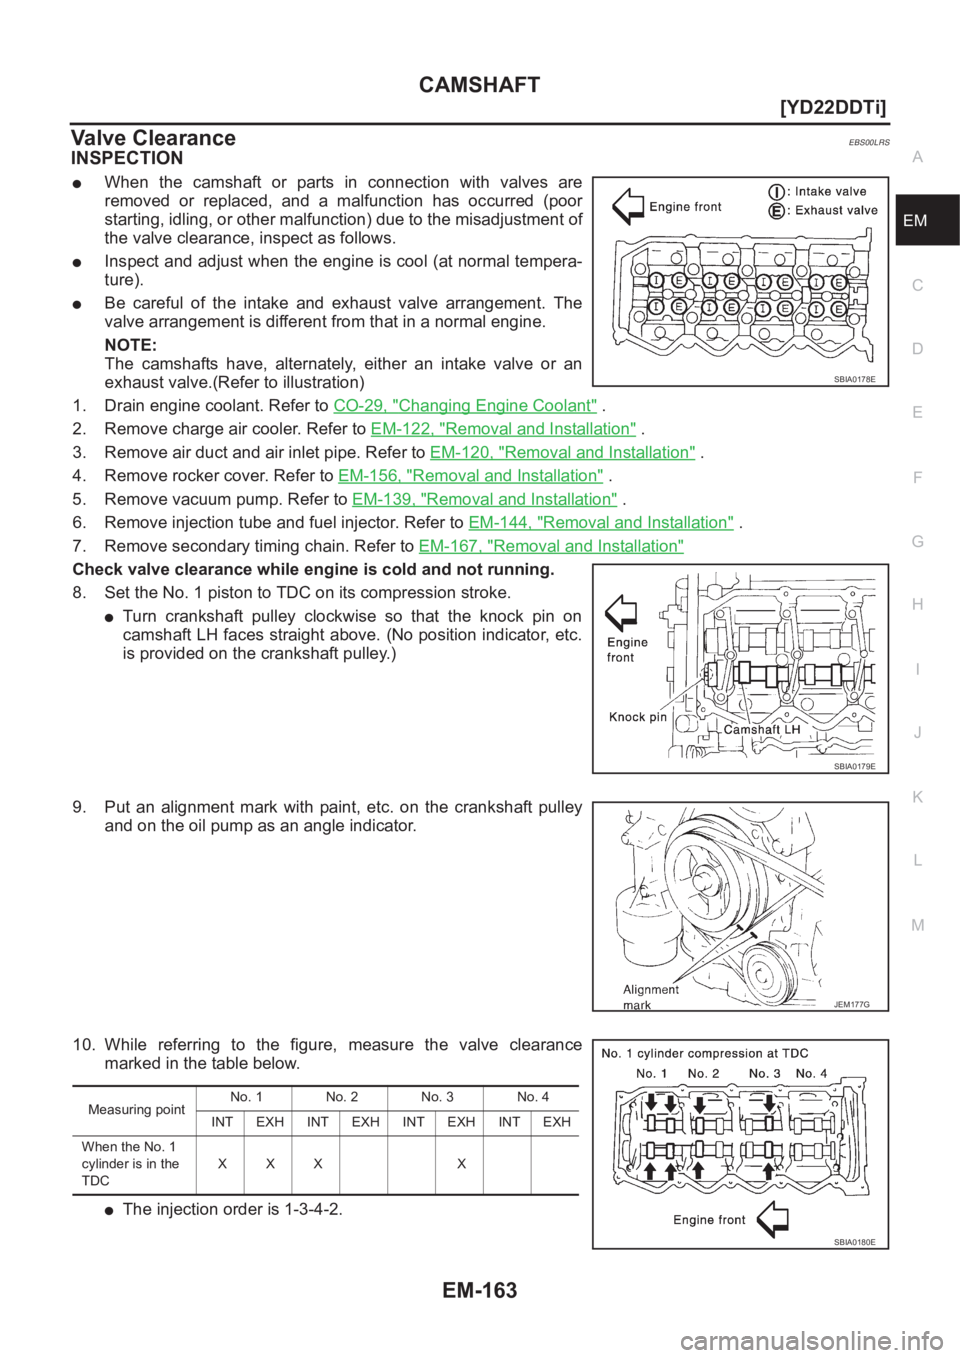
●Be careful of the intake and exhaust valve arrangement. The
valve arrangement is different from that in a normal engine.
NOTE:
The camshafts have, alternately, either an intake valve or an
exhaust valve.(Refer to illustration)
1. Drain engine coolant. Refer to CO-29, "
Changing Engine Coolant" .
2. Remove charge air cooler. Refer to EM-122, "
Removal and Installation" .
3. Remove air duct and air inlet pipe. Refer to EM-120, "
Removal and Installation" .
4. Remove rocker cover. Refer to EM-156, "
Removal and Installation" .
5. Remove vacuum pump. Refer to EM-139, "
Removal and Installation" .
6. Remove injection tube and fuel injector. Refer to EM-144, "
Removal and Installation" .
7. Remove secondary timing chain. Refer to EM-167, "
Removal and Installation"
Check valve clearance while engine is cold and not running.
8. Set the No. 1 piston to TDC on its compression stroke.
●Turn crankshaft pulley clockwise so that the knock pin on
camshaft LH faces straight above. (No position indicator, etc.
is provided on the crankshaft pulley.)
9. Put an alignment mark with paint, etc. on the crankshaft pulley
and on the oil pump as an angle indicator.
10. While referring to the figure, measure the valve clearance
marked in the table below.
●The injection order is 1-3-4-2.
SBIA0178E
SBIA0179E
JEM177G
Measuring pointNo. 1 No. 2 No. 3 No. 4
INT EXH INT EXH INT EXH INT EXH
When the No. 1
cylinder is in the
TDCXXX X
SBIA0180E
Page 214 of 3833
EM-164
[YD22DDTi]
CAMSHAFT
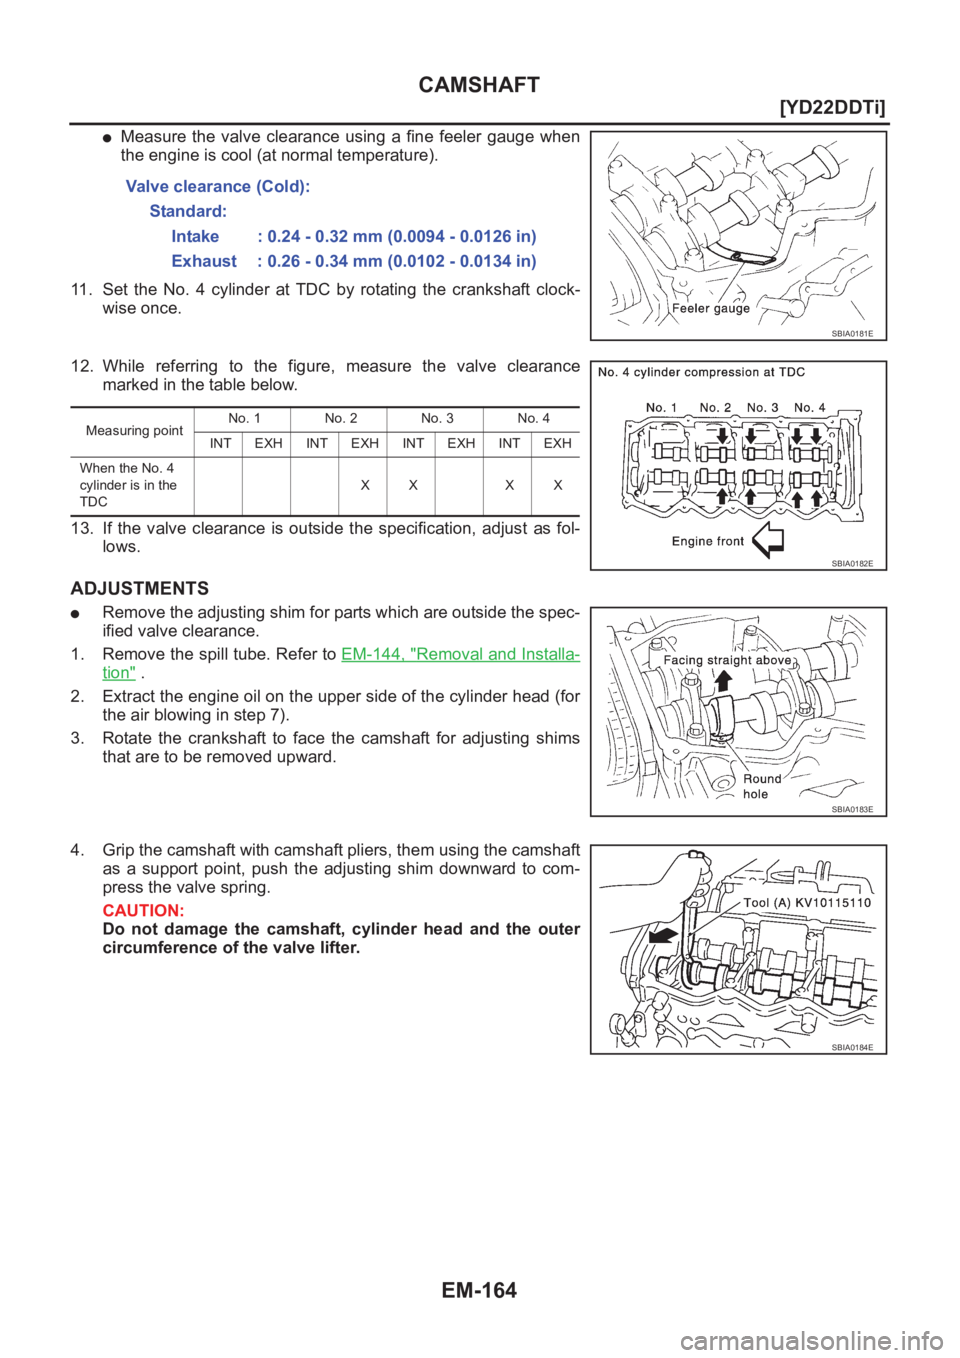
●Measure the valve clearance using a fine feeler gauge when
the engine is cool (at normal temperature).
11. Set the No. 4 cylinder at TDC by rotating the crankshaft clock-
wise once.
12. While referring to the figure, measure the valve clearance
marked in the table below.
13. If the valve clearance is outside the specification, adjust as fol-
lows.
ADJUSTMENTS
●Remove the adjusting shim for parts which are outside the spec-
ified valve clearance.
1. Remove the spill tube. Refer to EM-144, "
Removal and Installa-
tion" .
2. Extract the engine oil on the upper side of the cylinder head (for
the air blowing in step 7).
3. Rotate the crankshaft to face the camshaft for adjusting shims
that are to be removed upward.
4. Grip the camshaft with camshaft pliers, them using the camshaft
as a support point, push the adjusting shim downward to com-
press the valve spring.
CAUTION:
Do not damage the camshaft, cylinder head and the outer
circumference of the valve lifter.Valve clearance (Cold):
Standard:
Intake : 0.24 - 0.32 mm (0.0094 - 0.0126 in)
Exhaust : 0.26 - 0.34 mm (0.0102 - 0.0134 in)
SBIA0181E
Measuring pointNo. 1 No. 2 No. 3 No. 4
INT EXH INT EXH INT EXH INT EXH
When the No. 4
cylinder is in the
TDCXX XX
SBIA0182E
SBIA0183E
SBIA0184E
Page 218 of 3833
EM-168
[YD22DDTi]
SECONDARY TIMING CHAIN
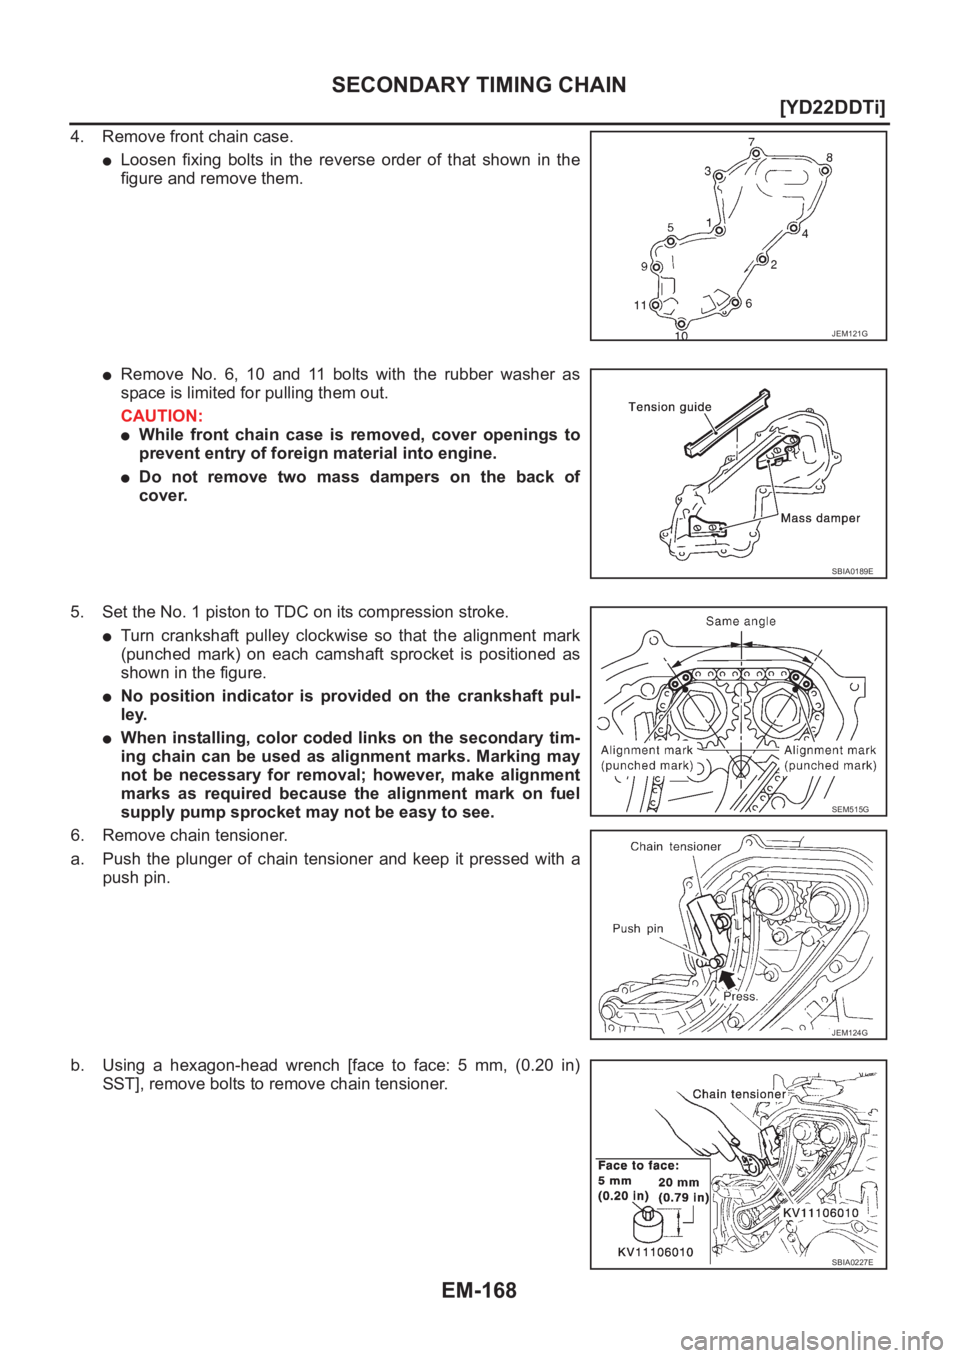
4. Remove front chain case.
●Loosen fixing bolts in the reverse order of that shown in the
figure and remove them.
●Remove No. 6, 10 and 11 bolts with the rubber washer as
space is limited for pulling them out.
CAUTION:
●While front chain case is removed, cover openings to
prevent entry of foreign material into engine.
●Do not remove two mass dampers on the back of
cover.
5. Set the No. 1 piston to TDC on its compression stroke.
●Turn crankshaft pulley clockwise so that the alignment mark
(punched mark) on each camshaft sprocket is positioned as
shown in the figure.
●No position indicator is provided on the crankshaft pul-
ley.
●When installing, color coded links on the secondary tim-
ing chain can be used as alignment marks. Marking may
not be necessary for removal; however, make alignment
marks as required because the alignment mark on fuel
supply pump sprocket may not be easy to see.
6. Remove chain tensioner.
a. Push the plunger of chain tensioner and keep it pressed with a
push pin.
b. Using a hexagon-head wrench [face to face: 5 mm, (0.20 in)
SST], remove bolts to remove chain tensioner.
JEM121G
SBIA0189E
SEM515G
JEM124G
SBIA0227E
Page 228 of 3833
EM-178
[YD22DDTi]
PRIMARY TIMING CHAIN
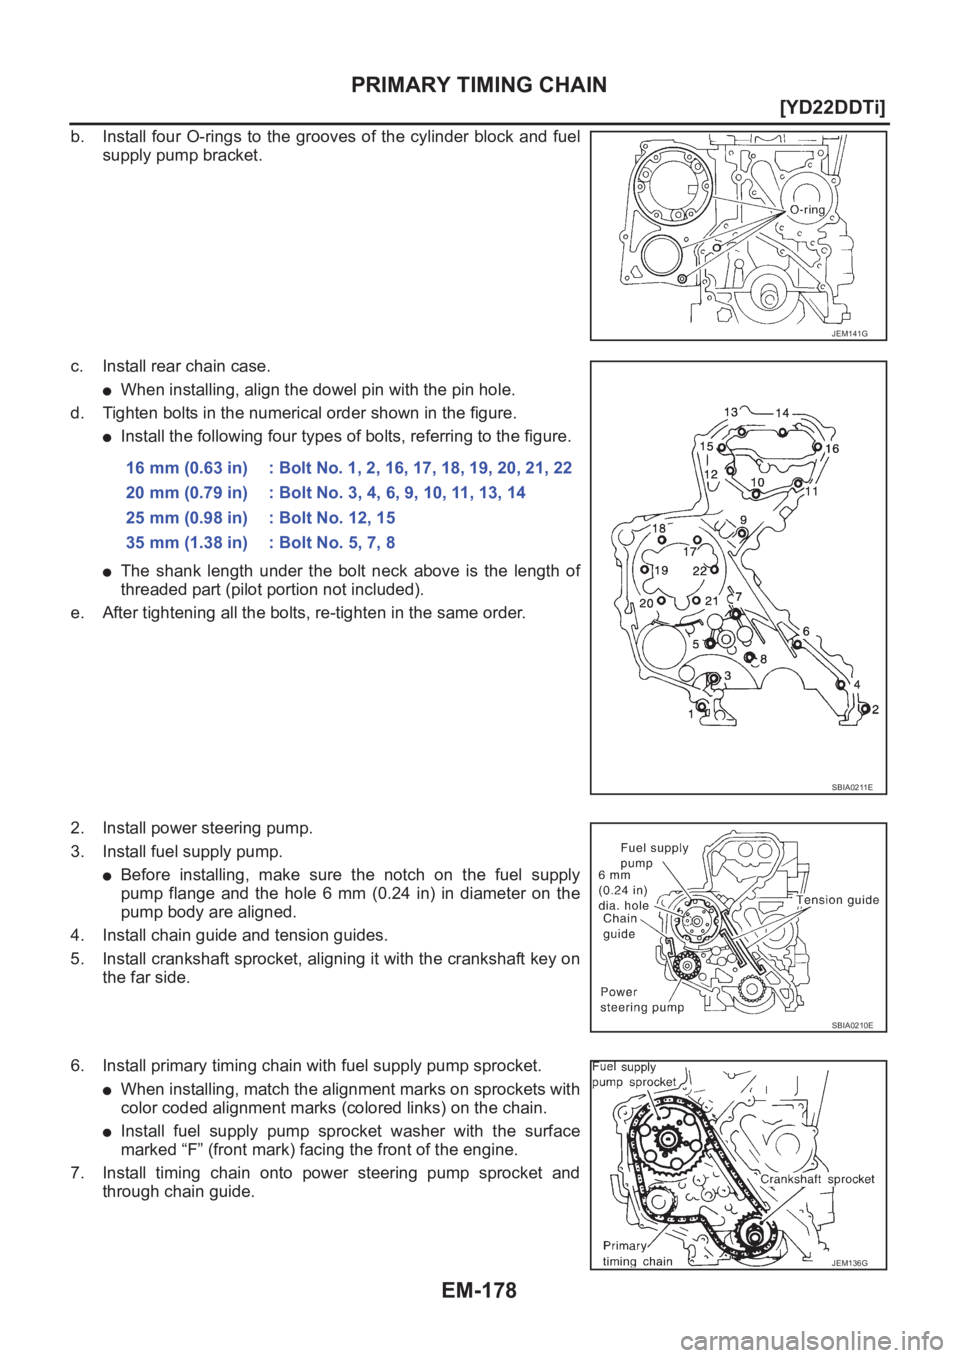
b. Install four O-rings to the grooves of the cylinder block and fuel
supply pump bracket.
c. Install rear chain case.
●When installing, align the dowel pin with the pin hole.
d. Tighten bolts in the numerical order shown in the figure.
●Install the following four types of bolts, referring to the figure.
●The shank length under the bolt neck above is the length of
threaded part (pilot portion not included).
e. After tightening all the bolts, re-tighten in the same order.
2. Install power steering pump.
3. Install fuel supply pump.
●Before installing, make sure the notch on the fuel supply
pump flange and the hole 6 mm (0.24 in) in diameter on the
pump body are aligned.
4. Install chain guide and tension guides.
5. Install crankshaft sprocket, aligning it with the crankshaft key on
the far side.
6. Install primary timing chain with fuel supply pump sprocket.
●When installing, match the alignment marks on sprockets with
color coded alignment marks (colored links) on the chain.
●Install fuel supply pump sprocket washer with the surface
marked “F” (front mark) facing the front of the engine.
7. Install timing chain onto power steering pump sprocket and
through chain guide.
JEM141G
16 mm (0.63 in) : Bolt No. 1, 2, 16, 17, 18, 19, 20, 21, 22
20 mm (0.79 in) : Bolt No. 3, 4, 6, 9, 10, 11, 13, 14
25 mm (0.98 in) : Bolt No. 12, 15
35 mm (1.38 in) : Bolt No. 5, 7, 8
SBIA0211E
SBIA0210E
JEM136G
Page 230 of 3833
EM-180
[YD22DDTi]
PRIMARY TIMING CHAIN
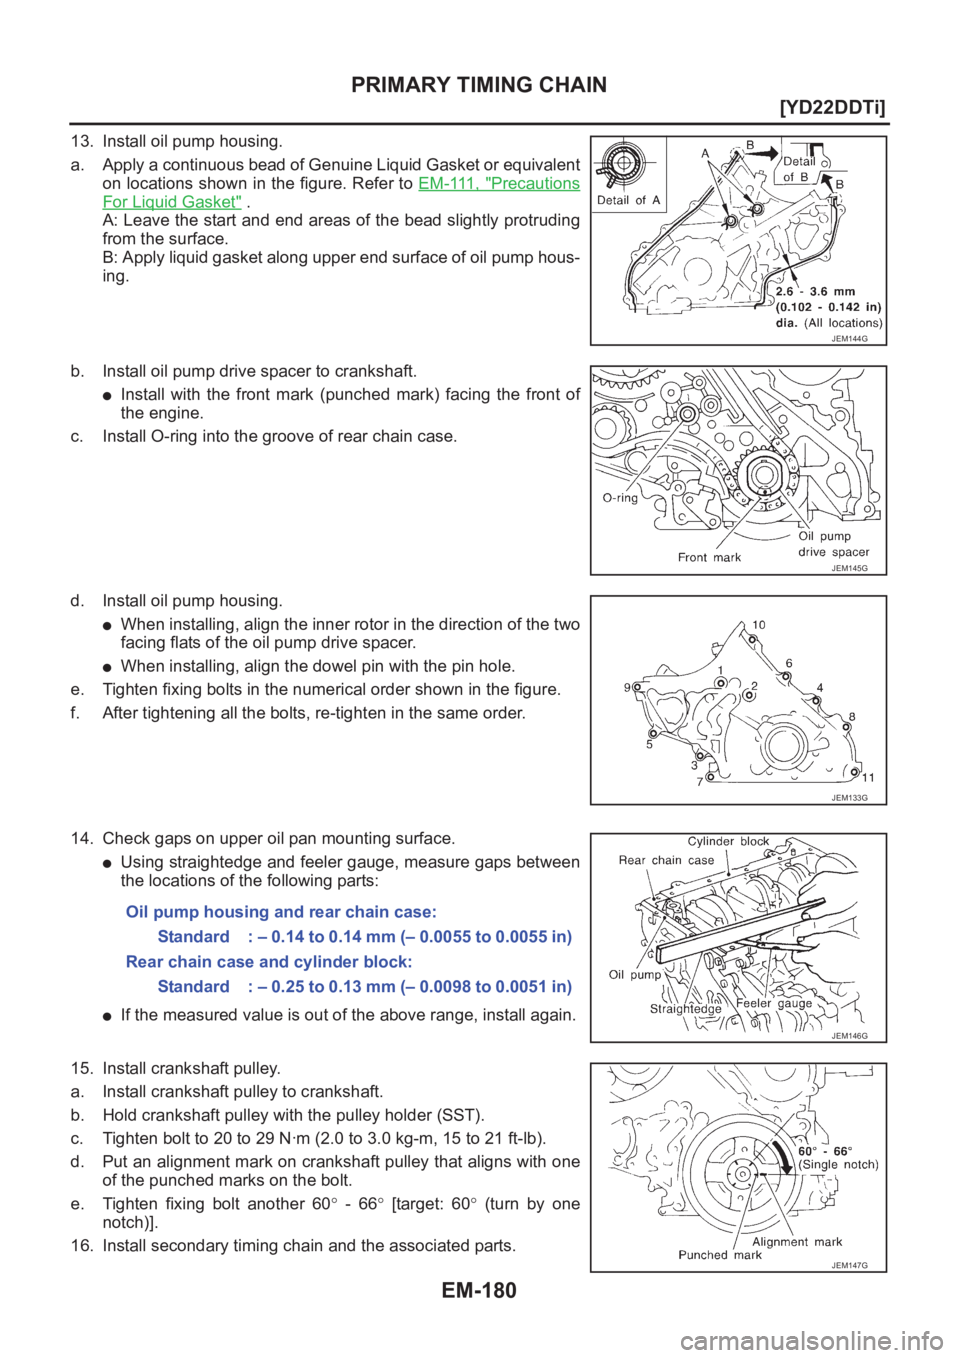
13. Install oil pump housing.
a. Apply a continuous bead of Genuine Liquid Gasket or equivalent
on locations shown in the figure. Refer to EM-111, "
Precautions
For Liquid Gasket" .
A: Leave the start and end areas of the bead slightly protruding
from the surface.
B: Apply liquid gasket along upper end surface of oil pump hous-
ing.
b. Install oil pump drive spacer to crankshaft.
●Install with the front mark (punched mark) facing the front of
the engine.
c. Install O-ring into the groove of rear chain case.
d. Install oil pump housing.
●When installing, align the inner rotor in the direction of the two
facing flats of the oil pump drive spacer.
●When installing, align the dowel pin with the pin hole.
e. Tighten fixing bolts in the numerical order shown in the figure.
f. After tightening all the bolts, re-tighten in the same order.
14. Check gaps on upper oil pan mounting surface.
●Using straightedge and feeler gauge, measure gaps between
the locations of the following parts:
●If the measured value is out of the above range, install again.
15. Install crankshaft pulley.
a. Install crankshaft pulley to crankshaft.
b. Hold crankshaft pulley with the pulley holder (SST).
c. Tighten bolt to 20 to 29 N·m (2.0 to 3.0 kg-m, 15 to 21 ft-lb).
d. Put an alignment mark on crankshaft pulley that aligns with one
of the punched marks on the bolt.
e. Tighten fixing bolt another 60° - 66° [target: 60° (turn by one
notch)].
16. Install secondary timing chain and the associated parts.
JEM144G
JEM145G
JEM133G
Oil pump housing and rear chain case:
Standard : – 0.14 to 0.14 mm (– 0.0055 to 0.0055 in)
Rear chain case and cylinder block:
Standard : – 0.25 to 0.13 mm (– 0.0098 to 0.0051 in)
JEM146G
JEM147G
Page 232 of 3833
EM-182
[YD22DDTi]
CYLINDER HEAD
CYLINDER HEAD
PFP:11041
On-Vehicle ServiceEBS00LRV
CHECKING COMPRESSION PRESSURE
1. Warm up engine thoroughly. Then, stop it.
2. Using CONSULT-II, make sure no error codes are indicated for self-diagnosis items. Refer to EC-1412,
"Basic Inspection" .
●Do not disconnect CONSULT-II until the end of this operation; it will be used to check engine rpm and
for error detection at the end of this operation.
3. Disconnect the negative battery terminal.
4. Remove charge air cooler. Refer to EM-122, "
Removal and Installation"
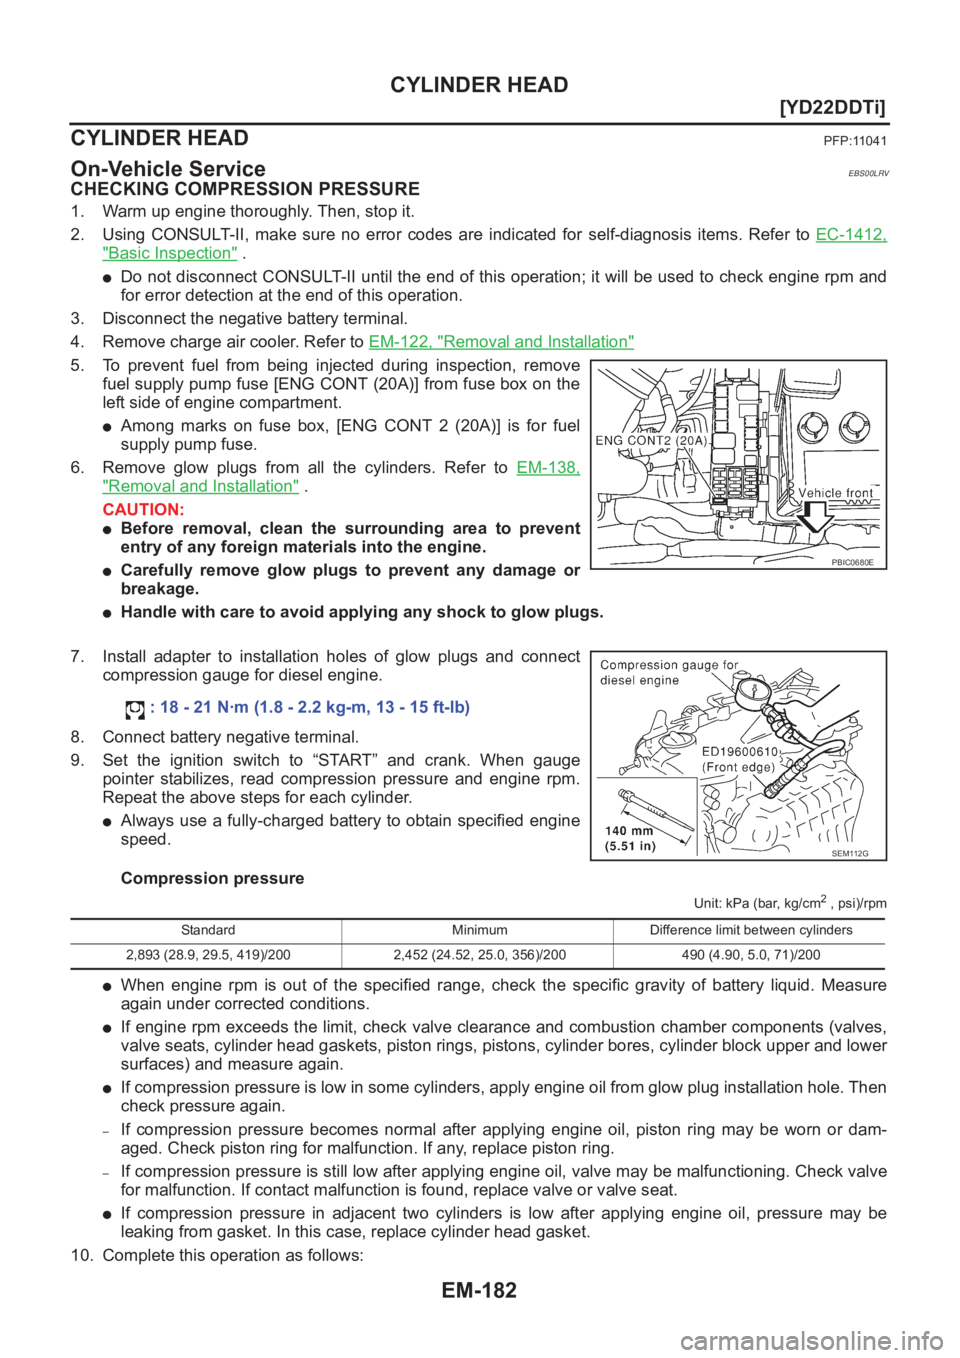
5. To prevent fuel from being injected during inspection, remove
fuel supply pump fuse [ENG CONT (20A)] from fuse box on the
left side of engine compartment.
●Among marks on fuse box, [ENG CONT 2 (20A)] is for fuel
supply pump fuse.
6. Remove glow plugs from all the cylinders. Refer to EM-138,
"Removal and Installation" .
CAUTION:
●Before removal, clean the surrounding area to prevent
entry of any foreign materials into the engine.
●Carefully remove glow plugs to prevent any damage or
breakage.
●Handle with care to avoid applying any shock to glow plugs.
7. Install adapter to installation holes of glow plugs and connect
compression gauge for diesel engine.
8. Connect battery negative terminal.
9. Set the ignition switch to “START” and crank. When gauge
pointer stabilizes, read compression pressure and engine rpm.
Repeat the above steps for each cylinder.
●Always use a fully-charged battery to obtain specified engine
speed.
Compression pressure
Unit: kPa (bar, kg/cm2 , psi)/rpm
●When engine rpm is out of the specified range, check the specific gravity of battery liquid. Measure
again under corrected conditions.
●If engine rpm exceeds the limit, check valve clearance and combustion chamber components (valves,
valve seats, cylinder head gaskets, piston rings, pistons, cylinder bores, cylinder block upper and lower
surfaces) and measure again.
●If compression pressure is low in some cylinders, apply engine oil from glow plug installation hole. Then
check pressure again.
–If compression pressure becomes normal after applying engine oil, piston ring may be worn or dam-
aged. Check piston ring for malfunction. If any, replace piston ring.
–If compression pressure is still low after applying engine oil, valve may be malfunctioning. Check valve
for malfunction. If contact malfunction is found, replace valve or valve seat.
●If compression pressure in adjacent two cylinders is low after applying engine oil, pressure may be
leaking from gasket. In this case, replace cylinder head gasket.
10. Complete this operation as follows:
PBIC0680E
: 18 - 21 N·m (1.8 - 2.2 kg-m, 13 - 15 ft-lb)
SEM112G
Standard Minimum Difference limit between cylinders
2,893 (28.9, 29.5, 419)/200 2,452 (24.52, 25.0, 356)/200 490 (4.90, 5.0, 71)/200
Page 234 of 3833
EM-184
[YD22DDTi]
CYLINDER HEAD
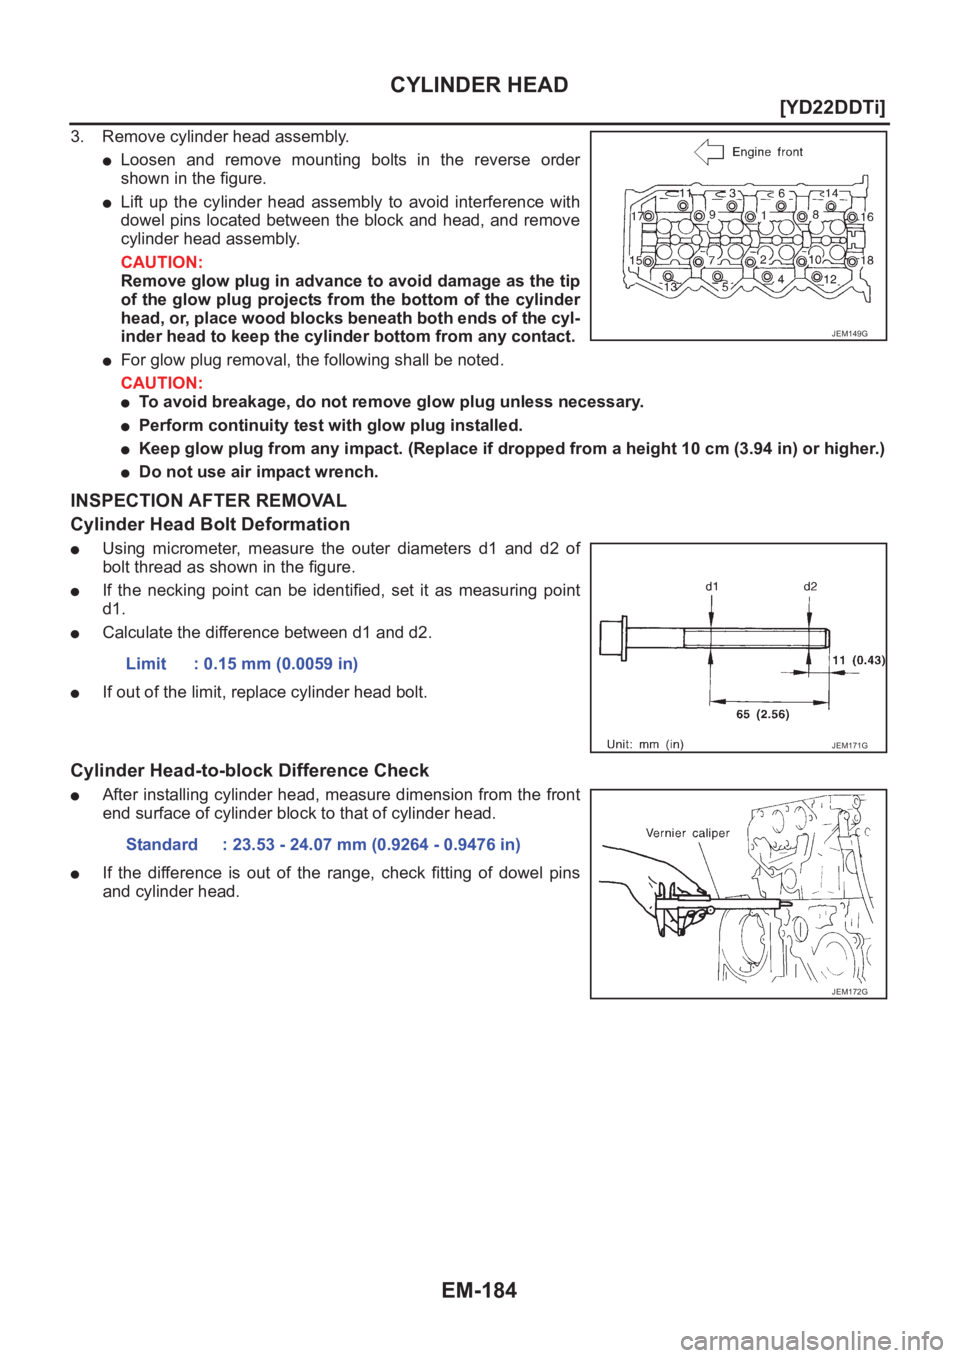
3. Remove cylinder head assembly.
●Loosen and remove mounting bolts in the reverse order
shown in the figure.
●Lift up the cylinder head assembly to avoid interference with
dowel pins located between the block and head, and remove
cylinder head assembly.
CAUTION:
Remove glow plug in advance to avoid damage as the tip
of the glow plug projects from the bottom of the cylinder
head, or, place wood blocks beneath both ends of the cyl-
inder head to keep the cylinder bottom from any contact.
●For glow plug removal, the following shall be noted.
CAUTION:
●To avoid breakage, do not remove glow plug unless necessary.
●Perform continuity test with glow plug installed.
●Keep glow plug from any impact. (Replace if dropped from a height 10 cm (3.94 in) or higher.)
●Do not use air impact wrench.
INSPECTION AFTER REMOVAL
Cylinder Head Bolt Deformation
●Using micrometer, measure the outer diameters d1 and d2 of
bolt thread as shown in the figure.
●If the necking point can be identified, set it as measuring point
d1.
●Calculate the difference between d1 and d2.
●If out of the limit, replace cylinder head bolt.
Cylinder Head-to-block Difference Check
●After installing cylinder head, measure dimension from the front
end surface of cylinder block to that of cylinder head.
●If the difference is out of the range, check fitting of dowel pins
and cylinder head.
JEM149G
Limit : 0.15 mm (0.0059 in)
JEM171G
Standard : 23.53 - 24.07 mm (0.9264 - 0.9476 in)
JEM172G
Page 235 of 3833
CYLINDER HEAD
EM-185
[YD22DDTi]
C
D
E
F
G
H
I
J
K
L
MA
EM
INSTALLATION
Before installation, remove old liquid gasket from mating surface of all liquid gasket applied parts.
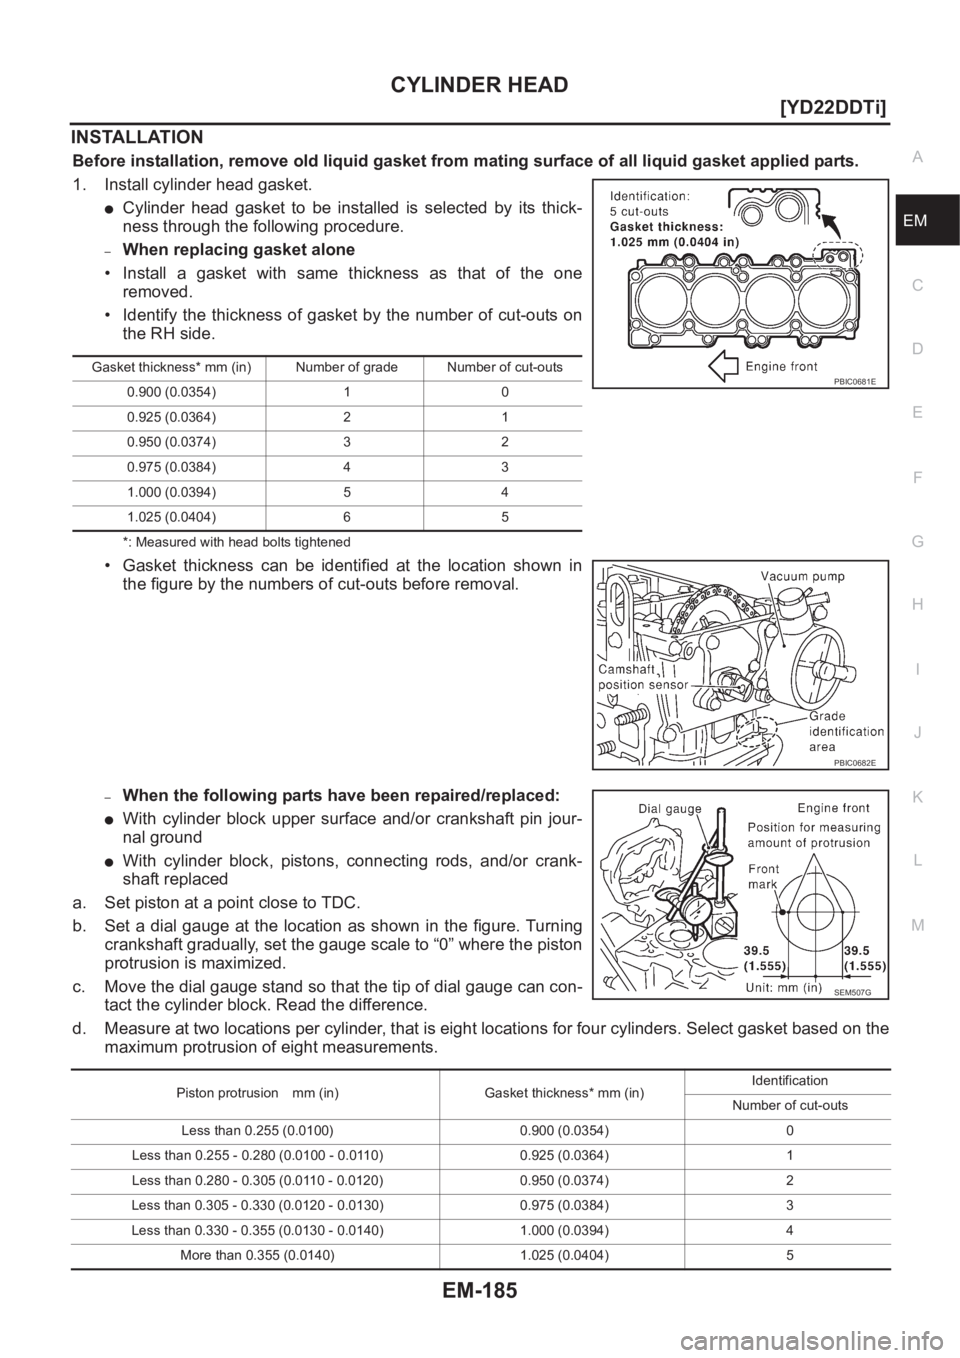
1. Install cylinder head gasket.
●Cylinder head gasket to be installed is selected by its thick-
ness through the following procedure.
–When replacing gasket alone
• Install a gasket with same thickness as that of the one
removed.
• Identify the thickness of gasket by the number of cut-outs on
the RH side.
*: Measured with head bolts tightened
• Gasket thickness can be identified at the location shown in
the figure by the numbers of cut-outs before removal.
–When the following parts have been repaired/replaced:
●With cylinder block upper surface and/or crankshaft pin jour-
nal ground
●With cylinder block, pistons, connecting rods, and/or crank-
shaft replaced
a. Set piston at a point close to TDC.
b. Set a dial gauge at the location as shown in the figure. Turning
crankshaft gradually, set the gauge scale to “0” where the piston
protrusion is maximized.
c. Move the dial gauge stand so that the tip of dial gauge can con-
tact the cylinder block. Read the difference.
d. Measure at two locations per cylinder, that is eight locations for four cylinders. Select gasket based on the
maximum protrusion of eight measurements.
Gasket thickness* mm (in) Number of grade Number of cut-outs
0.900 (0.0354) 1 0
0.925 (0.0364) 2 1
0.950 (0.0374) 3 2
0.975 (0.0384) 4 3
1.000 (0.0394) 5 4
1.025 (0.0404) 6 5PBIC0681E
PBIC0682E
SEM507G
Piston protrusion mm (in) Gasket thickness* mm (in)Identification
Number of cut-outs
Less than 0.255 (0.0100) 0.900 (0.0354) 0
Less than 0.255 - 0.280 (0.0100 - 0.0110) 0.925 (0.0364) 1
Less than 0.280 - 0.305 (0.0110 - 0.0120) 0.950 (0.0374) 2
Less than 0.305 - 0.330 (0.0120 - 0.0130) 0.975 (0.0384) 3
Less than 0.330 - 0.355 (0.0130 - 0.0140) 1.000 (0.0394) 4
More than 0.355 (0.0140) 1.025 (0.0404) 5
Page 247 of 3833
CYLINDER BLOCK
EM-197
[YD22DDTi]
C
D
E
F
G
H
I
J
K
L
MA
EM
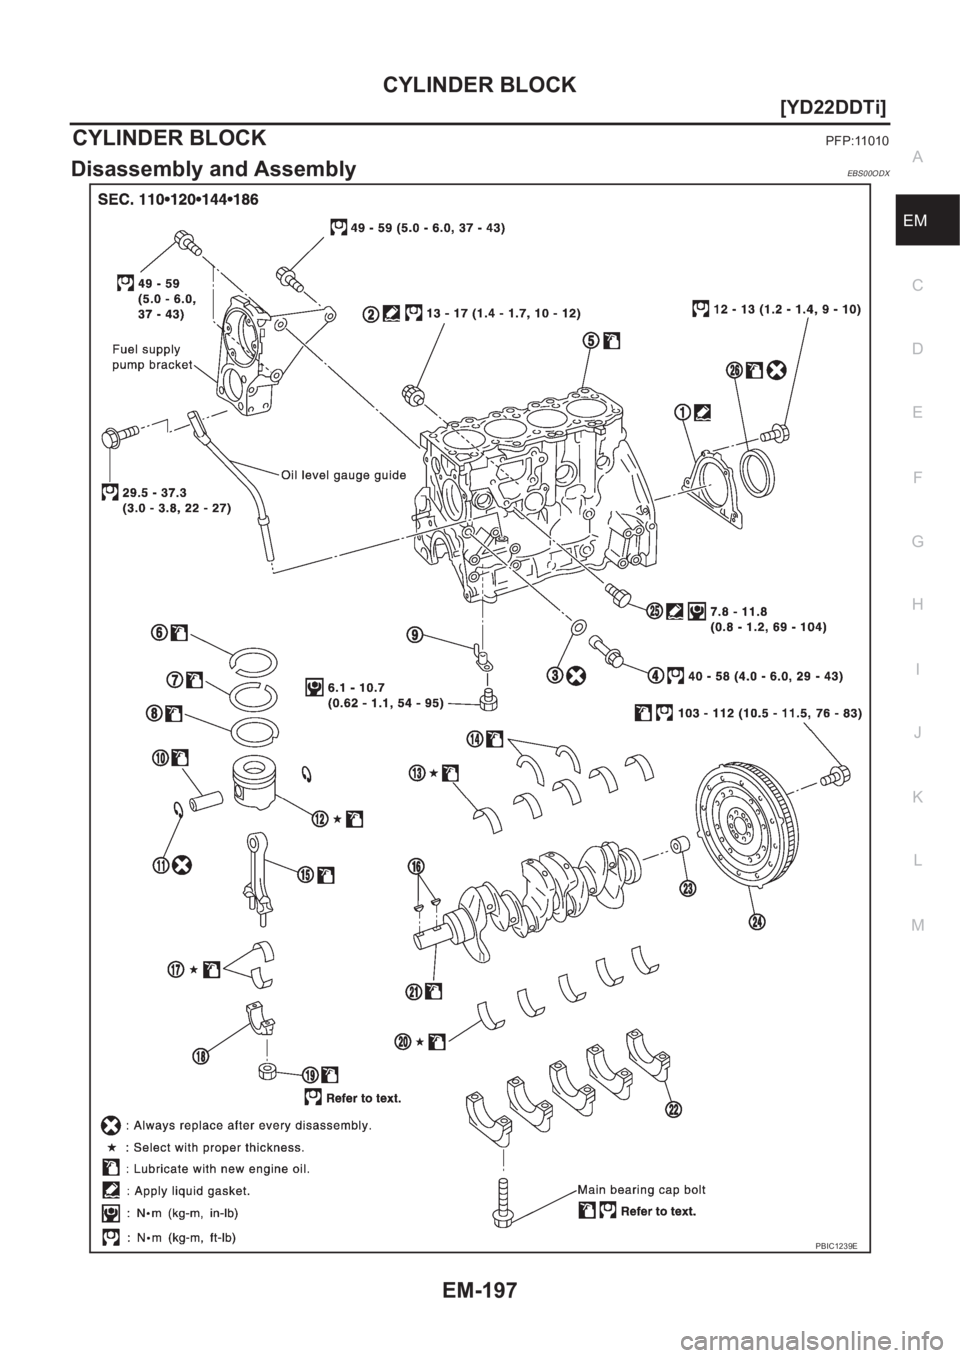
CYLINDER BLOCKPFP:11010
Disassembly and AssemblyEBS00ODX
PBIC1239E
Page 248 of 3833
EM-198
[YD22DDTi]
CYLINDER BLOCK
CAUTION:
Apply new engine oil to parts marked in illustration before installation.
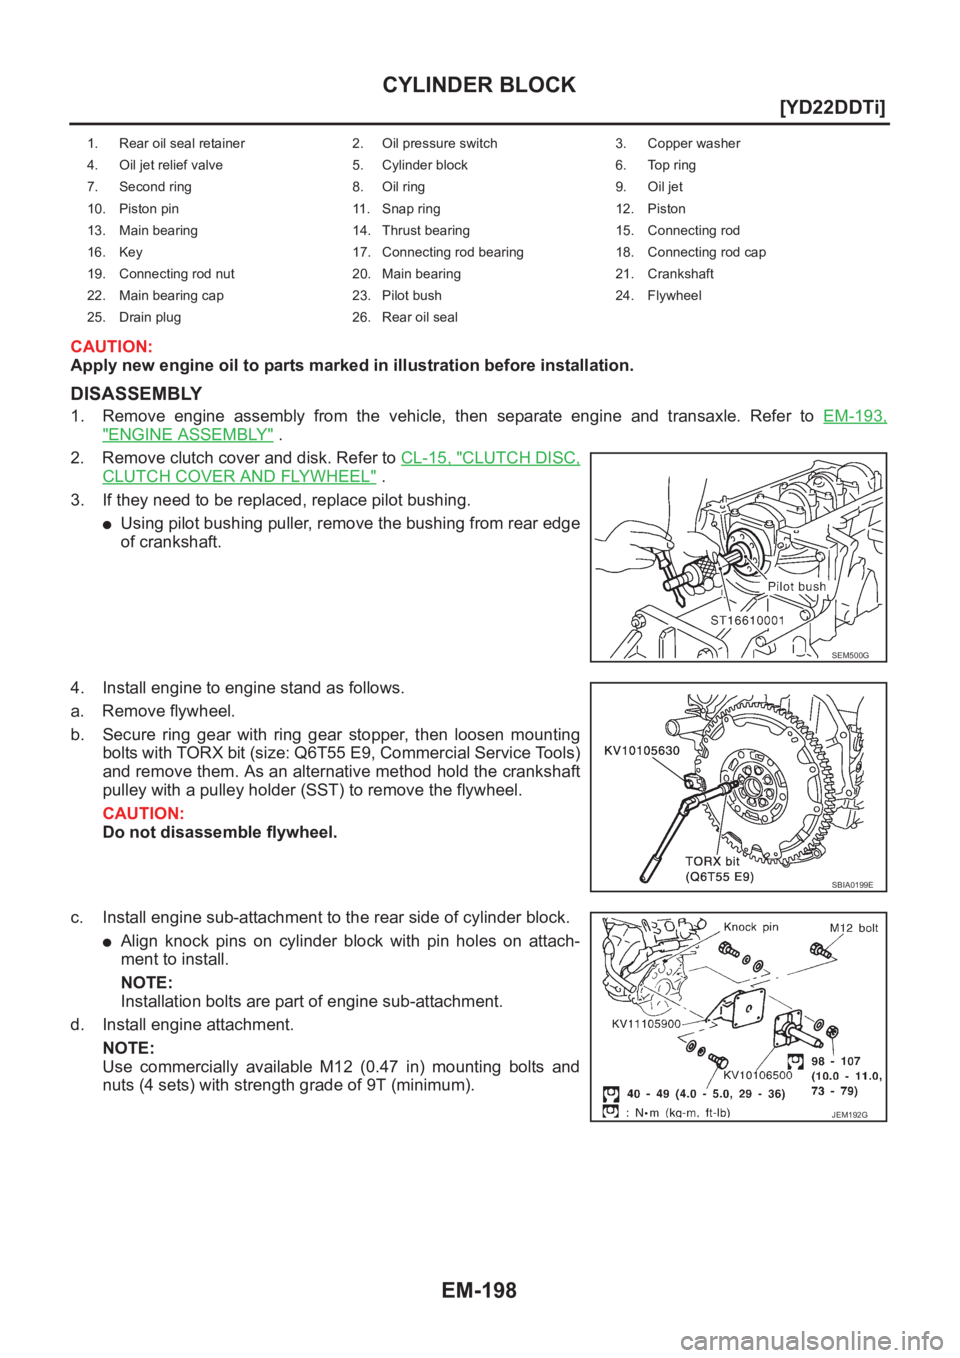
DISASSEMBLY
1. Remove engine assembly from the vehicle, then separate engine and transaxle. Refer to EM-193,
"ENGINE ASSEMBLY" .
2. Remove clutch cover and disk. Refer to CL-15, "
CLUTCH DISC,
CLUTCH COVER AND FLYWHEEL" .
3. If they need to be replaced, replace pilot bushing.
●Using pilot bushing puller, remove the bushing from rear edge
of crankshaft.
4. Install engine to engine stand as follows.
a. Remove flywheel.
b. Secure ring gear with ring gear stopper, then loosen mounting
bolts with TORX bit (size: Q6T55 E9, Commercial Service Tools)
and remove them. As an alternative method hold the crankshaft
pulley with a pulley holder (SST) to remove the flywheel.
CAUTION:
Do not disassemble flywheel.
c. Install engine sub-attachment to the rear side of cylinder block.
●Align knock pins on cylinder block with pin holes on attach-
ment to install.
NOTE:
Installation bolts are part of engine sub-attachment.
d. Install engine attachment.
NOTE:
Use commercially available M12 (0.47 in) mounting bolts and
nuts (4 sets) with strength grade of 9T (minimum).
1. Rear oil seal retainer 2. Oil pressure switch 3. Copper washer
4. Oil jet relief valve 5. Cylinder block 6. Top ring
7. Second ring 8. Oil ring 9. Oil jet
10. Piston pin 11. Snap ring 12. Piston
13. Main bearing 14. Thrust bearing 15. Connecting rod
16. Key 17. Connecting rod bearing 18. Connecting rod cap
19. Connecting rod nut 20. Main bearing 21. Crankshaft
22. Main bearing cap 23. Pilot bush 24. Flywheel
25. Drain plug 26. Rear oil seal
SEM500G
SBIA0199E
JEM192G