lock NISSAN X-TRAIL 2001 Service Workshop Manual
[x] Cancel search | Manufacturer: NISSAN, Model Year: 2001, Model line: X-TRAIL, Model: NISSAN X-TRAIL 2001Pages: 3833, PDF Size: 39.49 MB
Page 153 of 3833
SERVICE DATA AND SPECIFICATIONS (SDS)
EM-103
[QR]
C
D
E
F
G
H
I
J
K
L
MA
EM
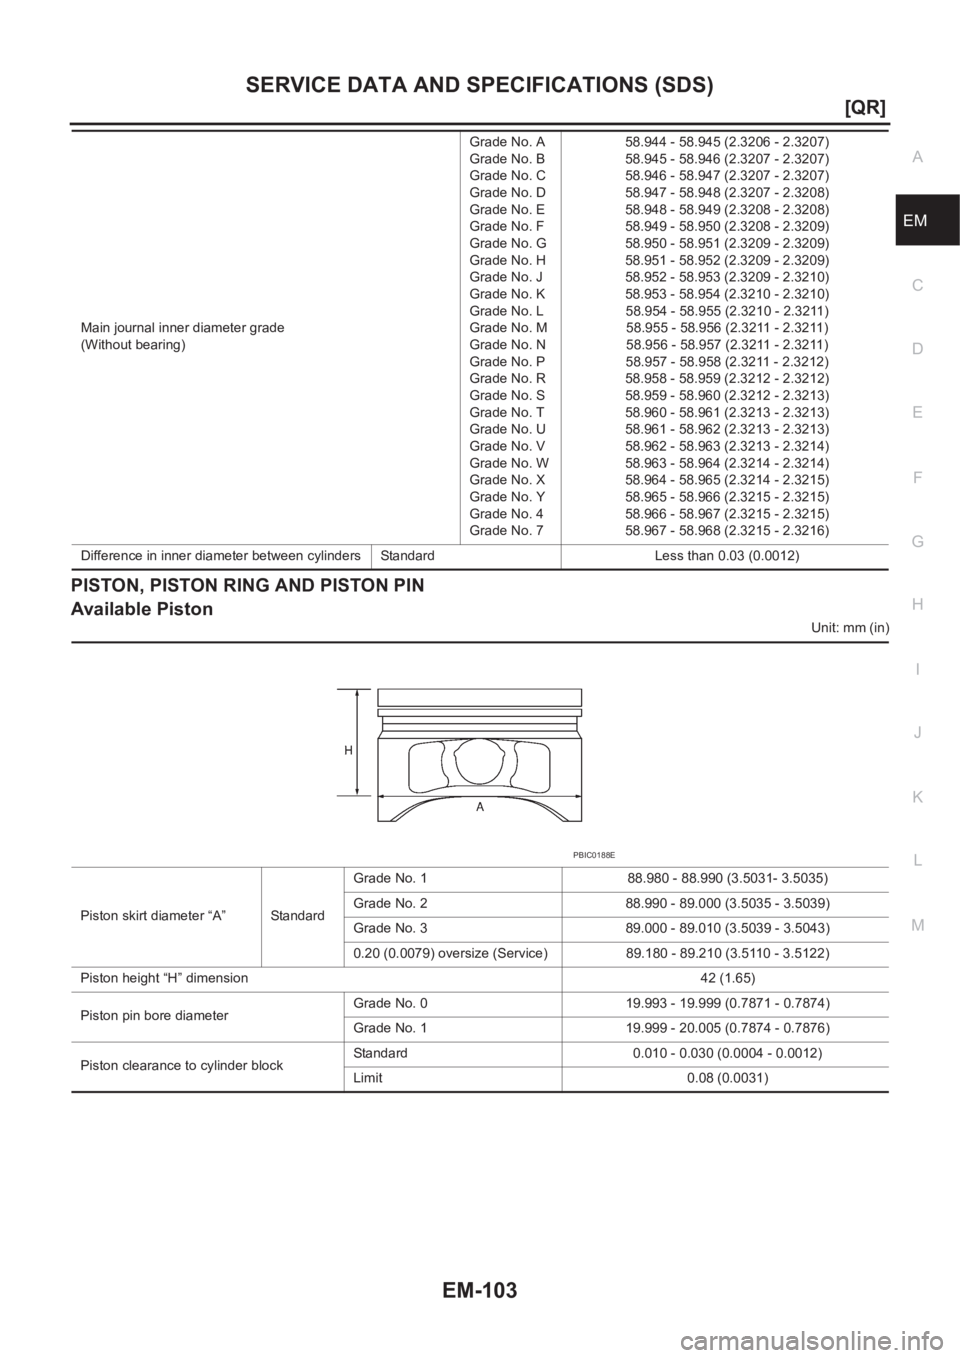
PISTON, PISTON RING AND PISTON PIN
Available Piston
Unit: mm (in) Main journal inner diameter grade
(Without bearing)Grade No. A
Grade No. B
Grade No. C
Grade No. D
Grade No. E
Grade No. F
Grade No. G
Grade No. H
Grade No. J
Grade No. K
Grade No. L
Grade No. M
Grade No. N
Grade No. P
Grade No. R
Grade No. S
Grade No. T
Grade No. U
Grade No. V
Grade No. W
Grade No. X
Grade No. Y
Grade No. 4
Grade No. 758.944 - 58.945 (2.3206 - 2.3207)
58.945 - 58.946 (2.3207 - 2.3207)
58.946 - 58.947 (2.3207 - 2.3207)
58.947 - 58.948 (2.3207 - 2.3208)
58.948 - 58.949 (2.3208 - 2.3208)
58.949 - 58.950 (2.3208 - 2.3209)
58.950 - 58.951 (2.3209 - 2.3209)
58.951 - 58.952 (2.3209 - 2.3209)
58.952 - 58.953 (2.3209 - 2.3210)
58.953 - 58.954 (2.3210 - 2.3210)
58.954 - 58.955 (2.3210 - 2.3211)
58.955 - 58.956 (2.3211 - 2.3211)
58.956 - 58.957 (2.3211 - 2.3211)
58.957 - 58.958 (2.3211 - 2.3212)
58.958 - 58.959 (2.3212 - 2.3212)
58.959 - 58.960 (2.3212 - 2.3213)
58.960 - 58.961 (2.3213 - 2.3213)
58.961 - 58.962 (2.3213 - 2.3213)
58.962 - 58.963 (2.3213 - 2.3214)
58.963 - 58.964 (2.3214 - 2.3214)
58.964 - 58.965 (2.3214 - 2.3215)
58.965 - 58.966 (2.3215 - 2.3215)
58.966 - 58.967 (2.3215 - 2.3215)
58.967 - 58.968 (2.3215 - 2.3216)
Difference in inner diameter between cylinders Standard Less than 0.03 (0.0012)
Piston skirt diameter “A” StandardGrade No. 1 88.980 - 88.990 (3.5031- 3.5035)
Grade No. 2 88.990 - 89.000 (3.5035 - 3.5039)
Grade No. 3 89.000 - 89.010 (3.5039 - 3.5043)
0.20 (0.0079) oversize (Service) 89.180 - 89.210 (3.5110 - 3.5122)
Piston height “H” dimension42 (1.65)
Piston pin bore diameterGrade No. 0 19.993 - 19.999 (0.7871 - 0.7874)
Grade No. 1 19.999 - 20.005 (0.7874 - 0.7876)
Piston clearance to cylinder blockStandard 0.010 - 0.030 (0.0004 - 0.0012)
Limit 0.08 (0.0031)
PBIC0188E
Page 159 of 3833
SERVICE DATA AND SPECIFICATIONS (SDS)
EM-109
[QR]
C
D
E
F
G
H
I
J
K
L
MA
EM
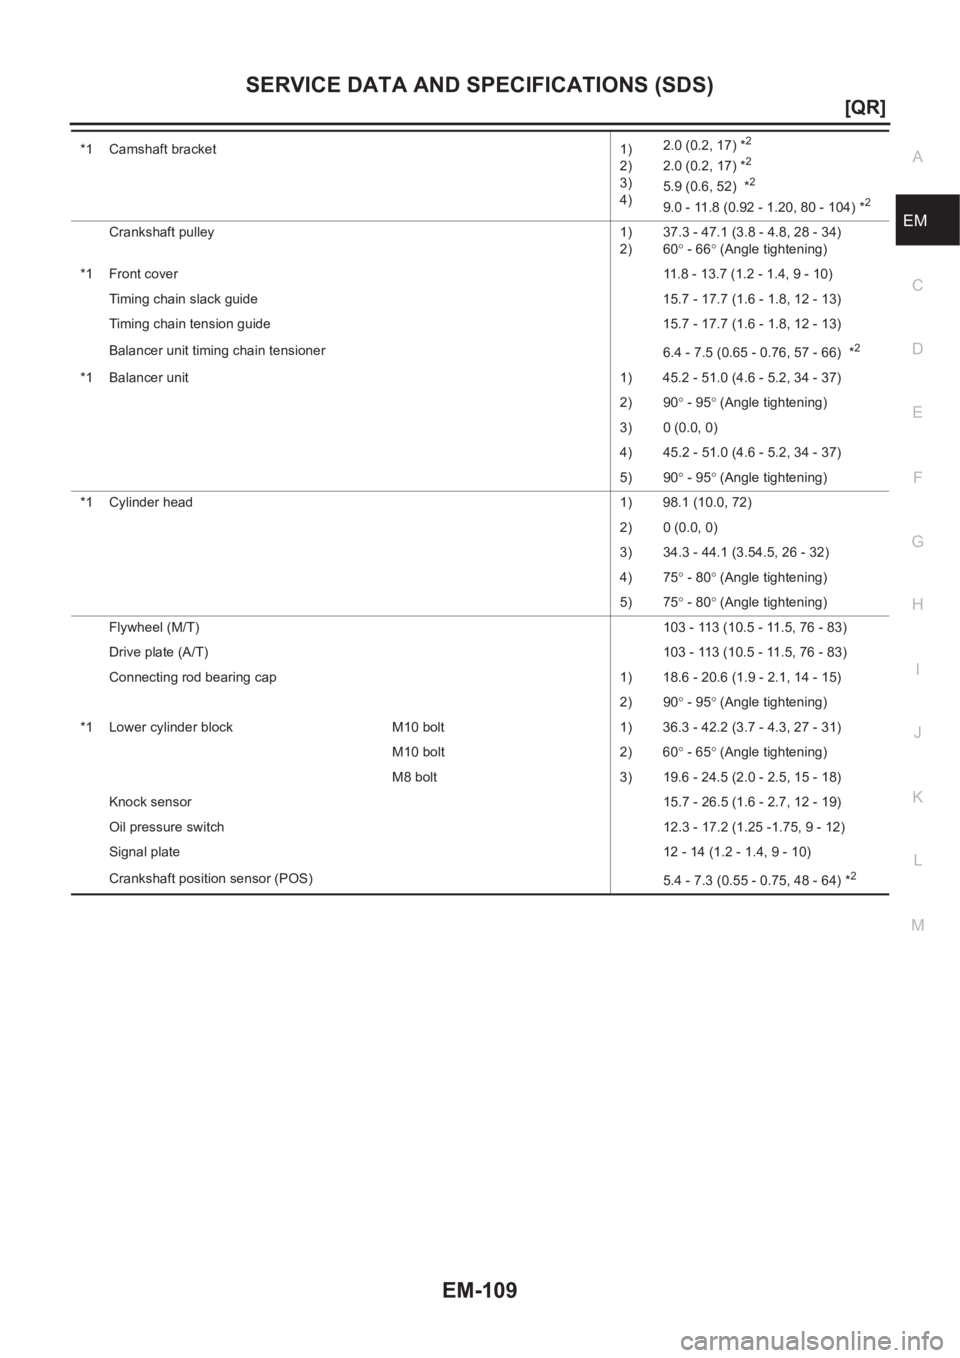
*1 Camshaft bracket 1)
2)
3)
4)2.0 (0.2, 17) *2
2.0 (0.2, 17) *2
5.9 (0.6, 52) *2
9.0 - 11.8 (0.92 - 1.20, 80 - 104) *2
Crankshaft pulley 1)
2)37.3 - 47.1 (3.8 - 4.8, 28 - 34)
60° - 66° (Angle tightening)
*1 Front cover 11.8 - 13.7 (1.2 - 1.4, 9 - 10)
Timing chain slack guide 15.7 - 17.7 (1.6 - 1.8, 12 - 13)
Timing chain tension guide 15.7 - 17.7 (1.6 - 1.8, 12 - 13)
Balancer unit timing chain tensioner
6.4 - 7.5 (0.65 - 0.76, 57 - 66) *
2
*1 Balancer unit 1) 45.2 - 51.0 (4.6 - 5.2, 34 - 37)
2) 90° - 95° (Angle tightening)
3) 0 (0.0, 0)
4) 45.2 - 51.0 (4.6 - 5.2, 34 - 37)
5) 90° - 95° (Angle tightening)
*1 Cylinder head 1) 98.1 (10.0, 72)
2) 0 (0.0, 0)
3) 34.3 - 44.1 (3.54.5, 26 - 32)
4) 75° - 80° (Angle tightening)
5) 75° - 80° (Angle tightening)
Flywheel (M/T)103 - 113 (10.5 - 11.5, 76 - 83)
Drive plate (A/T)103 - 113 (10.5 - 11.5, 76 - 83)
Connecting rod bearing cap 1) 18.6 - 20.6 (1.9 - 2.1, 14 - 15)
2) 90° - 95° (Angle tightening)
*1 Lower cylinder block M10 bolt 1) 36.3 - 42.2 (3.7 - 4.3, 27 - 31)
M10 bolt 2) 60° - 65° (Angle tightening)
M8 bolt 3) 19.6 - 24.5 (2.0 - 2.5, 15 - 18)
Knock sensor 15.7 - 26.5 (1.6 - 2.7, 12 - 19)
Oil pressure switch 12.3 - 17.2 (1.25 -1.75, 9 - 12)
Signal plate12 - 14 (1.2 - 1.4, 9 - 10)
Crankshaft position sensor (POS)
5.4 - 7.3 (0.55 - 0.75, 48 - 64) *
2
Page 160 of 3833
EM-110
[YD22DDTi]
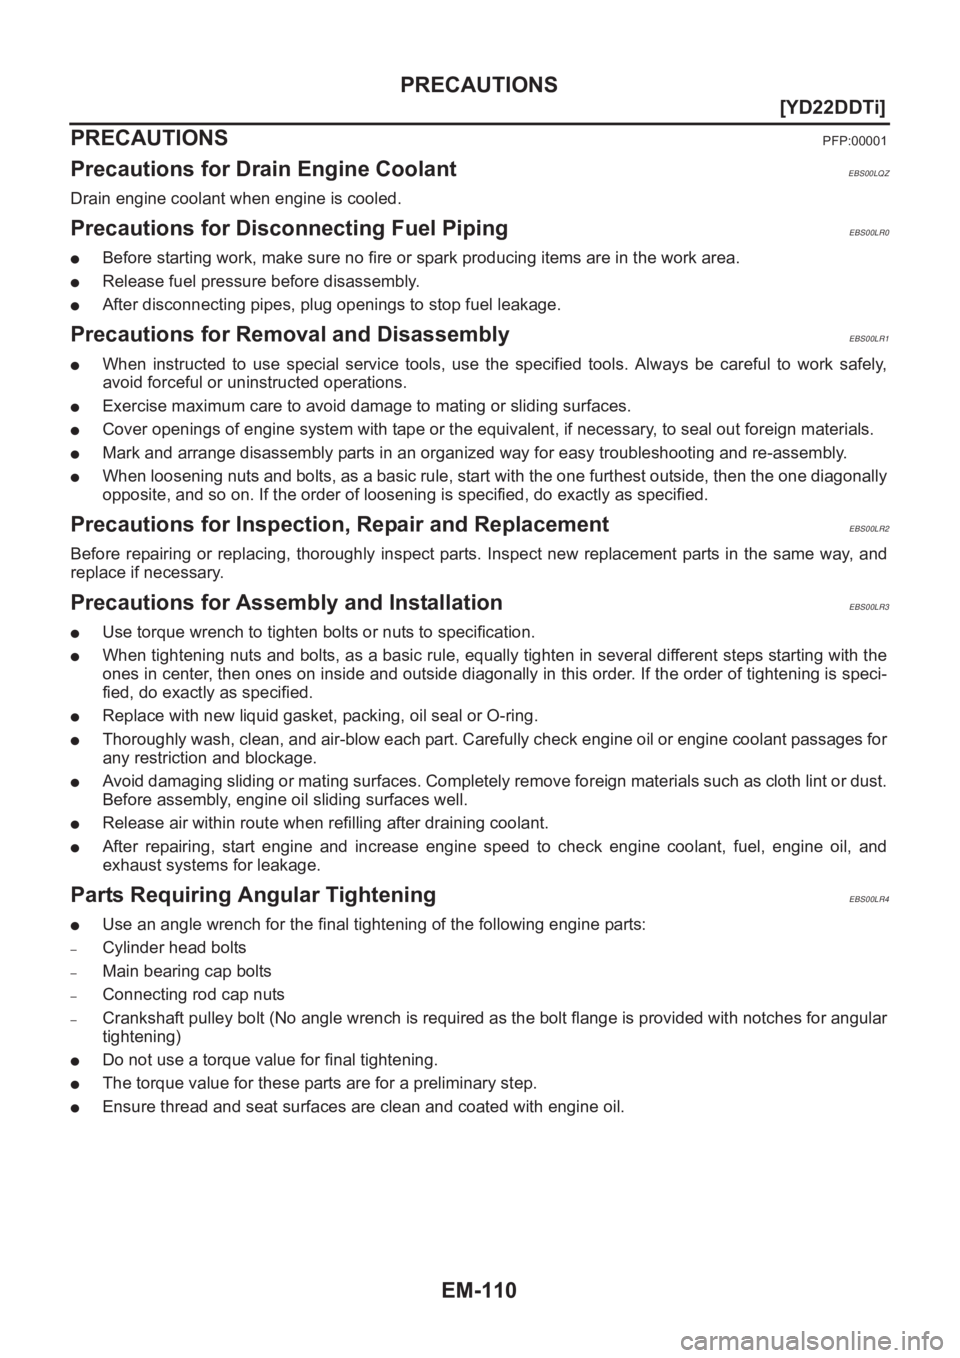
PRECAUTIONS
[YD22DDTi]PRECAUTIONSPFP:00001
Precautions for Drain Engine CoolantEBS00LQZ
Drain engine coolant when engine is cooled.
Precautions for Disconnecting Fuel PipingEBS00LR0
●Before starting work, make sure no fire or spark producing items are in the work area.
●Release fuel pressure before disassembly.
●After disconnecting pipes, plug openings to stop fuel leakage.
Precautions for Removal and DisassemblyEBS00LR1
●When instructed to use special service tools, use the specified tools. Always be careful to work safely,
avoid forceful or uninstructed operations.
●Exercise maximum care to avoid damage to mating or sliding surfaces.
●Cover openings of engine system with tape or the equivalent, if necessary, to seal out foreign materials.
●Mark and arrange disassembly parts in an organized way for easy troubleshooting and re-assembly.
●When loosening nuts and bolts, as a basic rule, start with the one furthest outside, then the one diagonally
opposite, and so on. If the order of loosening is specified, do exactly as specified.
Precautions for Inspection, Repair and ReplacementEBS00LR2
Before repairing or replacing, thoroughly inspect parts. Inspect new replacement parts in the same way, and
replace if necessary.
Precautions for Assembly and InstallationEBS00LR3
●Use torque wrench to tighten bolts or nuts to specification.
●When tightening nuts and bolts, as a basic rule, equally tighten in several different steps starting with the
ones in center, then ones on inside and outside diagonally in this order. If the order of tightening is speci-
fied, do exactly as specified.
●Replace with new liquid gasket, packing, oil seal or O-ring.
●Thoroughly wash, clean, and air-blow each part. Carefully check engine oil or engine coolant passages for
any restriction and blockage.
●Avoid damaging sliding or mating surfaces. Completely remove foreign materials such as cloth lint or dust.
Before assembly, engine oil sliding surfaces well.
●Release air within route when refilling after draining coolant.
●After repairing, start engine and increase engine speed to check engine coolant, fuel, engine oil, and
exhaust systems for leakage.
Parts Requiring Angular TighteningEBS00LR4
●Use an angle wrench for the final tightening of the following engine parts:
–Cylinder head bolts
–Main bearing cap bolts
–Connecting rod cap nuts
–Crankshaft pulley bolt (No angle wrench is required as the bolt flange is provided with notches for angular
tightening)
●Do not use a torque value for final tightening.
●The torque value for these parts are for a preliminary step.
●Ensure thread and seat surfaces are clean and coated with engine oil.
Page 167 of 3833
NOISE, VIBRATION, AND HARSHNESS (NVH) TROUBLESHOOTING
EM-117
[YD22DDTi]
C
D
E
F
G
H
I
J
K
L
MA
EM
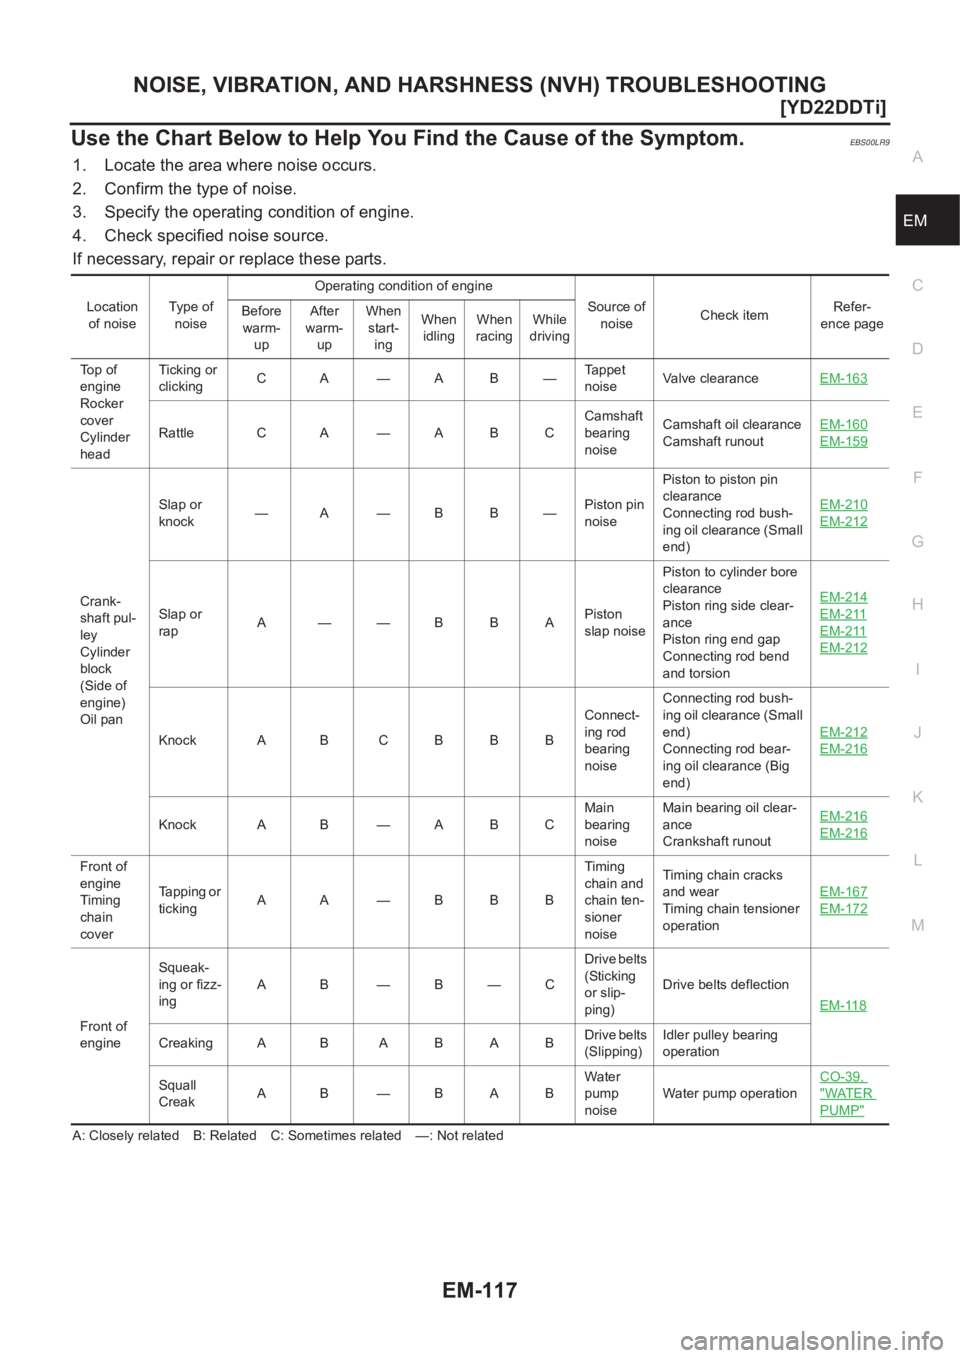
Use the Chart Below to Help You Find the Cause of the Symptom.EBS00LR9
1. Locate the area where noise occurs.
2. Confirm the type of noise.
3. Specify the operating condition of engine.
4. Check specified noise source.
If necessary, repair or replace these parts.
A: Closely related B: Related C: Sometimes related —: Not relatedLocation
of noiseType of
noiseOperating condition of engine
Source of
noiseCheck itemRefer-
ence page Before
warm-
upAfter
warm-
upWhen
start-
ingWhen
idlingWhen
racingWhile
driving
Top of
engine
Rocker
cover
Cylinder
headTicking or
clickingCA—AB—Tappet
noiseValve clearanceEM-163
Rattle C A — A B CCamshaft
bearing
noiseCamshaft oil clearance
Camshaft runoutEM-160EM-159
Crank-
shaft pul-
ley
Cylinder
block
(Side of
engine)
Oil panSlap or
knock—A—BB—Piston pin
noisePiston to piston pin
clearance
Connecting rod bush-
ing oil clearance (Small
end)EM-210
EM-212
Slap or
rapA ——BBAPiston
slap noisePiston to cylinder bore
clearance
Piston ring side clear-
ance
Piston ring end gap
Connecting rod bend
and torsionEM-214EM-211
EM-211
EM-212
Knock A B C B B BConnect-
ing rod
bearing
noiseConnecting rod bush-
ing oil clearance (Small
end)
Connecting rod bear-
ing oil clearance (Big
end)EM-212EM-216
Knock A B — A B CMain
bearing
noiseMain bearing oil clear-
ance
Crankshaft runoutEM-216EM-216
Front of
engine
Timing
chain
coverTapping or
tickingA A —BBBTiming
chain and
chain ten-
sioner
noiseTiming chain cracks
and wear
Timing chain tensioner
operationEM-167
EM-172
Front of
engineSqueak-
ing or fizz-
ingAB—B—CDrive belts
(Sticking
or slip-
ping)Drive belts deflection
EM-118
CreakingA B ABABDrive belts
(Slipping)Idler pulley bearing
operation
Squall
CreakA B —BABWater
pump
noiseWater pump operationCO-39,
"WATER
PUMP"
Page 168 of 3833
EM-118
[YD22DDTi]
DRIVE BELTS
DRIVE BELTS
PFP:02117
Checking Drive BeltsEBS00LRA
●Before inspecting the engine, make sure the engine has cooled
down; wait approximately 30 minutes after the engine has been
stopped.
●Visually inspect all belts for wear, damage or cracks on contact-
ing surfaces and edge areas.
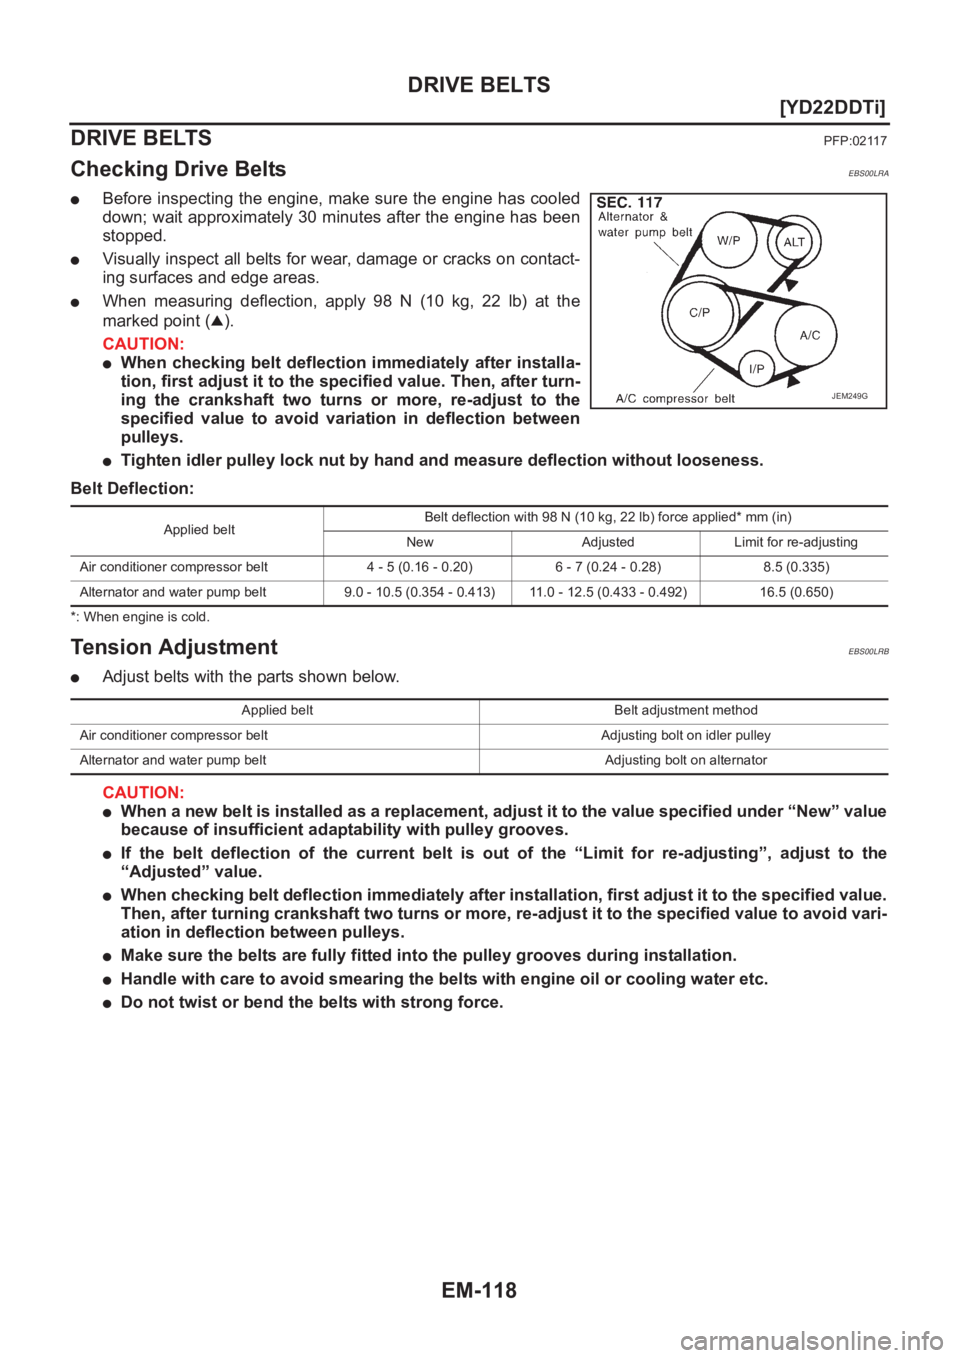
●When measuring deflection, apply 98 N (10 kg, 22 lb) at the
marked point ( ).
CAUTION:
●When checking belt deflection immediately after installa-
tion, first adjust it to the specified value. Then, after turn-
ing the crankshaft two turns or more, re-adjust to the
specified value to avoid variation in deflection between
pulleys.
●Tighten idler pulley lock nut by hand and measure deflection without looseness.
Belt Deflection:
*: When engine is cold.
Tension AdjustmentEBS00LRB
●Adjust belts with the parts shown below.
CAUTION:
●When a new belt is installed as a replacement, adjust it to the value specified under “New” value
because of insufficient adaptability with pulley grooves.
●If the belt deflection of the current belt is out of the “Limit for re-adjusting”, adjust to the
“Adjusted” value.
●When checking belt deflection immediately after installation, first adjust it to the specified value.
Then, after turning crankshaft two turns or more, re-adjust it to the specified value to avoid vari-
ation in deflection between pulleys.
●Make sure the belts are fully fitted into the pulley grooves during installation.
●Handle with care to avoid smearing the belts with engine oil or cooling water etc.
●Do not twist or bend the belts with strong force.
JEM249G
Applied beltBelt deflection with 98 N (10 kg, 22 lb) force applied* mm (in)
New Adjusted Limit for re-adjusting
Air conditioner compressor belt 4 - 5 (0.16 - 0.20) 6 - 7 (0.24 - 0.28) 8.5 (0.335)
Alternator and water pump belt 9.0 - 10.5 (0.354 - 0.413) 11.0 - 12.5 (0.433 - 0.492) 16.5 (0.650)
Applied belt Belt adjustment method
Air conditioner compressor belt Adjusting bolt on idler pulley
Alternator and water pump belt Adjusting bolt on alternator
Page 169 of 3833
DRIVE BELTS
EM-119
[YD22DDTi]
C
D
E
F
G
H
I
J
K
L
MA
EM
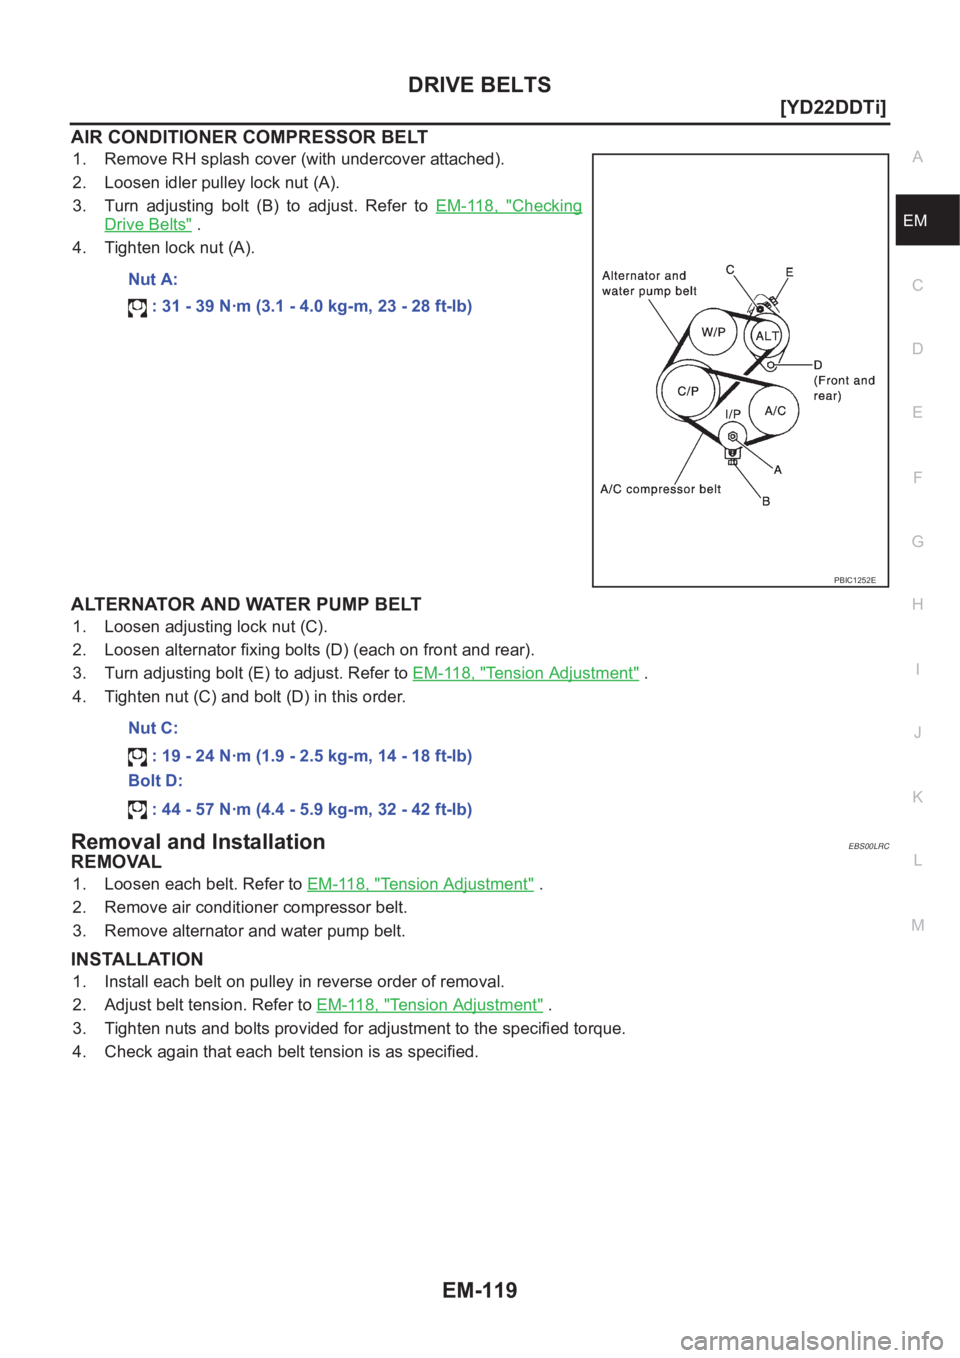
AIR CONDITIONER COMPRESSOR BELT
1. Remove RH splash cover (with undercover attached).
2. Loosen idler pulley lock nut (A).
3. Turn adjusting bolt (B) to adjust. Refer to EM-118, "
Checking
Drive Belts" .
4. Tighten lock nut (A).
ALTERNATOR AND WATER PUMP BELT
1. Loosen adjusting lock nut (C).
2. Loosen alternator fixing bolts (D) (each on front and rear).
3. Turn adjusting bolt (E) to adjust. Refer to EM-118, "
Tension Adjustment" .
4. Tighten nut (C) and bolt (D) in this order.
Removal and InstallationEBS00LRC
REMOVAL
1. Loosen each belt. Refer to EM-118, "Tension Adjustment" .
2. Remove air conditioner compressor belt.
3. Remove alternator and water pump belt.
INSTALLATION
1. Install each belt on pulley in reverse order of removal.
2. Adjust belt tension. Refer to EM-118, "
Tension Adjustment" .
3. Tighten nuts and bolts provided for adjustment to the specified torque.
4. Check again that each belt tension is as specified.Nut A:
: 31 - 39 N·m (3.1 - 4.0 kg-m, 23 - 28 ft-lb)
PBIC1252E
Nut C:
: 19 - 24 N·m (1.9 - 2.5 kg-m, 14 - 18 ft-lb)
Bolt D:
: 44 - 57 N·m (4.4 - 5.9 kg-m, 32 - 42 ft-lb)
Page 176 of 3833
EM-126
[YD22DDTi]
CATALYST
CATALYST
PFP:20905
Removal and InstallationEBS00LRG
REMOVAL
1. Remove engine undercover.
2. Drain engine coolant. Refer to CO-29, "
Changing Engine Coolant" .
3. Remove radiator upper and lower hoses.
4. Remove radiator fan. Refer to CO-33, "
Disassembly and Assembly Radiator Fan" .
5. Remove radiator mount bracket and radiator. Refer to CO-32, "
Removal and Installation" .
6. Remove water inlet pipe.
7. Remove insulators.
8. Disconnect exhaust front tube. Refer to EX-2, "
EXHAUST SYSTEM" .
9. Remove catalyst.
CAUTION:
Do not disassemble.
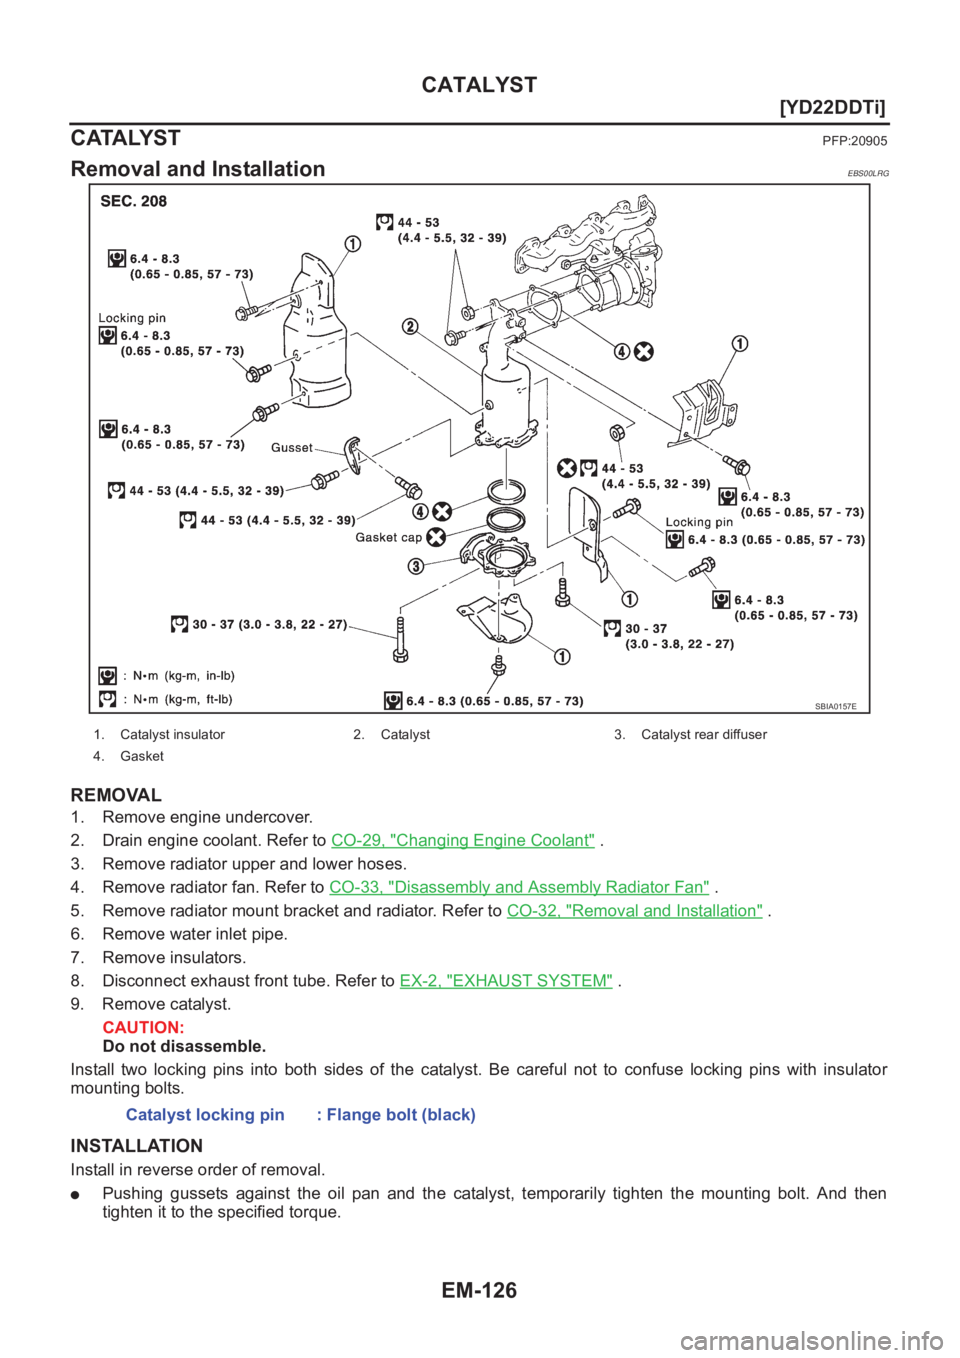
Install two locking pins into both sides of the catalyst. Be careful not to confuse locking pins with insulator
mounting bolts.
INSTALLATION
Install in reverse order of removal.
●Pushing gussets against the oil pan and the catalyst, temporarily tighten the mounting bolt. And then
tighten it to the specified torque.
SBIA0157E
1. Catalyst insulator 2. Catalyst 3. Catalyst rear diffuser
4. Gasket
Catalyst locking pin : Flange bolt (black)
Page 185 of 3833
OIL PAN AND OIL STRAINER
EM-135
[YD22DDTi]
C
D
E
F
G
H
I
J
K
L
MA
EM
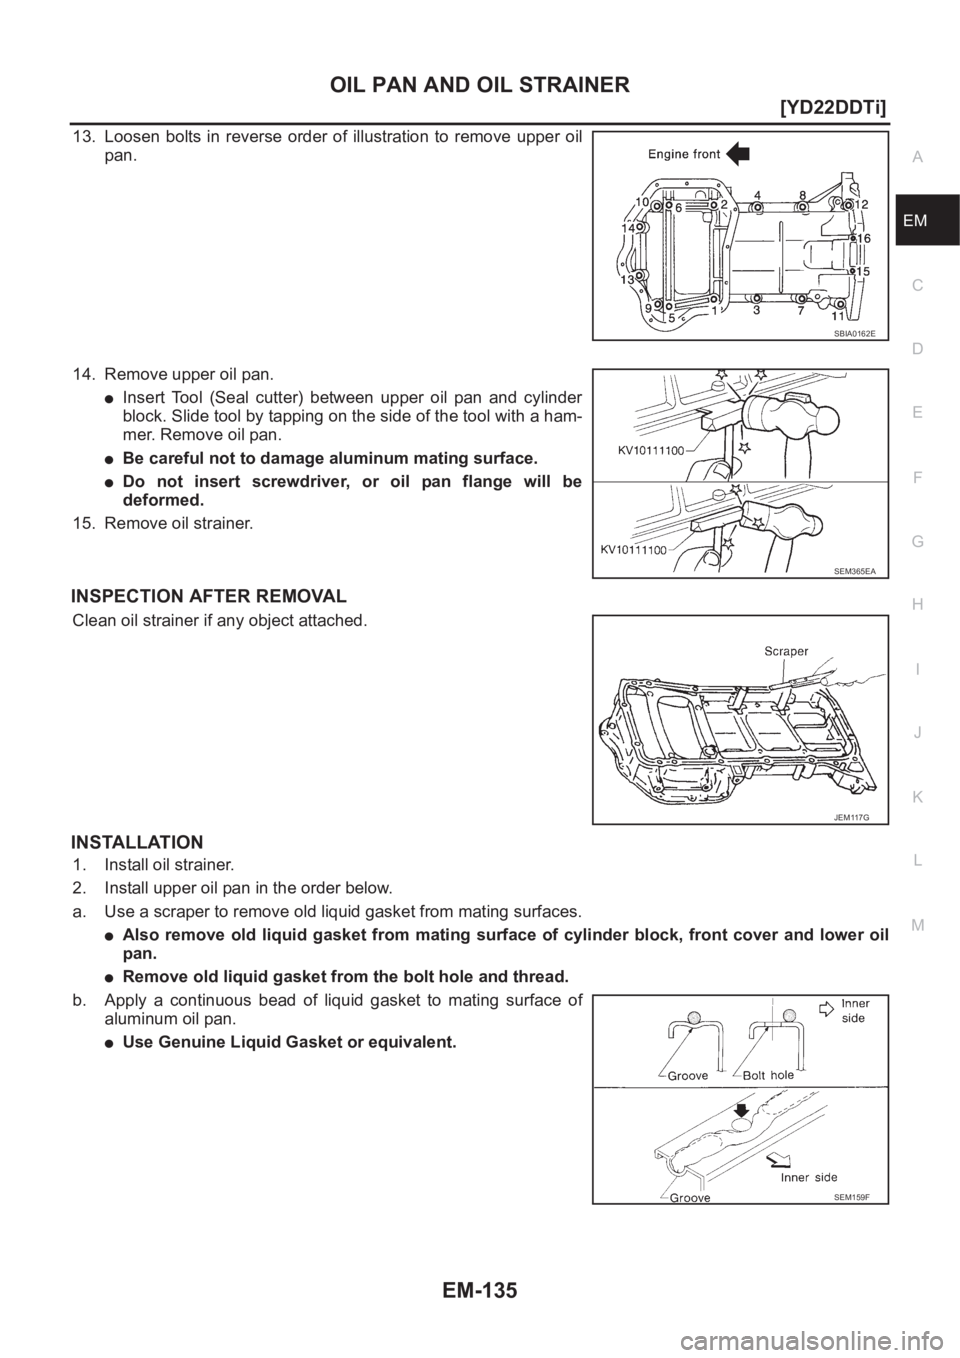
13. Loosen bolts in reverse order of illustration to remove upper oil
pan.
14. Remove upper oil pan.
●Insert Tool (Seal cutter) between upper oil pan and cylinder
block. Slide tool by tapping on the side of the tool with a ham-
mer. Remove oil pan.
●Be careful not to damage aluminum mating surface.
●Do not insert screwdriver, or oil pan flange will be
deformed.
15. Remove oil strainer.
INSPECTION AFTER REMOVAL
Clean oil strainer if any object attached.
INSTALLATION
1. Install oil strainer.
2. Install upper oil pan in the order below.
a. Use a scraper to remove old liquid gasket from mating surfaces.
●Also remove old liquid gasket from mating surface of cylinder block, front cover and lower oil
pan.
●Remove old liquid gasket from the bolt hole and thread.
b. Apply a continuous bead of liquid gasket to mating surface of
aluminum oil pan.
●Use Genuine Liquid Gasket or equivalent.
SBIA0162E
SEM365EA
JEM117G
SEM159F
Page 198 of 3833
EM-148
[YD22DDTi]
FUEL SUPPLY PUMP
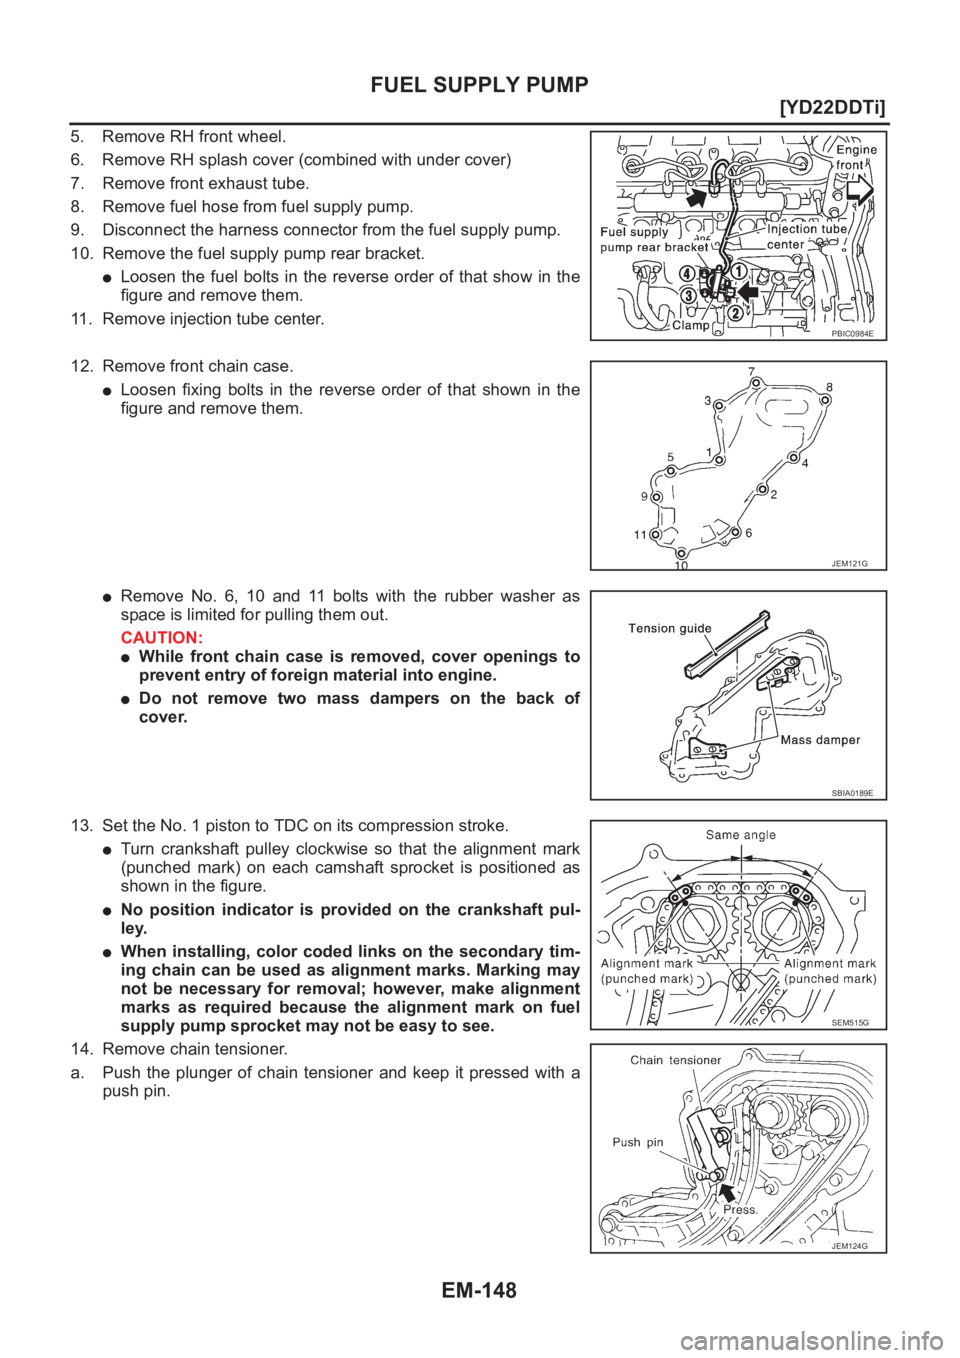
5. Remove RH front wheel.
6. Remove RH splash cover (combined with under cover)
7. Remove front exhaust tube.
8. Remove fuel hose from fuel supply pump.
9. Disconnect the harness connector from the fuel supply pump.
10. Remove the fuel supply pump rear bracket.
●Loosen the fuel bolts in the reverse order of that show in the
figure and remove them.
11. Remove injection tube center.
12. Remove front chain case.
●Loosen fixing bolts in the reverse order of that shown in the
figure and remove them.
●Remove No. 6, 10 and 11 bolts with the rubber washer as
space is limited for pulling them out.
CAUTION:
●While front chain case is removed, cover openings to
prevent entry of foreign material into engine.
●Do not remove two mass dampers on the back of
cover.
13. Set the No. 1 piston to TDC on its compression stroke.
●Turn crankshaft pulley clockwise so that the alignment mark
(punched mark) on each camshaft sprocket is positioned as
shown in the figure.
●No position indicator is provided on the crankshaft pul-
ley.
●When installing, color coded links on the secondary tim-
ing chain can be used as alignment marks. Marking may
not be necessary for removal; however, make alignment
marks as required because the alignment mark on fuel
supply pump sprocket may not be easy to see.
14. Remove chain tensioner.
a. Push the plunger of chain tensioner and keep it pressed with a
push pin.
PBIC0984E
JEM121G
SBIA0189E
SEM515G
JEM124G
Page 209 of 3833
CAMSHAFT
EM-159
[YD22DDTi]
C
D
E
F
G
H
I
J
K
L
MA
EM
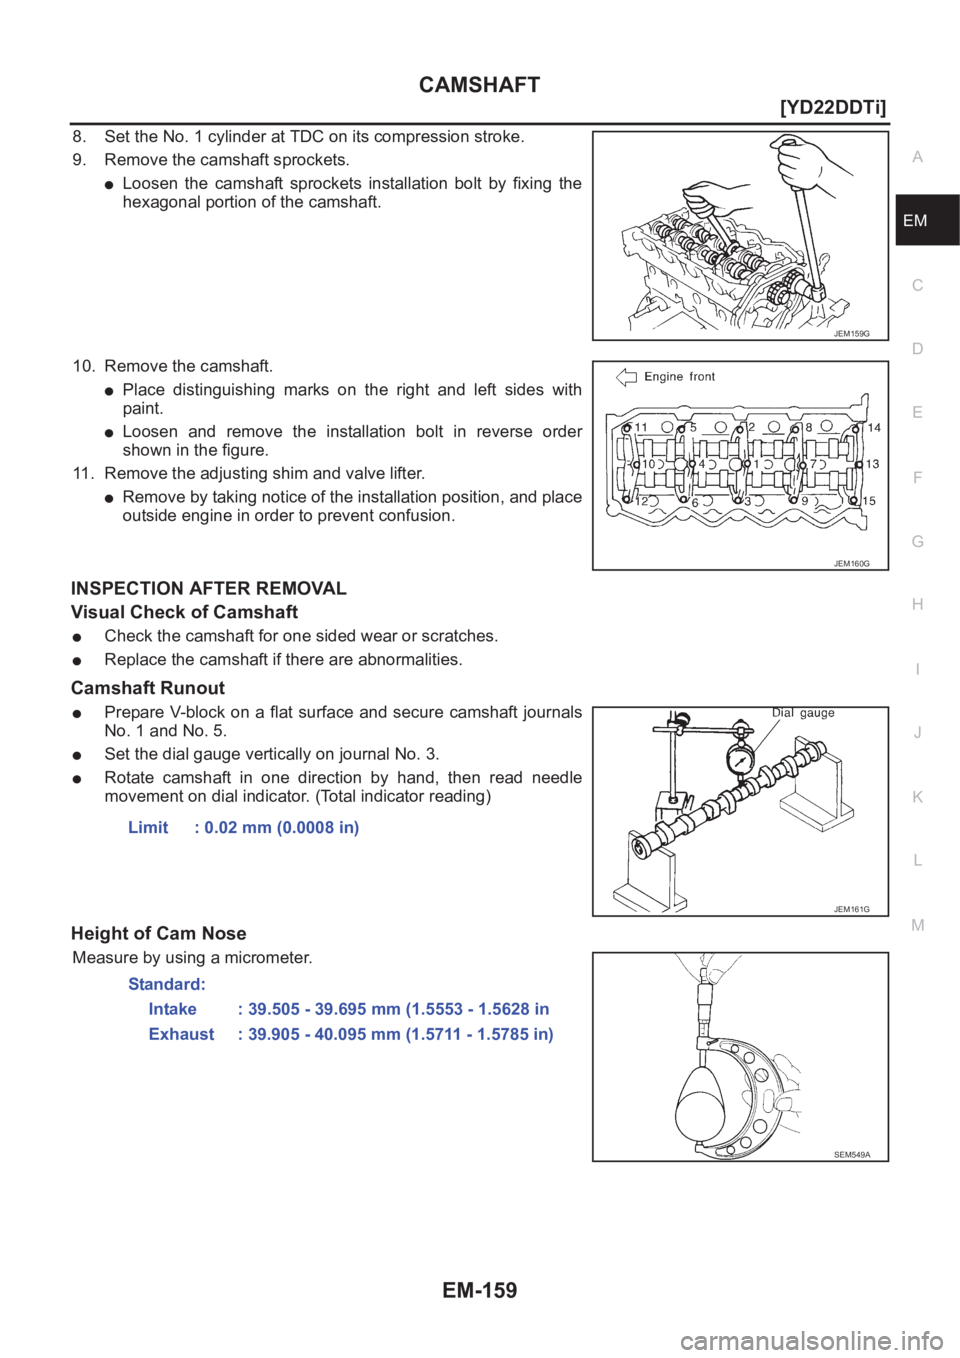
8. Set the No. 1 cylinder at TDC on its compression stroke.
9. Remove the camshaft sprockets.
●Loosen the camshaft sprockets installation bolt by fixing the
hexagonal portion of the camshaft.
10. Remove the camshaft.
●Place distinguishing marks on the right and left sides with
paint.
●Loosen and remove the installation bolt in reverse order
shown in the figure.
11. Remove the adjusting shim and valve lifter.
●Remove by taking notice of the installation position, and place
outside engine in order to prevent confusion.
INSPECTION AFTER REMOVAL
Visual Check of Camshaft
●Check the camshaft for one sided wear or scratches.
●Replace the camshaft if there are abnormalities.
Camshaft Runout
●Prepare V-block on a flat surface and secure camshaft journals
No. 1 and No. 5.
●Set the dial gauge vertically on journal No. 3.
●Rotate camshaft in one direction by hand, then read needle
movement on dial indicator. (Total indicator reading)
Height of Cam Nose
Measure by using a micrometer.
JEM159G
JEM160G
Limit : 0.02 mm (0.0008 in)
JEM161G
Standard:
Intake : 39.505 - 39.695 mm (1.5553 - 1.5628 in
Exhaust : 39.905 - 40.095 mm (1.5711 - 1.5785 in)
SEM549A