child lock NISSAN XTERRA 2000 WD22 / 1.G Owners Manual
[x] Cancel search | Manufacturer: NISSAN, Model Year: 2000, Model line: XTERRA, Model: NISSAN XTERRA 2000 WD22 / 1.GPages: 263, PDF Size: 2.16 MB
Page 24 of 263
you could be thrown into it and re-
ceive neck or other serious injuries.
You could also slide under the lap belt
and receive serious internal injuries.
OFor most effective protection when
the vehicle is in motion, the seat
should be upright. Always sit well
back in the seat and adjust the seat
belt properly.
Fastening the seat belt
1. Adjust the seat.
2. Slowly pull the seat belt out of the retrac-
tor and insert the tongue into the buckle
until you hear and feel the latch engage.
The retractor is designed to lock during
a sudden stop or on impact. A slow
pulling motion permits the seat belt to
move, and allows you some freedom of
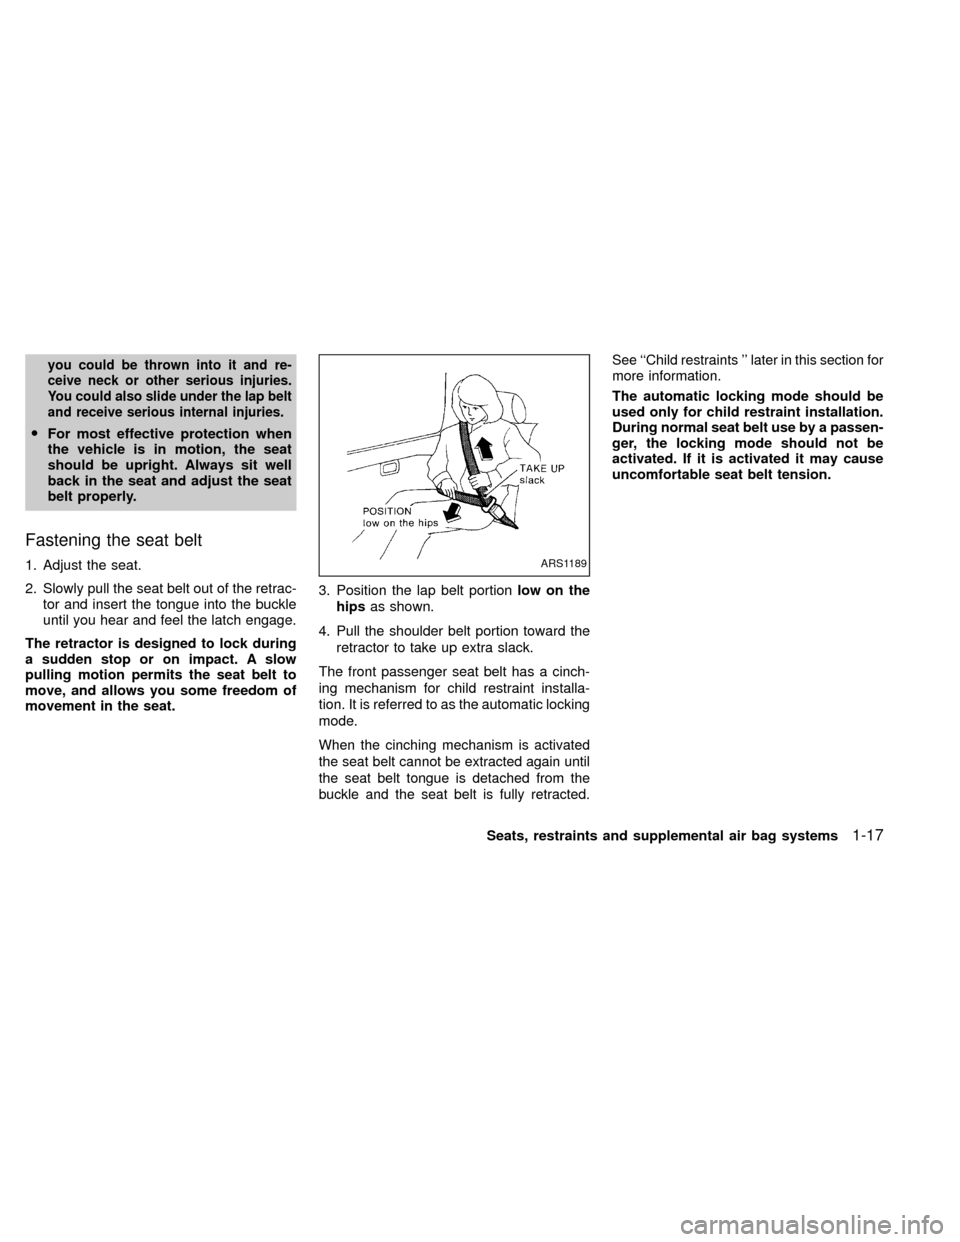
movement in the seat.3. Position the lap belt portionlow on the
hipsas shown.
4. Pull the shoulder belt portion toward the
retractor to take up extra slack.
The front passenger seat belt has a cinch-
ing mechanism for child restraint installa-
tion. It is referred to as the automatic locking
mode.
When the cinching mechanism is activated
the seat belt cannot be extracted again until
the seat belt tongue is detached from the
buckle and the seat belt is fully retracted.See ``Child restraints '' later in this section for
more information.
The automatic locking mode should be
used only for child restraint installation.
During normal seat belt use by a passen-
ger, the locking mode should not be
activated. If it is activated it may cause
uncomfortable seat belt tension.
ARS1189
Seats, restraints and supplemental air bag systems1-17
ZX
Page 30 of 263
WARNING
OImproper use of a child restraint can
result in increased injuries for both
the infant or child and other occu-
pants in the vehicle.
OFollow all of the child restraint
manufacturer's instructions for in-
stallation and use. When purchasing
a child restraint, be sure to select
one which will fit your child and
vehicle. It may not be possible to
properly install some types of child
restraints in your vehicle.
OIf the child restraint is not anchored
properly, the risk of a child being
injured in a collision or a sudden
stop greatly increases.
OAdjustable seatbacks should be po-
sitioned to fit the child restraint, but
as upright as possible.
O
After attaching the child restraint,
test it before you place the child in it.
Tilt it from side to side. Try to tug it
forward and check to see if the belt
holds the restraint in place. If the
restraint is not secure, tighten the
belt as necessary.OFor a front-facing child restraint, if
the seat position where it is installed
has a 3-point type lap/shoulder belt,
check to make sure the shoulder belt
does not go in front of the child's
face or neck. If it does, put the shoul-
der belt behind the child restraint. If
you must install a front-facing child
restraint in the front seat, see ªInstal-
lation on front passenger seatº later
in this section for details.
OWhen your child restraint is not in
use, keep it secured with a seat belt
to prevent it from being thrown
around in case of a sudden stop or
accident.
CAUTION
ORemember that a child restraint left
in a closed vehicle can become very
hot. Check the seating surface and
buckles before placing your child in
the child restraint.
OThe three-point belt in your vehicle
is equipped with an automatic lock-
ing mode retractor which must be
used when installing a child re-
straint.
OFailure to use the retractor's locking
mode will result in the child restraint
not being properly secured. The re-
straint could tip over or otherwise be
unsecured and cause injury to the
child in a sudden stop or collision.
Seats, restraints and supplemental air bag systems
1-23
ZX
Page 33 of 263
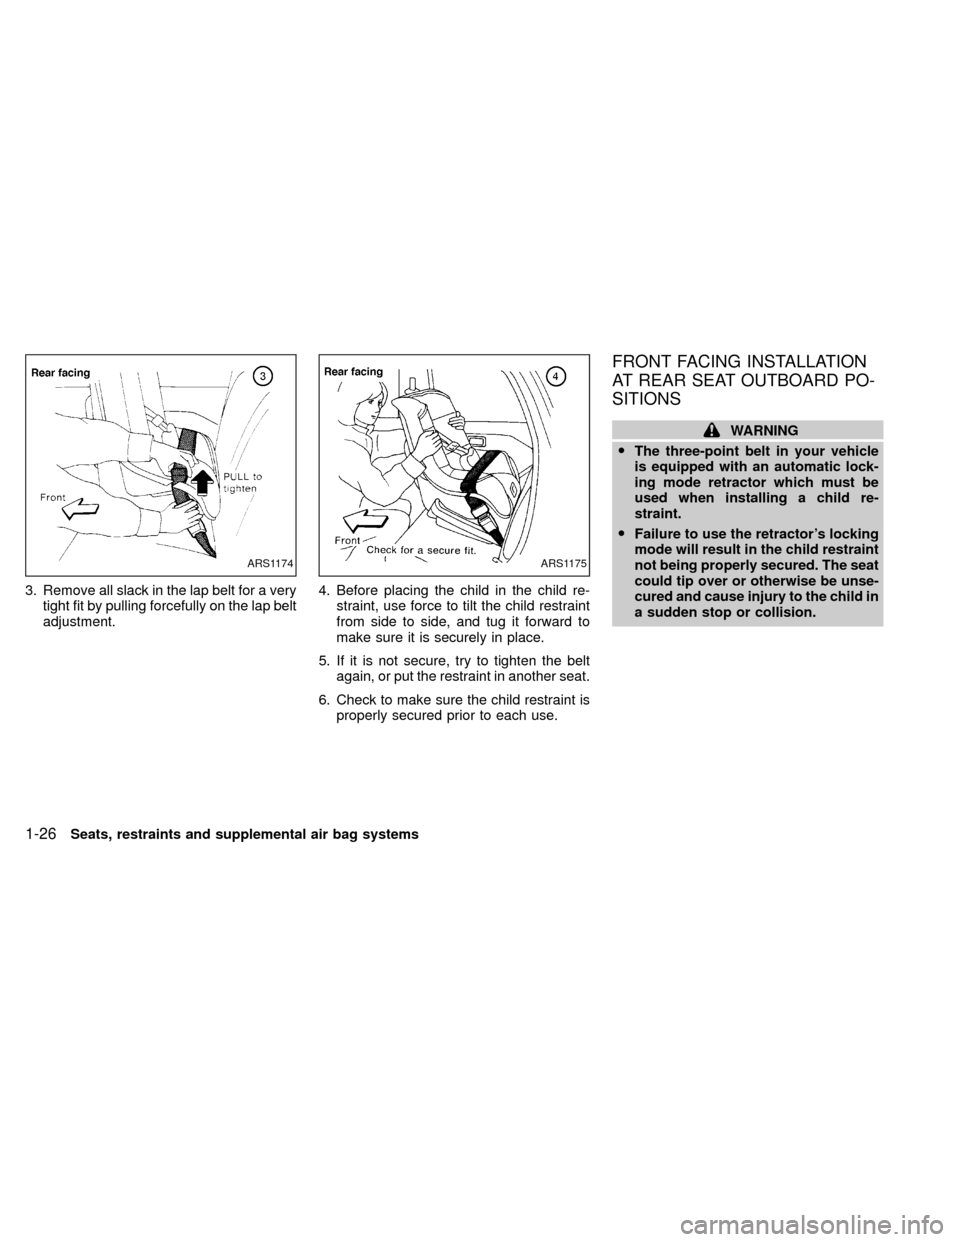
3. Remove all slack in the lap belt for a very
tight fit by pulling forcefully on the lap belt
adjustment.4. Before placing the child in the child re-
straint, use force to tilt the child restraint
from side to side, and tug it forward to
make sure it is securely in place.
5. If it is not secure, try to tighten the belt
again, or put the restraint in another seat.
6. Check to make sure the child restraint is
properly secured prior to each use.
FRONT FACING INSTALLATION
AT REAR SEAT OUTBOARD PO-
SITIONS
WARNING
OThe three-point belt in your vehicle
is equipped with an automatic lock-
ing mode retractor which must be
used when installing a child re-
straint.
OFailure to use the retractor's locking
mode will result in the child restraint
not being properly secured. The seat
could tip over or otherwise be unse-
cured and cause injury to the child in
a sudden stop or collision.
ARS1174ARS1175
1-26Seats, restraints and supplemental air bag systems
ZX
Page 34 of 263
When you install a child restraint in a rear
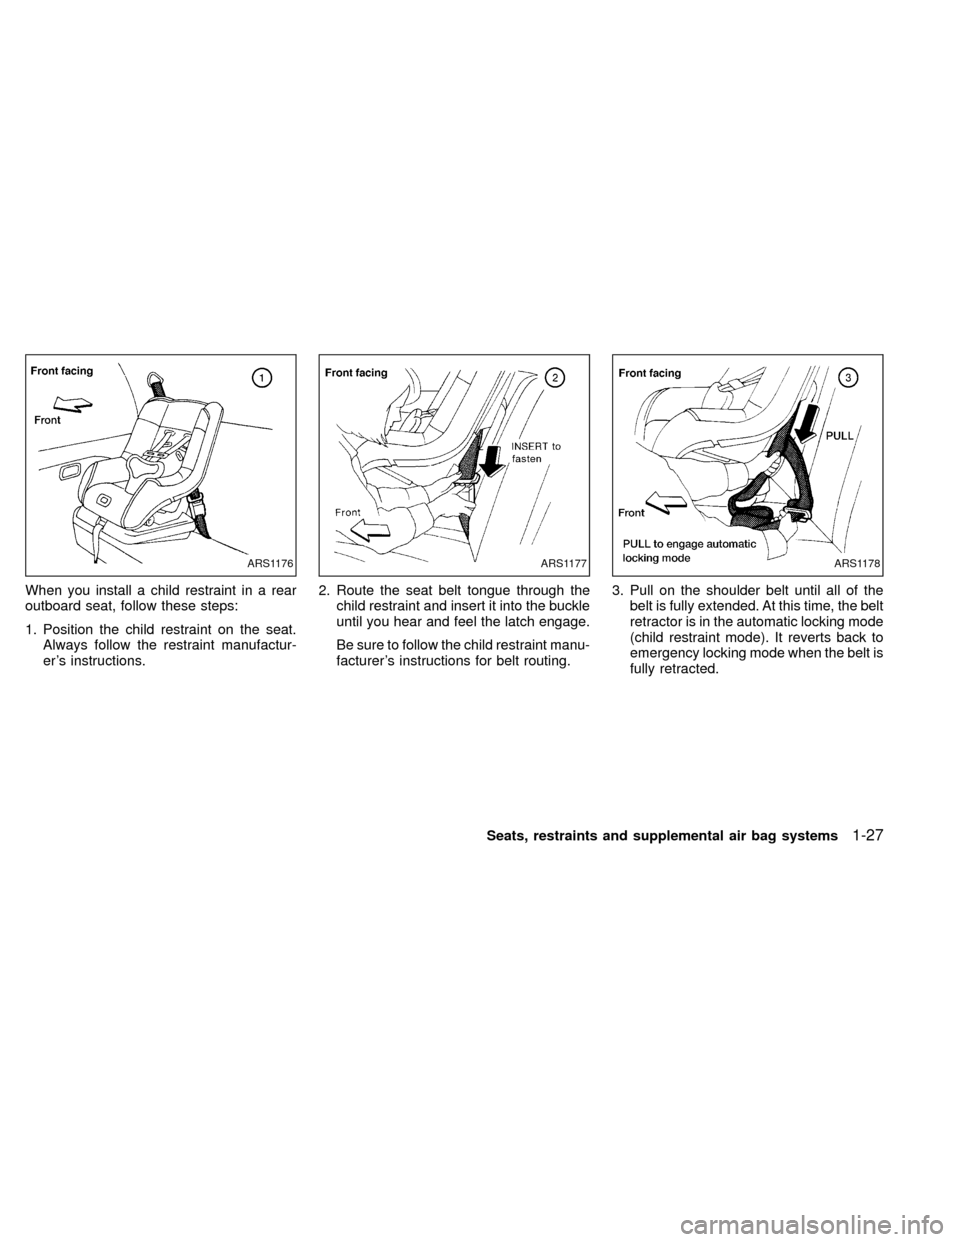
outboard seat, follow these steps:
1. Position the child restraint on the seat.
Always follow the restraint manufactur-
er's instructions.2. Route the seat belt tongue through the
child restraint and insert it into the buckle
until you hear and feel the latch engage.
Be sure to follow the child restraint manu-
facturer's instructions for belt routing.3. Pull on the shoulder belt until all of the
belt is fully extended. At this time, the belt
retractor is in the automatic locking mode
(child restraint mode). It reverts back to
emergency locking mode when the belt is
fully retracted.
ARS1176ARS1177ARS1178
Seats, restraints and supplemental air bag systems1-27
ZX
Page 35 of 263
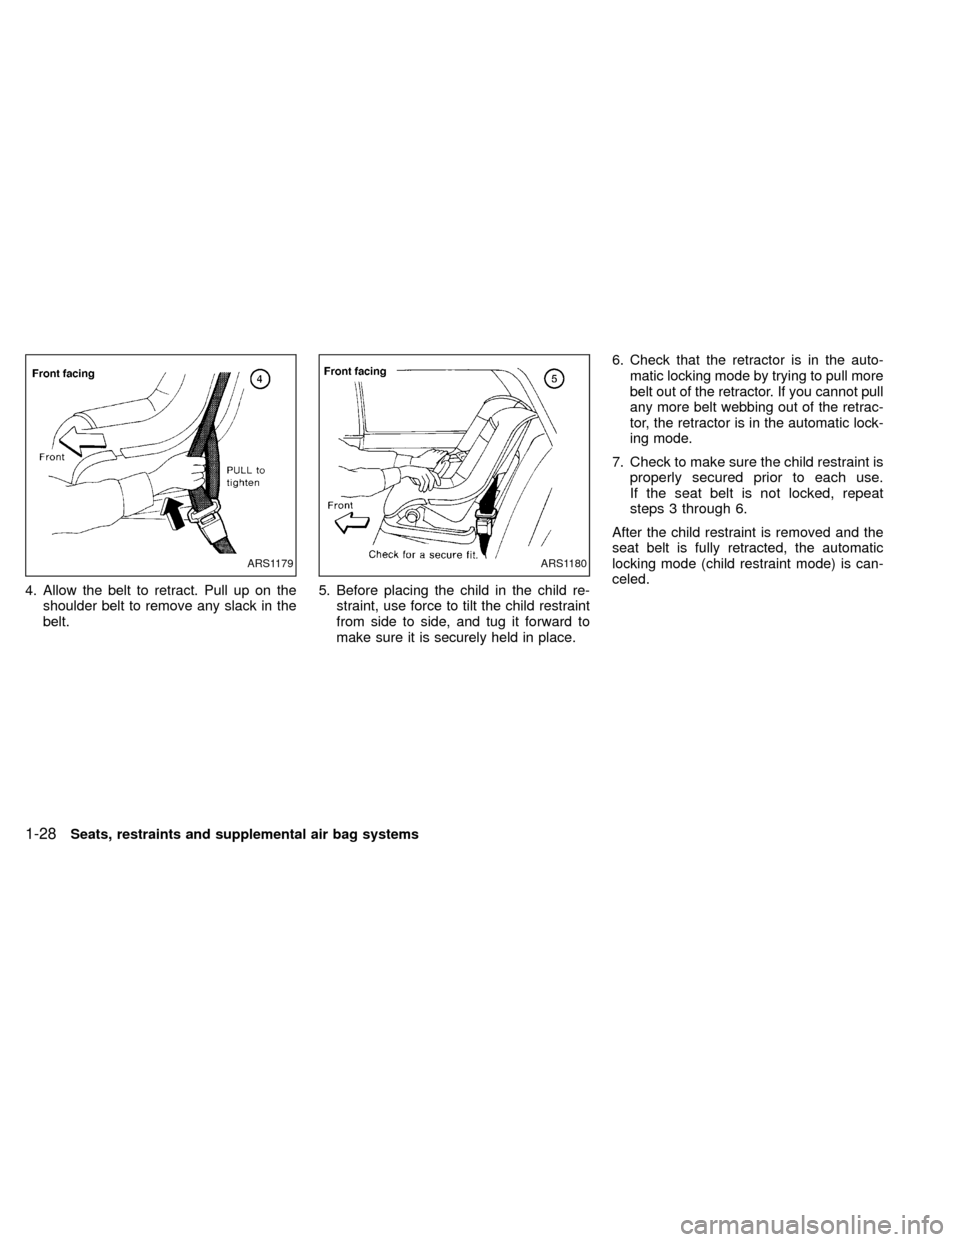
4. Allow the belt to retract. Pull up on the
shoulder belt to remove any slack in the
belt.5. Before placing the child in the child re-
straint, use force to tilt the child restraint
from side to side, and tug it forward to
make sure it is securely held in place.6. Check that the retractor is in the auto-
matic locking mode by trying to pull more
belt out of the retractor. If you cannot pull
any more belt webbing out of the retrac-
tor, the retractor is in the automatic lock-
ing mode.
7.
Check to make sure the child restraint is
properly secured prior to each use.
If the seat belt is not locked, repeat
steps 3 through 6.
After the child restraint is removed and the
seat belt is fully retracted, the automatic
locking mode (child restraint mode) is can-
celed.
ARS1179ARS1180
1-28Seats, restraints and supplemental air bag systems
ZX
Page 36 of 263
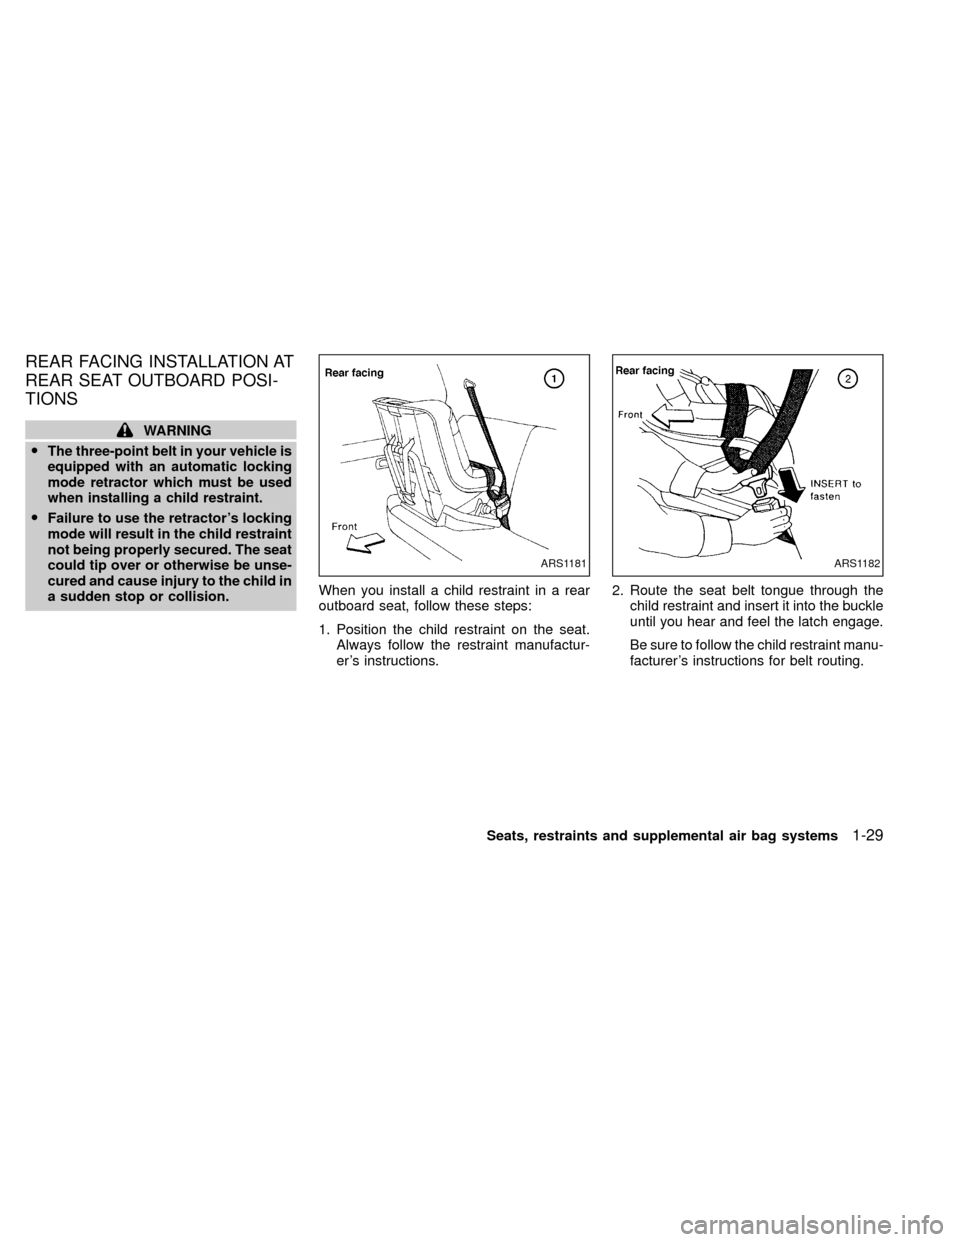
REAR FACING INSTALLATION AT
REAR SEAT OUTBOARD POSI-
TIONS
WARNING
O
The three-point belt in your vehicle is
equipped with an automatic locking
mode retractor which must be used
when installing a child restraint.
OFailure to use the retractor's locking
mode will result in the child restraint
not being properly secured. The seat
could tip over or otherwise be unse-
cured and cause injury to the child in
a sudden stop or collision.When you install a child restraint in a rear
outboard seat, follow these steps:
1. Position the child restraint on the seat.
Always follow the restraint manufactur-
er's instructions.2. Route the seat belt tongue through the
child restraint and insert it into the buckle
until you hear and feel the latch engage.
Be sure to follow the child restraint manu-
facturer's instructions for belt routing.
ARS1181ARS1182
Seats, restraints and supplemental air bag systems1-29
ZX
Page 37 of 263
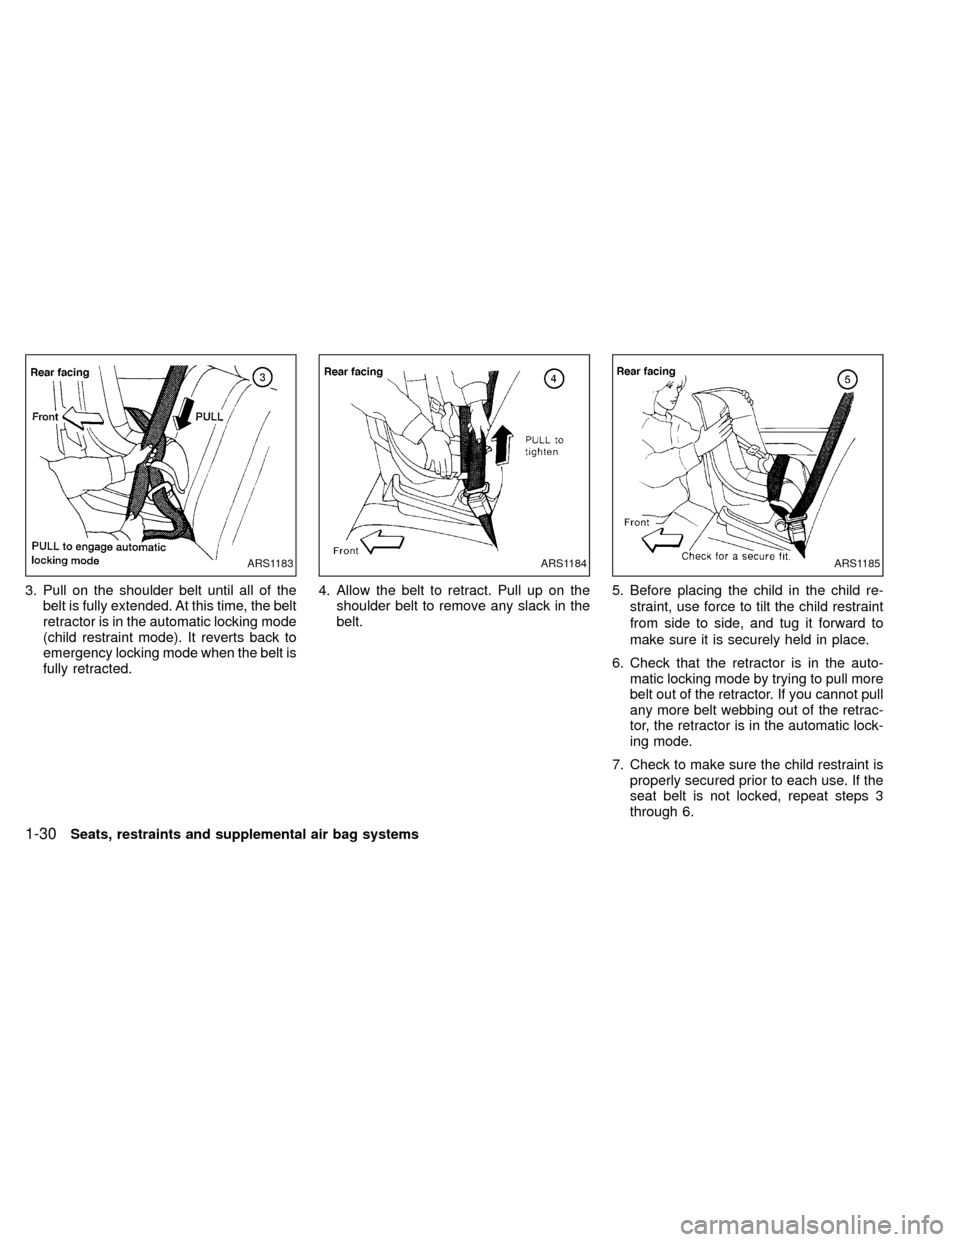
3. Pull on the shoulder belt until all of the
belt is fully extended. At this time, the belt
retractor is in the automatic locking mode
(child restraint mode). It reverts back to
emergency locking mode when the belt is
fully retracted.4. Allow the belt to retract. Pull up on the
shoulder belt to remove any slack in the
belt.5. Before placing the child in the child re-
straint, use force to tilt the child restraint
from side to side, and tug it forward to
make sure it is securely held in place.
6. Check that the retractor is in the auto-
matic locking mode by trying to pull more
belt out of the retractor. If you cannot pull
any more belt webbing out of the retrac-
tor, the retractor is in the automatic lock-
ing mode.
7. Check to make sure the child restraint is
properly secured prior to each use. If the
seat belt is not locked, repeat steps 3
through 6.
ARS1183ARS1184ARS1185
1-30Seats, restraints and supplemental air bag systems
ZX
Page 38 of 263
After the child restraint is removed and the
seat belt is fully retracted, the automatic
locking mode (child restraint mode) is can-
celed.
TOP STRAP CHILD RESTRAINT
If your child restraint has a top strap, install
the anchor bracket to a provided anchor
point. Anchor bracket hardware must be
installed. The top strap anchor bracket hard-
ware is available through an authorized
NISSAN dealer.
Part # 88894-89900*
*: Always check with the Parts Department
at an authorized NISSAN dealer for the
latest parts information.
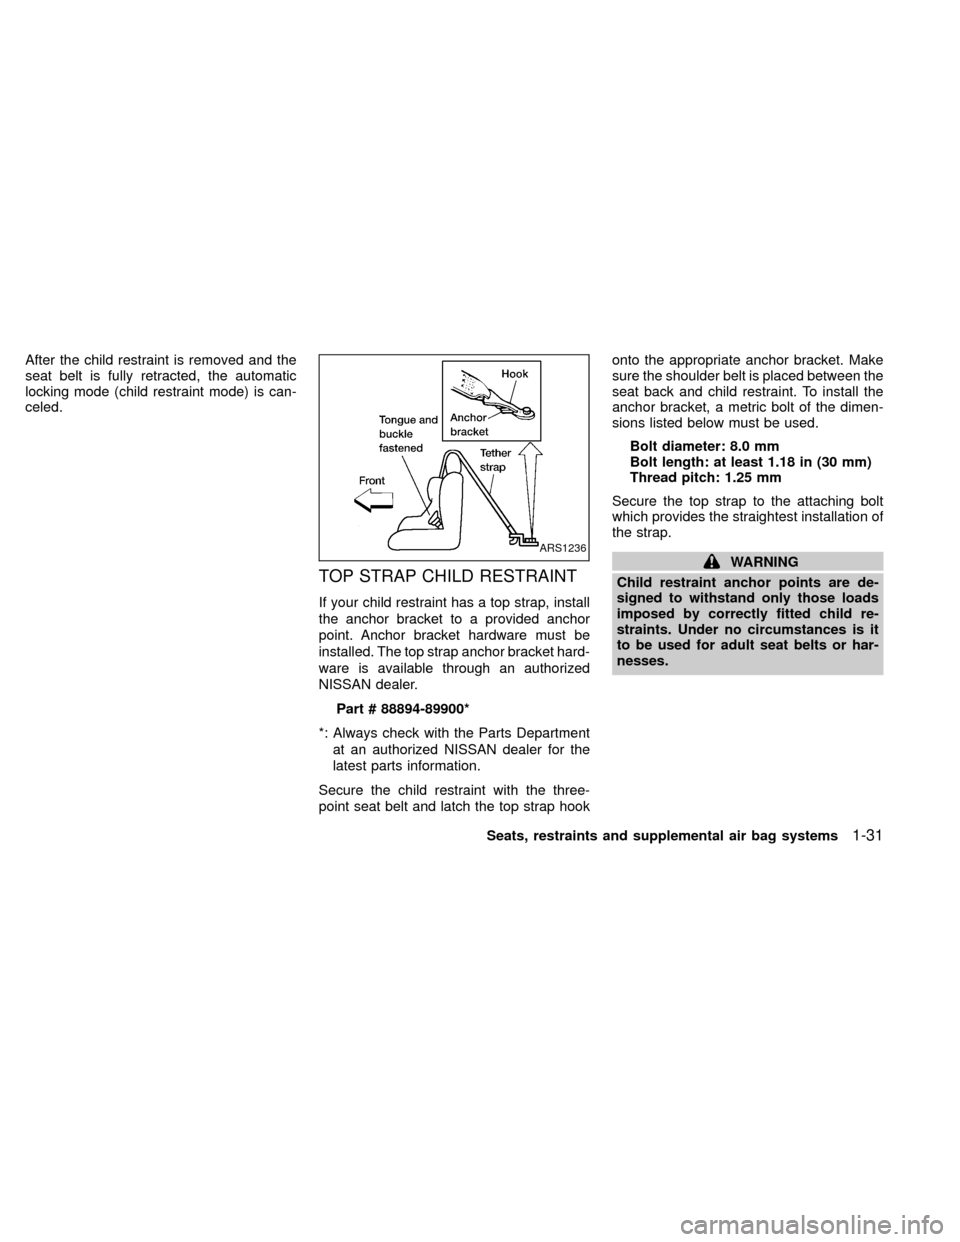
Secure the child restraint with the three-
point seat belt and latch the top strap hookonto the appropriate anchor bracket. Make
sure the shoulder belt is placed between the
seat back and child restraint. To install the
anchor bracket, a metric bolt of the dimen-
sions listed below must be used.
Bolt diameter: 8.0 mm
Bolt length: at least 1.18 in (30 mm)
Thread pitch: 1.25 mm
Secure the top strap to the attaching bolt
which provides the straightest installation of
the strap.
WARNING
Child restraint anchor points are de-
signed to withstand only those loads
imposed by correctly fitted child re-
straints. Under no circumstances is it
to be used for adult seat belts or har-
nesses.ARS1236
Seats, restraints and supplemental air bag systems1-31
ZX
Page 40 of 263
OThe three-point seat belt in your ve-
hicle is equipped with an automatic
locking mode retractor which must
be used when installing a child re-
straint.
OFailure to use the retractor's locking
mode will result in the child restraint
not being properly secured. The re-
straint could tip over or otherwise be
unsecured and cause injury to the
child in a sudden stop or collision.
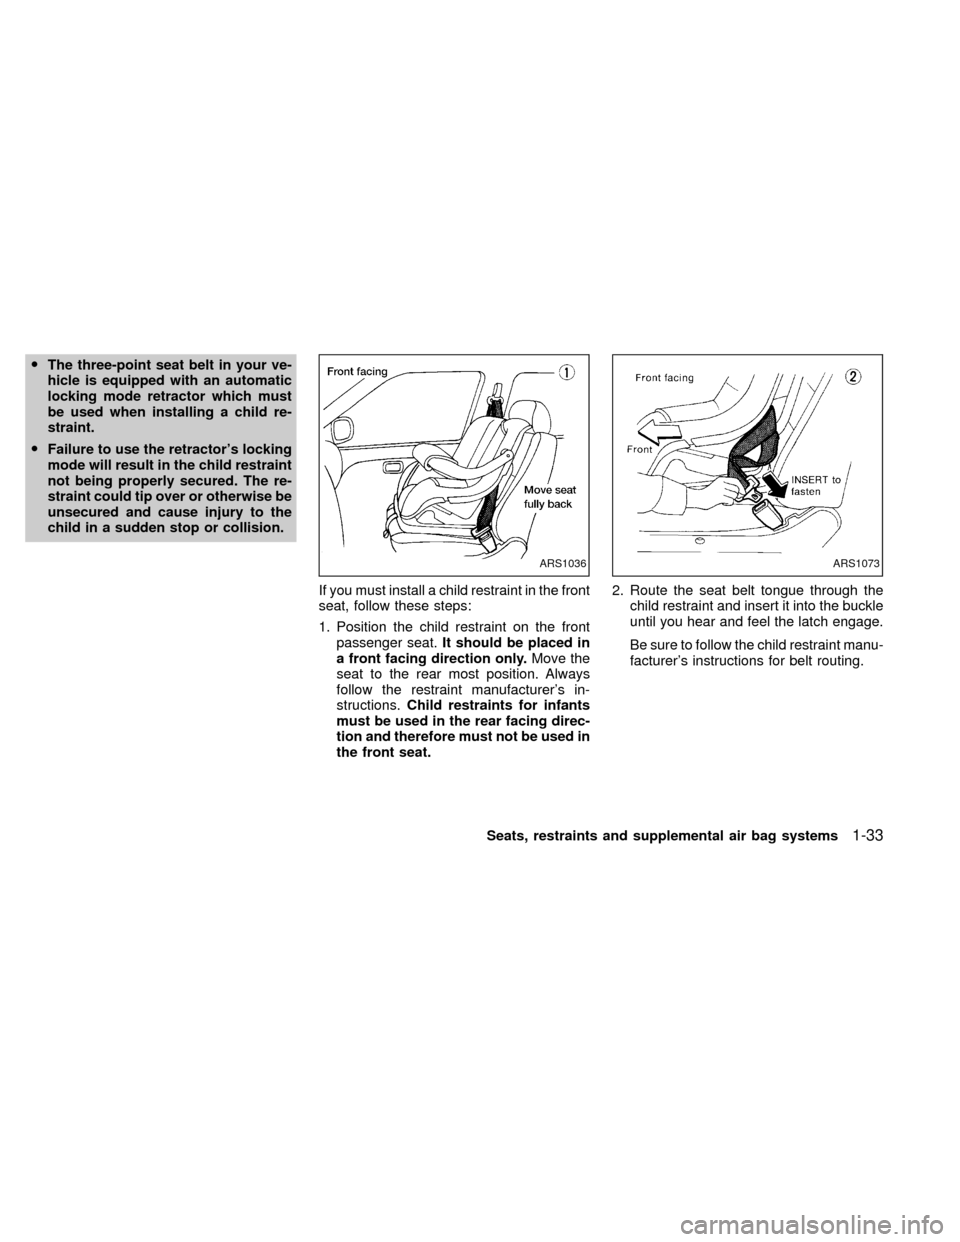
If you must install a child restraint in the front
seat, follow these steps:
1. Position the child restraint on the front
passenger seat.It should be placed in
a front facing direction only.Move the
seat to the rear most position. Always
follow the restraint manufacturer's in-
structions.Child restraints for infants
must be used in the rear facing direc-
tion and therefore must not be used in
the front seat.2. Route the seat belt tongue through the
child restraint and insert it into the buckle
until you hear and feel the latch engage.
Be sure to follow the child restraint manu-
facturer's instructions for belt routing.
ARS1036ARS1073
Seats, restraints and supplemental air bag systems1-33
ZX
Page 41 of 263
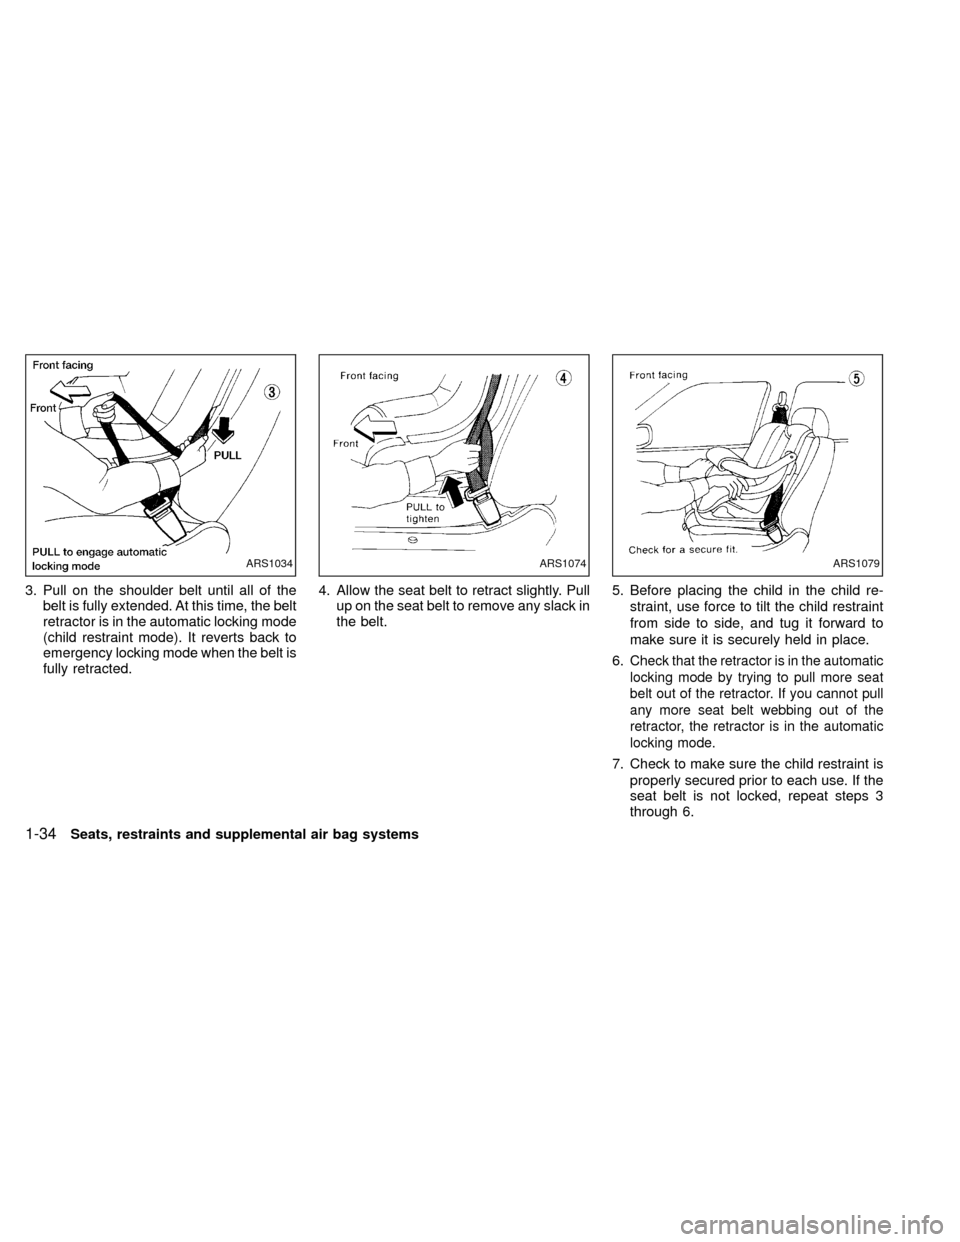
3. Pull on the shoulder belt until all of the
belt is fully extended. At this time, the belt
retractor is in the automatic locking mode
(child restraint mode). It reverts back to
emergency locking mode when the belt is
fully retracted.4. Allow the seat belt to retract slightly. Pull
up on the seat belt to remove any slack in
the belt.5. Before placing the child in the child re-
straint, use force to tilt the child restraint
from side to side, and tug it forward to
make sure it is securely held in place.
6.
Check that the retractor is in the automatic
locking mode by trying to pull more seat
belt out of the retractor. If you cannot pull
any more seat belt webbing out of the
retractor, the retractor is in the automatic
locking mode.
7. Check to make sure the child restraint is
properly secured prior to each use. If the
seat belt is not locked, repeat steps 3
through 6.
ARS1034ARS1074ARS1079
1-34Seats, restraints and supplemental air bag systems
ZX