instrument panel NISSAN XTERRA 2000 WD22 / 1.G Owners Manual
[x] Cancel search | Manufacturer: NISSAN, Model Year: 2000, Model line: XTERRA, Model: NISSAN XTERRA 2000 WD22 / 1.GPages: 263, PDF Size: 2.16 MB
Page 13 of 263
This supplemental restraint system section
contains important information concerning
the driver and passenger supplemental air
bags. The supplemental restraint system air
bags can help reduce impact force to the
driver and front passenger in certain frontal
collisions. The supplemental air bags are
designed tosupplementthe crash protec-
tion provided by the driver and front passen-
ger seat belts and arenot a substitutefor
them. Seat belts should always be correctly
worn and the driver and front passenger
seated a suitable distance away from the
steering wheel and instrument panel. See
``Seat belts'' for instructions and precautions
on seat belt usage later in this section.
The supplemental air bags operate only
when the ignition switch is in the ON or
START position.
WARNING
OThe supplemental air bags ordinarily
will not inflate in the event of a side
impact, rear impact, roll over, or
lower severity frontal collision. Al-
ways wear your seat belts to help
reduce the risk or severity of injury
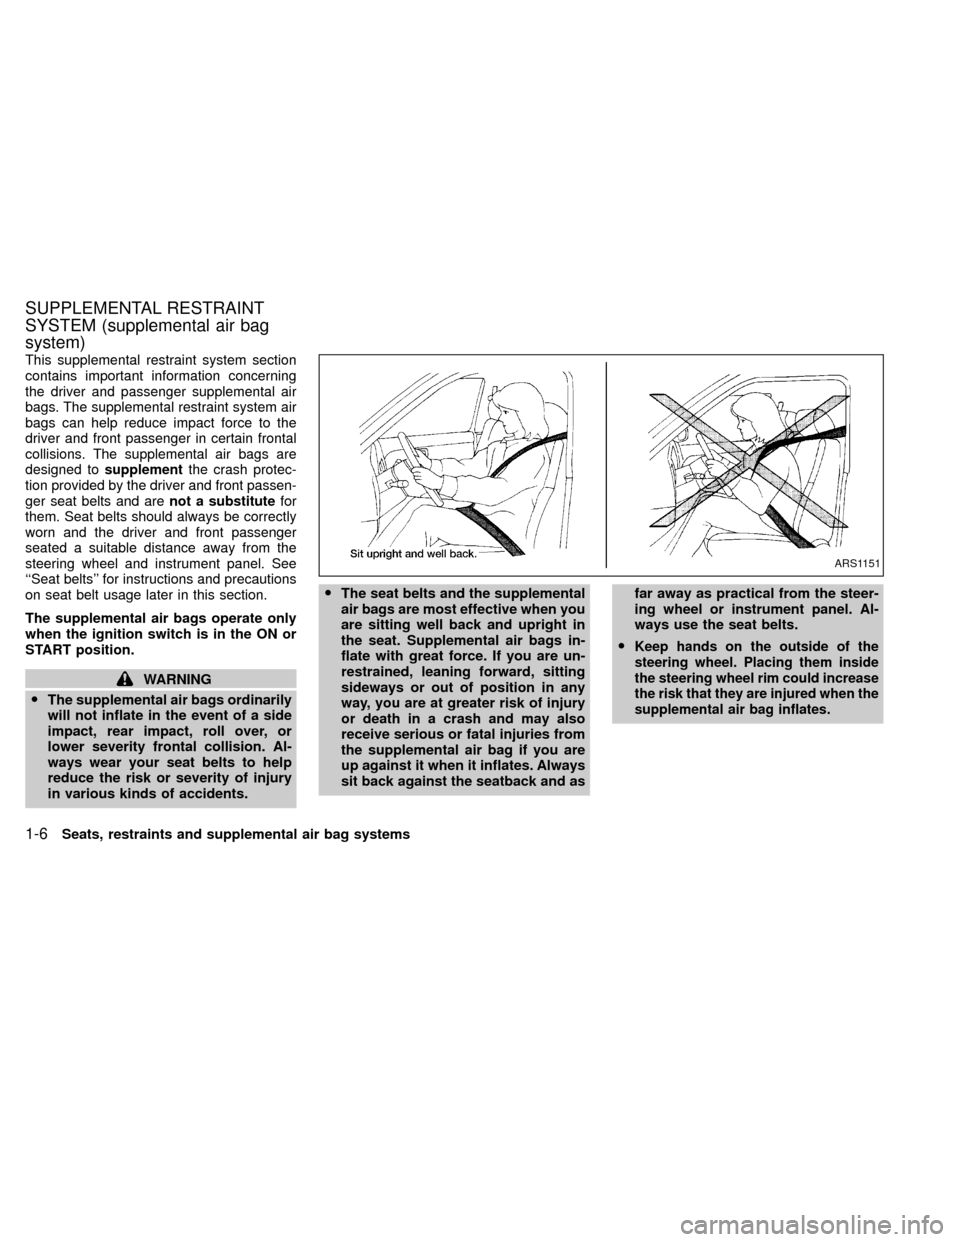
in various kinds of accidents.OThe seat belts and the supplemental
air bags are most effective when you
are sitting well back and upright in
the seat. Supplemental air bags in-
flate with great force. If you are un-
restrained, leaning forward, sitting
sideways or out of position in any
way, you are at greater risk of injury
or death in a crash and may also
receive serious or fatal injuries from
the supplemental air bag if you are
up against it when it inflates. Always
sit back against the seatback and asfar away as practical from the steer-
ing wheel or instrument panel. Al-
ways use the seat belts.
O
Keep hands on the outside of the
steering wheel. Placing them inside
the steering wheel rim could increase
the risk that they are injured when the
supplemental air bag inflates.
ARS1151
SUPPLEMENTAL RESTRAINT
SYSTEM (supplemental air bag
system)
1-6Seats, restraints and supplemental air bag systems
ZX
Page 16 of 263

The driver supplemental air bag is located in
the center of the steering wheel. The pas-
senger supplemental air bag is located in
the top right section of the instrument panel.
These systems are designed to meet optional
certification requirements under U.S. regula-tions. They are also permitted in Canada. The
optional certification allows air bags to be
designed to inflate somewhat less forcefully
than previously.However, all of the informa-
tion, cautions and warnings in this manual
still apply and must be followed.
The supplemental air bag system is de-
signed to inflate in higher severity frontal
collisions, although it may inflate if the
forces in another type of collision are similar
to those of a higher severity frontal impact. It
may not inflate in certain frontal collisions.
Vehicle damage (or lack of it) is not always
an indication of proper supplemental air bag
system operation.
When the supplemental air bag inflates, a
fairly loud noise may be heard, followed by
the release of smoke. This smoke is not
harmful and does not indicate a fire, but
care should be taken not to intentionally
inhale it, as it may cause irritation and
choking. Those with a history of a breathing
condition should get fresh air promptly.
The supplemental air bags, along with the
use of the seat belts, helps to cushion the
impact force on the face and chest of the
occupant. It can help save lives and reduce
serious injuries. However, an inflating sup-
plemental air bag may cause facial abrasions
or other injuries. Supplemental air bags do
not provide restraint to the lower body.
Seat belts should be correctly worn and the
driver and passenger seated upright as far
as practical away from the steering wheel or
instrument panel. Since the supplemental air
ARS1228
SUPPLEMENTAL AIR BAG
SYSTEM
Seats, restraints and supplemental air bag systems1-9
ZX
Page 17 of 263
bags inflate quickly in order to help protect
the front occupants, the force of the supple-
mental air bags inflating can increase the
risk of injury if the occupant is too close to or
against the supplemental air bag module
during inflation.
The supplemental air bags deflate quickly
after a collision.
The supplemental air bags operate only
when the ignition switch is in the ON or
START position.
WARNING
ODo not place any objects on the
steering wheel pad or on the instru-
ment panel. Also, do not place any
objects between any occupant and
the steering wheel or on the instru-
ment panel. Such objects may be-
come dangerous projectiles, and
cause injury if the supplemental air
bag inflates.
ORight after inflation, several supple-
mental air bag system components
will be hot. Do not touch them; you
may severely burn yourself.O
No unauthorized changes should be
made to any components or wiring of
the supplemental air bag system. This
is to prevent accidental inflation of
the supplemental air bag or damage
to the supplemental air bag system.
ODo not make unauthorized changes to
your vehicle's electrical system, sus-
pension system or front end structure.
This could affect proper operation of
the supplemental air bag system.
OTampering with the supplemental air
bag system may result in serious
personal injury. Tampering includes
changes to the steering wheel and
the instrument panel assembly, by
placing material over the steering
wheel pad and above the instrument
panel, or by installing additional trim
material around the supplemental air
bag system.OWork around and on the supplemen-
tal air bag system should be done by
an authorized NISSAN dealer. Instal-
lation of electrical equipment should
also be done by an authorized NIS-
SAN dealer. The yellow Supplemen-
tal Restraint System (SRS) wiring
should not be modified or discon-
nected. Unauthorized electrical test
equipment and probing devices
should not be used on the supple-
mental air bag system.
OThe SRS wiring harnesses (except
the pre-tensioner seat belt system)
are covered with yellow insulation
either just before the harness con-
nectors or over the complete har-
ness for easy identification.
When selling your vehicle, we request that
you inform the buyer about the supplemental
air bag system and guide the buyer to the
appropriate sections in this owner's manual.
1-10Seats, restraints and supplemental air bag systems
ZX
Page 18 of 263

Warning labels about the supplemental air
bag system are placed in the vehicle as
shown in the illustration.The supplemental air bag warning light,
displaying
in the instrument panel,
monitors the circuits of the supplemental air
bag system. The circuits monitored by the
supplemental air bag warning light are the
diagnosis sensor unit, the supplemental air
bag modules and all related wiring.
When the ignition key is in the ON or START
position, the supplemental air bag warning
light illuminates for about 7 seconds and
then turns off. This means the system is
operational.
If any of the following system conditions
occur, the supplemental air bag system
ARS1229
ARS1230
WARNING LABELS SUPPLEMENTAL AIR BAG
WARNING LIGHT
Seats, restraints and supplemental air bag systems1-11
ZX
Page 57 of 263
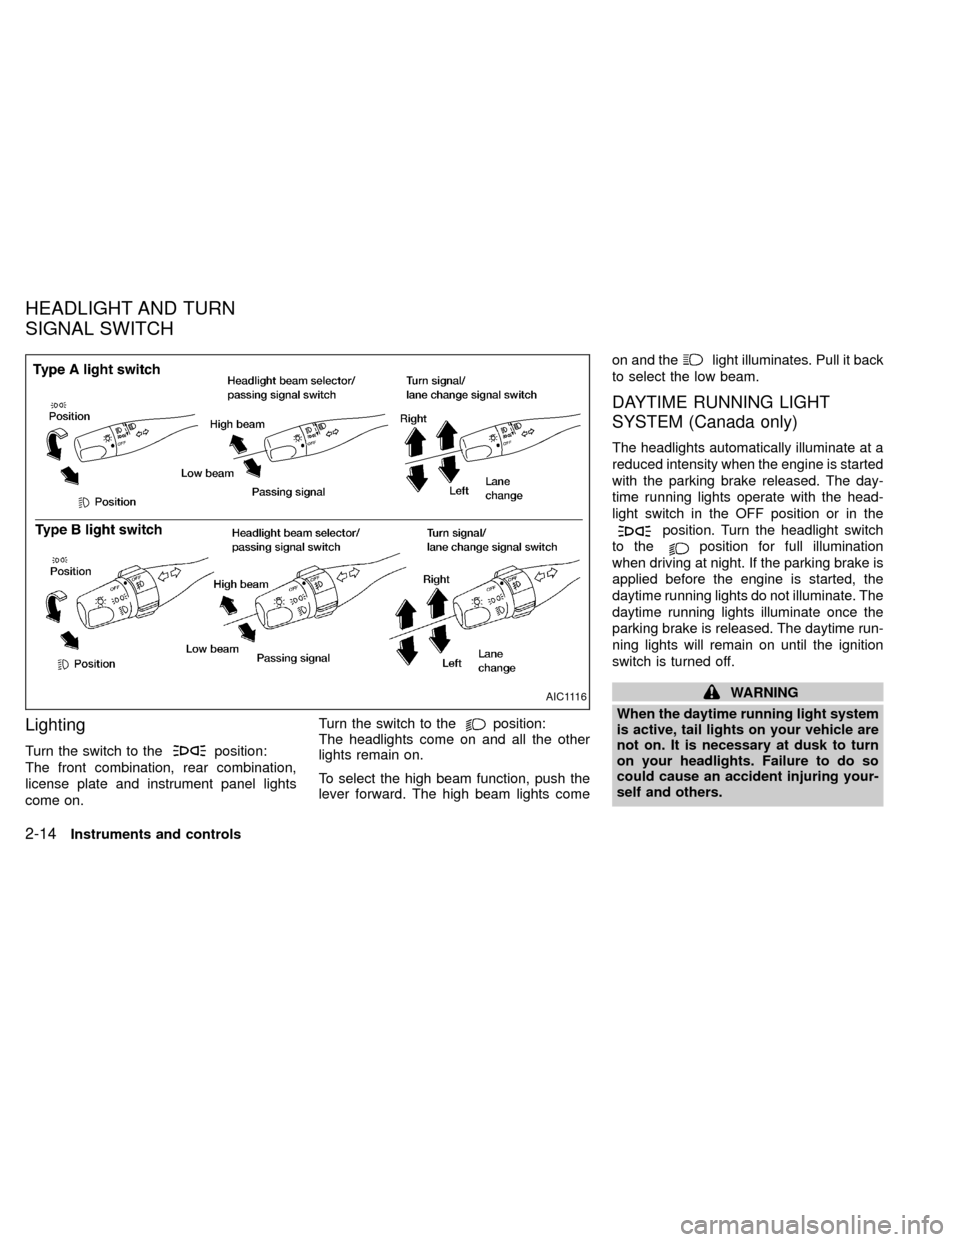
Lighting
Turn the switch to theposition:
The front combination, rear combination,
license plate and instrument panel lights
come on.Turn the switch to the
position:
The headlights come on and all the other
lights remain on.
To select the high beam function, push the
lever forward. The high beam lights comeon and the
light illuminates. Pull it back
to select the low beam.
DAYTIME RUNNING LIGHT
SYSTEM (Canada only)
The headlights automatically illuminate at a
reduced intensity when the engine is started
with the parking brake released. The day-
time running lights operate with the head-
light switch in the OFF position or in the
position. Turn the headlight switch
to the
position for full illumination
when driving at night. If the parking brake is
applied before the engine is started, the
daytime running lights do not illuminate. The
daytime running lights illuminate once the
parking brake is released. The daytime run-
ning lights will remain on until the ignition
switch is turned off.
WARNING
When the daytime running light system
is active, tail lights on your vehicle are
not on. It is necessary at dusk to turn
on your headlights. Failure to do so
could cause an accident injuring your-
self and others.AIC1116
HEADLIGHT AND TURN
SIGNAL SWITCH
2-14Instruments and controls
ZX
Page 60 of 263
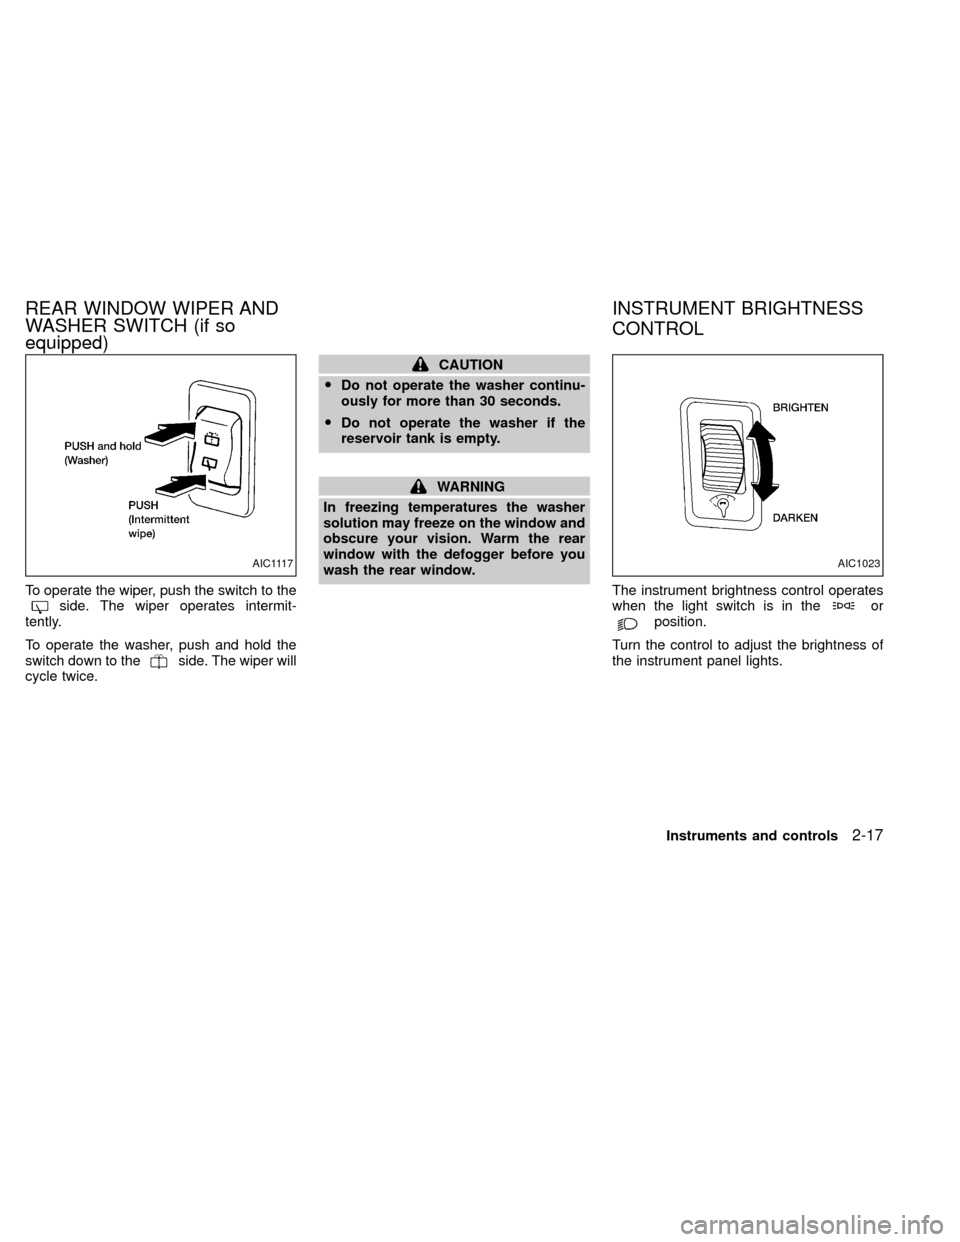
To operate the wiper, push the switch to theside. The wiper operates intermit-
tently.
To operate the washer, push and hold the
switch down to the
side. The wiper will
cycle twice.
CAUTION
ODo not operate the washer continu-
ously for more than 30 seconds.
ODo not operate the washer if the
reservoir tank is empty.
WARNING
In freezing temperatures the washer
solution may freeze on the window and
obscure your vision. Warm the rear
window with the defogger before you
wash the rear window.
The instrument brightness control operates
when the light switch is in the
orposition.
Turn the control to adjust the brightness of
the instrument panel lights.
AIC1117AIC1023
REAR WINDOW WIPER AND
WASHER SWITCH (if so
equipped)INSTRUMENT BRIGHTNESS
CONTROL
Instruments and controls2-17
ZX
Page 63 of 263
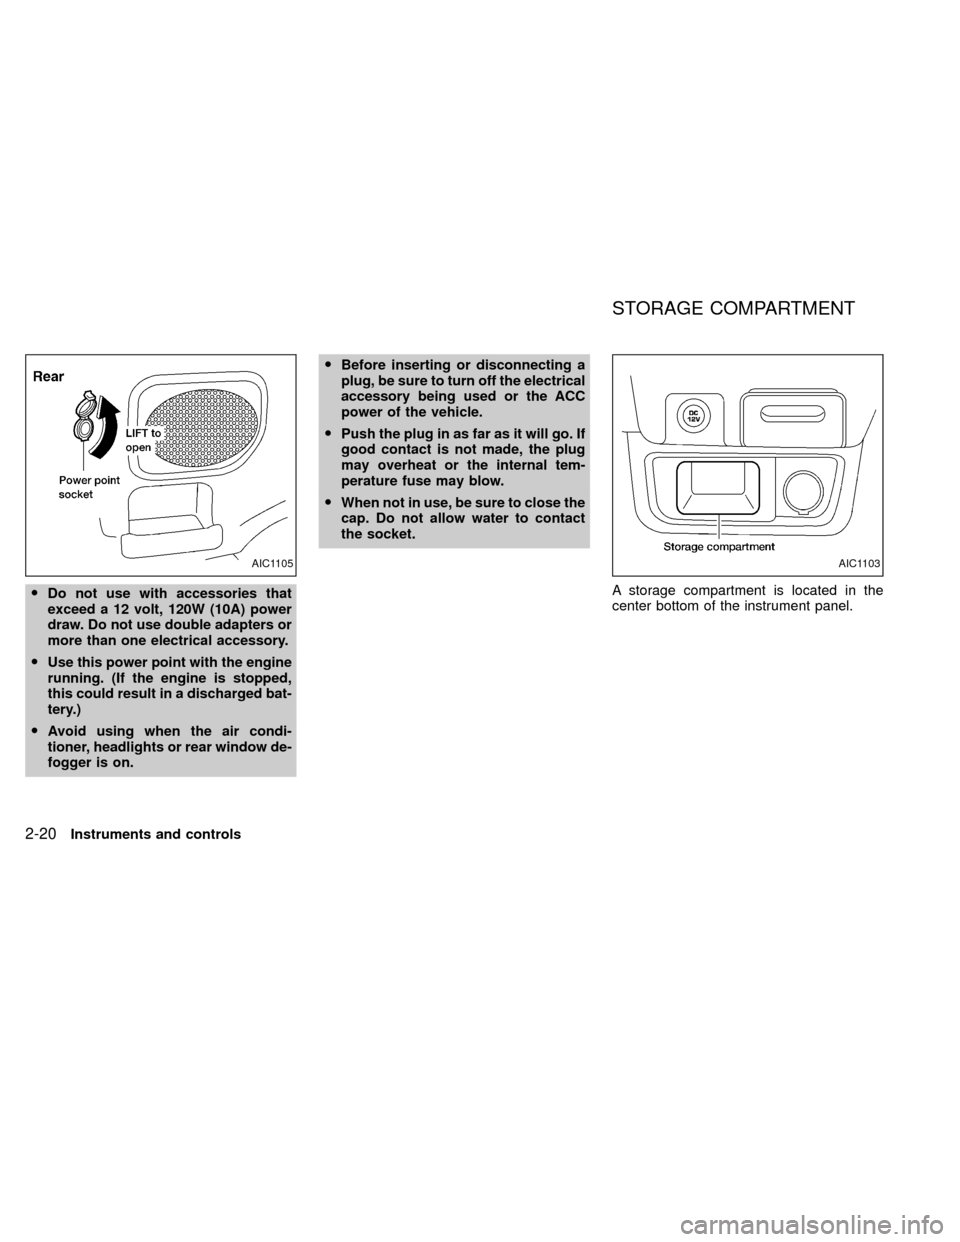
ODo not use with accessories that
exceed a 12 volt, 120W (10A) power
draw. Do not use double adapters or
more than one electrical accessory.
OUse this power point with the engine
running. (If the engine is stopped,
this could result in a discharged bat-
tery.)
OAvoid using when the air condi-
tioner, headlights or rear window de-
fogger is on.OBefore inserting or disconnecting a
plug, be sure to turn off the electrical
accessory being used or the ACC
power of the vehicle.
OPush the plug in as far as it will go. If
good contact is not made, the plug
may overheat or the internal tem-
perature fuse may blow.
OWhen not in use, be sure to close the
cap. Do not allow water to contact
the socket.
A storage compartment is located in the
center bottom of the instrument panel.
AIC1105AIC1103
STORAGE COMPARTMENT
2-20Instruments and controls
ZX
Page 69 of 263

The power windows operate when the igni-
tion key is in the ON position.
To open the driver window, press the driver
switch and hold it down. To close the win-
dow, lift the switch up. The driver side
control panel is equipped with switches to
open or close all the windows.
Locking passenger's windows
When the lock button is depressed, only the
driver side window can be opened or
closed. Push it in again to cancel the win-
dow lock function.
Passenger power window switch
The passenger switch opens or closes the
passenger window. To open the window,
press the switch and hold it down. To close
the window, lift the switch up.
Rear power windows
The rear power window switches open or
close only the corresponding window. To
open the window, push the switch and hold
it down. To close the window, push the
switch up.
AIC1028AIC1110
2-26Instruments and controls
ZX
Page 80 of 263
WARNING
OMake sure the hood is completely
closed and latched before driving.
Failure to do so could cause the
hood to fly open and result in an
accident.
OIf you see steam or smoke coming
from the engine compartment, to
avoid injury do not open the hood.
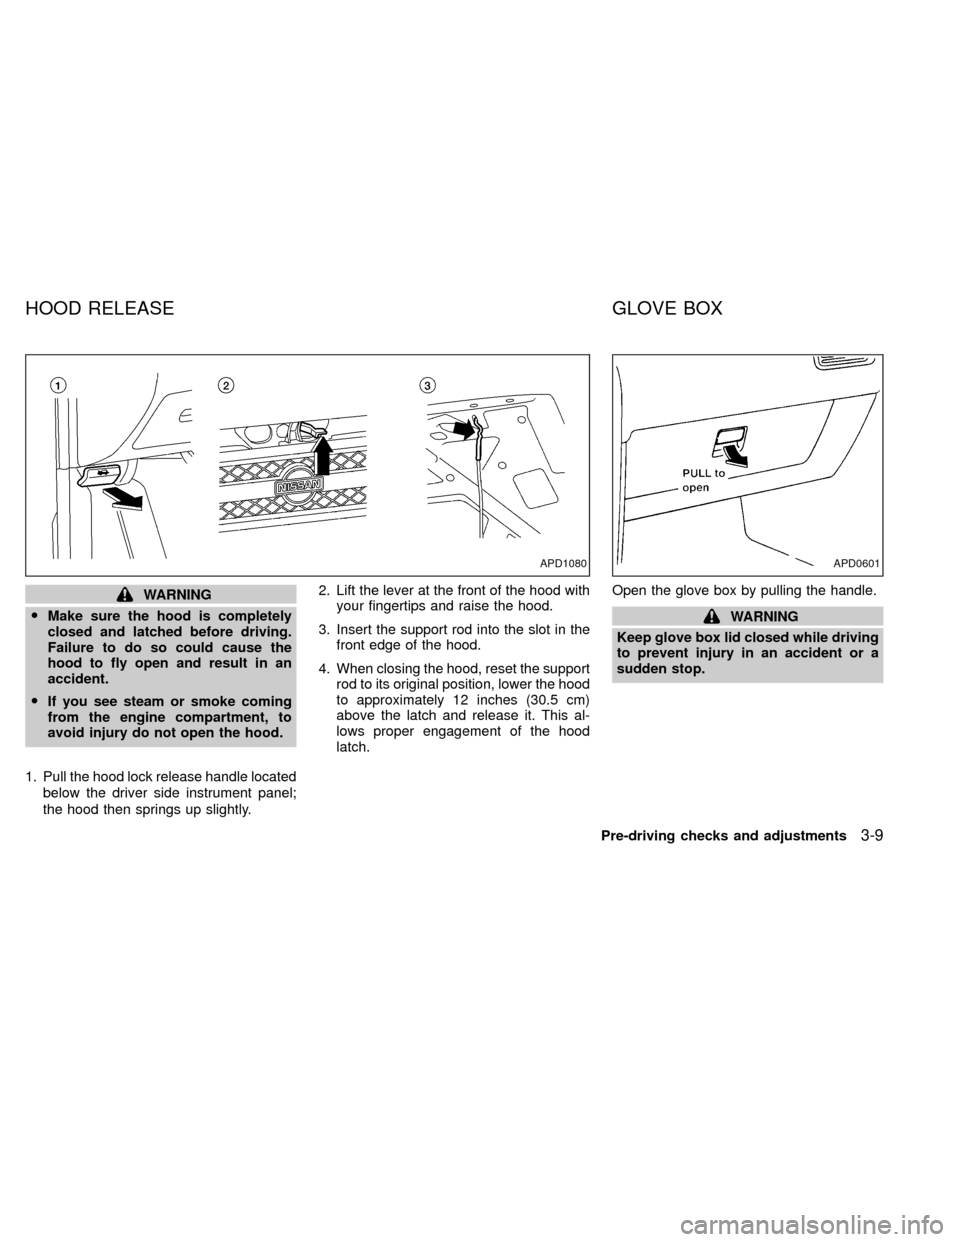
1. Pull the hood lock release handle located
below the driver side instrument panel;
the hood then springs up slightly.2. Lift the lever at the front of the hood with
your fingertips and raise the hood.
3. Insert the support rod into the slot in the
front edge of the hood.
4. When closing the hood, reset the support
rod to its original position, lower the hood
to approximately 12 inches (30.5 cm)
above the latch and release it. This al-
lows proper engagement of the hood
latch.Open the glove box by pulling the handle.
WARNING
Keep glove box lid closed while driving
to prevent injury in an accident or a
sudden stop.
APD1080APD0601
HOOD RELEASE GLOVE BOX
Pre-driving checks and adjustments3-9
ZX
Page 137 of 263

Accelerator downshift
In D position
For rapid passing or hill climbing, while
driving fully depress the accelerator pedal to
the floor. This shifts the transmission down
into second gear or first gear, depending on
the vehicle speed.
OVERDRIVE SWITCH
ON: With the engine running and the se-
lector lever in the D (Drive) position,
the transmission upshifts into OVER-
DRIVE as vehicle speed increases.
OVERDRIVE does not engage until the
engine has reached operating tempera-
ture.
OFF: For driving up and down long slopes
where engine braking is necessary
push the OVERDRIVE switch once.
The O/D OFF indicator light in the
instrument panel comes on at this time.
When cruising at a low speed or
climbing a gentle slope, you may feel
uncomfortable shift shocks as the
transmission shifts between third gear
and overdrive repeatedly. In this case,
depress the OVERDRIVE switch to
turn the OVERDRIVE off. The O/D
OFF indicator light in the instrument
panel comes on at this time.
When driving conditions change, depress
the overdrive switch to turn the OVER-
DRIVE on.
Remember not to drive at high speeds for
extended periods of time with the OVER-
DRIVE off. This reduces fuel economy.
ASD1023
5-12Starting and driving
ZX