ESP NISSAN XTERRA 2006 N50 / 2.G User Guide
[x] Cancel search | Manufacturer: NISSAN, Model Year: 2006, Model line: XTERRA, Model: NISSAN XTERRA 2006 N50 / 2.GPages: 304, PDF Size: 4.93 MB
Page 190 of 304
The power assisted steering uses a hydraulic
pump, driven by the engine, to assist steering.
If the engine stops or the drive belt breaks, you
will still have control of the vehicle. However,
much greater steering effort is needed, especially
in sharp turns and at low speeds.
WARNING
If the engine is not running or is turned off
while driving, the power assist for the
steering will not work. Steering will be
much harder to operate.The brake system has two separate hydraulic
circuits. If one circuit malfunctions, you will still
have braking at two wheels.
BRAKE PRECAUTIONS
Vacuum assisted brakes
The brake booster aids braking by using engine
vacuum. If the engine stops, you can stop the
vehicle by depressing the brake pedal. However,
greater foot pressure on the brake pedal will be
required to stop the vehicle and stopping dis-
tance will be longer.
Using the brakes
Avoid resting your foot on the brake pedal while
driving. This will overheat the brakes, wear out the
brakes and pads faster, and reduce gas mileage.
To help reduce brake wear and to prevent the
brakes from overheating, reduce speed and
downshift to a lower gear before going down a
slope or long grade. Overheated brakes may
reduce braking performance and could result in
loss of vehicle control.
WARNING
cWhile driving on a slippery surface, be
careful when braking, accelerating or
downshifting. Abrupt braking or accel-
erating could cause the wheels to skid
and result in an accident.
cIf the engine is not running or is turned
off while driving, the power assist for
the brakes will not work. Braking will be
harder.
Wet brakes
When the vehicle is washed or driven through
water, the brakes may get wet. As a result, your
braking distance will be longer and the vehicle
may pull to one side during braking.
To dry the brakes, drive the vehicle at a safe
speed while lightly pressing the brake pedal to
heat up the brakes. Do this until the brakes return
to normal. Avoid driving the vehicle at high
speeds until the brakes function correctly.
Parking brake break-in
Break-in the parking brake shoes whenever the
stopping effect of the parking brake is weakened
or whenever the parking brake shoes and/or
drum/rotors are replaced, in order to assure the
best brake performance.
POWER STEERING BRAKE SYSTEM
5-28Starting and driving
ZREVIEW COPYÐ2006 Xterra(xtr)
Owners ManualÐUSA_English(nna)
08/01/05Ðdebbie
X
Page 192 of 304
cWhen installing a spare tire, make sure
it is the proper size and type as speci-
fied on the tire placard. For tire placard
location information, refer to “Tire plac-
ard” in the “Technical and consumer
information” section of this manual.
cRefer to “Wheels and tires” in the
“Maintenance and do-it-yourself” sec-
tion of this manual.cABLS is a form of traction control using
sensors from the Anti-lock Brake System
(ABS) to transfer power from a slipping drive
wheel to a wheel with more traction. The
ABLS system applies braking to the slipping
wheel, which helps redirect power to an-
other wheel.
cOn 4WD models the ABLS system operates
in both 4H and 4LO modes. On 2WD ve-
hicles, the ABLS system operates on the
drive axle only.
cThe ABLS system is always ON unless the
system detects brake pad overheating. If
high brake pad temperature is detected, it
will turn OFF, but normal brake function will
continue. ABLS will function even when the
VDC system (if so equipped) is turned OFF.
WARNING
The ABLS system provides increased trac-
tion, but will not prevent accidents due to
abrupt steering operation or by careless
driving or dangerous driving practices.
Reduce vehicle speed and be especially
careful when driving and cornering on
slippery surfaces, and always drive
carefully.When accelerating or driving on slippery sur-
faces, the tires may spin or slide. With the Vehicle
Dynamic Control (VDC) system, sensors detect
these movements and control the braking and
engine output to help improve vehicle stability.
cWhen the vehicle dynamic control (VDC)
system is operating, the SLIP indicator in the
instrument panel blinks.
cIf the 4WD transfer case is shifted into 4LO
the
indicator light will come on and
the VDC system will be turned off. See
“Transfer case shifting procedures” earlier in
this section.
cIf the SLIP indicator blinks, the road condi-
tions are slippery. Be sure to adjust your
speed and driving to these conditions. See
“Slip indicator light”, and “Vehicle dynamic
control (VDC) off indicator light” in the “In-
struments and controls” section.
If the battery is removed or discharged, the trac-
tion control system may be disabled and the
SLIPand
indicator lights will not turn off
after 2 seconds when the ignition switch is turned
to the ON position. Perform the following proce-
dure to reset the system:
cStart the engine and set the steering wheel
in the straight forward position.
ACTIVE BRAKE LIMITED SLIP (ABLS)
SYSTEM (if so equipped)VEHICLE DYNAMIC CONTROL (VDC)
SYSTEM (if so equipped)
5-30Starting and driving
ZREVIEW COPYÐ2006 Xterra(xtr)
Owners ManualÐUSA_English(nna)
08/01/05Ðdebbie
X
Page 193 of 304
cDrive the vehicle at speeds above 10 mph
(15 km/h) for at least 10 minutes.
cThe VDC OFF indicator light should go off
indicating the traction control system is op-
erational.
cIf you interrupt the reset procedure by turn-
ing the ignition off, you will need to restart
the reset procedure.
If after driving the vehicle for more than 10 min-
utes and theSLIPand
lights remain illumi-
nated in the instrument panel, have the vehicle
dynamic control system checked by a NISSAN
dealer.
If the vehicle is operated with the vehicle dynamic
control system off using the VDC OFF switch,
most VDC functions will be turned off. The VDC
system will still try to transfer power from a slip-
ping drive wheel to one with more traction when
the VDC system switch is OFF. The Slip indicator
will flash if wheel spin is detected. The ABS will
still operate with the VDC system off.
When the VDC system is operating, you may feel a
pulsation in the brake pedal and hear a noise or
vibration from under the hood. This is normal and
indicates that the VDC system is working properly.
The computer has a built in diagnostic feature
that tests the system each time you start the
engine and move the vehicle forward or in reverseat a slow speed. When the self-test occurs, you
may hear a clunk noise and/or feel a pulsation in
the brake pedal. This is normal and is not an
indication of a malfunction.
WARNING
cThe vehicle dynamic control system is
designed to help improve driving stabil-
ity but does not prevent accidents due
to abrupt steering operation at high
speeds or by careless or dangerous
driving techniques. Reduce vehicle
speed and be especially careful when
driving and cornering on slippery sur-
faces and always drive carefully.
cIf brake related parts such as brake
pads, rotors and calipers are not stan-
dard equipment or are extremely dete-
riorated, the vehicle dynamic control
system may not operate properly and
the vehicle dynamic control off indica-
tor light may come on.
cDo not modify the vehicle’s suspension.
If suspension parts such as shock ab-
sorbers, struts, springs, stabilizer bars
and bushings are not NISSAN approved
for your vehicle or are extremely dete-
riorated the vehicle dynamic controlsystem may not operate properly. This
could adversely affect vehicle handling
performance, and the VDC OFF indica-
tor light may come on.
cWhen driving on extremely inclined sur-
faces such as higher banked corners,
the vehicle dynamic control system may
not operate properly and the VDC OFF
indicator light may come on. Do not
drive on these types of roads.
cWhen driving on an unstable surface
such as a turntable, ferry, elevator or
ramp, the vehicle dynamic control off
indicator light may illuminate. This is
not a malfunction. Restart the engine
after driving onto a stable surface
cIf wheels or tires other than the recom-
mended ones are used, the vehicle dy-
namic control system may not operate
properly and the vehicle dynamic con-
trol off indicator light may come on.
cThe vehicle dynamic control system is
not a substitute for winter tires or tire
chains on a snow covered road.
Starting and driving5-31
ZREVIEW COPYÐ2006 Xterra(xtr)
Owners ManualÐUSA_English(nna)
08/01/05Ðdebbie
X
Page 194 of 304
WARNING
cNever rely solely on the hill descent
control system to control vehicle speed
when driving on steep down hill grades.
Always drive carefully and attentively
when using the hill descent control sys-
tem and decelerate the vehicle speed
by depressing the brake pedal if neces-
sary. Be especially careful when driving
on frozen, muddy or an extremely steep
downhill roads. Failure to control ve-
hicle speed may result in a loss of con-
trol of the vehicle and possible serious
injury or death.
cThe hill descent control may not control
the vehicle speed on a hill under all load
or road conditions. Always be prepared
to depress the brake pedal to control
vehicle speed. Failure to do so may re-
sult in a collision or serious personal
injury.
The hill descent control system helps maintain
vehicle speed when driving under 15-21 mph
(25-35 km/h) on steeper downhill grades. HDC
is useful when engine braking alone in 4H or 4L
cannot control vehicle speed. HDC applies the
vehicle brakes to control vehicle speed allowingthe driver to concentrate on steering while reduc-
ing the burden of brake and accelerator opera-
tion.
cWhen additional braking is required on
steep downhill roads activate the HDC sys-
tem by pushing the switch ON, see “Hill
descent control (HDC) switch” in the “In-
struments and controls” section.
cOnce the system is activated the indicator
light will remain on in the instrument panel,
see “Hill descent control (HDC) system on
indicator light” in the “Instruments and con-
trols” section.
If the accelerator or brake pedal is depressed
while the HDC system is on, the system will stop
operating temporarily. As soon as the accelerator
or brake pedal is released, the HDC system
begins to function again if the HDC operating
conditions are fulfilled.
For the best results, when descending steep
downhill grades, the HDC switch should be ON
and the selector lever in 2 (Second gear) or 1
(Low gear) for engine braking.
WARNING
cNever rely solely on the hill start assist
system to prevent the vehicle from mov-
ing backward on a hill. Always drive
carefully and attentively. Depress the
brake pedal when the vehicle is
stopped on a steep hill. Be especially
careful when stopped on a hill on frozen
or muddy roads. Failure to prevent the
vehicle from rolling backwards may re-
sult in a loss of control of the vehicle
and possible serious injury or death.
cThe hill start assist system is not de-
signed to hold the vehicle at a standstill
on a hill. Depress the brake pedal when
the vehicle is stopped on a steep hill.
Failure to do so may cause the vehicle
to roll backwards and may result in a
collision or serious personal injury.
cThe hill start assist may not prevent the
vehicle from rolling backwards on a hill
under all load or road conditions. Al-
ways be prepared to depress the brake
pedal to prevent the vehicle from rolling
backwards. Failure to do so may result
in a collision or serious personal injury.
HILL DESCENT CONTROL (HDC)
SYSTEM (if so equipped)HILL START ASSIST (HSA) SYSTEM
(if so equipped)
5-32Starting and driving
ZREVIEW COPYÐ2006 Xterra(xtr)
Owners ManualÐUSA_English(nna)
08/01/05Ðdebbie
X
Page 203 of 304
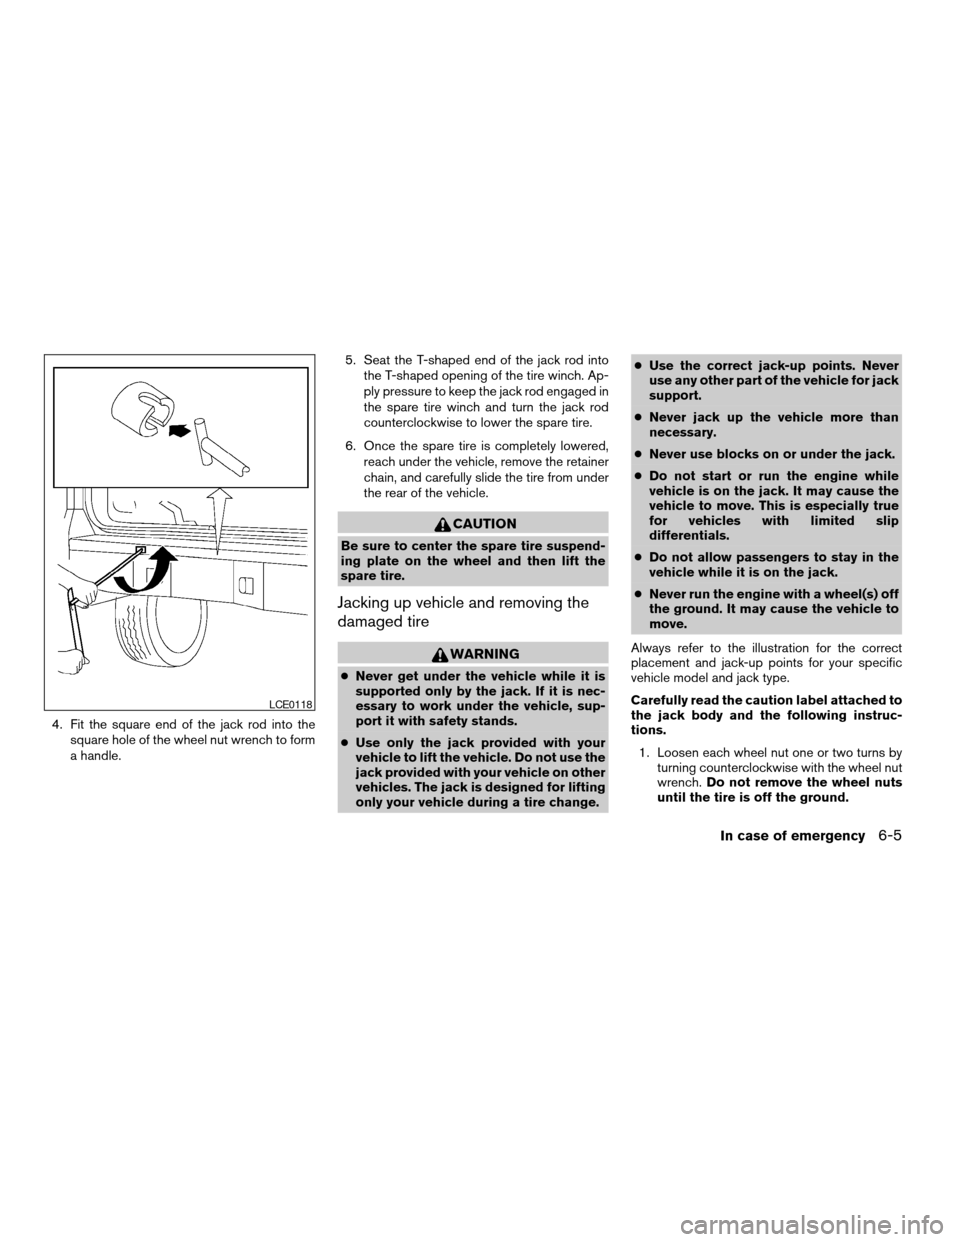
4. Fit the square end of the jack rod into the
square hole of the wheel nut wrench to form
a handle.5. Seat the T-shaped end of the jack rod into
the T-shaped opening of the tire winch. Ap-
ply pressure to keep the jack rod engaged in
the spare tire winch and turn the jack rod
counterclockwise to lower the spare tire.
6. Once the spare tire is completely lowered,
reach under the vehicle, remove the retainer
chain, and carefully slide the tire from under
the rear of the vehicle.
CAUTION
Be sure to center the spare tire suspend-
ing plate on the wheel and then lift the
spare tire.
Jacking up vehicle and removing the
damaged tire
WARNING
cNever get under the vehicle while it is
supported only by the jack. If it is nec-
essary to work under the vehicle, sup-
port it with safety stands.
cUse only the jack provided with your
vehicle to lift the vehicle. Do not use the
jack provided with your vehicle on other
vehicles. The jack is designed for lifting
only your vehicle during a tire change.cUse the correct jack-up points. Never
use any other part of the vehicle for jack
support.
cNever jack up the vehicle more than
necessary.
cNever use blocks on or under the jack.
cDo not start or run the engine while
vehicle is on the jack. It may cause the
vehicle to move. This is especially true
for vehicles with limited slip
differentials.
cDo not allow passengers to stay in the
vehicle while it is on the jack.
cNever run the engine with a wheel(s) off
the ground. It may cause the vehicle to
move.
Always refer to the illustration for the correct
placement and jack-up points for your specific
vehicle model and jack type.
Carefully read the caution label attached to
the jack body and the following instruc-
tions.
1. Loosen each wheel nut one or two turns by
turning counterclockwise with the wheel nut
wrench.Do not remove the wheel nuts
until the tire is off the ground.
LCE0118
In case of emergency6-5
ZREVIEW COPYÐ2006 Xterra(xtr)
Owners ManualÐUSA_English(nna)
08/01/05Ðdebbie
X
Page 217 of 304
UNDERBODY
In areas where road salt is used in winter, it is
necessary to clean the underbody regularly in
order to prevent dirt and salt from building up and
causing the acceleration of corrosion on the un-
derbody and suspension. Before the winter pe-
riod and again in the spring, the underseal must
be checked and, if necessary, retreated.
GLASS
Use glass cleaner to remove smoke and dust film
from the glass surfaces. It is normal for glass to
become coated with a film after the vehicle is
parked in the hot sun. Glass cleaner and a soft
cloth will easily remove this film.
CAUTION
When cleaning the inside of the windows,
do not use sharp-edged tools, abrasive
cleaners or chlorine-based disinfectant
cleaners. They could damage the electri-
cal conductors, radio antenna elements or
rear window defroster elements.
ALUMINUM ALLOY WHEELS
Wash the wheels regularly, especially during win-
ter months in areas where road salt is used. If not
removed, road salt can discolor the wheels.
CHROME PARTS
Clean all chrome parts regularly with a non-
abrasive chrome polish to maintain the finish.
TIRE DRESSINGS
NISSAN does not recommend the use of tire
dressings. Tire manufacturers apply a coating to
the tires to help reduce discoloration of the rub-
ber. If a tire dressing is applied to the tires, it may
react with the coating and form a compound. This
compound may come off the tire while driving and
stain the vehicle paint.
If you choose to use a tire dressing, take the
following precautions:
cUse a water-based tire dressing. The coat-
ing on the tire dissolves more easily with an
oil-based tire dressing.
cApply a light coat of tire dressing to help
prevent it from entering the tire
tread/grooves (where it would be difficult to
remove) .cWipe off excess tire dressing using a dry
towel. Make sure the tire dressing is com-
pletely removed from the tire tread/grooves.
cAllow the tire dressing to dry as recom-
mended by tire dressing manufacturer.
Appearance and care7-3
ZREVIEW COPYÐ2006 Xterra(xtr)
Owners ManualÐUSA_English(nna)
08/01/05Ðdebbie
X
Page 219 of 304

SEAT BELTS
The seat belts can be cleaned by wiping them
with a sponge dampened in a mild soap solution.
Allow the belts to dry completely in the shade
before using them. See “Seat belt maintenance”
in the “Safety – Seats, seat belts and supplemen-
tal restraint system” section of this manual.
WARNING
Do not allow wet seat belts to roll up in the
retractor. NEVER use bleach, dye or
chemical solvents to clean the seat belts,
since these materials may severely
weaken the seat belt webbing.
MOST COMMON FACTORS
CONTRIBUTING TO VEHICLE
CORROSION
cThe accumulation of moisture-retaining dirt
and debris in body panel sections, cavities,
and other areas.
cDamage to paint and other protective coat-
ings caused by gravel and stone chips or
minor traffic accidents.
ENVIRONMENTAL FACTORS
INFLUENCE THE RATE OF
CORROSION
Moisture
Accumulation of sand, dirt and water on the ve-
hicle body underside can accelerate corrosion.
Wet floor coverings will not dry completely inside
the vehicle, and should be removed for drying to
avoid floor panel corrosion.
Relative humidity
Corrosion will be accelerated in areas of high
relative humidity, especially those areas where
the temperatures stay above freezing and where
atmospheric pollution exists and road salt is
used.
Temperature
High temperatures accelerate the rate of corro-
sion to those parts which are not well ventilated.
Air pollution
Industrial pollution, the presence of salt in the air
in coastal areas, or heavy road salt use acceler-
ates the corrosion process. Road salt also accel-
erates the disintegration of paint surfaces.
TO PROTECT YOUR VEHICLE
FROM CORROSION
cWash and wax your vehicle often to keep the
vehicle clean.
cAlways check for minor damage to the paint
and repair it as soon as possible.
cKeep drain holes at the bottom of the doors
open to avoid water accumulation.
cCheck the underbody for accumulation of
sand, dirt or salt. If present, wash with water
as soon as possible.
CORROSION PROTECTION
Appearance and care7-5
ZREVIEW COPYÐ2006 Xterra(xtr)
Owners ManualÐUSA_English(nna)
08/01/05Ðdebbie
X
Page 222 of 304

Your new NISSAN has been designed to have
minimum maintenance requirements with longer
service intervals to save you both time and
money. However, some day-to-day and regular
maintenance is essential to maintain your NIS-
SAN’s good mechanical condition, as well as its
emission and engine performance.
It is the owner’s responsibility to make sure that
the scheduled maintenance, as well as general
maintenance, is performed.
As the vehicle owner, you are the only one who
can ensure that your vehicle receives proper
maintenance. You are a vital link in the mainte-
nance chain.
Scheduled maintenance
For your convenience, both required and optional
scheduled maintenance items are described and
listed in your “NISSAN Service and Maintenance
Guide.” You must refer to that guide to ensure
that necessary maintenance is performed on your
NISSAN at regular intervals.
General maintenance
General maintenance includes those items which
should be checked during normal day-to-day op-
eration. They are essential for proper vehicle op-
eration. It is your responsibility to perform these
maintenance procedures regularly as prescribed.Performing general maintenance checks requires
minimal mechanical skill and only a few general
automotive tools.
These checks or inspections can be done by you,
a qualified technician, or, if you prefer, a NISSAN
dealer.
Where to go for service
If maintenance service is required or your vehicle
appears to malfunction, have the systems
checked and corrected by a NISSAN dealer.
NISSAN technicians are well-trained specialists
who are kept up-to-date with the latest service
information through technical bulletins, service
tips, and in-dealership training programs. They
are completely qualified to work on NISSAN ve-
hiclesbeforethey work on your vehicle, rather
than after they have worked on it.
You can be confident that a NISSAN dealer’s
service department performs the best job to meet
the maintenance requirements on your vehicle —
in a reliable and economic way.During the normal day-to-day operation of the
vehicle, general maintenance should be per-
formed regularly as prescribed in this section. If
you detect any unusual sounds, vibrations or
smells, be sure to check for the cause or have a
NISSAN dealer do it promptly. In addition, you
should notify a NISSAN dealer if you think that
repairs are required.
When performing any checks or maintenance
work, closely observe the “Maintenance precau-
tions” later in this section.
EXPLANATION OF GENERAL
MAINTENANCE ITEMS
Additional information on the following
items with “*” is found later in this section.
Outside the vehicle
The maintenance items listed here should be
performed from time to time, unless otherwise
specified.
Doors and engine hoodCheck that the doors
and engine hood operate properly. Also ensure
that all latches lock securely. Lubricate hinges,
latches, latch pins, rollers and links as necessary.
Make sure that the secondary latch keeps the
hood from opening when the primary latch is
released.
MAINTENANCE REQUIREMENTS GENERAL MAINTENANCE
8-2Maintenance and do-it-yourself
ZREVIEW COPYÐ2006 Xterra(xtr)
Owners ManualÐUSA_English(nna)
08/01/05Ðdebbie
X
Page 246 of 304

Replace the battery in the keyfob as follows:
s1Open the lid using a coinsA.
s2Remove the batterysB.
s3Install a new batterysCwith the “+” facing
down.Recommended battery: CR2025 or equivalent.
s4Close the lid securely.
5. Press the
button, then thebutton two or three times to check the key-
fob operation.If the battery is removed for any reason
other than replacement, perform step 5.
cAn improperly disposed battery can
hurt the environment. Always confirm
local regulations for battery disposal.
cThe keyfob is water-resistant; how-
ever, if it does get wet, immediately
wipe completely dry.
cThe operational range of the keyfob
extends to approximately 33 ft (10 m)
from the vehicle. This range may vary
with conditions.
FCC Notice:
Changes or modifications not expressly ap-
proved by the party responsible for compli-
ance could void the user’s authority to op-
erate the equipment.
This device complies with Part 15 of the FCC
Rules and RSS-210 of Industry Canada.
Operation is subject to the following two
conditions: (1) This device may not cause
harmful interference, and (2) this device
must accept any interference received, in-
cluding interference that may cause undes-
ired operation of the device.LDI0484
KEYFOB BATTERY REPLACEMENT
8-26Maintenance and do-it-yourself
ZREVIEW COPYÐ2006 Xterra(xtr)
Owners ManualÐUSA_English(nna)
08/01/05Ðdebbie
X
Page 266 of 304
E–85 fuel
E-85 fuel is a mixture of approximately 85% fuel
ethanol and 15% unleaded gasoline. E-85 can
only be used in a Flexible Fuel Vehicle (FFV) . Do
not use E-85 in your vehicle. U.S. government
regulations require fuel ethanol dispensing
pumps to be identified by a small, square, orange
and black label with the common abbreviation or
the appropriate percentage for that region.
Aftermarket fuel additives
NISSAN does not recommend the use of any
aftermarket fuel additives (for example, fuel injec-
tor cleaner, octane booster, intake valve deposit
removers, etc.) which are sold commercially.
Many of these additives intended for gum, varnish
or deposit removal may contain active solvents or
similar ingredients that can be harmful to the fuel
system and engine.
Octane rating tips
Using unleaded gasoline with an octane
rating lower than recommended can cause
persistent, heavy “spark knock.” (“Spark
knock” is a metallic rapping noise.) If se-
vere, this can lead to engine damage. If you
detect a persistent heavy spark knock even
when using gasoline of the stated octane
rating, or if you hear steady spark knock
while holding a steady speed on levelroads, have a NISSAN dealer correct the
condition. Failure to correct the condition
is misuse of the vehicle, for which NISSAN
is not responsible.
Incorrect ignition timing may result in spark
knock, after-run and/or overheating, which may
cause excessive fuel consumption or engine
damage. If any of the above symptoms are en-
countered, have your vehicle checked at a
NISSAN dealer.
However, now and then you may notice
light spark knock for a short time while
accelerating or driving up hills. This is not a
cause for concern, because you get the
greatest fuel benefit when there is light
spark knock for a short time under heavy
engine load.
CAUTION
cYour vehicle is not designed to run on
E-85 fuel. Using E-85 fuel in a vehicle
not specifically designed for E-85 fuel
can damage fuel system components
and is not covered by the NISSAN new
vehicle limited warranty.
cE-85 is a mixture of approximately 85%
fuel ethanol and 15% unleaded
gasoline.cU.S. government regulations require
ethanol dispensing pumps to be identi-
fied by a small, square, orange and
black label with the common abbrevia-
tion or the appropriate percentage for
that region.
9-4Technical and consumer information
ZREVIEW COPYÐ2006 Xterra(xtr)
Owners ManualÐUSA_English(nna)
08/01/05Ðdebbie
X