ECO mode NISSAN XTERRA 2009 Owner´s Manual
[x] Cancel search | Manufacturer: NISSAN, Model Year: 2009, Model line: XTERRA, Model: NISSAN XTERRA 2009Pages: 336, PDF Size: 4.52 MB
Page 96 of 336
For additional information, see “Security sys-
tems” later in this section.
Slip indicator light
This indicator light will blink when the traction
control system is limiting wheel spin. Slippery
road conditions may exist if the slip indicator
blinks on. If this happens, adjust your driving
accordingly.
The slip indicator light also comes on when you
place the ignition switch in the ON position. The
light will turn off after about 2 seconds if the
system is operational. If the light does not come
on or does not go off, have the traction control
system checked by a NISSAN dealer.
If the battery is removed or discharged, the trac-
tion control system is disabled and the slip indi-
cator light will not turn off after 2 seconds when
the ignition switch is placed in the ON position.
To reset the system, you must perform the reset
procedure. Refer to “Vehicle Dynamic Control
(VDC) system” in the “Starting and driving” sec-
tion of this manual.
If the light does not go off after performing the
reset procedure, have the traction control system
checked by a NISSAN dealer.
Transfer 4LO position
indicator light (
model)
The light should turn off within 1 second after
turning the ignition switch to ON.
This light comes on when the 4WD shift switch is
set in the 4LO position with the ignition switch in
the ON position.
The transfer case may be damaged if you shift the
switch while driving.
Make sure the transfer 4LO position indicator
light turns on when you shift the 4WD shift switch
to 4LO.
The indicator light may blink while shifting
from one drive mode to the other.
The 4LO indicator light must stop blinking and
remain illuminated or turn off before shifting the
transmission into gear. If the shift selector is
shifted from the N (Neutral) position to any other
gear when the 4LO indicator light is blinking, the
vehicle may move unexpectedly.When you shift between 4H and 4LO, follow the
instructions below:
cFor automatic transmission models, stop the
vehicle and shift the shift selector to the N
(Neutral) position with the brake pedal de-
pressed, then depress and turn the 4WD
shift switch to 4LO or 4H.
cFor manual transmission models, stop the
vehicle and shift the shift selector to the N
(Neutral) position with the clutch pedal de-
pressed, then depress and turn the 4WD
shift switch to 4LO or 4H.
You cannot move the transfer 4WD shift switch
between 4H and 4LO unless you stop the vehicle
and shift the shift selector to the N position with
the brake pedal (AT models) or clutch pedal (MT
models) depressed.
Turn signal/hazard indicator
lights
The appropriate light flashes when the turn signal
switch is activated.
Both lights flash when the hazard switch is turned
on.
2-20Instruments and controls
ZREVIEW COPYÐ2009 Xterra(xtr)
Owners ManualÐUSA_English(nna)
05/21/08Ðdebbie
X
Page 97 of 336
Vehicle Dynamic Control OFF
indicator light
This indicator light comes on when the Vehicle
Dynamic Control off switch is pushed to OFF, the
transfer case is in the 4LO position (
model) , or when the Vehicle Dynamic Control
system is not functioning properly. This indicates
the Vehicle Dynamic Control system is not oper-
ating.
Push the Vehicle Dynamic Control off switch
again or restart the engine and the system will
operate normally. See “Vehicle Dynamic Control
(VDC) system” in the “Starting and driving” sec-
tion of this manual.
The Vehicle Dynamic Control light also comes on
when you turn the ignition key to the ON position.
The light will turn off after about 2 seconds if the
system is operational. If the light stays on or
comes on along with the SLIP indicator light
while you are driving, have the Vehicle Dynamic
Control system checked by a NISSAN dealer.
If the battery is removed or discharged, the Ve-
hicle Dynamic Control system is disabled and the
VDC indicator light will not turn off after 2 sec-
onds when the ignition switch is turned to the ON
position. To reset the system, you must perform
the reset procedure. Refer to “Vehicle DynamicControl (VDC) system” in the “Starting and driv-
ing” section of this manual.
If the light does not go off after performing the
reset procedure, have the traction control system
checked by a NISSAN dealer.
While the Vehicle Dynamic Control system is
operating, you might feel slight vibration or hear
the system working when starting the vehicle or
accelerating, but this is normal.
The VDC system will be disabled and the VDC
light will illuminate when the electronic locking
rear differential (E-lock) system switch (if so
equipped) is turned on and the E-lock system is
engaged. If the E-lock system disengages or the
switch is turned off, the VDC system will be
enabled and the VDC light will turn off.
AUDIBLE REMINDERS
Brake pad wear warning
The disc brake pads have audible wear warnings.
When a disc brake pad requires replacement, it
makes a high pitched scraping sound when the
vehicle is in motion, whether or not the brake
pedal is depressed. Have the brakes checked as
soon as possible if the warning sound is heard.
Key reminder chime
A chime sounds if the driver’s door is opened
while the key is left in the ignition switch. Remove
the key and take it with you when leaving the
vehicle.
Light reminder chime
With the ignition switch placed in the OFF posi-
tion, a chime sounds when the driver’s door is
opened if the headlights or parking lights are on.
Turn the headlight control switch off before leav-
ing the vehicle.
Instruments and controls2-21
ZREVIEW COPYÐ2009 Xterra(xtr)
Owners ManualÐUSA_English(nna)
05/21/08Ðdebbie
X
Page 140 of 336
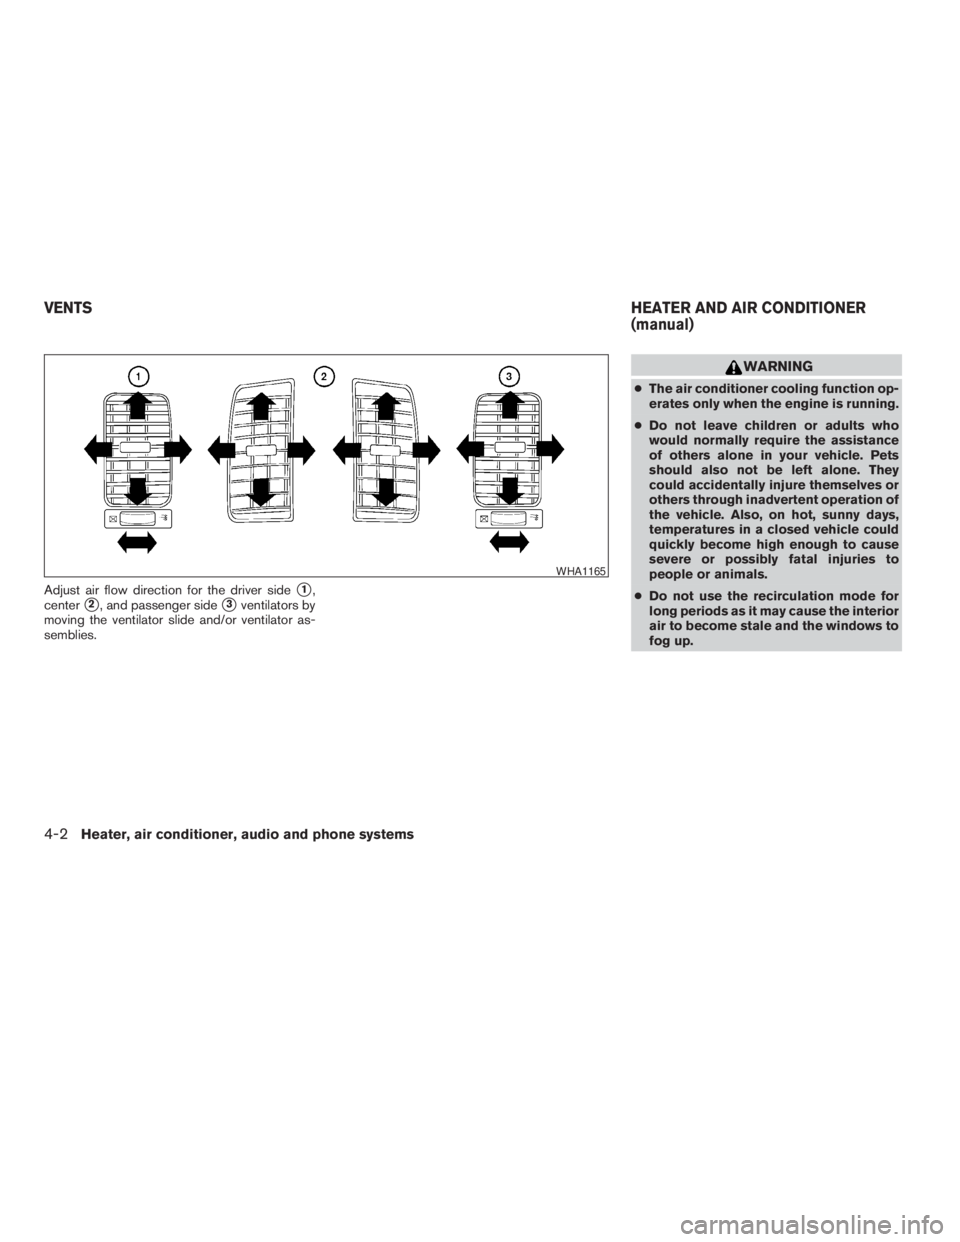
Adjust air flow direction for the driver sides1,
center
s2, and passenger sides3ventilators by
moving the ventilator slide and/or ventilator as-
semblies.
WARNING
cThe air conditioner cooling function op-
erates only when the engine is running.
cDo not leave children or adults who
would normally require the assistance
of others alone in your vehicle. Pets
should also not be left alone. They
could accidentally injure themselves or
others through inadvertent operation of
the vehicle. Also, on hot, sunny days,
temperatures in a closed vehicle could
quickly become high enough to cause
severe or possibly fatal injuries to
people or animals.
cDo not use the recirculation mode for
long periods as it may cause the interior
air to become stale and the windows to
fog up.
WHA1165
VENTSHEATER AND AIR CONDITIONER
(manual)
4-2Heater, air conditioner, audio and phone systems
ZREVIEW COPYÐ2009 Xterra(xtr)
Owners ManualÐUSA_English(nna)
05/21/08Ðdebbie
X
Page 147 of 336
WARNING
cThe air conditioner cooling function op-
erates only when the engine is running.
cDo not leave children or adults who
would normally require the assistance
of others alone in your vehicle. Pets
should also not be left alone. They
could accidentally injure themselves or
others through inadvertent operation of
the vehicle. Also, on hot, sunny days,
temperatures in a closed vehicle could
quickly become high enough to cause
severe or possibly fatal injuries to
people or animals.
cDo not use the recirculation mode for
long periods as it may cause the interior
air to become stale and the windows to
fog up.
WHA1074
HEATER AND AIR CONDITIONER
(manual)
Heater, air conditioner, audio and phone systems4-9
ZREVIEW COPYÐ2009 Xterra(xtr)
Owners ManualÐUSA_English(nna)
05/21/08Ðdebbie
X
Page 162 of 336
To adjust Bass, Treble, Fade and Balance, press
the MENU button until the desired mode appears
in the display. Press the SEEK button to adjust
Bass and Treble to the desired level. You can also
use the SEEK button to adjust Fade and Balance
modes. Fade adjusts the sound level between the
front and rear speakers and Balance adjusts the
sound between the right and left speakers.
Once you have adjusted the sound quality to the
desired level, press the MENU button repeatedly
until the radio or CD display reappears. Other-
wise, the radio or CD display will automatically
reappear after about 10 seconds.
NOTE:
If the clock is enabled, pressing the MENU
button will change the mode as follows:
BAS!TRE!FAD!BAL!CLOCK!
Hour adjustment!Minute adjustment!
Audio!BAS
For more information on setting the clock, see
“Clock set” later in this section.
Clock operation
Press the MENU button until CLOCK is dis-
played; use the SEEK button to turn the clock
display on (CLK ON) or off (CLK OFF) .Clock set
If the clock is not displayed with the ignition
switch in the ACC or ON position, you need to
select the CLK ON mode. Press the MENU but-
ton repeatedly until CLOCK is displayed. Use the
SEEK button to enable CLK ON mode.
1. Press the MENU button repeatedly until
CLOCK mode appears; press the SEEK
button until CLK ON appears.
2. Press the MENU button again; the hours will
start flashing.
3. Press the SEEK button
orto
adjust the hour.
4. Press the MENU button again; the display
will switch to the minute adjustment mode.
5. The minutes will start flashing. Press SEEK
button
orto adjust the minutes.
6. Press the MENU button again to exit the
clock set mode.
The display will return to the regular clock display
after 10 seconds, or press the MENU button
again to return to the regular clock display.Resetting the time
Hold the MENU button down and then press the
TUNE/SEEK button; the time will reset as fol-
lows:
cIf the displayed minutes before the reset are
in the range of :00 - :29, the hour displayed
before the reset will stay the same and the
minutes will be reset to :00.
cIf the displayed minutes before the reset are
in the range of :30 - :59, the hour displayed
before the reset will advance by one hour
and the minutes will be reset to :00.
For example, if the MENU button and the TUNE/
SEEK button are pressed while the time dis-
played is between 8:00 and 8:29, the display will
be reset to 8:00. If the buttons were pressed
while the time was between 8:30 and 8:59, the
display will be reset to 9:00. At the same time the
display will return to the audio.
FM/AM radio operation
FM·AM button:
Press the FM·AM button to change from AMÃ!
FM reception.
The FM stereo indicator, ST, illuminates during
FM stereo reception. When the stereo broadcast
signal is weak, the radio automatically changes
from stereo to monaural reception.
4-24Heater, air conditioner, audio and phone systems
ZREVIEW COPYÐ2009 Xterra(xtr)
Owners ManualÐUSA_English(nna)
05/21/08Ðdebbie
X
Page 163 of 336
TUNE buttons:
Manual tuning
Press the TUNE
orbutton for less
than 0.5 seconds for manual tuning.
To move quickly through the channels, press and
hold either TUNE
orbutton down
for more than 1.5 seconds.
SEEK buttons:
SEEK tuning
Press the SEEK
orbutton to seek
through the frequencies. Seek tuning begins
from low to high frequencies, or high to low
frequencies, depending on which button is
pressed, and stops at the next broadcasting sta-
tion. Once the highest broadcasting station is
reached, the radio continues in the seek mode at
the lowest broadcasting station.
Station memory operations:
18 stations can be set for the FM and AM radio to
the A, B and C preset button in any combination
of AM or FM stations.
1. Press the PRESET A·B·C button to change
between storage banks. The radio displaysthe icon A, B or C to indicate which set of
presets are active.
2. Tune to the desired station using manual
TUNE or SEEK tuning. Press and hold any of
the desired station memory buttons (1 – 6)
until a beep sound is heard. (The radio mutes
when the select button is pressed.)
3. The channel indicator will then come on and
the sound will resume. Programming is now
complete.
4. Other buttons can be set in the same man-
ner.
If the battery cable is disconnected, or if the fuse
opens, the radio memory will be canceled. In that
case, reset the desired stations.
Compact disc (CD) player operation
Turn the ignition switch to the ACC or ON posi-
tion, and carefully insert the compact disc into the
slot with the label side up. The compact disc is
automatically pulled into the slot and starts to
play.
If the radio is already operating, it automatically
turns off and the compact disc begins to play.CD button:
When the CD button is pressed with a compact
disc loaded and the radio playing, the radio turns
off and the last used compact disc starts to play.
TUNE (rewind and fast
forward) buttons:
When the TUNE
orbutton is
pressed while the compact disc is playing, the
compact disc plays at an increased speed while
rewinding or fast forwarding. When the button is
released, the compact disc returns to normal play
speed.
SEEK buttons:
When
is pressed while the compact disc
is playing, the next track following the present
one starts to play from the beginning.
Press
several times to skip several tracks.
Each time the button is pressed, the CD ad-
vances 1 additional track. The track number ap-
pears in the display window. (When the last track
on the compact disc is skipped, the first track is
played.)
When
is pressed, the track being played
returns to the beginning. Press
several
times to skip back several tracks. Each time the
button is pressed, the CD moves back one track.
Heater, air conditioner, audio and phone systems4-25
ZREVIEW COPYÐ2009 Xterra(xtr)
Owners ManualÐUSA_English(nna)
05/21/08Ðdebbie
X
Page 164 of 336
SEEK (Scan CDs) button:
Press and hold the SEEK
button for more
than 1.5 seconds to scan through the first 10
seconds of a track on the compact disc. The
SCAN icon is flashed during scan mode.
The scan mode is canceled once it scans through
all the tracks on the disc, or if the SEEK
orbutton is pressed during the scan
mode.
RPT button:
When the RPT button is pressed while the com-
pact disc is being played, the play pattern can be
changed as follows:
1Ã!Normal
1: The track that is currently playing will be re-
peated.
RDM button:
When the RDM button is pressed while the com-
pact disc is being played, the play pattern can be
changed as follows:
RDMÃ!Normal
RDM: Tracks from the disc that is currently play-
ing will be played randomly.
CD EJECT button:
When the
button is pressed with a com-
pact disc loaded, the compact disc will be
ejected.
When the
button is pressed while the
compact disc is being played, the compact disc
will eject and the system will turn off.
CD IN indicator:
CD IN indicator appears on the display when the
CD is loaded with the system on.
4-26Heater, air conditioner, audio and phone systems
ZREVIEW COPYÐ2009 Xterra(xtr)
Owners ManualÐUSA_English(nna)
05/21/08Ðdebbie
X
Page 166 of 336
level. You can also use the SEEK/TRACK button
to adjust Fade and Balance modes. Fade adjusts
the sound level between the front and rear speak-
ers and Balance adjusts the sound between the
right and left speakers.
Once you have adjusted the sound quality to the
desired level, press the AUDIO button repeatedly
until the radio or CD display reappears. Other-
wise, the radio or CD display will automatically
reappear after about 7 seconds.
Clock set
1. Press and hold the MENU button until it
beeps (for more than 2 seconds) to enter the
clock set mode.
2. The hours will start flashing. Press the
SEEK/TRACK button
orto ad-
just the hours.
3. Press the MENU button until the radio beeps
to switch to the minute adjustment.
4. The minutes will start flashing. Press the
SEEK/TRACK button
orto ad-
just the minutes.
5. Press the MENU button again to exit the
clock set mode.The display will return to the regular clock display
after 7 seconds, or press the MENU button again
to return to the regular clock display.
FM/AM radio operation
FM/AM band select:
Pressing the BAND button will change the band
as follows:
AMÃ!FM
When the BAND button is pressed while the
ignition switch is in the ACC or ON position, the
radio will come on at the station last played.
If a compact disc is playing when the BAND
button is pressed, the compact disc will auto-
matically be turned off and the last radio station
played will come on.
The FM stereo indicator, ST, illuminates during
FM stereo reception. When the stereo broadcast
signal is weak, the radio automatically changes
from stereo to monaural reception.
MENU button:
Press the MENU button while the radio is playing
to change the tuning mode as follows:
SEEK tuning mode!TUNE mode!SCAN
tuning modeTUNE and SCAN are shown in the display win-
dow for each mode. No icon is displayed for
SEEK tuning.
SEEK tuning
While in SEEK tuning mode, press the SEEK/
TRACK button
orfor less than 1.5
seconds. SEEK tuning begins from low to high
frequencies or high to low frequencies, depend-
ing on which button is pressed, and stops at the
next broadcasting station. Press the
but-
ton, once the highest broadcasting station is
reached, the radio continues in the SEEK mode
at the lowest broadcasting station. Press
the
button, once the lowest broadcasting
station is reached, the radio continues in the
SEEK mode at the highest broadcasting station.
Manual tuning
While in TUNE mode, press the SEEK/TRACK
button
orfor manual tuning. Press
and hold the SEEK/TRACK button
orto move quickly through the channels.
4-28Heater, air conditioner, audio and phone systems
ZREVIEW COPYÐ2009 Xterra(xtr)
Owners ManualÐUSA_English(nna)
05/21/08Ðdebbie
X
Page 167 of 336
SCAN tuning
While in SCAN tuning mode, press and hold the
SEEK/TRACK button
orfor more
than 1.5 seconds.
Scan tuning begins from low to high frequencies
or high to low frequencies, depending on which
SEEK/TRACK button
oris pressed.
scan tuning stops at each broadcasting station
for 5 seconds. When scanning, SCAN illumi-
nates in the display and the radio station blinks.
When temporarily stopped on a station, SCAN
blinks and the radio station display is solid.
Pressing the SEEK/TRACK button
oragain during this 5 second period stops
scan tuning and the radio remains tuned to that
radio station.
Station memory operations:
18 stations can be set for the FM and AM radio to
the A, B and C preset button in any combination
of AM or FM stations.
1. Press the PRESET A·B·C button to change
between storage banks. The radio displays
the icon A, B or C to indicate which set of
presets are active.
2. Tune to the desired station using manual
TUNE or SEEK tuning. Press and hold any ofthe desired station memory buttons (1 – 6)
until a beep sound is heard. (The radio mutes
when the select button is pressed.)
3. The channel indicator will then come on and
the sound will resume. Programming is now
complete.
4. Other buttons can be set in the same man-
ner.
If the battery cable is disconnected, or if the fuse
opens, the radio memory will be canceled. In that
case, reset the desired stations.
Compact disc (CD) player operation
Turn the ignition switch to the ACC or ON posi-
tion, and carefully insert the compact disc into the
slot with the label side up. The compact disc is
automatically pulled into the slot and starts to
play.
If the radio is already operating, it automatically
turns off and the compact disc begins to play.
CD button:
When the CD button is pressed with a compact
disc loaded and the radio playing, the radio turns
off and the compact disc starts to play.
SEEK/TRACK button:
When the SEEK/TRACK button
is
pressed while the compact disc is playing, the
next track following the present one starts to play
from the beginning. Press SEEK/TRACK
button
several times to skip several tracks.
Each time the button is pressed, the CD ad-
vances 1 additional track. The track number ap-
pears in the display window. (When the last track
on the compact disc is skipped, the first track is
played.)
When SEEK/TRACK button
is pressed,
the track being played returns to the beginning.
Press SEEK/TRACK button
several times
to skip back several tracks. Each time the button
is pressed the CD moves back 1 track.
SEEK/TRACK (FF/REV)
button:
Press and hold the SEEK/TRACK button
orwhile a compact disc is playing, the
compact disc plays at an increased speed while
fast forwarding or rewinding. When the button is
released, the compact disc returns to normal play
speed.
Heater, air conditioner, audio and phone systems4-29
ZREVIEW COPYÐ2009 Xterra(xtr)
Owners ManualÐUSA_English(nna)
05/21/08Ðdebbie
X
Page 169 of 336
12.CD eject button
13. VOL control knob and PWR button
14. Station and CD select (1 – 6) buttons
15. TUNE/TRACK knob and AUDIO button
*No satellite radio reception is available
when the RADIO button is pressed to
access satellite radio stations unless
optional satellite receiver and antenna
are installed and an XMTsatellite radio
service subscription is active. Satellite
radio can only be installed in vehicles
that were factory pre-wired for satellite
radio. Satellite radio is not available in
Alaska, Hawaii and Guam.
FM/AM/SAT RADIO WITH
COMPACT DISC (CD) CHANGER (if
so equipped)
For all operation precautions, see9Audio opera-
tion precautions9earlier in this section.
No satellite radio reception is available when the
RADIO button is pressed to access satellite radio
stations unless optional satellite receiver and an-
tenna are installed and an XMTsatellite radio
service subscription is active. Satellite radio can
only be installed in vehicles that were factorypre-wired for satellite radio. Satellite radio is not
available in Alaska, Hawaii and Guam.
Audio main operation
POWER/VOLUME control:
Turn the ignition switch to ACC or ON, and then
press the PWR/VOL control knob while the sys-
tem is off to call up the mode (radio or CD) which
was playing immediately before the system was
turned off.
To turn the system off, press the PWR/VOL con-
trol knob.
Turn the PWR/VOL control knob to adjust the
volume.
This vehicle may be equipped with Speed Sen-
sitive Volume (SSV) for audio. The audio volume
changes as the driving speed changes.
AUDIO knob (BASS, MIDRANGE, TREBLE,
FADE, BALANCE and SSV if so equipped):
Press the AUDIO control knob to change the
mode as follows:
BASS!MID!TREBLE!FADE!BALANCE
!SSV (if so equipped)
To adjust Bass, Mid (Midrange) , Treble, Fade and
Balance, press the AUDIO knob until the desired
mode appears in the display. Turn the Tuning
knob to adjust Bass and Treble to the desiredlevel. You can also use the Tuning knob to adjust
Fader and Balance modes. Fader adjusts the
sound level between the front and rear speakers
and Balance adjusts the sound between the right
and left speakers.
To change the SSV mode to OFF, LOW, MID or
HIGH, turn the Tuning knob to the right or left.
Once you have adjusted the sound quality to the
desired level, press the AUDIO knob repeatedly
until the radio or CD display reappears. Other-
wise, the radio or CD display will automatically
reappear after about 10 seconds.
Clock set
1. Press the DISP/CLOCK button until it
beeps (>1.5 seconds) .
2. The hours will start flashing. Press the CAT
FOLDER
orbutton or SEEK
TRACK
orbutton to adjust the
hours.
3. Press the DISP/CLOCK button again to
switch to the minute adjustment.
4. Press the CAT FOLDER
or
button or SEEK TRACKorbutton to adjust the minutes.
5. Press the DISP/CLOCK button again to exit
the clock set mode.
Heater, air conditioner, audio and phone systems4-31
ZREVIEW COPYÐ2009 Xterra(xtr)
Owners ManualÐUSA_English(nna)
05/21/08Ðdebbie
X