ECO mode NISSAN XTERRA 2009 Owner´s Manual
[x] Cancel search | Manufacturer: NISSAN, Model Year: 2009, Model line: XTERRA, Model: NISSAN XTERRA 2009Pages: 336, PDF Size: 4.52 MB
Page 245 of 336
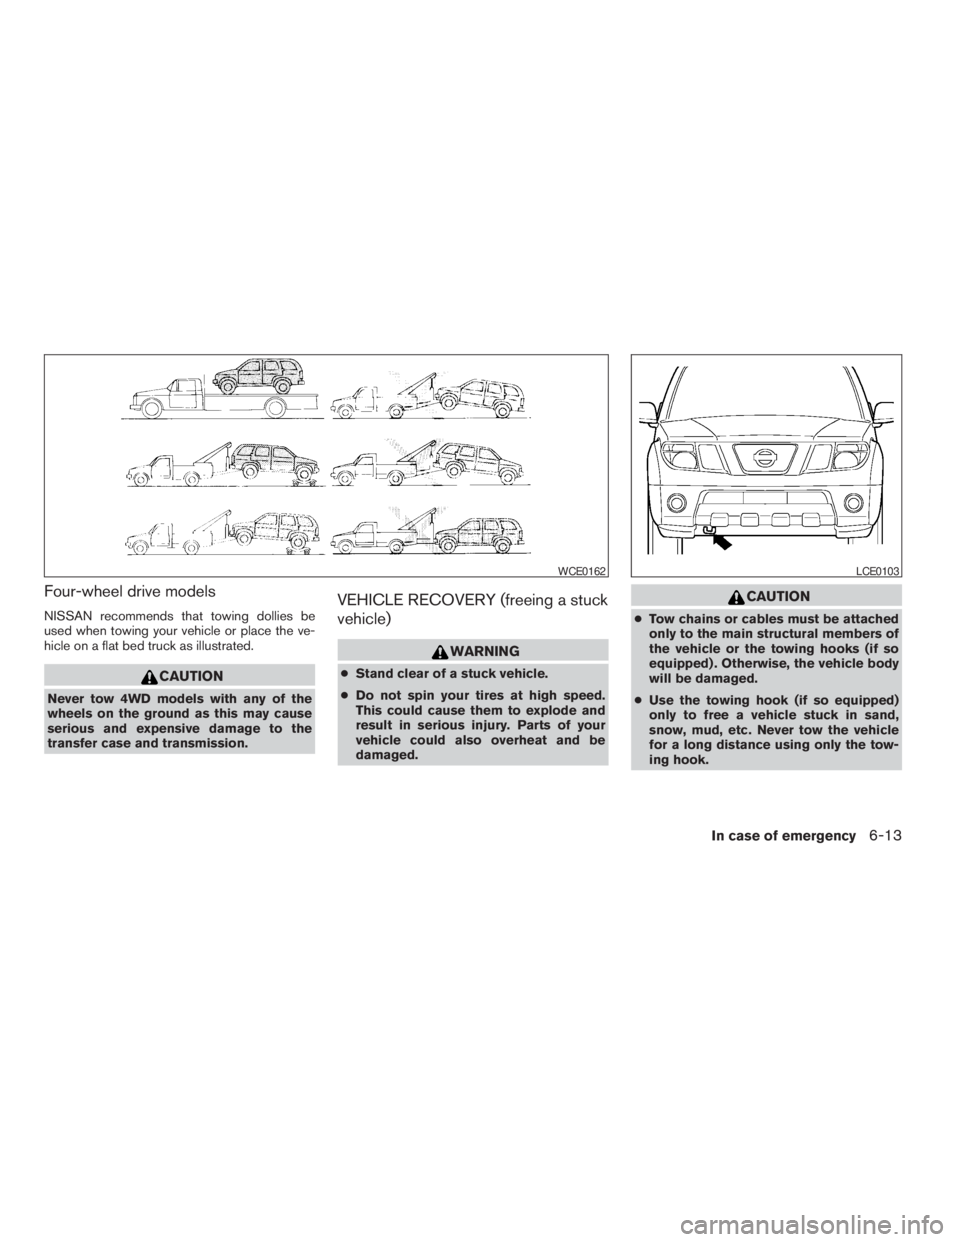
Four-wheel drive models
NISSAN recommends that towing dollies be
used when towing your vehicle or place the ve-
hicle on a flat bed truck as illustrated.
CAUTION
Never tow 4WD models with any of the
wheels on the ground as this may cause
serious and expensive damage to the
transfer case and transmission.
VEHICLE RECOVERY (freeing a stuck
vehicle)
WARNING
cStand clear of a stuck vehicle.
cDo not spin your tires at high speed.
This could cause them to explode and
result in serious injury. Parts of your
vehicle could also overheat and be
damaged.
CAUTION
cTow chains or cables must be attached
only to the main structural members of
the vehicle or the towing hooks (if so
equipped) . Otherwise, the vehicle body
will be damaged.
cUse the towing hook (if so equipped)
only to free a vehicle stuck in sand,
snow, mud, etc. Never tow the vehicle
for a long distance using only the tow-
ing hook.
WCE0162LCE0103
In case of emergency6-13
ZREVIEW COPYÐ2009 Xterra(xtr)
Owners ManualÐUSA_English(nna)
05/21/08Ðdebbie
X
Page 246 of 336
cThe towing hook is under tremendous
force when used to free a stuck vehicle.
Never pull the hook at an angle.
cAlways pull the cable straight out from
the front or rear of the vehicle.
cPulling devices should be routed so
they do not touch any part of the sus-
pension, steering, brake or cooling
systems.
cPulling devices such as ropes or canvas
straps are not recommended for use in
vehicle towing or recovery.
Pulling a stuck vehicle
If your vehicle is stuck in sand, snow, mud, etc.,
use a tow strap or other device designed specifi-
cally for vehicle recovery. Always follow the re-
covery device manufacturer’s instructions.
Attach the tow strap to the towing hook.
Rocking a stuck vehicle
If your vehicle is stuck in sand, snow, mud, etc.,
use the following procedure:
1. Turn off the Vehicle Dynamic Control System
(if so equipped) .
2. Make sure the area in front and behind the
vehicle is clear of obstructions.3. Turn the steering wheel right and left to clear
an area around the front tires.
4. Slowly rock the vehicle forward and back-
ward.
cShift back and forth between R (Reverse)
and D (Drive) (automatic transmission
models) or 1st (low) and R (Reverse)
(manual transmission models) .
cApply the accelerator as little as possible
to maintain the rocking motion.
cRelease the accelerator pedal before
shifting between R and D (automatic
transmission models) or 1st and R
(manual transmission models) .
cDo not spin the tires above 35 mph (55
km/h) .
5. If the vehicle can not be freed after a few
tries, contact a professional towing service
to remove the vehicle.
6-14In case of emergency
ZREVIEW COPYÐ2009 Xterra(xtr)
Owners ManualÐUSA_English(nna)
05/21/08Ðdebbie
X
Page 250 of 336
Occasionally remove loose dust from the interior
trim, plastic parts and seats using a vacuum
cleaner or soft bristled brush. Wipe the vinyl and
leather surfaces with a clean, soft cloth damp-
ened in mild soap solution, then wipe clean with a
dry, soft cloth.
Regular care and cleaning is required in order to
maintain the appearance of the leather.
Before using any fabric protector, read the manu-
facturer’s recommendations. Some fabric pro-
tectors contain chemicals that may stain or
bleach the seat material.
Use a cloth dampened only with water to clean
the meter and gauge lens.
CAUTION
cNever use benzine, thinner or any simi-
lar material.
cSmall dirt particles can be abrasive and
damaging to leather surfaces and
should be removed promptly. Do not
use saddle soap, car waxes, polishes,
oils, cleaning fluids, solvents, deter-
gents or ammonia-based cleaners as
they may damage the leather’s natural
finish.cNever use fabric protectors unless rec-
ommended by the manufacturer.
cDo not use glass or plastic cleaner on
meter or gauge lens covers. It may dam-
age the lens cover.
FLOOR MATS
The use of genuine NISSAN floor mats can ex-
tend the life of your vehicle carpet and make it
easier to clean the interior.No matter what
mats are used, be sure they are fitted for
your vehicle and are properly positioned in
the footwell to prevent interference with
pedal operation.Mats should be maintained
with regular cleaning and replaced if they be-
come excessively worn.
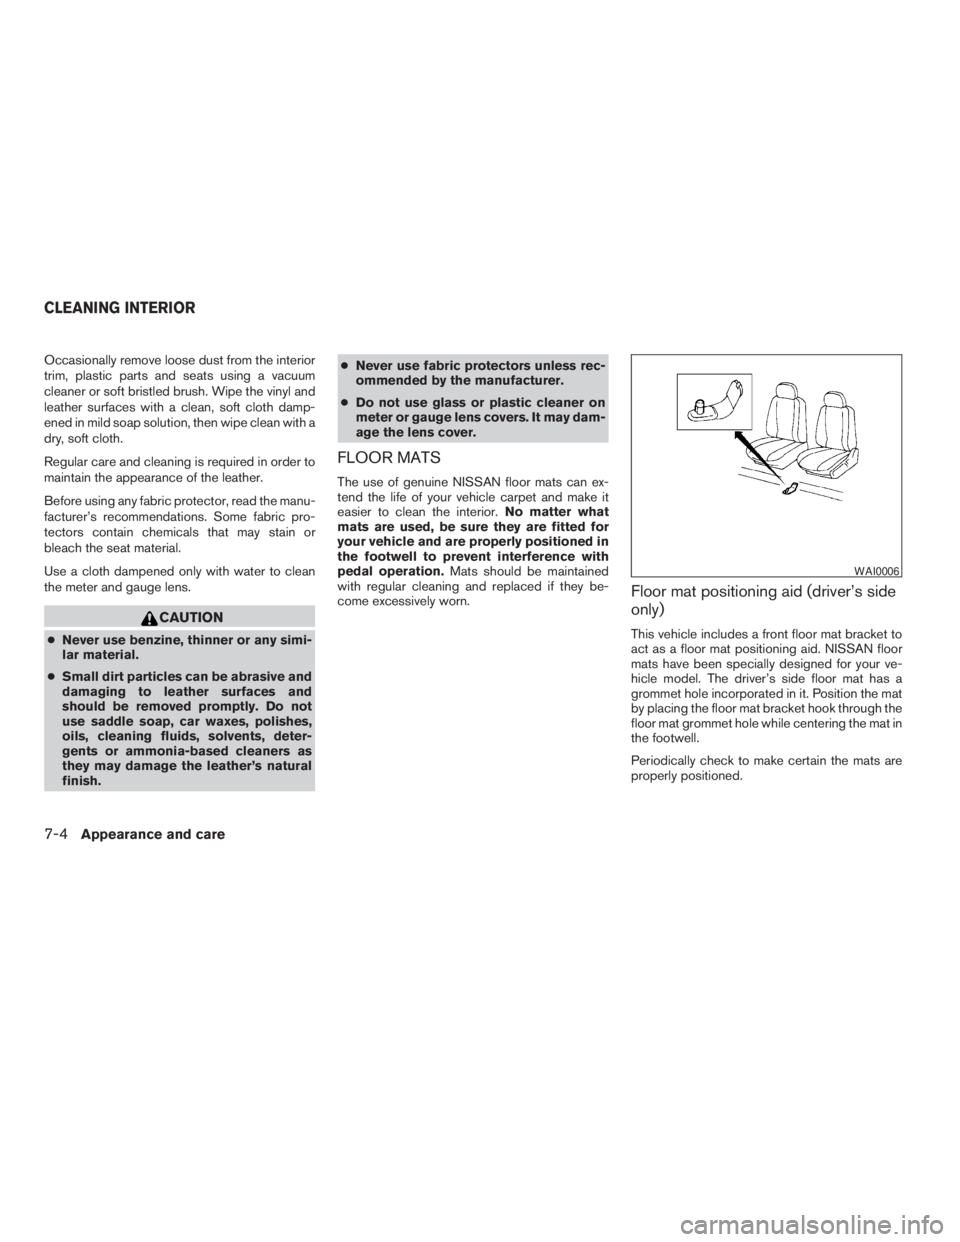
Floor mat positioning aid (driver’s side
only)
This vehicle includes a front floor mat bracket to
act as a floor mat positioning aid. NISSAN floor
mats have been specially designed for your ve-
hicle model. The driver’s side floor mat has a
grommet hole incorporated in it. Position the mat
by placing the floor mat bracket hook through the
floor mat grommet hole while centering the mat in
the footwell.
Periodically check to make certain the mats are
properly positioned.
WAI0006
CLEANING INTERIOR
7-4Appearance and care
ZREVIEW COPYÐ2009 Xterra(xtr)
Owners ManualÐUSA_English(nna)
05/21/08Ðdebbie
X
Page 284 of 336
If you have a flat tire, see the “In case of
emergency” section of this manual.
TIRE PRESSURE
Tire Pressure Monitoring System
(TPMS)
This vehicle is equipped with the Tire
Pressure Monitoring System (TPMS) . It
monitors tire pressure of all tires except
the spare. When the low tire pressure
warning light is lit, one or more of your
tires is significantly under-inflated.
The TPMS will activate only when the
vehicle is driven at speeds above 16 MPH
(25 km/h) . Also, this system may not de-
tect a sudden drop in tire pressure (for
example a flat tire while driving) .
For more details, refer to “Low tire pres-
sure warning light” in the “Instruments and
controls” section, “Tire pressure informa-
tion” in the “Heater, air conditioner, audio
and phone systems” section, “Tire Pres-
sure Monitoring System (TPMS)” in the
“Starting and driving” section, and “Flat
tire” in the “In case of emergency” section.
Tire inflation pressure
Check the tire pressures (including the
spare) often and always prior to long dis-
tance trips. The recommended tire pres-
sure specifications are shown on the
F.M.V.S.S./C.M.V.S.S. certification label
or the Tire and Loading Information label
under the “Cold Tire Pressure” heading.
The Tire and Loading Information label is
affixed to the driver side center pillar. Tire
pressures should be checked regularly
because:
cMost tires naturally lose air over time.
cTires can lose air suddenly when
driven over potholes or other objects
or if the vehicle strikes a curb while
parking.
The tire pressures should be checked
when the tires are cold. The tires are
considered COLD after the vehicle has
been parked for 3 or more hours, or driven
less than 1 mile (1.6 km) at moderate
speeds.Incorrect tire pressure, including un-
der inflation, may adversely affect
tire life and vehicle handling.
WARNING
cImproperly inflated tires can fail
suddenly and cause an accident.
cThe Gross Vehicle Weight Rating
(GVWR) is located on the
F.M.V.S.S./C.M.V.S.S. certifica-
tion label. The vehicle weight ca-
pacity is indicated on the Tire and
Loading Information label (if so
equipped) . Do not load your ve-
hicle beyond this capacity. Over-
loading your vehicle may result in
reduced tire life, unsafe operat-
ing conditions due to premature
tire failure, or unfavorable han-
dling characteristics and could
also lead to a serious accident.
Loading beyond the specified ca-
pacity may also result in failure of
other vehicle components.
WHEELS AND TIRES
8-32Maintenance and do-it-yourself
ZREVIEW COPYÐ2009 Xterra(xtr)
Owners ManualÐUSA_English(nna)
05/21/08Ðdebbie
X
Page 285 of 336
cBefore taking a long trip, or
whenever you heavily load your
vehicle, use a tire pressure gauge
to ensure that the tire pressures
are at the specified level.
cFor additional information re-
garding tires, refer to “Important
Tire Safety Information” (US) or
“Tire Safety Information”
(Canada) in the Warranty Infor-
mation Booklet.
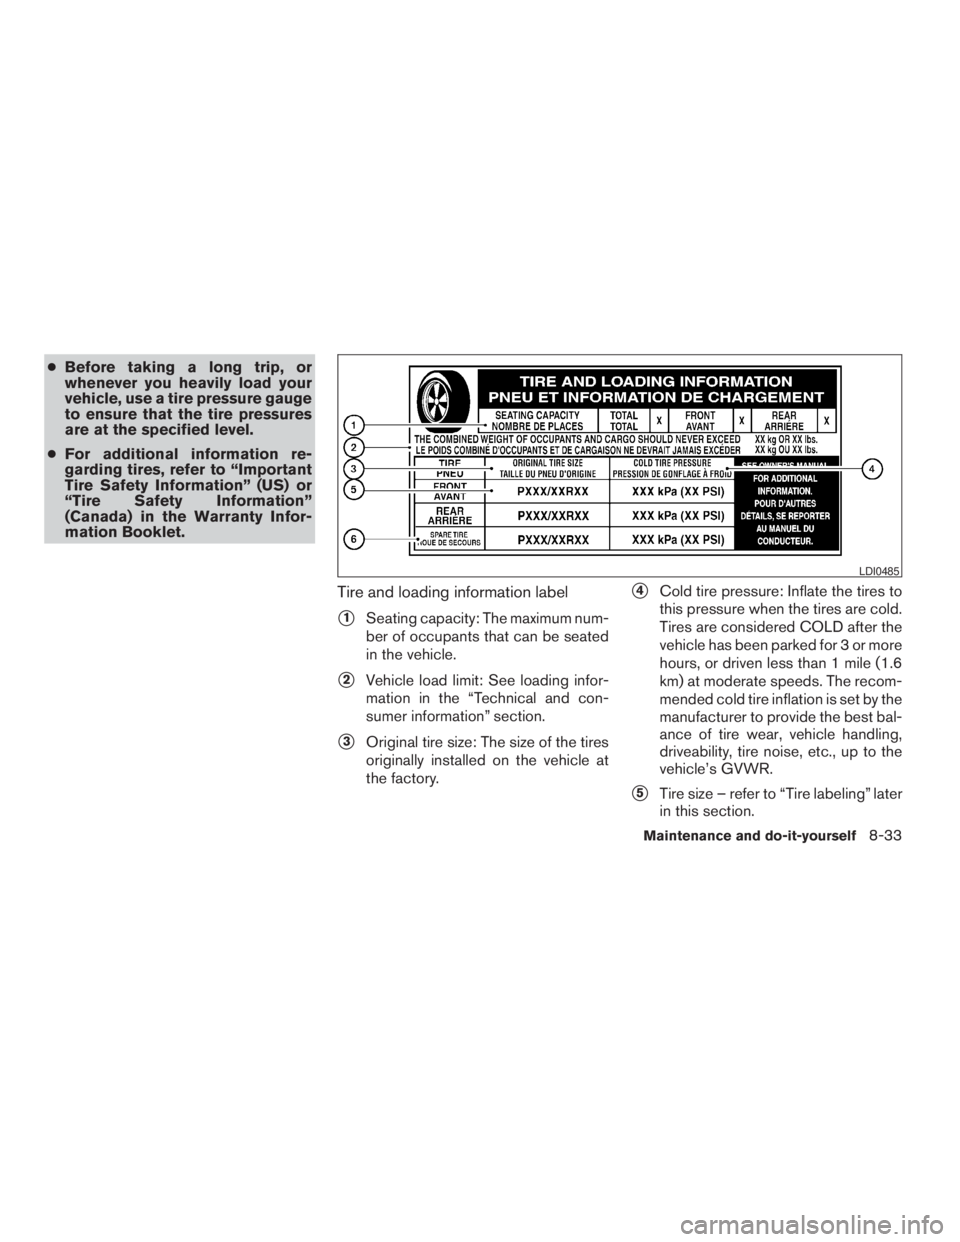
Tire and loading information label
s1Seating capacity: The maximum num-
ber of occupants that can be seated
in the vehicle.
s2Vehicle load limit: See loading infor-
mation in the “Technical and con-
sumer information” section.
s3Original tire size: The size of the tires
originally installed on the vehicle at
the factory.
s4Cold tire pressure: Inflate the tires to
this pressure when the tires are cold.
Tires are considered COLD after the
vehicle has been parked for 3 or more
hours, or driven less than 1 mile (1.6
km) at moderate speeds. The recom-
mended cold tire inflation is set by the
manufacturer to provide the best bal-
ance of tire wear, vehicle handling,
driveability, tire noise, etc., up to the
vehicle’s GVWR.
s5Tire size – refer to “Tire labeling” later
in this section.
LDI0485
Maintenance and do-it-yourself8-33
ZREVIEW COPYÐ2009 Xterra(xtr)
Owners ManualÐUSA_English(nna)
05/21/08Ðdebbie
X
Page 290 of 336
s7The word “radial”
The word “radial” is shown if the tire has
radial structure.
s8Manufacturer or brand name
Manufacturer or brand name is shown.
Other Tire-related Terminology
In addition to the many terms that are
defined throughout this section, Intended
Outboard Sidewall is (1) the sidewall that
contains a whitewall, bears white lettering
or bears manufacturer, brand, and/or
model name molding that is higher or
deeper than the same molding on the
other sidewall of the tire, or (2) the out-
ward facing sidewall of an asymmetrical
tire that has a particular side that must
always face outward when mounted on a
vehicle.
TYPES OF TIRES
WARNING
cWhen changing or replacing tires, be
sure all four tires are of the same type
(i.e., Summer, All Season or Snow) and
construction. A NISSAN dealer may be
able to help you with information about
tire type, size, speed rating and
availability.
cReplacement tires may have a lower
speed rating than the factory equipped
tires, and may not match the potential
maximum vehicle speed. Never exceed
the maximum speed rating of the tire.
cFor additional information regarding
tires, refer to “Important Tire Safety In-
formation” (US) or “Tire Safety Informa-
tion” (Canada) in the Warranty Informa-
tion Booklet.
All season tires
NISSAN specifies All Season tires on some mod-
els to provide good performance all year, includ-
ing snowy and icy road conditions. All Season
tires are identified by ALL SEASON and/or M&S
on the tire sidewall. Snow tires have better snow
traction than All Season tires and may be more
appropriate in some areas.
Summer tires
NISSAN specifies summer tires on some models
to provide superior performance on dry roads.
Summer tire performance is substantially re-
duced in snow and ice. Summer tires do not have
the tire traction rating “M&S” on the tire sidewall.
If you plan to operate your vehicle in snowy or icy
conditions, NISSAN recommends the use of
SNOW tires or ALL SEASON tires on all four
wheels.
Snow tires
If snow tires are needed, it is necessary to select
tires equivalent in size and load rating to the
original equipment tires. If you do not, it can
adversely affect the safety and handling of your
vehicle.
Generally, snow tires have lower speed ratings
than factory equipped tires and may not match
the potential maximum vehicle speed. Never ex-
ceed the maximum speed rating of the tire.
If you install snow tires, they must be the same
size, brand, construction and tread pattern on all
four wheels.
For additional traction on icy roads, studded tires
may be used. However, some U.S. states and
Canadian provinces prohibit their use. Check
local, state and provincial laws before installing
8-38Maintenance and do-it-yourself
ZREVIEW COPYÐ2009 Xterra(xtr)
Owners ManualÐUSA_English(nna)
05/21/08Ðdebbie
X
Page 293 of 336
Replacing wheels and tires
When replacing a tire, use the same size, tread
design, speed rating and load carrying capacity
as originally equipped. Recommended types and
sizes are shown in “Wheels and tires” in the
“Technical and consumer information” section of
this manual.
WARNING
cThe use of tires other than those recom-
mended or the mixed use of tires of
different brands, construction (bias,
bias-belted or radial) , or tread patterns
can adversely affect the ride, braking,
handling, VDC system, ground clear-
ance, body-to-tire clearance, tire chain
clearance, speedometer calibration,
headlight aim and bumper height.
Some of these effects may lead to acci-
dents and could result in serious per-
sonal injury.
cIf your vehicle was originally equipped
with 4 tires that were the same size and
you are only replacing 2 of the 4 tires,
install the new tires on the rear axle.
Placing new tires on the front axle may
cause loss of vehicle control in some
driving conditions and cause an acci-
dent and personal injury.cIf the wheels are changed for any rea-
son, always replace with wheels which
have the same off-set dimension.
Wheels of a different off-set could
cause premature tire wear, degrade ve-
hicle handling characteristics, affect
the VDC system and/or interference
with the brake discs/drums. Such inter-
ference can lead to decreased braking
efficiency and/or early brake pad/shoe
wear. Refer to “Wheels and tires” in the
“Technical and consumer information”
section of this manual for wheel off-set
dimensions.
cWhen a spare tire is mounted or a wheel
is replaced, tire pressure will not be
indicated, the TPMS will not function
and the low tire pressure warning light
will flash for approximately 1 minute.
The light will remain on after 1 minute.
Contact your NISSAN dealer as soon as
possible for tire replacement and/or
system resetting.
cReplacing tires with those not originally
specified by NISSAN could affect the
proper operation of the TPMS.cDo not install a damaged or deformed
wheel or tire even if it has been re-
paired. Such wheels or tires could have
structural damage and could fail with-
out warning.
cThe use of retread tires is not
recommended.
cFor additional information regarding
tires, refer to “Important Tire Safety In-
formation” (US) or “Tire Safety Informa-
tion” (Canada) in the Warranty Informa-
tion Booklet.
Four-wheel drive models
CAUTION
Always use tires of the same type, size,
brand, construction (bias, bias-belted or
radial) , and tread pattern on all four
wheels. Failure to do so may result in a
circumference difference between tires
on the front and rear axles which will
cause excessive tire wear and may dam-
age the transmission, transfer case and
differential gears.
Maintenance and do-it-yourself8-41
ZREVIEW COPYÐ2009 Xterra(xtr)
Owners ManualÐUSA_English(nna)
05/21/08Ðdebbie
X
Page 314 of 336
Temperature conditions can also affect towing.
For example, towing a heavy trailer in high outside
temperatures on graded roads can affect engine
performance and cause overheating. The engine
protection mode, which helps reduce the chance
of engine damage, could activate and automati-
cally decrease engine power. Vehicle speed may
decrease under high load. Plan your trip carefully
to account for trailer and vehicle load, weather
and road conditions.
WARNING
Overheating can result in reduced engine
power and vehicle speed. The reduced
speed may be lower than other traffic,
which could increase the chance of a col-
lision. Be especially careful when driving.
If the vehicle cannot maintain a safe driv-
ing speed, pull to the side of the road in a
safe area. Allow the engine to cool and
return to normal operation. See “If your
vehicle overheats” in the “In case of emer-
gency” section of this manual.
CAUTION
Vehicle damage resulting from improper
towing procedures is not covered by
NISSAN warranties.
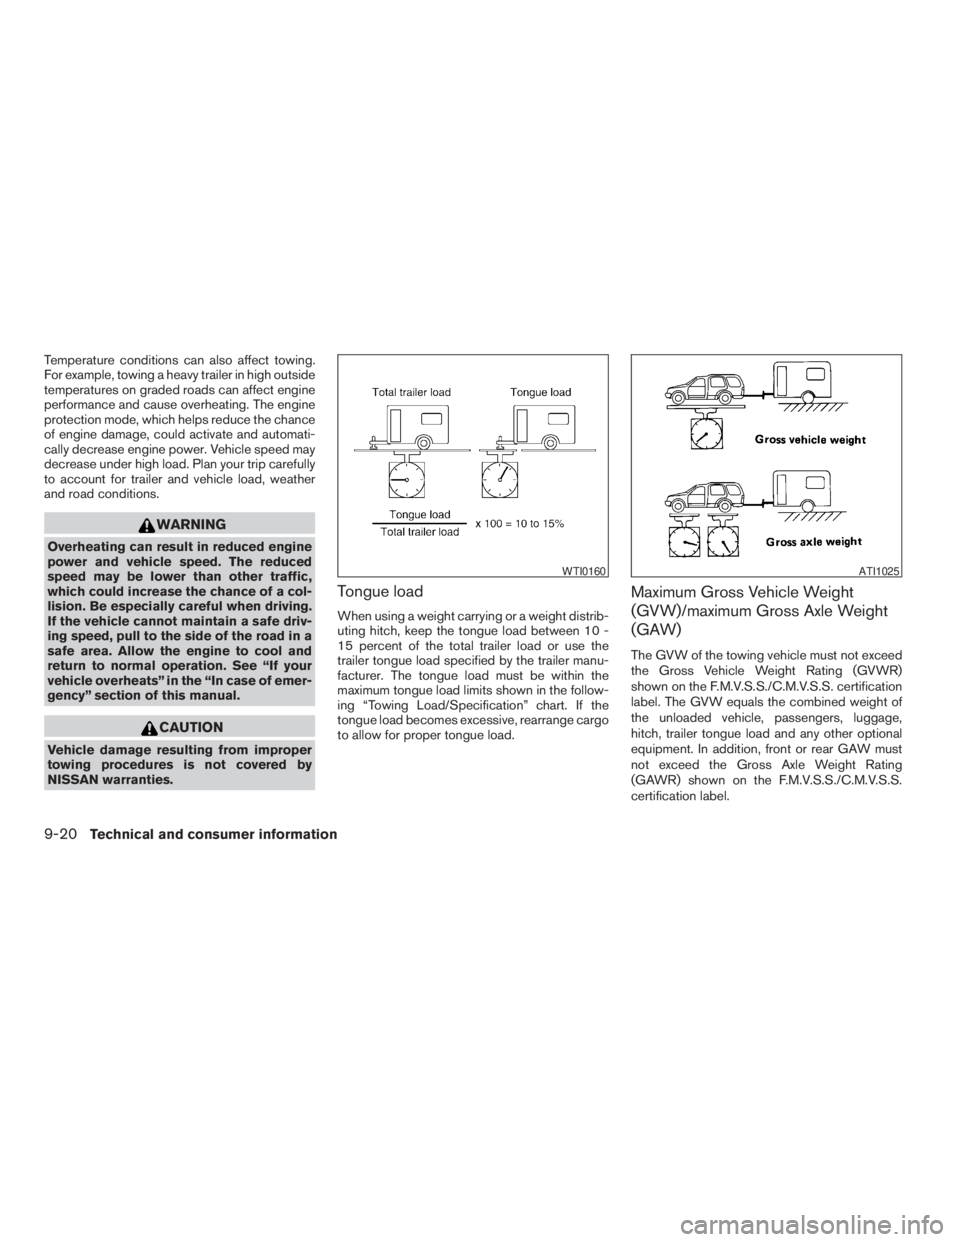
Tongue load
When using a weight carrying or a weight distrib-
uting hitch, keep the tongue load between 10 -
15 percent of the total trailer load or use the
trailer tongue load specified by the trailer manu-
facturer. The tongue load must be within the
maximum tongue load limits shown in the follow-
ing “Towing Load/Specification” chart. If the
tongue load becomes excessive, rearrange cargo
to allow for proper tongue load.
Maximum Gross Vehicle Weight
(GVW)/maximum Gross Axle Weight
(GAW)
The GVW of the towing vehicle must not exceed
the Gross Vehicle Weight Rating (GVWR)
shown on the F.M.V.S.S./C.M.V.S.S. certification
label. The GVW equals the combined weight of
the unloaded vehicle, passengers, luggage,
hitch, trailer tongue load and any other optional
equipment. In addition, front or rear GAW must
not exceed the Gross Axle Weight Rating
(GAWR) shown on the F.M.V.S.S./C.M.V.S.S.
certification label.
WTI0160ATI1025
9-20Technical and consumer information
ZREVIEW COPYÐ2009 Xterra(xtr)
Owners ManualÐUSA_English(nna)
05/21/08Ðdebbie
X
Page 320 of 336
WARNING
Never connect a trailer brake system di-
rectly to the vehicle brake system.
Electric trailer brake controller
Trailers equipped with electric brakes may re-
quire the installation of an aftermarket trailer
brake controller.
A Genuine NISSAN jumper harness is available
that is specifically designed to be used when
installing an aftermarket brake controller.
Install the aftermarket electric trailer brake con-
troller according to the manufacturer’s instruc-
tions.
Pre-towing tips
cBe certain your vehicle maintains a level
position when a loaded and/or unloaded
trailer is hitched. Do not drive the vehicle if it
has an abnormal nose-up or nose-down
condition; check for improper tongue load,
overload, worn suspension or other possible
causes of either condition.
cAlways secure items in the trailer to prevent
load shift while driving.cKeep the cargo load as low as possible in
the trailer to keep the trailer center of gravity
low.
cLoad the trailer so approximately 60% of the
trailer load is in the front half and 40% is in
the back half. Also make sure the load is
balanced side to side.
cCheck your hitch, trailer tire pressure, ve-
hicle tire pressure, trailer light operation, and
trailer wheel lug nuts every time you attach a
trailer to the vehicle.
cBe certain your rearview mirrors conform to
all federal, state or local regulations. If not,
install any mirrors required for towing before
driving the vehicle.
cDetermine the overall height of the vehicle
and trailer so the required clearance is
known.
Trailer towing tips
In order to gain skill and an understanding of the
vehicle’s behavior, you should practice turning,
stopping and backing up in an area which is free
from traffic. Steering stability and braking perfor-
mance will be somewhat different than under
normal driving conditions.
cAlways secure items in the trailer to prevent
load shift while driving.cLock the trailer hitch coupler with a pin or
lock to prevent the coupler from inadvert-
ently becoming unlatched.
cAvoid abrupt starts, acceleration or stops.
cAvoid sharp turns or lane changes.
cAlways drive your vehicle at a moderate
speed.
cWhen backing up, hold the bottom of the
steering wheel with one hand. Move your
hand in the direction in which you want the
trailer to go. Make small corrections and
back up slowly. If possible, have someone
guide you when you are backing up.
Always block the wheels on both vehicle and
trailer when parking. Parking on a slope is not
recommended; however, if you must do so:
CAUTION
If you move the shift selector lever to the P
(Park) position before blocking the
wheels and applying the parking brake,
transmission damage could occur.
1. Apply and hold the brake pedal.
2. Have someone place blocks on the downhill
side of the vehicle and trailer wheels.
9-26Technical and consumer information
ZREVIEW COPYÐ2009 Xterra(xtr)
Owners ManualÐUSA_English(nna)
05/21/08Ðdebbie
X
Page 322 of 336
cBe careful when passing other vehicles.
Passing while towing a trailer requires con-
siderably more distance than normal pass-
ing. Remember, the length of the trailer must
also pass the other vehicle before you can
safely change lanes.
cUse the Tow Mode or downshift the trans-
mission to a lower gear for engine braking
when driving down steep or long hills. This
will help slow the vehicle without applying
the brakes.
cAvoid holding the brake pedal down too long
or too frequently. This could cause the
brakes to overheat, resulting in reduced
braking efficiency.
cIncrease your following distance to allow for
greater stopping distances while towing a
trailer. Anticipate stops and brake gradually.
cNISSAN recommends that the cruise con-
trol not be used while towing a trailer.
cSome states or provinces have specific
regulations and speed limits for vehicles that
are towing trailers. Obey the local speed
limits.
cCheck your hitch, trailer wiring harness con-
nections, and trailer wheel lug nuts after 50
miles (80 km) of travel and at every break.cWhen launching a boat, don’t allow the wa-
ter level to go over the exhaust tail pipe or
rear bumper.
cMake sure you disconnect the trailer lights
before backing the trailer into the water or
the trailer lights may burn out.
When towing a trailer, final drive gear oil
should be replaced and transmission oil/
fluid should be changed more frequently.
For additional information, see the “Main-
tenance and do-it-yourself” section earlier
in this manual.
FLAT TOWING
Towing your vehicle with all four wheels on the
ground is sometimes called flat towing. This
method is sometimes used when towing a vehicle
behind a recreational vehicle, such as a motor
home.
CAUTION
cFailure to follow these guidelines can
result in severe transmission damage.
cWhenever flat towing your vehicle, al-
ways tow forward, never backward.cDO NOT tow any automatic transmis-
sion vehicle with all four wheels on the
ground (flat towing) . Doing so WILL
DAMAGE internal transmission parts
due to lack of transmission lubrication.
cFor emergency towing procedures refer
to “Towing recommended by NISSAN”
in the “In case of emergency” section of
this manual.
Automatic Transmission
To tow a vehicle equipped with an automatic
transmission, an appropriate vehicle dollyMUST
be placed under the towed vehicle’s drive
wheels.Alwaysfollow the dolly manufacturer’s
recommendations when using their product.
Manual Transmission
cAlways tow with the manual transmission in
Neutral.
cOn four-wheel drive vehicles, place the
transfer case in the 2H range. Failure to do
so will cause the powertrain to bind up.
cAfter towing 500 miles (805 km) , start and
idle the engine with the transmission in Neu-
tral for two minutes. Failure to idle the engine
after every 500 miles (805 km) of towing
may cause damage to internal transmission
parts.
9-28Technical and consumer information
ZREVIEW COPYÐ2009 Xterra(xtr)
Owners ManualÐUSA_English(nna)
05/21/08Ðdebbie
X