change time Oldsmobile Achieva 1998 Owner's Manuals
[x] Cancel search | Manufacturer: OLDSMOBILE, Model Year: 1998, Model line: Achieva, Model: Oldsmobile Achieva 1998Pages: 356, PDF Size: 18.04 MB
Page 4 of 356
GENERAL MOTORS, GM, the GM Emblem,
OLDSMOBILE, the OLDSMOBILE Rocket Emblem
and the name
ACHIEVA are registered trademarks of
General Motors Corporation.
This manual includes the latest information at the time it
was printed. We reserve the right to make changes in the
product after that time without further notice.
Please keep this manual
in your vehicle, so it will be
there if you ever need it when you’re on the road.
If you
sell
the vehicle, please leave this manual in it so the new
owner can use it.
Litho in
U.S.A.
Part No. 22656198 A First Edition
r We support voluntary
technician certification.
VOLUNTARY TECHNICIAN WE SUPPORT
CERTIFICATION THROUGH
National Institute for
AUTOMOTIVE SERVICE
EXCELLENCE
“Copyright General Motors Corporation 1997
All Rights Reserved
Page 71 of 356
This device complies with Part 15 of the FCC Rules.
Operation is subject to the following two conditions:
(1) this device may not cause harmful interference,
and
(2) this device must accept any interference
received, including interference that may cause
undesired operation.
This device complies with
RSS-210 of Industry Canada.
Operation is subject to the following two conditions:
(1) this device may not cause interference, and (2) this
device must accept any interference received, including
interference that may cause undesired operation of
the device.
Changes or modifications to this system by other than
an authorized service facility could void authorization
to use this equipment.
This system has a range of about
3 feet (1 m) up to
30 feet (9 m). At times you may notice a decrease in
range, This
is normal for any remote keyless entry
system. If the transmitter does not work or if you have
to stand closer to your vehicle for
the transmitter to
work, try this:
Check to determine if battery replacement or
synchronization is necessary. See
the instructions
that follow.
Check the distance. You may be too far from your
vehicle. You may need to stand closer during rainy
or snowy weather.
Check the location. Other vehicles or objects may be
blocking the signal. Take a few steps to the left or
right, hold the transmitter higher, and try again.
If you’re still having trouble, see your retailer or a
qualified technician for service.
Operation
The following functions are available with the Remote
Lock Control system:
LOCK: All doors will automatically lock when
the
LOCK button on the transmitter is pressed. The interior
lamps stay on for a few seconds after all of the doors
are closed.
UNLOCK: The driver’s door will unlock automatically
when the UNLOCK button on the transmitter is pressed.
If the UNLOCK button
is pressed again within five
seconds, all remaining doors will unlock. The interior
lamps will stay on for
40 seconds or until the ignition is
turned
on.
2-7
Page 72 of 356
Trunk Release: The trunk will unlock anytime the
vehicle symbol on the transmitter is pressed and
the ignition is
OFF. If the ignition is on, the trunk
will unlock if the gear selector is in PARK
(P) or
NEUTRAL
(N) . The interior lamps will come on
for
40 seconds or until the ignition switch is turned
to the
ON position.
Matching Transmitter(s) To Your Vehicle
Each remote lock control transmitter is coded to
prevent another transmitter from unlocking your vehicle.
If a transmitter is lost or stolen, a replacement can be
purchased through your retailer. Remember to bring any
remaining transmitters with you when you go to your
retailer. When the retailer matches the replacement
transmitter to your vehicle, any remaining transmitters
must also be matched. Once your retailer has coded the
new transmitter, the lost transmitter will not unlock your
vehicle, Each vehicle can have only two transmitters
matched to
it.
You can match your transmitter to as many 1998
General Motors vehicles as you own, as long as they
have the same Remote Lock Control system. Contact
your retailer for assistance with this.
Battery Replacement
Under normal use, the battery in your remote lock
control transmitter should last about two years.
You can tell the battery is weak if the transmitter won’t
work at the normal range in any location.
If you have to
get close to your vehicle before the transmitter works,
it’s probably time to change the battery.
I NOTICE:
When replacing the battery, use care not to
touch any
of the circuitry. Static from your
body transferred to these surfaces may damage
the transmitter.
2-8
Page 79 of 356
Starting Your 2.4 Liter Engine
1. With your foot off the accelerator pedal, turn your
ignition key to
START. When the engine starts, let
go of the key. The idle speed will go down as your
engine gets warm.
NOTICE:
Holding your key in START for longer than
15 seconds at a time will cause your battery to be
drained much sooner. And the excessive heat can
damage your starter motor.
L
2. If the engine doesn’t start right away, and if the
weather is very cold (below
-20” F or -29” C),
push the accelerator pedal about one-quarter of the
way down while you turn the key to START. Do this
until the engine starts.
As soon as it does, let go of
the key.
3. If your engine still won’t start (or starts but then stops), \
it could be flooded with too much gasoline. Try
pushing your accelerator pedal all
the way to the floor
and holding it there as you hold the key in START for
a maximum of
15 seconds. This clears the extra
gasoline from the engine.
If the engine still won’t start
or starts briefly but then stops again, repeat step 1 or 2,
depending on temperature. When the engine starts,
release the key and the accelerator pedal.
NOTICE:
Your engine is designed to work with the
electronics in your vehicle. If you add electrical
parts or accessories, you could change the
way
the engine operates. Before adding electrical
equipment, check with your retailer. If you don’t,
your engine might not perform properly.
If you ever have to have your vehicle towed, see
the part
of this manual that tells how to do it
without damaging your vehicle. See “Towing
Your Vehicle” in the Index.
2-15
Page 80 of 356
Starting Your 3100 Engine
1. Without pushing the accelerator pedal, turn your
ignition key to START. When the engine starts, let
go
of the key. The idle speed will go down as your
engine gets warm.
NOTICE:
Holding your key in START for longer than
15 seconds at a time will cause your battery to
be drained much sooner. And the excessive heat
can damage your starter motor.
2. If your engine won’t start (or starts but then stops), it
could be flooded with too much gasoline. Try
pushing your accelerator pedal all the way to the
floor and holding it there as you hold the key in
START for up to
15 seconds. This clears the extra
gasoline from the engine.
NOTICE:
Your engine is designed to work with the
electronics in your vehicle.
If you add electrical
parts
or accessories, you could change the way
the engine operates. Before adding electrical
equipment, check with your retailer.
If you don’t,
your engine might not perform properly.
If you ever have to have your vehicle towed, see
the part of this manual that tells how to do it
without damaging your vehicle. See “Towing
Your Vehicle” in the Index.
2-16
Page 95 of 356
If the arrows don’t go on at all when you signal a
turn, check the fuse (see “Fuses and Circuit Breakers”
in the Index) or contact your Oldsmobile retailer
service department).
Turn Signal On Chime
A warning chime signal will come on if you have left
your turn signal
on for more than 3/4 mile (1 km).
Headlamp HighLow Beam
To change the headlamps
from low beam to high or
high to low, pull the turn
signal lever all the way
toward you. Then release it.
When the high beams are on, a light on the instrument
panel also will be on.
The headlamp high/low beam indicator may flash if the
Daytime Running Lamps
(DRL) system is experiencing
a problem or if a headlamp is malfunctioning.
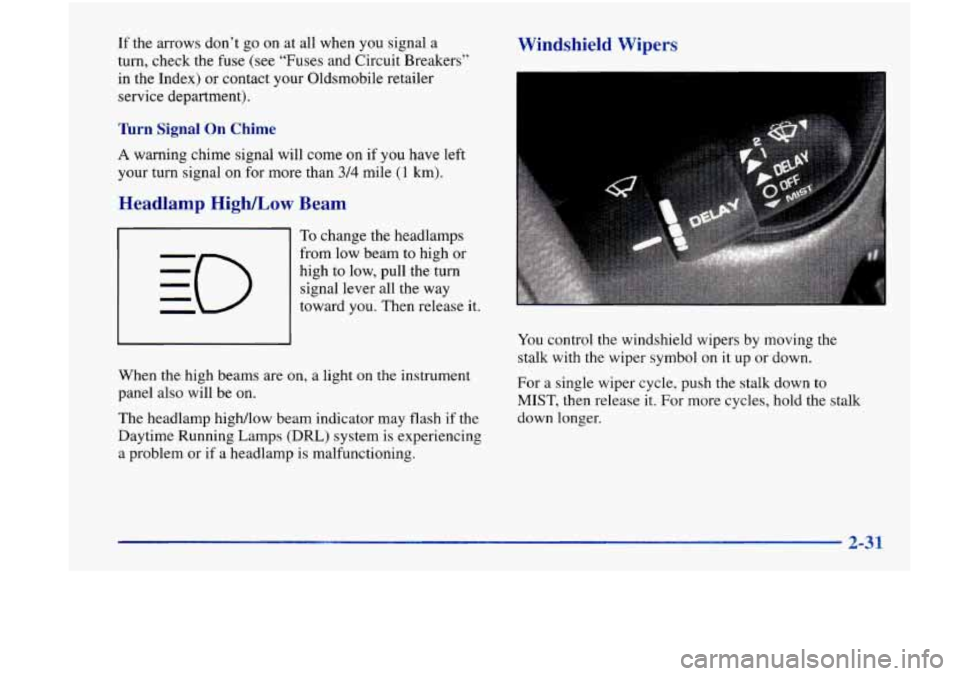
Windshield Wipers
You control the windshield wipers by moving the
stalk with the wiper symbol on it up or down,
For a single wiper cycle, push the stalk down to
MIST, then release it. For more cycles, hold the stalk
down longer.
2-31
Page 131 of 356
AM-FM Stereo with Cassette Tape Player
and Automatic Tone Control
(If Equipped)
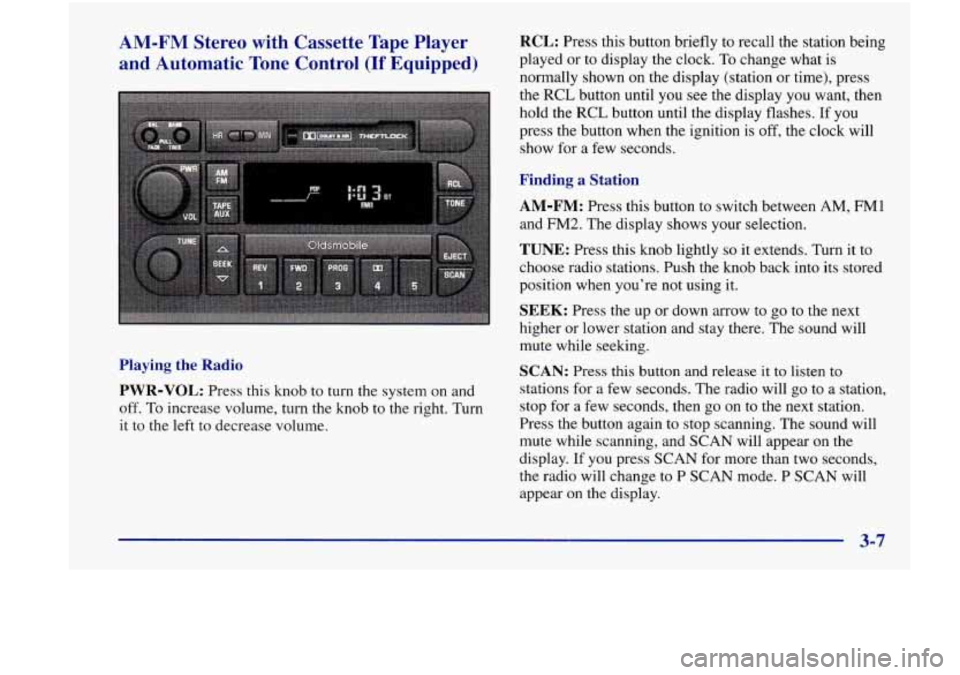
Playing the Radio
PWR-VOL:
Press this knob to turn the system on and
off. To increase volume, turn the knob to the right. Turn
it to the
left to decrease volume.
RCL: Press this button briefly to recall the station being
played or to display the clock. To change what is
normally shown on the display (station or time), press
the RCL button until you
see the display you want, then
hold the RCL button until the display flashes. If you
press the button when the ignition
is off, the clock will
show for a few seconds.
Finding a Station
AM-FM: Press this button to switch between AM, FMl
and FM2. The display shows your selection.
TUNE: Press this knob lightly so it extends. Turn it to
choose radio stations. Push the knob back into its stored
position when you’re not using it.
SEEK: Press the up or down arrow to go to the next
higher or lower station and stay there. The sound will
mute while seeking.
SCAN: Press this button and release it to listen to
stations for a few seconds. The radio will
go to a station,
stop for a few seconds, then go on to the next station.
Press the button again
to stop scanning. The sound will
mute while scanning, and SCAN will appear on the
display. If
you press SCAN for more than two seconds,
the radio will change to P SCAN mode. P SCAN will
appear
on the display.
3-7
Page 135 of 356
AM-FM Stereo with Cassette Tape and
Compact Disc Player with Automatic Tone
Control
(If Equipped)
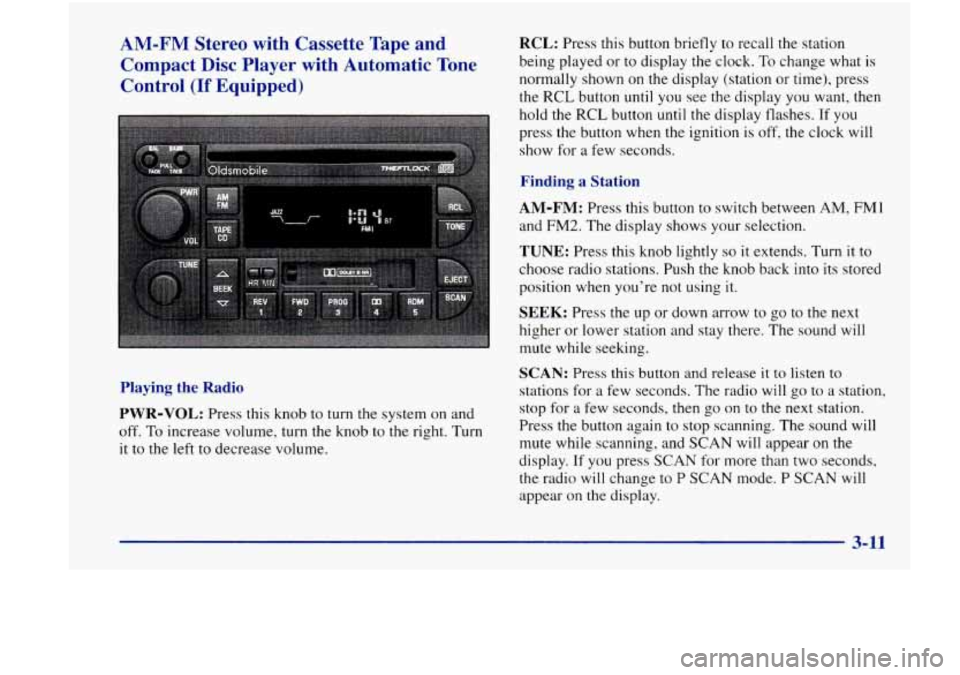
Playing the Radio
PWR-VOL: Press this knob to turn the system on and
off. To increase volume, turn the knob to the right. Turn
it to the left to decrease volume.
RCL: Press this button briefly to recall the station
being played or to display the clock.
To change what is
normally shown on the display (station or time), press
the RCL button until you see the display you want, then
hold the
RCL button until the display flashes. If you
press the button when the ignition is off, the clock will
show for a few seconds.
Finding a Station
AM-FM: Press this button to switch between AM, FM1
and FM2. The display shows your selection.
TUNE: Press this knob lightly so it extends. Turn it to
choose radio stations. Push the knob back into its stored
position when you’re not using it.
SEEK: Press the up or down arrow to go to the next
higher or lower station and stay there. The sound will
mute while seeking.
SCAN: Press this button and release it to listen to
stations for a few seconds. The radio will go to a station,
stop for a few seconds, then
go on to the next station.
Press the button again
to stop scanning. The sound will
mute while scanning, and SCAN will appear on the
display. If you press
SCAN for more than two seconds,
the radio will change to
P SCAN mode. P SCAN will
appear on the display.
3-11
Page 140 of 356
RCL: Press this button to see which track is playing.
Press it again within
five seconds to see how long it has
been playing.
To change what is normally shown on the
display (track or elapsed time), press the button until
you see the display you want, then hold the button until
the display flashes. While elapsed time is showing,
EL
TM will appear on the display.
AM-FM: Press this button to play the radio when a
disc
is in the player.
TAPE-CD: Press this button to change to the tape or
disc function when the radio is on and either a tape or
CD is inserted. Press AM-FM to return to the radio
while a CD or tape is playing. The inactive tape or CD
will remain safely inside the radio for future listening. If
you have the optional CD changer and the CD changer
is loaded, the TAPE-CD button will activate the changer
and a box will be lighted around CDC in the display.
EJECT Press this button to remove the compact disc or
cassette tape. The icon with the box around it on the
display will eject and the radio will play. EJECT may be
activated with either the ignition or radio off. Cassettes
and compact discs may be loaded with the radio and
ignition
off if this button is pressed first.
Theft-Deterrent Feature
THEFTLOCK@ is designed to discourage theft of your
radio. It works by using a secret code to disable all radio
functions whenever battery power is removed.
The THEFTLOCK feature for the radio may be used or
ignored. If ignored, the system plays normally and the
radio is not protected by the feature. If THEFTLOCK is
activated, your radio will not operate if stolen.
When THEFTLOCK is activated, the radio will display
LOC to indicate a locked condition anytime battery
power is removed.
If your battery loses power for any
reason, you must unlock the radio with the secret code
before it will operate.
Activating the Theft-Deterrent Feature
The instructions which follow explain how to enter your
secret code
to activate the THEFTLOCK system. It is
recommended that you read through all nine steps
before starting the procedure.
NOTE: If you allow more than 15 seconds to elapse
between any steps, the radio automatically reverts to
time and you must start
the procedure over at Step 4.
1. Write down any three or four-digit number from
000 to 1999 and keep it in a safe place separate
from the vehicle.
3-16
Page 157 of 356
Remember: Anti-lock doesn’t change the time you need
to get your foot up to the brake pedal or always decrease
stopping distance. If you get too close to the vehicle in
front of you, you won’t have time to apply your brakes
if that vehicle suddenly slows or stops. Always leave
enough room up ahead to stop, even though you have
anti-lock brakes.
Using Anti-Lock
Don’t pump the brakes. Just hold the brake pedal down
firmly and let anti-lock work for you. You may feel a
slight brake pedal pulsation or notice some noise, but
this is normal.
Enhanced Traction System
If your vehicle has the optional four-speed automatic
transaxle, it also has an Enhanced Traction System
(ETS) that limits wheel spin. This
is especially useful in
slippery road conditions. The system operates only if it
senses that one
or both of the front wheels are spinning
or beginning to lose traction. When this happens, the
system reduces engine power and may also upshift
the
transaxle to limit wheel spin.
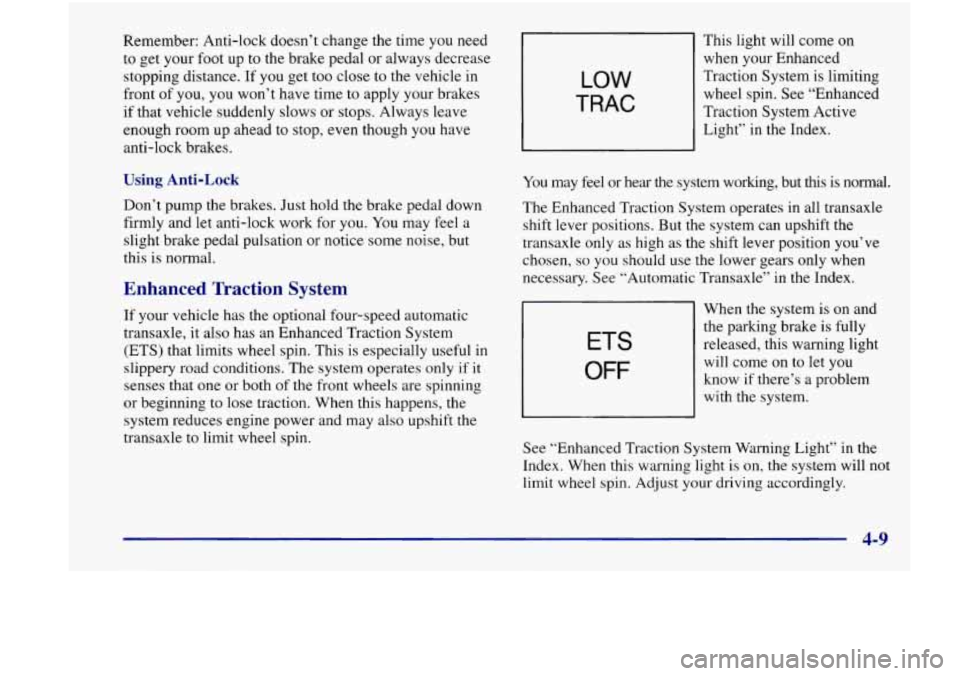
LOW
TRAC
This light will come on
when your Enhanced
Traction System is limiting
wheel spin. See “Enhanced
Traction System Active
Light” in the Index.
You may feel or hear the system working, but this is normal.
The Enhanced Traction System operates in all transaxle
shift lever positions. But the system can upshift the
transaxle only as high as the shift lever position you’ve
chosen,
so you should use the lower gears only when
necessary. See “Automatic Transaxle” in the Index.
31 When the system is on and
ETS
OFF
the parking brake is fully
released, this warning light
will come on
to let you
know if there’s a problem
with the system.
See “Enhanced Traction System Warning Light’’ in the
Index. When this warning light is on, the system will not
limit wheel spin. Adjust your driving accordingly.
4-9