instrument panel OLDSMOBILE AURORA 1995 Owner's Manual
[x] Cancel search | Manufacturer: OLDSMOBILE, Model Year: 1995, Model line: AURORA, Model: OLDSMOBILE AURORA 1995Pages: 372, PDF Size: 19.14 MB
Page 138 of 372

Dual Temperature Control
With this feature, the right front seat passenger can
control the temperature of heated air for hidher own
zone.
To turn on the system, adjust the control on the
passenger side armrest to the temperature setting
desired. The system can
also be turned on and off by
pressing the
PASS TEMP button on the comfort control
system
on the instrument panel.
The passenger temperature control on the passenger
armrest
will illuminate only if the headlamps or parking
lamps are on.
Defogging Windows with the Air Conditioning System
DEF: To quickly defog the windshield use DEE
fl Defog: Use defog to keep the windows clear
while
also providing heat through the lower outlets.
-
3-6 --
ProCarManuals.com
Page 170 of 372

Avoid needless heavy braking. Some people drive in
spurts -- heavy acceleration followed by heavy braking
-- rather than keeping pace with traffic. This is a
mistake. Your brakes may not have time to cool between
hard stops. Your brakes will wear
out much fdster if you
do a lot of heavy braking. If you keep pace with the
traffic and allow realistic following distances, you will
eliminate a lot
of unnecessary braking. That means
better braking and longer brake life.
If your engine ever stops while you’re driving, brake
normally but don’t pump your brakes.
If you do, the
pedal may get harder to push down. If your engine
stops, you will still have some power brake assist.
But
you will use it when you brake. Once the power assist is
used up,
it may take longer to stop and the brake pedal
will be harder to push.
Anti-Lock Brakes (ABS)
Your Aurora has an advanced electronic braking system
that
will help prevent a braking skid.
ANT’- (I)
LOCK
This light on the
instrument panel
will
come on briefly when
you start your vehicle.
When you start your vehicle and begin to drive away,
you may hear a momentary motor or clicking noise. And
you may even notice that your brake pedal moves
a little
while this is going on. This is the ABS system testing
itself.
If there’s a problem with the anti-lock brake
system, the anti-lock brake system warning light will
stay
on.
See “Anti-Lock Brake System Warning Light“ in the
Index.
4-6
ProCarManuals.com
Page 199 of 372

Making Turns
I NOTICE:
Making very sharp turns while trailering could
cause the trailer to come in contact with the
vehicle. Your vehicle could be damaged. Avoid
making very sharp turns while trailering.
When you‘re turning with a trailer, make wider turns
than normal.
Do this so your trailer won’t strike soft
shoulders, curbs, road signs, trees, or other objects.
Avoid jerky or sudden maneuvers. Signal well
in
advance.
Turn Signals When Towing a Trailer
When you tow a trailer, your vehicle has to have a
different turn signal flasher and extra wiring. The green
arrows on your instrument panel will flash whenever
you signal a turn or lane change. Properly hooked
up,
the trailer lamps will also flash, telling other drivers
you‘re about to turn, change lanes or stop.
When towing
a trailer, the green arrows on your
instrument panel will flash for turns even
if the bulbs on
the trailer are burned out. Thus. you may think drivers
behind you are seeing your signal when they are not. It’s
important to check occasionally to be sure
the trailer
bulbs are still working.
Driving On Grades
Reduce speed and shift to a lower gear h4for-c you start
down a long or steep downgrade.
If you don’t shift
down, you might have to use your brakes so much that
they would get hot and no longer work well.
ProCarManuals.com
Page 202 of 372

1
The HAZARD light on the
instrument panel will also
come
on.
HAZARDA
Your hazard flashers work no matter what position your
key is
in, and even if the key isn’t in.
To turn off the flashers, press the button down again.
When the flashers are
on, your turn signals won’t work.
Other Warning Devices
If you carry reflective triangles, you can set one up at
the side of the road about 300 feet (100 m) behind your
vehicle.
Jump Starting
If your battery has run down, you may want to use
another vehicle and some jumper cables to start your
Aurora. But please follow the steps to do it safely.
5-2
ProCarManuals.com
Page 237 of 372

Checking Things Under the Hood
The following sections tell you how to check fluids,
lubricants and important parts underhood.
Hood Release
v-
To open the hood. first
pull the hood release
handle inside the vehicle, located
to the
left of the steering
wheel under
the
instrument panel. Then
go to the front
of the vehicle and pull up on the
underhood release.
Lift the
hood.
6-7
ProCarManuals.com
Page 240 of 372

Engine Accessory Belt
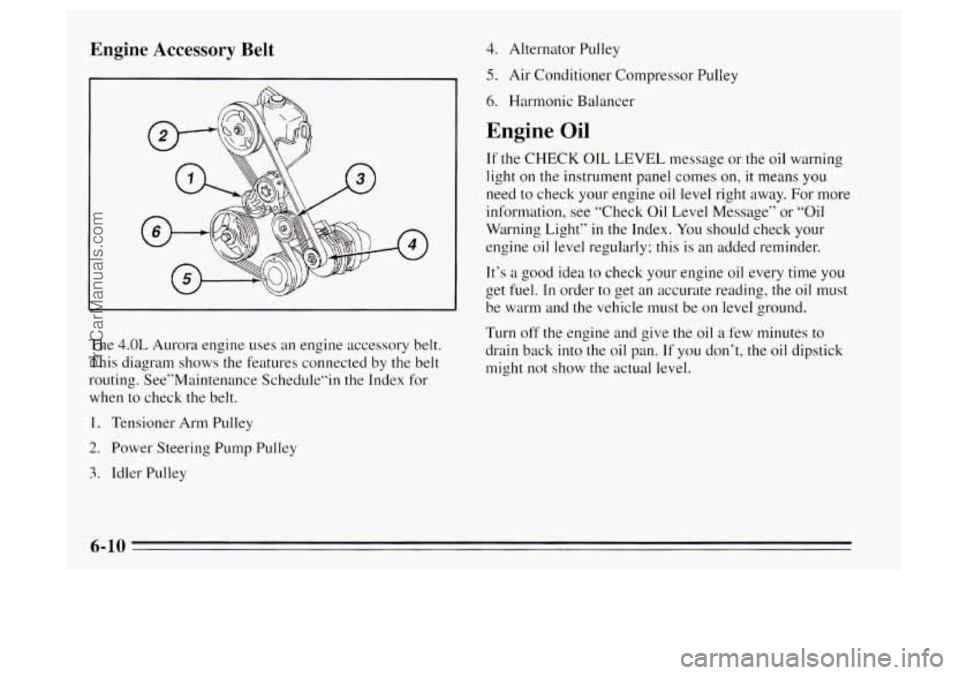
The 4.0L Aurora engine uses an engine accessory belt.
This diagram shows the features connected by the belt
routing. See”Maintenance Schedu1e”in the Index for
when to check the belt.
1. Tensioner Arm Pulley
2. Power Steering Pump Pulley
3. Idler Pulley 4.
Alternator Pulley
5. Air Conditioner Compressor Pulley
6. Harmonic Balancer
Engine Oil
If the CHECK 01L LEVEL message or the oil warning
light on the instrument panel comes
on, it means you
need to check your engine oil level right away.
For more
information, see “Check Oil Level Message” or
“Oil
Warning Light” in the Index. You should check your
engine
oil level regularly; this is an added reminder.
It’s a
good idea to check your engine oil every time you
get fuel. In order to get an accurate reading, the oil must
be warm and the vehicle must be on level ground.
Turn off the engine and give the
oil a few minutes to
drain back into the oil pan.
If you don’t, the oil dipstick
might not show the actual level.
6-10
ProCarManuals.com
Page 276 of 372

Cleaning Leather Care of Safety Belts
1 i I saddle soap.
1 For stubborn stains, use a GM Vinylkeather Cleaner
Use a soft cloth
with lukewarm water and a mild soap or
I
I
I
or equivalent product.
cleaners, furniture polish or shoe polish on leather.
is allowed to work into the finish, it can harm the
leather.
Never use oils, varnishes, solvent-based or abrasive
1 Soiled leather should be cleaned immediately. If dirt
Cleaning the Top of the Instrument Panel
Use only mild soap and water to clean the top surfaces
of the instrument panel. Sprays containing silicones or
waxes may cause annoying reflections in the windshield
and even make it difficult to see through the windshield
under certain conditions. Keep belts clean and
dry. Glass
Glass should be cleaned often. GM Glass Cleaner (GM
Part No. 1050427) or a liquid household glass cleaner
will remove normal tobacco smoke and dust films.
Don’t use abrasive cleaners on glass, because they may
cause scratches. Avoid placing decals on the inside rear
window, since they may have to be scraped
off later. If
abrasive cleaners are used on the inside of the rear
window, an electric defogger element may be damaged.
Any temporary license should not be attached across the
defogger grid.
6-46
ProCarManuals.com
Page 281 of 372

Vehicle Identification Number (VIN)
I. I
ENGINE A95 7 ASSEMBLY
CODE MODEL YEAR
PLANT
This is the legal identifier for your Aurora. It appears on
a plate in the front corner of the instrument panel, on the
driver's side. You can see
it if you look through the
windshield from outside your vehicle. The VIN also
appears on the Vehicle Certification and Service Parts
labels and the certificates of title and registration.
Engine Identification
The eighth character in your VIN is the engine code.
This code will help you identify your engine,
specifications, and replacement parts.
Service Parts Identification Label
You'll find this label inside the trunk on the side trim
near the power antenna. It's very helpful
if you ever
need
to order parts. On this label is:
your VIN,
0 the model designation,
0 paint information, and
0 a list of all production options and special
equipment.
Be sure that this label is not removed from the vehicle.
6-51
ProCarManuals.com
Page 285 of 372

The third fuse panel is located on the left side of the
instrument panel.
To open it, simply pull on the latch
and the door will open.
You’ll find
a fuse puller clipped to the inside of the
cover. Place the wide end of the fuse puller over the
plastic end
of the fuse. Squeeze the ends over the fuse
and pull
it out. To close the fuse door, press the door
closed and
it will latch. Two
spare fuses are located below the fuse puller. You’ll
also find spare fuses
in the slots labeled “Spare” on the
following charts.
Look at the silver-colored band inside the fuse. If the
band is broken or melted, replace the fuse. Be sure you
replace a bad fuse with a new one of the correct amp
rating.
6-55
ProCarManuals.com
Page 287 of 372

r.
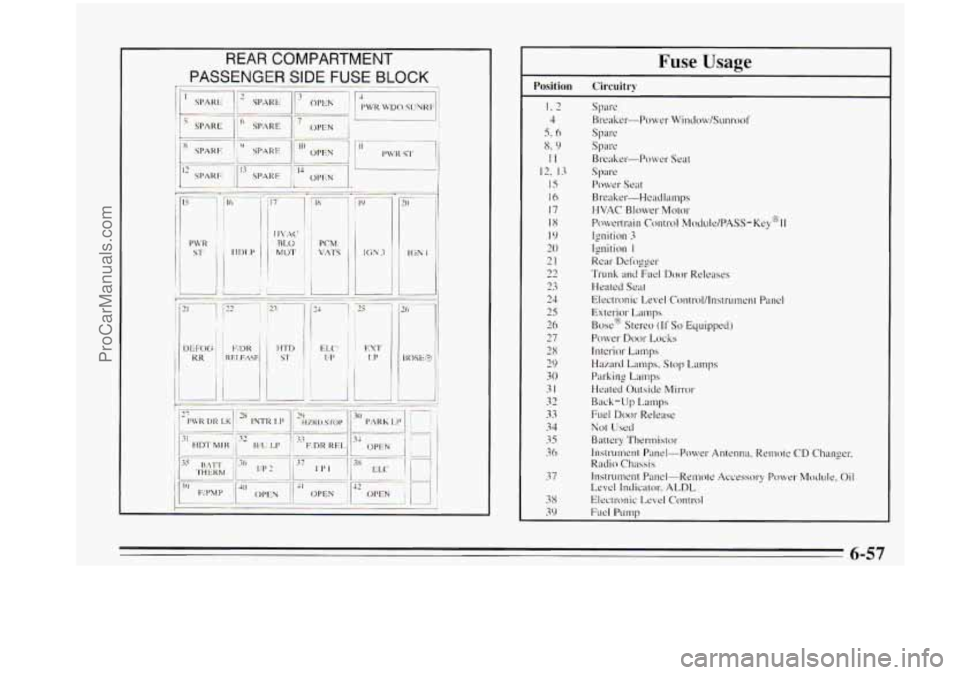
Fuse Usage
Position Circuitry
I. 2
4
5. 6
x. 9
II
12, 13
15
16
17
18
I9
20
21
22
23
24
25
26
27
28
29
30
31
32
33
34
35
36
37
38
39
Spare
Breaker-Power Window/Sunrool'
Spare
Spre
Breaker-Power Seat
spa re
Power Seat
Breaker.-Headlamps
HVAC Blower Mo~or
Ignition 3
Ignition I
Rear Defogger
Trunk and FLKI Door Releases
Heated Seat
Electronic Level Control/lnstrument Panel
Exterior Lamps
Box@ Stereo
(If So Equipped)
Power Door Locks
Interior Lamp
Hazard Lamps. Stop Lamps
Parking
Lamps
Heated Outside h4irror
Back-Up Lamps
Fuel
Door Release
Not Used
Battery Thertmislor
Instrument Panel-Power Antenna, Remote CD Changer.
Rndio
Chassis
Instrument Panel-Remote Accessory Power Module. Oil
Level Indicator, ALDL
Electronic Level Control
Fuel Pump
Powertrain
control MOCIUI~/PASS-K~~@II
6-57
ProCarManuals.com