wheel OLDSMOBILE AURORA 1995 Service Manual
[x] Cancel search | Manufacturer: OLDSMOBILE, Model Year: 1995, Model line: AURORA, Model: OLDSMOBILE AURORA 1995Pages: 372, PDF Size: 19.14 MB
Page 237 of 372

Checking Things Under the Hood
The following sections tell you how to check fluids,
lubricants and important parts underhood.
Hood Release
v-
To open the hood. first
pull the hood release
handle inside the vehicle, located
to the
left of the steering
wheel under
the
instrument panel. Then
go to the front
of the vehicle and pull up on the
underhood release.
Lift the
hood.
6-7
ProCarManuals.com
Page 255 of 372

Brake Wear
Your Aurora has four-wheel disc brakes.
Disc brake pads have built-in wear indicators that make
a high-pitched warning sound when the brake pads are
worn and new pads are needed. The sound may come
and
go or be heard all the time your vehicle is moving
(except when
you are pushing on the brake pedal
firmly).
I NOTICE:
Continuing to drive with worn-out brake pads
could result in costly brake repair.
Some driving conditions or climates may cause a brake
squeal when the brakes are first applied or lightly
applied. This does not mean something is wrong
with
your brakes.
Brake linings should always
be replaced as complete
axle sets.
Brake Pedal Travel
See your retailer if the brake pedal does not return to
normal height, or
if there is a rapid increase in pedal
travel. This could be
a sign of brake trouble.
Brake Adjustment
Every time YOLI apply the brakes, with or without the
vehicle moving, your brakes adjust for wear.
6-25
ProCarManuals.com
Page 266 of 372

NOTICE: (Continued)
If your tires have
too much air (overinflation),
you can get:
Unusual wear
0 Bad handling
0 Rough ride
0 Needless damage from road hazards.
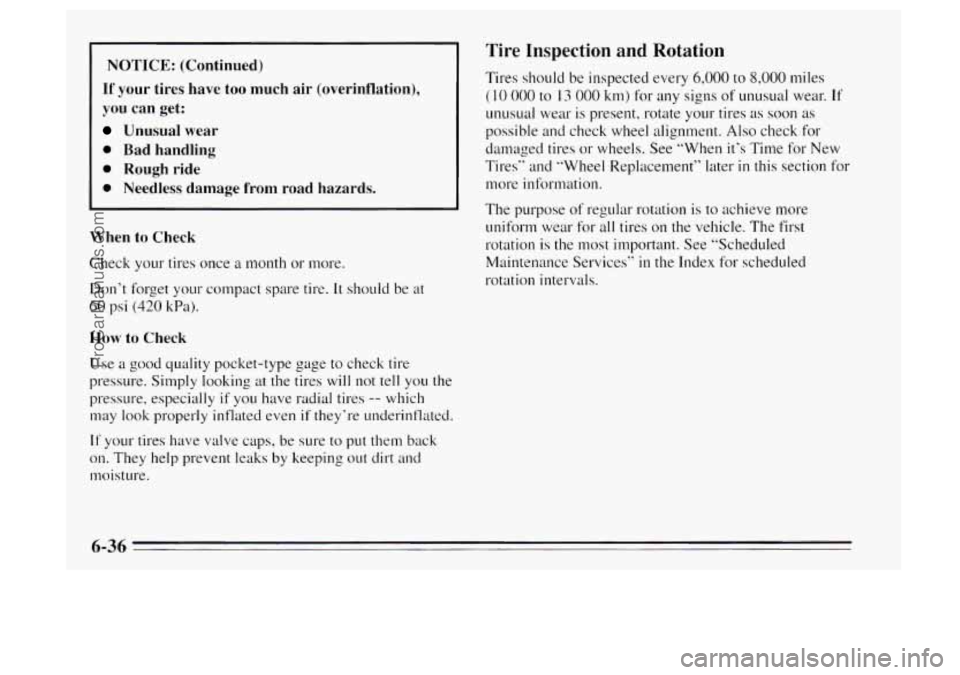
When to Check
Check your tires once a month or more,
Don’t forget your compact spare tire.
It should be at
60 psi (420 kPa).
Use a good quality pocket-type gage to check tire
pressure. Simply looking
at the tires will not tell you the
pressure, especially
if you have radial tires -- which
may look properly inflated even
if they’re underinflated.
If your tires have valve caps, be sure to put them back
on. They help prevent leaks
by keeping out dirt and
moisture.
Tire Inspection and Rotation
Tires should be inspected every 6,000 to 8,000 miles
( 10 000 to 13 000 km) for any signs of unusual wear. If
unusual wear is present, rotate your tires as soon as
possible and check wheel alignment.
Also check for
damaged tires or wheels. See “When it’s Time for New
Tires” and “Wheel Replacement” later
in this section for
more information.
The purpose of regular rotation is
to achieve more
uniform wear for all tires on the vehicle. The first
rotation is the most important. See “Scheduled
Maintenance Services’’
in the Index for scheduled
rotation intervals.
6-36
ProCarManuals.com
Page 267 of 372

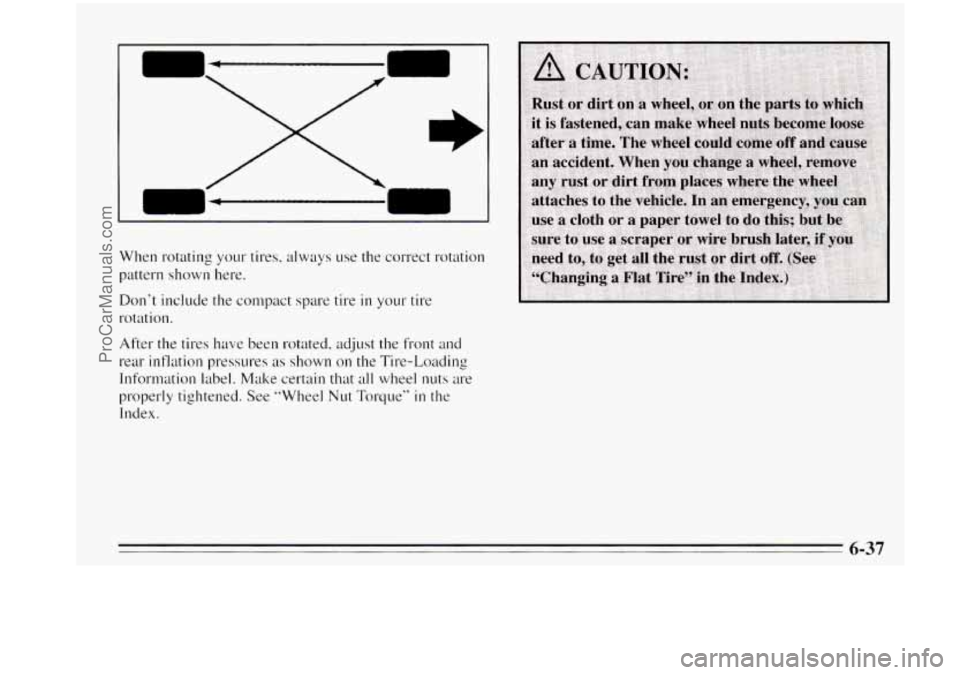
When rotating your tires, always use the correct rotation
pattern shown here.
Don't include the conlpact spare tire
in your tire
rotation.
After the tires have been rotated, adjust the front and
rear inflation pressures
as shown on the Tire-Loading
Information label. Make certain that all wheel nuts are
properly tightened. See "Wheel
Nut Torque" in the
Index.
ProCarManuals.com
Page 270 of 372

Temperature - A, B, C
The temperature grades are A (the highest), B, and C,
representing the tire’s resistance to the generation of
heat and
its ability to dissipate heat when tested under
controlled conditions on
a specified indoor laboratory
test wheel. Sustained high temperature can cause the
material
of the tire to degenerate and reduce tire life, and
excessive temperature can lead to sudden tire failure.
The grade
C corresponds to a level of performance
which all passenger car tires must meet under the
Federal Motor Vehicle Safety Standard
No. 109. Grades
B and A represent higher levels of performance on the
laboratory test wheel than
the minimum required by law.
Warning: The temperature grade
for this tire is
established for a tire that is properly inflated and not
overloaded. Excessive speed, underinflation, or
excessive loading, either separately or in combination,
can cause heat buildup and possible tire failure.
These grades are molded
on the sidewalls of passenger
car tires. While the tires available
as standard
or optional
equipment on General Motors vehicles may vary with
respect to these grades,
all such tires meet General
Motors performance standards and have been approved
for use on General Motors vehicles. All passenger type
(P Metric) tires must conform to Federal safety
requirements
in addition to these grades.
Wheel Alignment and Tire Balance
The wheels on your vehicle were aligned and balanced
carefully at
the factory to give you the longest tire life
and best overall performance.
In most cases, you will not need to have your wheels
aligned again. However, if you notice unusual tire wear
or your vehicle pulling one way or the
other, the
alignment may need to be reset.
If you notice your
vehicle vibrating when driving on
a smooth road, your
wheels may need
to be rebalanced.
ProCarManuals.com
Page 271 of 372

Wheel Replacement
Replace any wheel that is bent, cracked, or badly rusted
or corroded. If wheel nuts keep coming loose, the wheel,
wheel bolts, and wheel nuts should be replaced.
If the
wheel leaks air, replace it (except some aluminum
wheels, which can sometimes
be repaired). See your
Aurora retailer if any
of these conditions exist.
Your retailer will know the kind
of wheel you need.
Each new wheel should have the same load carrying
capacity, diameter, width, offset, and be mounted the
same way as the one it replaces.
If you need
to replace any of your wheels, wheel bolts,
or wheel nuts, replace them only with new
GM original
equipment parts. This way, you will be sure to have the
right wheel, wheel bolts, and wheel nuts for your Aurora
model.
I NOTICE:
The wrong wheel can also cause problems with
bearing life, brake cooling,
speedometer/odometer calibration, headlamp aim, bumper height, vehicle ground clearance,
and tire
or tire chain clearance to the body and
chassis.
6-41
ProCarManuals.com
Page 272 of 372

Tire Chains
NOTICE:
Use tire chains only where legal and only when
you must. Use only
SAE Class “S” type chains
that are the proper size for your tires. Install
them on the front tires and tighten them as
tightly as possible with the ends securely
fastened. Drive slowly and follow the chain
manufacturer’s instructions.
If you can hear the
chains contacting your vehicle, stop and retighten
them.
If the contact continues, slow down until it
stops. Driving too fast or spinning the wheels
with chains on will damage your vehicle.
ProCarManuals.com
Page 278 of 372

Finish Care
Occasional waxing or mild polishing of your Aurora by
hand may be necessary
to remove residue from the paint
finish.
You can get GM approved cleaning products
from your retailer. (See “Appearance Care and
Materials’’ in the Index.)
Your Aurora has
a “basecoat/clearcoat)’ paint finish. The
clearcoat gives more depth and gloss to the colored
basecoat. Always use waxes and polishes that are
non-abrasive and made for a basecoatklearcoat paint
finish.
1 NOTICE:
Machine compounding or aggressive polishing on
a basecoatklearcoat paint finish may dull the
finish or leave swirl marks.
Foreign materials such as calcium chloride and other
salts, ice melting agents, road oil and tar, tree sap, bird
droppings, chemicals from industrial chimneys, etc.
can
damage your vehicle’s finish if they remain on painted
surfaces.
Wash the vehicle as soon as possible. If
necessary, use non-abrasive cleaners that are marked
safe for painted surfaces to remove foreign matter.
Exterior painted surfaces are subject
to aging, weather
and chemical fallout that can take their toll over
a period
of years. You can help to keep the paint finish looking
new by keeping your Aurora garaged or covered
whenever possible.
Aluminum Wheels
Your aluminum wheels have a protective coating similar
to the painted surface
of your vehicle. Don’t use strong
soaps, chemicals, chrome polish, abrasive cleaners or
abrasive cleaning brushes on them because you could
damage this coating. After rinsing thoroughly, a wax
may be applied.
I NOTICE:
Don’t use an automatic vehicle wash that has
hard silicon carbide cleaning brushes. These
brushes can take the protective coating
off your
aluminum wheels.
ProCarManuals.com
Page 290 of 372

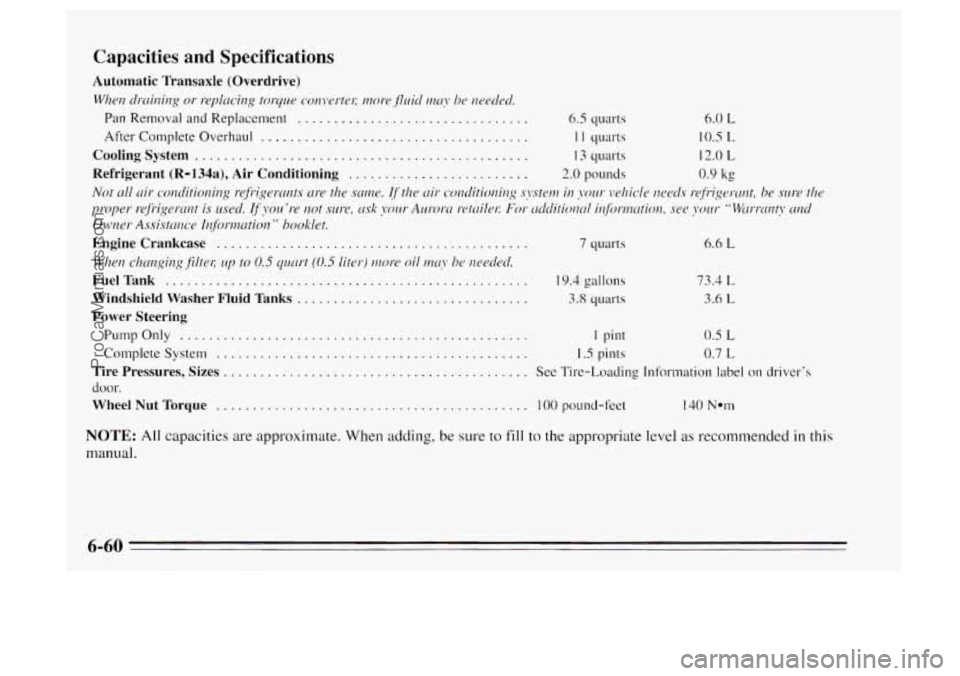
Capacities and Specifications
Automatic Transaxle (Overdrive)
Wlwn cllvrinirlg or seplcrcing tol-q~te convertel; more jlllicl n~tr~‘ bo rwederl.
Pan Removal and Replacement ................................ 6.5 quarts 6.0 L
After Complete Overhaul ..................................... I 1 quarts 10.5 L
Coolingsystem .............................................. 13 quarts 12.0 L
Refrigerant (R=134a), Air Conditioning ......................... 2.0 pounds 0.9 kg
Not trll uir conditionirlg r.efi.igel-crnts are the smw. If the nir conditiorrillg sj-steul in ~olrr vehicle Ileocls wfi-igesmt, he s1r1-e tho
proper r.cfi-igercult is used. If you ’re not ~111-e. trsk yolrr Ausoln t-etllilel: For c-tdclitionrrl i~~/i~mt~tion, .we jwrr Wirrrtrnt?* trrd
Owrwr Assistmcp Ir4fC)rmution” hooklet.
Enginecrankcase ........................................... 7 c]llasts 6.6 L
When chcmgir~g~fi’ltet; up to 0.5 qlrcu-t (0.5 liter) more oil mry be t1cecltd
FuelTank .................................................. 19.4 gallons 73.4 L
Windshield Washer Fluid Tanks ................................ 3.8 quarts 3.6 L
Power Steering
PumpOnly ................................................ 1 pint 0.5 L
Complete System ........................................... 1.5 pints 0.7 L
Tire Pressures, Sizes .......................................... See Tire-Loading Information label on driver’s
door.
Wheel Nut Torque ........................................... 100 pound-feet 140 Nom
NOTE: All capacities are approximate. When adding, be sure to fill to the appropriate level as recommended in this
manual.
6-60
ProCarManuals.com
Page 332 of 372

Part C: Periodic Maintenance
Inspections
Listed below are inspections and services which should
be performed at least twice
a year (for instance, each
spring and fall). You should let your
GM retailer’s
service department or other qualified service center do
these jobs. Make
SLI~~ any necessary repairs are
completed
at once.
Restraint Systems
Now and then, make sure all your belts, buckles, latch
plates, retractors, anchorages and reminder systems are working properly. Look for any loose parts or damage.
If you see anything that might keep a restraint system
from doing its job, have
it repaired.
Steering, Suspension and Front-
Wheel-Drive Axle Boot and Seal Inspection
Inspect the front and rear suspension and steering
system for damaged, loose or missing parts,
signs of
wear, or lack of lubrication. Inspect the power steering
lines and hoses for proper hookup, binding, leaks,
cracks, chafing, etc. Clean and then inspect the drive
axle boot seals for damage, tears or leakage. Replace
seals
if necessary.
Exhaust System Inspection
Inspect the complete exhaust system. Inspect the body
near the exhaust system.
Look for broken, damaged,
missing or out-of-position parts
as well as open seams,
holes, loose connections,
or other conditions which
could cause a heat build-up in the floor pan or could let
exhaust fumes into the vehicle. See “Engine Exhaust”
in
the Index.
Throttle Linkage Inspection
Inspect the throttle linkage for interference or binding,
and for damaged or missing parts. Replace parts as
needed. Accelerator and cruise control cables should
not
be lubricated.
Brake System Inspection
Inspect the complete system. Inspect brake lines and
hoses for proper hookup, binding, leaks, cracks, chafing,
etc. Inspect disc brake pads
for wear and rotors for
surface condition. Inspect other brake parts, including
calipers, parking brake, etc.
You may need to have your
brakes inspected more often
if your driving habits or
conditions result
in frequent braking.
7-40
ProCarManuals.com