wheel OLDSMOBILE AURORA 1995 Owner's Guide
[x] Cancel search | Manufacturer: OLDSMOBILE, Model Year: 1995, Model line: AURORA, Model: OLDSMOBILE AURORA 1995Pages: 372, PDF Size: 19.14 MB
Page 211 of 372

NOTICE:
Towing a vehicle over rough surfaces could
damage
a vehicle. Damage can occur from vehicle
to ground or vehicle to wheel-lift equipment.
To
help avoid damage, install a towing dolly and
raise the vehicle until adequate clearance is
obtained between the ground and/or wheel-lift
equipment.
Do not attach winch cables or J-hooks to
suspension components when using car carrier
equipment.
Always use T-hooks inserted in the
T-hook slots.
2. Attach a separate safety
chain wound the
outboard end
of each
control arln.
Towing from the Rear-Vehicle Hook up
Before hooking up to a tow truck, be sure to read all the
information under "Towing Your Vehicle" earlier
in this
section.
I. Attach T-hook chains on both sides in the slotted
holes
in the floor pan support rails .just ahead of the
rear wheels.
5-11
ProCarManuals.com
Page 221 of 372

If a Tire Goes Flat
It’s unusual for a tire to “blow out” while you’re driving.
especially
if you maintain your tires properly. If air goes
out of a tire, it‘s much more likely to leak out slowly.
But
if you should ever have a “blowout,” here are a few
tips about what to expect and what to do:
If a front tire fdils, the flat tire will create a drag that
pulls
the vehicle toward that side. Take your foot off the
accelerator pedal and grip the steering wheel firmly.
Steer to maintain lane position, then gently brake to a
stop well out
of the traffic lane.
A rear blowout, particularly on a curve, acts much like a
skid and may require the same correction you’d use in a
skid. In any rear blowout, remove your foot from the
accelerator pedal. Get the vehicle under control by
steering the way you want the vehicle to go.
It may be
very bumpy and noisy, but you can still steer. Gently
brake to a stop, well off the road
if possible.
If a tire goes flat, the next part shows how to use your
jacking equipment to change
a flat tire safely.
Changing a Flat Tire
If a tire goes flat, avoid further tire and wheel damage
by driving slowly to a level place. Turn on your hazard
warning flashers.
5-21
ProCarManuals.com
Page 223 of 372

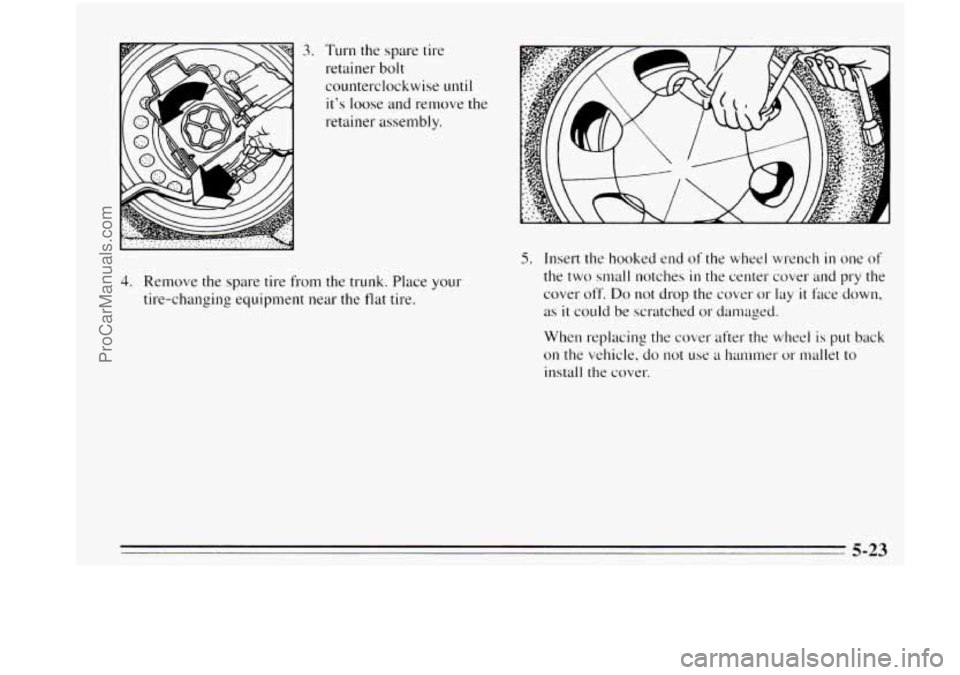
3. Turn the spare tire
retainer bolt
counterclockwise
until
it’s loose and remove the
retainer assembly.
4. Remove the spare tire from the trunk. Place your
tire-changing equipment near the flat tire.
5. Insert the hooked end of the wlleel wrench in one of
the two small notches
in the center cover and pry the
cover off.
Do not drop the cover or lay it face down,
as
it could be scratched or damaged.
When replacing the cover after the wheel is
put back
on the vehicle, do not use a han~mer or mallet to
install the cover.
5-23
ProCarManuals.com
Page 224 of 372

-4
A. P
4. Use the wheel wrench to loosen the wheel nuts. but
don't remove them.
r
7. Turn the end of the jack
clockwise
by hand to
raise the jack head
a few
inches.
8. Near each wheel well is a notch on the frame to
position the jack head. The front notch
is I 1 inches
(28 cm) back from the front wheel well. The rear
notch
is 7.5 inches (1 9 cm) forward from the rear
wheel well. You'll find the word
JACK and an arrow
stamped into the plastic near each notch.
5-24
ProCarManuals.com
Page 225 of 372

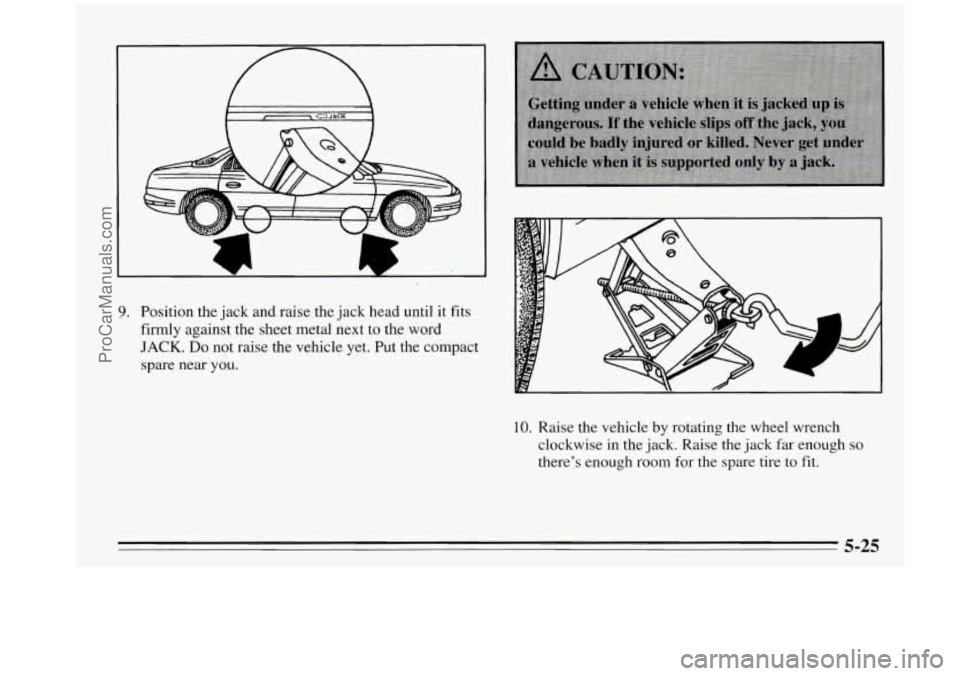
9. Position the jack and raise the jack head until it fits
firmly against the sheet metal next to the word
JACK. Do not raise the vehicle yet. Put the compact
spare near
you.
10. Raise the vehicle by rotating the wheel wrench
clockwise in the jack. Raise the jack far enough
so
there’s enough room for the spare tire to fit.
ProCarManuals.com
Page 226 of 372

I NOTICE:
Raising your vehicle with the jack improperly
positioned will damage the vehicle or may allow
the vehicle to fall off the jack. Be sure to fit the
jack lift head into the proper location before
raising your vehicle.
11. Remove all the wheel nuts and take off the flat tire.
/- 7--.. 12. Remove any rust or
dirt
from the wheel
bolts, mounting
surfaces and spare
wheel. Place the
spare on the wheel
mounting surface.
5-26
ProCarManuals.com
Page 227 of 372

13. Replace the
wheel
nuts with the
rounded end of the
nuts toward the
wheel. Tighten
each nut by hand
until the wheel is
held against the
hub.
14. Lower the vehicle by rotating the wheel wrench
counterclockwise on the jack. Lower the jack
completely. 15. In
a crisscross sequence,
tighten the wheel nuts
firmly.
5-27
ProCarManuals.com
Page 228 of 372

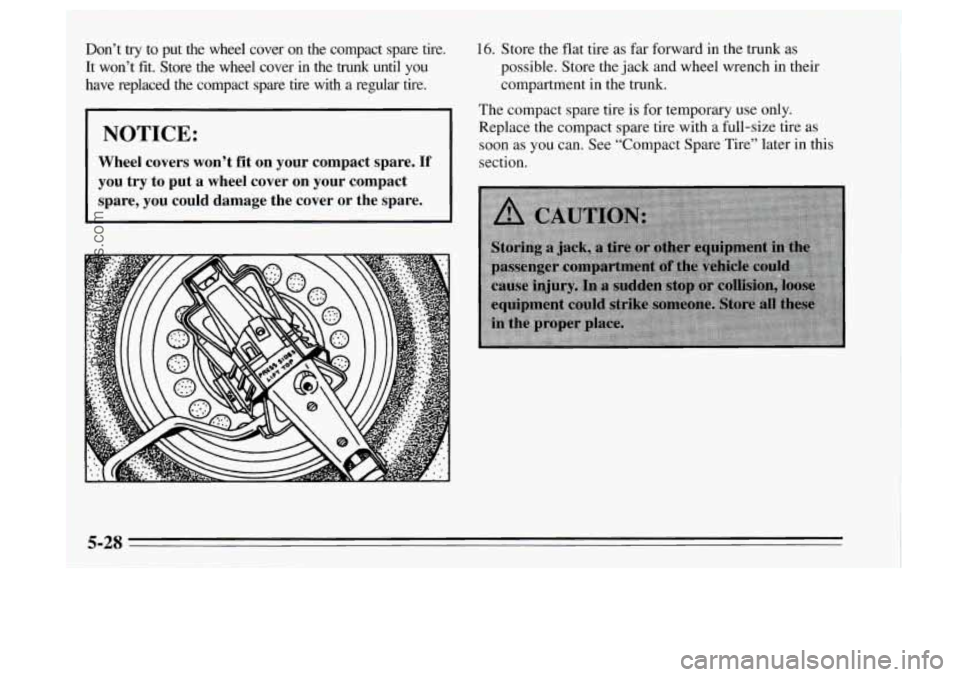
Don’t try to put the wheel cover on the compact spare tire.
It won’t fit. Store the wheel cover
in the trunk until you
have replaced the compact spare tire with a regular tire.
NOTICE:
Wheel covers won’t fit on your compact spare. If
you try to put a wheel cover on your compact
spare, you could damage the cover or the
1 spare.
16. Store the flat tire as far forward in the trunk as
possible. Store the jack and wheel wrench in their
compartment in the trunk.
The compact spare tire is for temporary use only.
Replace the compact spare tire with a full-size tire as
soon as you can. See “Compact Spare Tire’’ later in this
section.
5-28
ProCarManuals.com
Page 229 of 372

Compact Spare Tire
Although the compact spare was fully inflated when
your vehicle
was new, it can lose air after a time. Check
the inflation pressure regularly.
It should be 60 psi
(420 kPa). After installing the compact spare on your
vehicle, you should stop
as soon as possible and make
sure your spare tire is correctly inflated. The compact
spare is made
to perform well at posted speed limits for
distances up to
3,000 miles (5 000 km), so you can
finish your trip and have your full-size tire repaired or
replaced where you want. Of course, it’s best
to replace
your spare with
a full-size tire as soon as you can. Your
spare will last longer and be in good shape in case you
need
it again.
NOTICE:
Don’t take your compact spare through an
automatic car wash with guide rails. The
compact spare can get caught on the rails. That
can damage the tire and wheel, and maybe other
parts
of your vehicle. Don‘t
use your compact spare
on some other vehicle.
And don’t mix your compact spare or wheel
with other
wheels or tires. They won’t fit. Keep your spare and its
wheel together.
I NOTICE:
Tire chains won’t fit your compact spare. Using
them will damage your vehicle and destroy the
chains too. Don’t use tire chains on your compact
spare.
5-29
ProCarManuals.com
Page 230 of 372

If You’re Stuck: In Sand, Mud, Ice or
Snow I NOTICE:
Spinning your wheels can destroy parts of your
vehicle as well as the tires. If you spin the wheels
too fast while shifting your transaxle back and
forth, you can destroy your transaxle. What you don’t want to do when your vehicle is stuck is
to spin your wheels too fdst. The method known
as
“rocking” can help you get out when you’re stuck, but
you must use caution.
For information about using tire chains on your vehicle,
see “Tire Chains’’
in the Index.
Rocking Your Vehicle to Get It Out:
First, turn your steering wheel left and right. That will
clear the area around your front wheels. You should turn
your traction control system
off. (See ”Traction Control
System”
in the Index.) Then shift back and forth
between REVERSE
(R) and a forward gear, spinning the
wheels
as little as possible. Release the accelerator pedal
while you shift, and press lightly
on the accelerator
pedal when the transaxle
is in gear. If that doesn’t get
you out after
a few tries, you may need to be towed out.
If you do need to be towed out, see “Towing Your
Vehicle”
in the Index.
5-30
ProCarManuals.com