headlamp OLDSMOBILE AURORA 2003 User Guide
[x] Cancel search | Manufacturer: OLDSMOBILE, Model Year: 2003, Model line: AURORA, Model: OLDSMOBILE AURORA 2003Pages: 387, PDF Size: 18.05 MB
Page 132 of 387

Theater Dimming Parade Dimming
This feature allows for a three to five-second fade out of
the overhead courtesy lamps instead of immediate
turn
off after you remove the key from the ignition. They
will not fade
if the interior lamps are manually turned
on. The lower instrument panel courtesy lamps will not
fade out.
Delayed Exit Lighting
This feature will turn on the interior lamps for 25 seconds
after you remove the key from the ignition while the
doors are closed and it is night. This will give you time
to find the door handle or lock switches as you exit
the vehicle. When the
25 seconds are up, or if the key
is reinserted into the ignition, the lights will be turned
off by the theater dimming system. The lamps will turn
off immediately by pressing the lock symbol on the
remote keyless entry transmitter, by turning the ignition
key to ON or by activating the power door locks. To activate the instrument panel backlighting during the
day,
turn the exterior lamps control to the parking
lamp position. Dimming
of the instrument panel display
is not possible during daylight hours. The instrument
panel display can only be adjusted when the parking
lamps are on and it is dark outside.
Perimeter Lighting
When the unlock symbol on the remote keyless entry
transmitter is pressed, the DRL headlamps, parking
lamps and back-up lamps will turn on for approximately
25 seconds if it is dark enough outside.
This feature can be programmed to be on or
off for
each transmitter. You can also program how long the
exterior lamps will stay on after unlocking the vehicle.
You must program this feature through the
DIC. See DIC
Vehicle Personalization on page 3-52.
3-1 9
ProCarManuals.com
Page 134 of 387

Battery Load Management
The battery load management feature is designed to
monitor the vehicle’s electrical load and determine when
the battery is in a heavy discharge condition. During
times of high electrical loading, the engine may idle at a
higher rpm setting than normal to make sure the
battery charges. High electrical loads may occur when
several of the following are on: headlamps, high beams,
fog lamps, rear window defogger, blower fan, heated
seats and engine cooling fans.
If your vehicle’s battery remains in a heavy discharge
condition for a long period of time, the fan, rear
defogger, heated seats and heated mirrors will be
disabled and the DIC will display BATTERY SAVER
ACTIVE. This can happen either under long periods of
idling or low speed driving with high electrical loading,
or in the event of a charging system fault.
Accessory Power Outlets
With accessory power outlets you can plug in auxiliary
electrical equipment such as a cellular telephone or
CB radio.
The accessory power outlet
(1 2-volt) is located on the
front passenger’s side of the vehicle, near the floor
on the console.
Your vehicle may have a small cap that must be pulled
down to access the accessory power outlet.
If it
does, when not using the outlet be sure to cover it with
the protective cap.
The accessory power outlet will only operate when the
ignition is in
ON and for 10 minutes after turning the
ignition
off. If you would like the accessory power outlet
to operate regardless of ignition position, and for
extended periods of time, see “Engine Compartment
Fuse Block under
Fuses and Circuit Breakers on
page 5-92 or contact your dealer.
Noficer When using an accessory power outlet,
maximum eieciricai ioaa rnusi noi exceeci i5 amps.
Always turn off any electrical equipment when
not in use. Leaving electrical equipment on for
extended periods will drain your battery.
3-2 1
ProCarManuals.com
Page 163 of 387

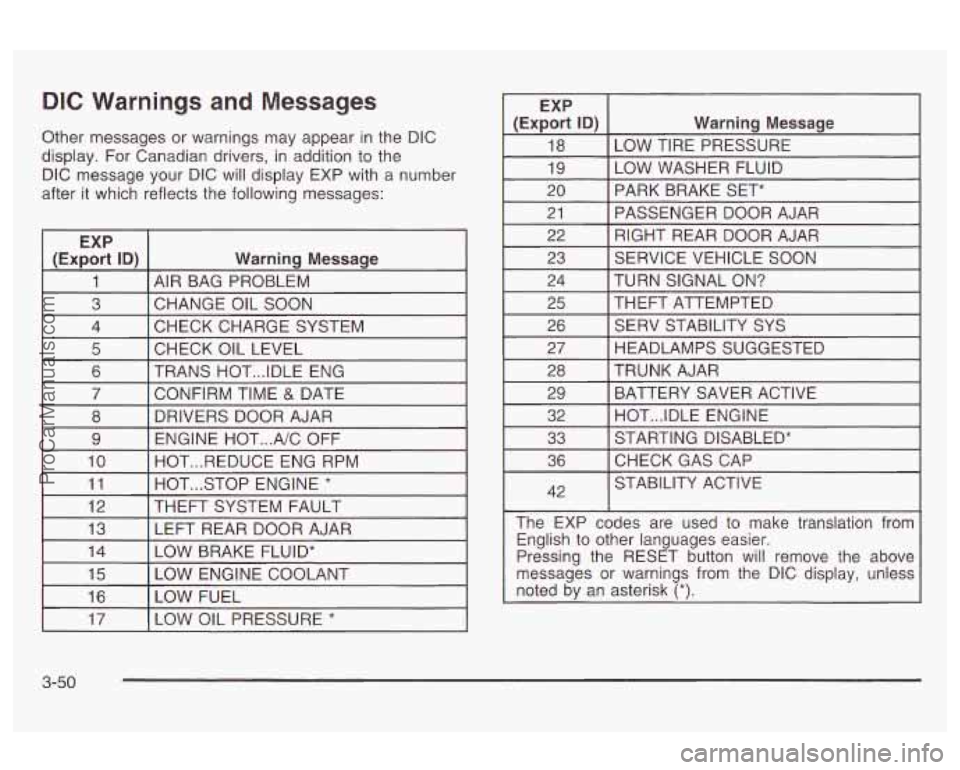
DIC Warnings and Messages
Other messages or warnings may appear in the DIC
display.
For Canadian drivers, in addition to the
DIC message your DIC will display EXP with
a number
after it which reflects the following messages:
EXP
(Export ID)
Warning Message
1 AIR BAG PROBLEM
3 CHECK CHARGE SYSTEM
4
CHANGE OIL SOON
I 5 I CHECK OIL LEVEL I I
6 I TRANS HOT ... IDLE ENG
I 7 I CONFIRM TIME & DATE I
8
ENGINE HOT
... A/C OFF
9 DRIVERS DOOR AJAR
10 HOT
... STOP ENGINE * 11 HOT
... REDUCE ENG RPM
I 12 I THEFT SYSTEM
FAULT I I
13 I LEFT REAR DOOR AJAR
I (ExE% ID) I Warning Message
18
LOW WASHER FLUID
19 LOW TIRE PRESSURE
20 PASSENGER DOOR AJAR
21 PARK BRAKE SET*
RIGHT REAR DOOR AJAR
22
23
TURN SIGNAL
ON? 24 SERVICE VEHICLE
SOON
I 25 I THEFT ATTEMPTED I I
26 [ SERV STABILITY SYS
I 27 I HEADLAMPS SUGGESTED I
28
BATTERY SAVER ACTIVE
29 TRUNK AJAR
32 STARTING DISABLED*
33 HOT
... IDLE ENGINE
36
42 CHECKGASCAP
STABILITY ACTIVE
The EXP codes are used to make translation from English to other languages easier.
Pressing the RESET button will remove the above
messages or warnings from the DIC display, unless
noted by an asterisk
(*).
I 17 I LOW OIL PRESSURE * I
3-50
ProCarManuals.com
Page 206 of 387

Adjust your inside rearview mirror to reduce the
glare from headlamps behind you.
Since you can’t see as well, you may need to slow
down and keep more space between you and
other vehicles.
Slow down, especially
on higher speed roads. Your
headlamps can light up only
so much road ahead.
In remote areas, watch for animals.
If you’re tired, pull off the road in a safe place
and rest.
No one can see as well at night as in the daytime. But
as we get older these differences increase.
A
50-year-old driver may require at least twice as much
light to see the same thing at night as a 20-year-old.
What you do in the daytime can also affect your
night vision. For example,
if you spend the day in bright
sunshine you are wise to wear sunglasses. Your
eyes will have less trouble adjusting to night. But
if
you’re driving, don’t wear sunglasses at night. They may
make a lot of things invisible.
cui uwwr I wrI yiare irur.11 i~lt=aiiiar-~lps, but they dku
You can be temporarily blinded by approaching
headlamps. It can take a second or two, or even several
seconds, for your eyes to readjust to the dark. When
you are faced with severe glare (as from a driver
who doesn’t lower the high beams, or a vehicle with
misaimed headlamps), slow down a little. Avoid staring
directly into the approaching headlamps.
Keep your windshield and all the glass on your vehicle
clean
- inside and out. Glare at night is made much
worse by dirt on the glass. Even the inside of the glass
can build up a film caused by dust. Dirty glass makes
lights dazzle and flash more than clean glass would,
making the pupils of your eyes contract repeatedly.
Remember that your headlamps light up far less of a
roadway when you are in a turn or curve. Keep
your eyes moving; that way, it’s easier to pick out dimly
lighted objects. Just as your headlamps should be
checked regularly for proper aim,
so should your eyes
be examined regularly. Some drivers suffer from
night blindness
- the inability to see in dim light - and
aren’t even aware
of it.
4-1 7
ProCarManuals.com
Page 220 of 387

C -..- .. car. .. -~,. ex-._.ust gases under your
vehicle. This can cause deadly CO (carbon
monoxide) gas to get inside.
CO could
overcome you and kill you. You can’t see
it or
smell
it, so you might not know it is in your
vehicle. Clear away snow from around the
base of your vehicle, especially any that
is
blocking your exhaust pipe. And check around
again from time to time to be sure snow
doesn’t collect there.
Open a window just
a little on the side of the
vehicle that’s away from the wind. This will
help keep CO out.
nun your engme only as lorig as yuu must. I tlls saves
fuel. When you run the engine, make it go a little
faster than just idle. That is, push the accelerator
slightly. This uses less fuel for the heat that you get and
it keeps the battery charged.
You will need a
well-charged battery to restart the vehicle, and possibly
for signaling later on with your headlamps. Let the
heater run for a while.
Then, shut the engine
off and close the window almost
all the way to preserve the heat. Start the engine
again and repeat this only when you feel really
uncomfortable from the cold. But do it as little as
possible. Preserve the fuel as long
as you can. To help
keep warm, you can get out of the vehicle and do
some fairly vigorous exercises every half hour or
so until
help comes.
4-3 1
ProCarManuals.com
Page 234 of 387

Section 5 Service and Appearance Care
Service ............................................................ 5-3
Doing Your Own Service Work
........................ -5-4
Adding Equipment to the Outside of Your
Vehicle
...................................................... 5-4
Fuel
................................................................ 5-5
Gasoline Octane
............................................ 5-5
Gasoline Specifications
.................................... 5-5
California Fuel
............................................... 5-6
Additives
......................................... ...... 5-6
Fuels in Foreign Countries
........................... 5-7
Filling Your Tank
........................................ 5-7
Filling a Portable Fuel Container
..... . 5-11
the Hood
.................................................... 5-12
Hood Release
.............................................. 5-13
Engine Compartment Overview
....................... 5-14
Engine Oil
................................................... 5-15
Engine Air Cleaner/Filter
................................ 5-21
P,L!tSrn2.tlC Tr2!ns2x!n !=!!lid ............................. .- E;-33 --
Engine Coolant ............................................. 5-24
Coolant Surge Tank Pressure Cap
.................. 5-28
Engine Overheating
....................................... 5-28
Cooling System
............................................ 5-31
.W indshieid .Washer Fiuid 5-36
Checking Things Under
Power Steering Fluid
..................................... 5-37 ~ ................................
Brakes ........................................................ 5.39
Battery
........................................................ 5.42
Jump Starting
............................................... 5-44
Headlamp Aiming
.............................. ...... 5-50
Bulb Replacement ......................................... -5-54
Halogen Bulbs
............................................. -5-54
Headlamps
................................................. -5-55
Front Turn Signal and Parking Lamps
.......... 5-57
Taillamps, Turn Signal, Stoplamps and
Back-up Lamps
..................................... 5-58
Replacement Bulbs
....................................... 5-58
Windshield Wiper Blade Replacement
.............. 5-59
Tires
.............................................................. 5-60
Inflation
-- Tire Pressure ................................ 5-60
Check Tire Pressure System
.......................... 5-62
Tire Inspection and Rotation
........................... 5-63
When It Is Time for New Tires
....................... 5-65
Buying New Tires
......................................... 5-66
UIIIIUIIII I Ilt: Uudllly uldullly d-UI
Wheel Alignment and Tire Balance .................. 5-68
Wheel Replacement
...................................... 5-68
Tire Chains
................................................. -5-70
If a Tire Goes Flat ........................................ 5-70
Changing a Flat Tire
..................................... 5-71
Compact Spare Tire
5-81
I I.-:+- T. n . ._I.&. . n.-- -I:__ _. re7 ..........................
- ......................................
5- 1
ProCarManuals.com
Page 235 of 387

Section 5 Service and Appearance Care
Appearance Care ......................................
Cleaning the Inside of Your Vehicle ...............
Weatherstrips .............................................
Cleaning the Outside of Your Vehicle ............
Sheet Metal Damage ...................................
Finish Damage ...........................................
Underbody Maintenance ..............................
Chemical Paint Spotting ...............................
GM Vehicle Care/Appearance Materials .........
Care of Safety Belts ....................................
-5-82
. 5.82
. 5.84
. 5.84
. 5.85
. 5.87
. 5.87
. 5.87
-5-87
. 5.88
Vehicle Identification ...................................... 5.90
Vehicle Identification Number (VIN)
................. 5-90
Service Parts Identification Label
.................... 5-90
Electrical System
........................................... 5-91
Add-on Electrical Equipment
......................... 5-91
Windshield Wiper Fuses
................................ 5-91
Fuses and Circuit Breakers
........................... 5-92
Removing the Rear Seat Cushion ................... 5-95
Capacities and Specifications
........................ 5-100
Normal Maintenance Replacement Parts ......... 5-101
Headlamp
Wiring
.......................................... 5-91
Power Windows and Other Power Options
....... 5-91
5-2
ProCarManuals.com
Page 283 of 387

Headlamp Aiming
Your vehicle has a visual optical headlamp aiming
system equipped with horizontal aim indicators. The aim
has been preset at the factory and should need no
further adjustment. This is true even though your
horizontal aim indicators may not fall exactly on the
“0 (zero) marks on their scales.
If your vehicle is damaged in an accident, the headlamp
aim may be affected. Aim adjustment to the low beam
may be necessary
if it is difficult to see lane markers (for
horizontal aim),
or if oncoming drivers flash their high
beams at you (for vertical aim).
If you believe your
headlamps need to be re-aimed, we recommend that
you take your vehicle to your dealer for service.
However, it is possible for you to re-aim your headlamps
as described
in the following procedure.
Notice: To make sure your headlamps are aimed
properly, read all the instructions before beginning.
Failure to follow these instructions could cause
damage to headlamp parts.
The vehicle should be properly prepared as follows:
The vehicle should be placed so the headlamps are
25 ft. (7.6 m) from a light colored wall or other flat
surface.
The vehicle must have all four tires on a perfectly
level surface which is level all the way to the wall
or other flat surface.
The vehicle should be placed so it is perpendicular
to the wall or other flat surface.
The vehicle should not have any snow, ice or mud
attached to it.
The vehicle should be fully assembled and all other
work stopped while headlamp aiming is being done.
full tank of fuel and one person or 160
Ibs (75 kg) on
the driver’s seat.
The vehicle should be normally loaded with a
Tires should be properly inflated.
5-50
ProCarManuals.com
Page 284 of 387

Headlamp aiming is done with the vehicle’s low beam Headlamp Horizontal Aiming
lamps. The high beam lamps will be correctly aimed
if the low beam lamps are aimed properly. Turn the horizontal aiming screw (A) until the
The headlamp aiming devices are under the hood near indicator
(B) is lined
up with zero.
the headlamps.
If you believe your headlamps need horizontal (lefvright)
adjustment, follow the horizontal aiming procedure.
If Once the horizontal aim is adjusted, then adjust the
you believe your headlamps need only vertical vertical aim.
jupiaownj aajustment, ioiiow oniy tne verticai aiming
procedure.
Adjustment screws can be turned with an
E8 Torx@
socket or T15 Torxa screwdriver.
5-51
ProCarManuals.com
Page 285 of 387

Headlamp Vertical Aiming
Notice: Horizontal aiming must be performed
before making any adjustments to the vertical aim.
Adjusting the vertical aim first will result in an
incorrect headlamp aim.
1. Find the aim dot on the lens of the low beam
lamps.
2. Measure the distance from the ground to the aim
dot on each lamp;
if left low beam, subtract two
inches. Record this distance.
3. At the wall or other flat surface, measure from the
ground upward the recorded distance from Step
2
and draw or tape a horizontal line the width of
the vehicle.
-- - /
I-
I
.-
4. Turn on the low-beam headlamps and place a
piece of cardboard or equivalent in front of the
headlamp not being aimed. This should allow only
the beam of light from the headlamp being
aimed to be seen on the flat surface.
Notice: Do not cover a headlamp to improve beam
cut-off when aiming. Covering a headlamp may
cause excessive heat build-up which may cause
damage to the headlamp.
5-52
ProCarManuals.com