lights OLDSMOBILE AURORA 2003 User Guide
[x] Cancel search | Manufacturer: OLDSMOBILE, Model Year: 2003, Model line: AURORA, Model: OLDSMOBILE AURORA 2003Pages: 387, PDF Size: 18.05 MB
Page 144 of 387

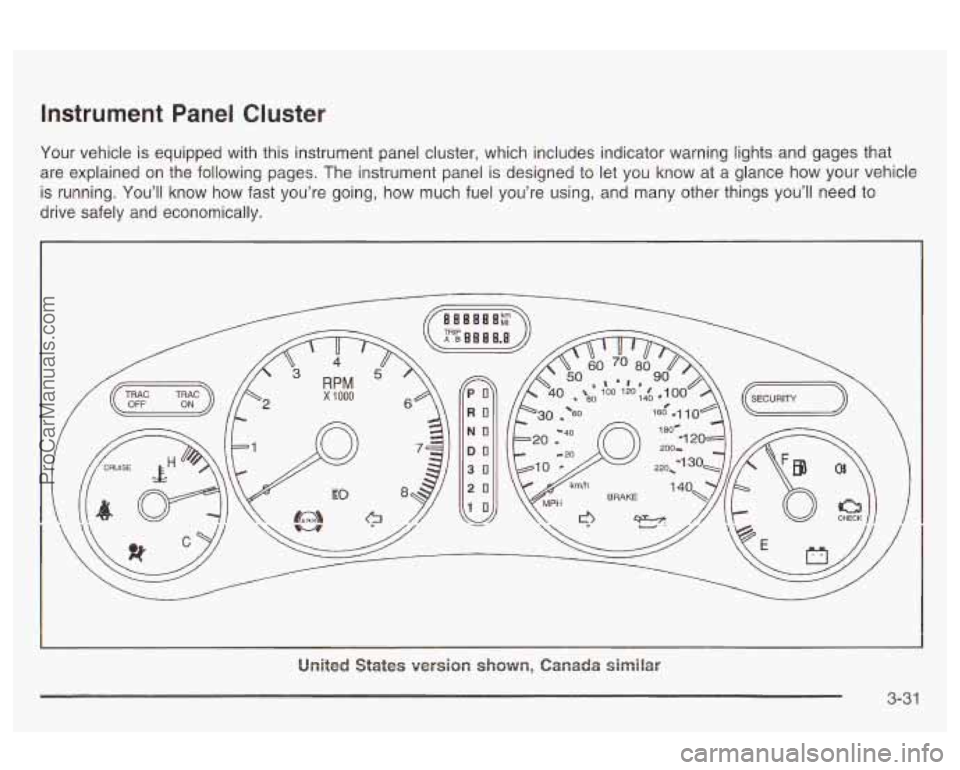
Instrument Panel Cluster
Your vehicle is equipped with this instrument panel cluster, which includes indicator warning lights and gages that
are explained on the following pages. The instrument panel is designed to let you know at a glance how your vehicle
is running. You’ll know how fast you’re going, how much fuel you’re using, and many other things you’ll need to
drive safely and economically.
PO
RO
NO
DO
30
20
10
United States version shown, Canada similar
3-3 1
ProCarManuals.com
Page 166 of 387

If you unlock the vehicle using the door key instead of
the transmitter, the personal choice settings will
correspond to the previous driver of the vehicle as
identified by the transmitter, the memory seat control or
the DIC.
If this happens and you were not the last
driver of the vehicle, press the correct driver number on
the door panel
for the memory seats, press the
unlock symbol
on the transmitter or select the
personalization programming mode and choose the
correct driver number.
After you have the correct driver number on the display
use the SELECT down arrow button to scroll through
the following messages and feature options:
e
e
DOORS LOCK IN GEAR - YES/NO
DOORS UNLOCK
- YES/NO
ALL DOORS IN PARK
- YES/NO
ALL DOORS AT KEY OFF
- YEWNO
DRIVERS DOOR IN PARK
- YES/NO
DRIVERS DOOR KEY
OFF - YES/NO
PASS WINDOW LOCKOUT
- YES/NO
KEY FOB FLASH
LIGHTS - YES/NO
KEY FOB CHIRP HORN
- YES/NO
DELAY LOCK OF DOORS - YES/NO
PERIMETER LIGHTS - YES/NO
EXT LIGHT TIMEOUT
- 5 to 30 Seconds
DISPLAY DRIVER ID
- YES/NO
KEY FOB MEMORY SEAT
- YES/NO
DRIVING POSITION
- YES
EXIT POSITION
- YES
TILT MIRROR REVERSE
- YES/NO
If you would like to exit the selection mode without
moving through each of the personal choice features,
simply press a different button
on the DIC or turn off the
ignition. The personal choices you made will still be
retained, even without passing through each of
the features. In order for your personal choices to save,
you must press the SELECT down arrow after making
your selections.
If you happen to move past a selection you would like
to make a personal choice for, press unlock on the
transmitter or press the appropriate driver number
on
return you to the beginning of the optional feature
programming mode.
A description of each feature programmable through the
DIC follows.
ii~e uuur parlei iur iile rllerllury seais. I 111s wiii TI. .
3-53
ProCarManuals.com
Page 169 of 387

Security Feedback
You can program the security feedback feature to
change
to the following modes:
Mode 1: No feedback when locking or unlocking the
vehicle.
Mode 2: Parking lamps and the DRL will flash twice
when unlocking the vehicle and flash once when locking
the vehicle.
Mode 3: Horn chirps when all doors are unlocked
(second unlock button press) and when locking
the vehicle.
Mode 4: Parking lamps and the DRL will flash twice
each time the button with the unlock symbol is pressed;
the horn chirps when all doors are unlocked. Parking
lamps and the exterior lamps flash once and the
horn chirps when locking the vehicle.
You can change these modes by different selections of
the following DIC displays:
KEY FOB LIGHTS FLASH - YES/NO
0 KEY FOB HORN CHIRP - YES/NO
Press the SELECT right arrow button
to toggle between
your choices and change the settings. Press the
SELECT down arrow button to store your changes in
memory and move on to the next selection. If you would
like to program your vehicle to Mode
1, do
the following:
1. Select NO for KEY FOB LIGHTS FLASH.
2. Select NO for KEY FOB HORN CHIRP.
If you would like to program your vehicle to Mode 2, do
the following:
1. Select YES for KEY FOB LIGHTS FLASH.
2. Select NO for KEY FOB HORN CHIRP.
If you would like to program your vehicle to Mode
3, do
the following:
1. Select NO for KEY FOB LIGHTS FLASH.
2. Select YES for KEY FOB HORN CHIRP.
If you would like to program your vehicle to Mode
4, do
the following:
1. Select YES for KEY FOB LIGHTS FLASH.
2. Select YES for KEY FOB HORN CHIRP.
For more information on this feature, see “Security
Feedback under
Remote Keyless Entry System
Operation on page
2-6.
3-56
ProCarManuals.com
Page 170 of 387

Delayed Locking
The delayed locking feature, which delays the actual
locking of the vehicle, can be made active or inactive
through the DIC. When DELAY LOCK OF DOORS
appears on the display, use the SELECT right arrow
button to toggle between YES and
NO. When you have
made your choice, press the SELECT down arrow
button to record your selection and move on to the next
choice.
For more information
on this feature, see Delayed
Locking on page
2- 1 1.
Perimeter Lighting
When the unlock symbol on the remote keyless entry
transmitter is pressed, the DRL, parking lamps and
back-up lamps will turn on
if it is dark enough outside.
You can control activation of this feature by choosing
YES or
NO when the PERIMETER LIGHTS choice
is displayed on the DIC. Make your choice by pressing
the SELECT right arrow button and record your
choice by presslng the
SELECT aown arrow bution.
You
will then be prompted to choose a TIMEOUT period. The EXT LIGHTS TIMEOUT feature can be changed to
the desired setting by
using the SELECT right arrow
button to toggle from
5 to 30 seconds. Each toggle will
increase the time by five seconds. Once the desired
timeout is displayed, press the SELECT down arrow to
record your choice and move on to the next personal
choice feature.
For more information on this feature, see “Perimeter
Lighting” under
lnterior Lamps on page 3-77.
Driver ID
This feature displays the driver ID, as identified by the
DIC.
If you choose YES when DISPLAY DRIVER
ID is shown on the DIC, the driver number will be
displayed every time the ignition is turned on. If
you choose
NO when DISPLAY DRIVER ID is shown
on the DIC, the driver number can be displayed by
pressing either a button on the remote keyless entry
transmitter or a memory seat button.
3-57
ProCarManuals.com
Page 206 of 387

Adjust your inside rearview mirror to reduce the
glare from headlamps behind you.
Since you can’t see as well, you may need to slow
down and keep more space between you and
other vehicles.
Slow down, especially
on higher speed roads. Your
headlamps can light up only
so much road ahead.
In remote areas, watch for animals.
If you’re tired, pull off the road in a safe place
and rest.
No one can see as well at night as in the daytime. But
as we get older these differences increase.
A
50-year-old driver may require at least twice as much
light to see the same thing at night as a 20-year-old.
What you do in the daytime can also affect your
night vision. For example,
if you spend the day in bright
sunshine you are wise to wear sunglasses. Your
eyes will have less trouble adjusting to night. But
if
you’re driving, don’t wear sunglasses at night. They may
make a lot of things invisible.
cui uwwr I wrI yiare irur.11 i~lt=aiiiar-~lps, but they dku
You can be temporarily blinded by approaching
headlamps. It can take a second or two, or even several
seconds, for your eyes to readjust to the dark. When
you are faced with severe glare (as from a driver
who doesn’t lower the high beams, or a vehicle with
misaimed headlamps), slow down a little. Avoid staring
directly into the approaching headlamps.
Keep your windshield and all the glass on your vehicle
clean
- inside and out. Glare at night is made much
worse by dirt on the glass. Even the inside of the glass
can build up a film caused by dust. Dirty glass makes
lights dazzle and flash more than clean glass would,
making the pupils of your eyes contract repeatedly.
Remember that your headlamps light up far less of a
roadway when you are in a turn or curve. Keep
your eyes moving; that way, it’s easier to pick out dimly
lighted objects. Just as your headlamps should be
checked regularly for proper aim,
so should your eyes
be examined regularly. Some drivers suffer from
night blindness
- the inability to see in dim light - and
aren’t even aware
of it.
4-1 7
ProCarManuals.com
Page 257 of 387

How to Add Fluid Engine Coolant
Refer to the Maintenance Schedule to determine what
kind of transaxle fluid to use. See
Part D:
Recommended Fluids and Lubricants on page 6-15.
If the fluid level is low, add only enough of the proper
fluid to bring the level into the cross-hatched area on the
dipstick.
1, Pull out the dipstick.
2. Using a long-neck funnel, add enough fluid at the
dipstick hole to bring it to the proper level.
It doesn’t take much fluid, generally less than one
pint
(0.5 L). Don’t overfill.
Notice: We recommend you use only fluid labeled
DEXRON@-Ill, because fluid with that label is
made especially for your automatic transaxle.
Damage caused by fluid other than DEXRON@-Ill is
not covered by your new vehicle warranty.
3. After adding fluid, recheck the fluid level as
described under “How to Check,” earlier in this
section. The
cooling system in your vehicle is filled with
DEX-COOL@ engine coolant. This coolant is designed
to remain in your vehicle for
5 years or 150,000 miles
(240
000 km), whichever occurs first, if you add
only extended life coolant.
The following explains your cooling system and how to
add coolant when it is
low. If you have a problem
with engine overheating, see
Engine Overheating on
page
5-28.
A 50/50 mixture of clean, drinkable water and
DEX-COOL@ coolant will:
Give freezing protection down to -34°F (-37°C).
Give boiling protection up to 265°F (129°C).
Protect against rust and corrosion.
Help keep the proper engine temperature.
Let the warning lights and gages work as they
should.
4. When the correct fluid level is obtained, push the
dipstick back in all the way.
5-24
ProCarManuals.com
Page 378 of 387

Trip Odometers .............................................. 3-32 Vehicle Personalization
Trunk
............................................................ 2-14 DIC ........................................................... 3-52
Trunk Lock Release
........................................ 2-15 Memory Seat and Mirrors ............................. 2-48
Trunk Release Lockout
.................................... 2-15 Vehicle Storage .............................................. 5-43
Turn and Lane-Change Signals
.......................... 3-6 Ventilation Adjustment ...................................... 3-27
Turn Signal/Multifunction Lever
........................... 3-6 Vinyl ............................................................. 5-83
Turn Signals When Towing a Trailer
.................. 4-41 Visors ........................................................... 2-18
U
Underbody Flushing Service ............................. 6-1 2
Understanding Radio Reception
........................ 3-74
Uniform Tire Quality Grading
............................ 5-67
United States
................................................... 7-4
Used Replacement Wheels
.............................. 5-69
Using HomeLink@
........................................... 2-44
Using RDS
.................................................... 3-62
v
Vehicle
Cnntrc\! ........................................................ 4-5
Damage Warnings ........................................... iv
Loading
...................................................... 4-34
Symbols
......................................................... iv
Number
(VIN) ............................................. 5-90
Service Parts Ideniification Label ................... 5-90
Vehicle Identification Warning
Lights. Gages and Indicators
................ 3-30
Warnings DIC Warnings and Messages
........................ 3-50
Hazard Warning Flashers
............................... 3-4
Safety and Symbols
......................................... III
Vehicle Damage .............................................. iv
Washing Your Vehicle
................................... 5-85
Other Warning
Devices
.................................. 3-5 ...
Weatherstrip Lubrication ..... .................... 6-10
Weight of the Trailer
......................... .... 4-38
Weight of the Trailer Tongue
............................. 4-38
What Kind of Engine Oil to Use
........................ 5-18
What to Do with Used Oil ................................ 5-20
What to Use .................................. 5-25, 5-37, 5-38
Wheels
Alignment and Tire Balance
.......................... 5-68
Replacement
............................................... 5-68
LVher; to Add Efigine Oil 1747 ..................................
15
ProCarManuals.com