lock OLDSMOBILE AURORA 2003 Workshop Manual
[x] Cancel search | Manufacturer: OLDSMOBILE, Model Year: 2003, Model line: AURORA, Model: OLDSMOBILE AURORA 2003Pages: 387, PDF Size: 18.05 MB
Page 142 of 387
A $&‘ v (Fan): Press the up or down arrow on the
fan button to override the automatic fan control and
increase or decrease the fan speed.
A TEMP v (Temperature): Press either arrow on
the TEMP button once to display your current
temperature setting in the digital display. Press the up
or down arrow again to provide
a warmer or cooler
temperature setting.
Climate Controls Personalization
If your vehicle is equipped with this feature, up to two
drivers are able to store and recall climate control
settings for the temperature, the fan speed and the
direction of the airflow.
Memory buttons
1 and 2 are located on the driver’s
door panel and correspond to the numbers
1 or 2 found
on the back of each remote keyless entry transmitter.
To store settings, do the following:
1. Select the desired temperature, fan speed and
airflow mode. If desired, a separate temperature
setting may also be selected for the front seat
passenger. For information on how to do this, see
Automatic Climate Control System on page 3-23.
2. Locate memory buttons 1 and 2 on the driver’s door
panel.
3. Press the memory button on the door panel that
corresponds to the number on the back
of the
transmitter you are programming, until you hear two
beeps. The beeps confirm that your selection has
been saved and can now be recalled. For more
information
on the memory feature, see Memory
Seat
and Mkrors on page 2-48.
Follow these steps each time you want to change the
stored settings.
To recall the climate control settings last stored on your
transmitter, press the unlock button on your remote
keyless entry transmitter and put the ignition in
ACC (Accessory) or
ON. The settings will be recalled.
3-29
ProCarManuals.com
Page 149 of 387
A PARK BRAKE SET message will be displayed on the
Driver Information Center (DIC) while the parking
brake is set and the vehicle is moving. The message
will not come on
if the transaxle is in PARK (P).
If the light comes on while you are driving, pull
off the
road and stop carefully. You may notice that the pedal is
harder
to push. Or, the pedal may go closer to the
floor. It may take longer
to stop. If the light is still on,
have the vehicle towed for service. See
Towing
Your Vehicle
on page 4-33.
Your brake system may not be working
properly
if the brake system warning light is
on. Driving with the brake system warning light
on can lead to an accident.
If the light is still
on after you’ve pulled
off the road and stopped
carefully, have the vehicle towed for service.
Anti-Lock Brake System Warning
Light
With the anti-lock brake
system, the light(s) will
come on when your engine is started and may stay
on for several seconds.
That’s normal.
If the light stays on, turn the ignition to
OFF. Or, if the
light comes on when you’re driving, stop as soon
as possible and turn the ignition
off. Then start the
engine again to reset the system.
If the light still stays
on, or comes on again while you’re driving, your vehicle
needs service.
If the regular brake system warning
light isn’t on, you still have brakes, but you don’t have
anti-lock brakes.
If the regular brake system warning
light is also on, you don’t have anti-lock brakes
and there’s a problem with your regular brakes. See
Brake System Warning Light on page 3-35 earlier in this
section.
The anti-lock brake system warning light will come on
briefly when you turn the ignition key to
ON. This is
normal.
If the light doesn’t come on then, have it fixed
so it will be ready to warn you if there is a problem.
3-36
ProCarManuals.com
Page 165 of 387
DIC Vehicle Personalization
The DIC can be used to program the following personal
choice features available with your vehicle:
Automatic Door Locks
Window Lock Out Security Feedback
Delayed Locking
Perimeter Lighting
Driver ID
Memory Seats
Outside Curb View Assist Mirror
To access the personalization menu, the vehicle must
be in PARK (P) with the ignition in ON and no warning
messages displayed on the DIC. You must then
press and hold both of the SELECT buttons for three
seconds. This will display the personalization menu.
The DIC display will show the following:
FEATURE PROGRAMMING
PRESS SELECT DOWN TO
SELECT MENU OPTIONS
PRESS SELECT RIGHT TO The next item
to be displayed is DRIVER
1 or
DRIVER
2. To change the driver number, press the
SELECT right arrow. The driver number that you select
should correspond with the number on the back of
your remote keyless entry transmitter. Once the correct
driver number has been selected, press the SELECT
down arrow to enter your choice and move on to
the next selection.
The DIC is used to program the personal choices
of two
drivers. The drivers are recognized as DRIVER
1 and
DRIVER
2. You will let the DIC and the vehicle
know which driver you are by using your remote keyless
entry transmitter or by pressing the appropriate
memory seat button located on the driver’s door or
choosing the driver with the DIC. Each remote keyless
entry transmitter was pre-programmed to belong to
DRIVER
1 or DRIVER 2. The personalization features
may be programmed differently for each driver.
When you press the unlock symbol on the transmitter,
the DIC will automatically change driver numbers
and the vehicle will recall the personal choice settings
that were last made to correspond to your transmitter,
including your radio and comfort control settings.
See
Climate Controls Personalization on page 3-29.
CHANGE SETTINGS
3-52
ProCarManuals.com
Page 166 of 387
If you unlock the vehicle using the door key instead of
the transmitter, the personal choice settings will
correspond to the previous driver of the vehicle as
identified by the transmitter, the memory seat control or
the DIC.
If this happens and you were not the last
driver of the vehicle, press the correct driver number on
the door panel
for the memory seats, press the
unlock symbol
on the transmitter or select the
personalization programming mode and choose the
correct driver number.
After you have the correct driver number on the display
use the SELECT down arrow button to scroll through
the following messages and feature options:
e
e
DOORS LOCK IN GEAR - YES/NO
DOORS UNLOCK
- YES/NO
ALL DOORS IN PARK
- YES/NO
ALL DOORS AT KEY OFF
- YEWNO
DRIVERS DOOR IN PARK
- YES/NO
DRIVERS DOOR KEY
OFF - YES/NO
PASS WINDOW LOCKOUT
- YES/NO
KEY FOB FLASH
LIGHTS - YES/NO
KEY FOB CHIRP HORN
- YES/NO
DELAY LOCK OF DOORS - YES/NO
PERIMETER LIGHTS - YES/NO
EXT LIGHT TIMEOUT
- 5 to 30 Seconds
DISPLAY DRIVER ID
- YES/NO
KEY FOB MEMORY SEAT
- YES/NO
DRIVING POSITION
- YES
EXIT POSITION
- YES
TILT MIRROR REVERSE
- YES/NO
If you would like to exit the selection mode without
moving through each of the personal choice features,
simply press a different button
on the DIC or turn off the
ignition. The personal choices you made will still be
retained, even without passing through each of
the features. In order for your personal choices to save,
you must press the SELECT down arrow after making
your selections.
If you happen to move past a selection you would like
to make a personal choice for, press unlock on the
transmitter or press the appropriate driver number
on
return you to the beginning of the optional feature
programming mode.
A description of each feature programmable through the
DIC follows.
ii~e uuur parlei iur iile rllerllury seais. I 111s wiii TI. .
3-53
ProCarManuals.com
Page 167 of 387
Automatic Door Locks ALL DOORS IN PARK - YES/NO
You can program the automatic door lock feature to
change to one of the following modes:
Mode
0: No automatic door lock or unlock.
Mode
1: All doors automatically lock when shifted out
of PARK (P).
No automatic door unlock.
Mode
2: All doors automatically lock when shifted out
of PARK (P). Only the driver’s door automatically
unlocks when shifted into PARK (P).
Mode
3: All doors automatically lock when shifted out
of PARK (P). All doors automatically unlock when shifted
into PARK (P).
Mode
4: All doors automatically lock when shifted out
of PARK (P). Only the driver’s door automatically
unlocks when the key is turned to OFF.
Mode
5: All doors automatically lock when shifted out
of PARK (P). All doors automatically unlock when
the key is turned to OFF.
You can change the mode your vehicle is in by different
selections of the following DIC displays:
DOORS LOCK IN GEAR - YES/NO
DOORS UNLOCK - YES/NO
ALL DOORS AT KEY OFF - YES/NO
DRIVERS DOOR IN PARK - YES/NO
DRIVERS DOOR KEY OFF - YES/NO
Press the SELECT right arrow button to toggle between
your choices and change the settings. Press the
SELECT down arrow button to store your changes in
memory and move on to the next selection.
If you would like to program your vehicle to Mode
0,
select NO for DOORS LOCK IN GEAR. Your door locks
will operate normally with no automatic feature.
If you would like to program your vehicle to Mode 1, do
the following:
1. Select YES for DOORS LOCK IN GEAR.
2. Select NO for DOORS UNLOCK.
If you would like to program your vehicle to Mode
2, do
the following:
1. Select YES for DOORS LOCK IN GEAR.
2. Select YES for DOORS UNLOCK
3. Select NO for ALL DOORS IN PARK.
4. Select NO for ALL DOORS AT KEY OFF.
5. Select YES for DRIVERS DOOR IN PARK.
3-54
ProCarManuals.com
Page 168 of 387
If you would like to program your vehicle to Mode 3, do
the following:
1. Select YES for DOORS LOCK IN GEAR.
2. Select YES for DOORS UNLOCK.
3. Select YES for ALL DOORS IN PARK.
If you would like to program your vehicle to Mode
4, do
the following:
1. Select YES for DOORS LOCK IN GEAR.
2. Select YES for DOORS UNLOCK.
3. Select NO for ALL DOORS IN PARK.
4. Select NO for ALL DOORS AT KEY OFF.
5. Select NO for DRIVERS DOOR IN PARK.
6. Select YES for DRIVERS DOOR KEY OFF.
If you would like to program your vehicle to Mode 5, do
the following:
1. Select YES for DOORS LOCK IN GEAR.
2. Select YES for DOORS UNLOCK.
3. Select NO for ALL DOORS IN PARK.
4. Select YES for ALL DOORS AT KEY OFF.
See Programmable Automatic Door Locks on page 2-12
for more information about this feature.
Window Lock Out
The number of passenger windows locked out by the
window LOCK switch can be programmed through
the DIC.
Press the SELECT right arrow button to toggle between
your choices and change the settings. Press the
SELECT down arrow button to store your changes in
memory and move on to the next selection.
If you select YES for PASS WINDOW LOCKOUT, all
three passenger window switches will be locked
out when the window LOCK switch
is on.
If you select NO for
PASS WINDOW LOCKOUT, only
the two rear passenger window switches will be
locked out when the window LOCK switch is on.
For more information on this feature, see “Window Lock
Out” under
Power Windows on page 2-18.
3-55
ProCarManuals.com
Page 169 of 387
Security Feedback
You can program the security feedback feature to
change
to the following modes:
Mode 1: No feedback when locking or unlocking the
vehicle.
Mode 2: Parking lamps and the DRL will flash twice
when unlocking the vehicle and flash once when locking
the vehicle.
Mode 3: Horn chirps when all doors are unlocked
(second unlock button press) and when locking
the vehicle.
Mode 4: Parking lamps and the DRL will flash twice
each time the button with the unlock symbol is pressed;
the horn chirps when all doors are unlocked. Parking
lamps and the exterior lamps flash once and the
horn chirps when locking the vehicle.
You can change these modes by different selections of
the following DIC displays:
KEY FOB LIGHTS FLASH - YES/NO
0 KEY FOB HORN CHIRP - YES/NO
Press the SELECT right arrow button
to toggle between
your choices and change the settings. Press the
SELECT down arrow button to store your changes in
memory and move on to the next selection. If you would
like to program your vehicle to Mode
1, do
the following:
1. Select NO for KEY FOB LIGHTS FLASH.
2. Select NO for KEY FOB HORN CHIRP.
If you would like to program your vehicle to Mode 2, do
the following:
1. Select YES for KEY FOB LIGHTS FLASH.
2. Select NO for KEY FOB HORN CHIRP.
If you would like to program your vehicle to Mode
3, do
the following:
1. Select NO for KEY FOB LIGHTS FLASH.
2. Select YES for KEY FOB HORN CHIRP.
If you would like to program your vehicle to Mode
4, do
the following:
1. Select YES for KEY FOB LIGHTS FLASH.
2. Select YES for KEY FOB HORN CHIRP.
For more information on this feature, see “Security
Feedback under
Remote Keyless Entry System
Operation on page
2-6.
3-56
ProCarManuals.com
Page 170 of 387
Delayed Locking
The delayed locking feature, which delays the actual
locking of the vehicle, can be made active or inactive
through the DIC. When DELAY LOCK OF DOORS
appears on the display, use the SELECT right arrow
button to toggle between YES and
NO. When you have
made your choice, press the SELECT down arrow
button to record your selection and move on to the next
choice.
For more information
on this feature, see Delayed
Locking on page
2- 1 1.
Perimeter Lighting
When the unlock symbol on the remote keyless entry
transmitter is pressed, the DRL, parking lamps and
back-up lamps will turn on
if it is dark enough outside.
You can control activation of this feature by choosing
YES or
NO when the PERIMETER LIGHTS choice
is displayed on the DIC. Make your choice by pressing
the SELECT right arrow button and record your
choice by presslng the
SELECT aown arrow bution.
You
will then be prompted to choose a TIMEOUT period. The EXT LIGHTS TIMEOUT feature can be changed to
the desired setting by
using the SELECT right arrow
button to toggle from
5 to 30 seconds. Each toggle will
increase the time by five seconds. Once the desired
timeout is displayed, press the SELECT down arrow to
record your choice and move on to the next personal
choice feature.
For more information on this feature, see “Perimeter
Lighting” under
lnterior Lamps on page 3-77.
Driver ID
This feature displays the driver ID, as identified by the
DIC.
If you choose YES when DISPLAY DRIVER
ID is shown on the DIC, the driver number will be
displayed every time the ignition is turned on. If
you choose
NO when DISPLAY DRIVER ID is shown
on the DIC, the driver number can be displayed by
pressing either a button on the remote keyless entry
transmitter or a memory seat button.
3-57
ProCarManuals.com
Page 179 of 387
< SEEK > : Your tape must have at least three
seconds of silence between each selection for seek to
work. Press the right or the left arrow to search for
the next or the previous selection on the tape. You can
skip as many as nine selections up or down on the
tape. Choose how many selections you want to skip,
then press the right or left
SEEK arrows that many
times. The number of selections to be skipped
will appear on the display.
< SCAN > : Press and hold either arrow for more
than two seconds until you hear a beep and SCAN
appears on the display. The tape will go to the next
selection, play for a few seconds, then
go on to the next
selection. Press this button again to stop scanning.
BAND: Press this button to listen to the radio when a
cassette tape is playing. The tape will stop but remain in
the player.
TP CD (TAPE): Press this button to play a cassette
tape or a CD when listening to the radio. Press TP CD
to switch between the tape and compact disc
if both
are loaded. The inactive tape or CD will remain safely
inside the radio for future listening. The display will
show the TAPE and CD symbols.
If you have the optional CD changer and it is loaded,
the TP CD button will activate the changer and a symbol
will be lit on the display.
A (Eject): Press this button, located next to the
cassette tape slot, to eject a tape. Eject may be
activated with either the ignition or radio
off. Cassettes
may be loaded with the radio and ignition
off if this
button is pressed first.
Cassette Tape Messages
If an error occurs while trying to play a cassette tape, it
could be for one of the following reasons:
TIGHT TAPE: When this message is displayed, the
tape
is tight and the player can’t turn the tape hubs.
Remove the tape. Hold the tape with the open end down
and try
to turn the right hub counterclockwise with a
pencil. Turn the tape over and repeat. If the hubs do not
turn easily, your tape may be damaged and should
not be used in the player. Try a new tape to make sure
your player is working properly.
BROKEN TAPE: If this message is displayed, the tape
is broken. Try a new tape.
WRAPPED: When this message is displayed, the tape
is wrapped around the tape head. Attempt to get the
cassette out. Try a new tape.
3-66
ProCarManuals.com
Page 183 of 387
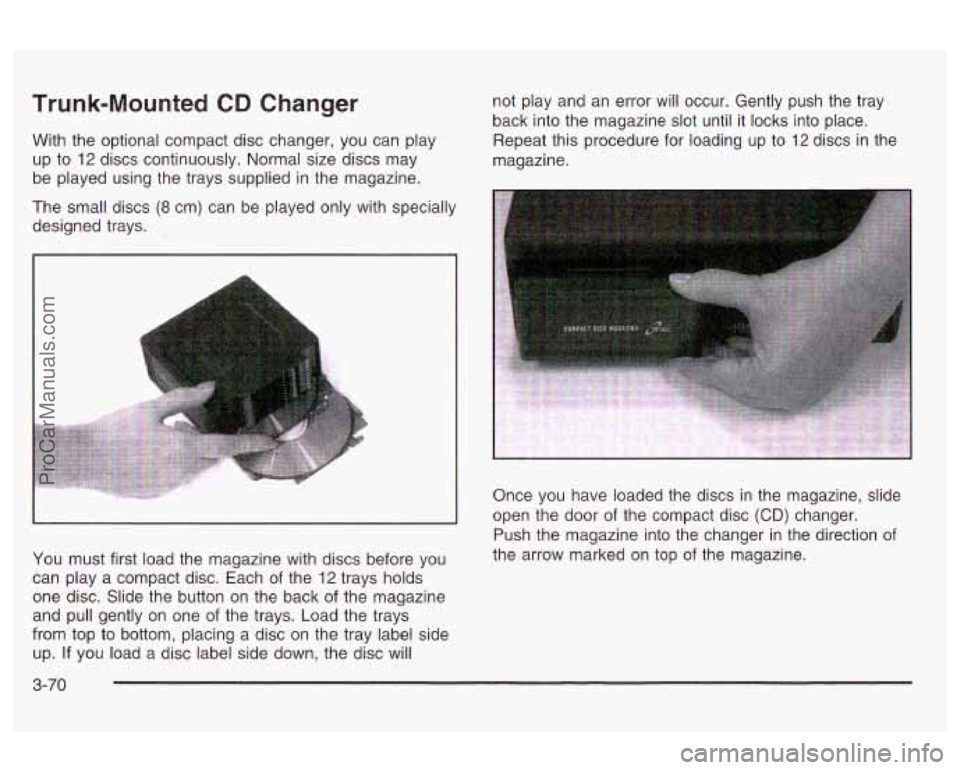
Trunk-Mounted CD Changer
With the optional compact disc changer, you can play
up to
12 discs continuously. Normal size discs may
be played using the trays supplied in the magazine.
The small discs
(8 cm) can be played only with specially
designed trays. not play
and an error
will occur. Gently push the tray
back into the magazine slot until it locks into place.
Repeat this procedure for loading up to
12 discs in the
magazine.
You must first load the magazine with discs before you
can play a compact disc. Each
of the 12 trays holds
one disc. Slide the button on the back of the magazine
and pull gently on one of the trays. Load the trays
from top to bottom, placing a disc on the tray label side
up.
If you load a disc label side down, the disc will Once you have loaded
the discs in the magazine, slide
open the door of the compact disc
(CD) changer.
Push the magazine into the changer in the direction of
the arrow marked on top of the magazine.
3-70
ProCarManuals.com