instrument cluster OLDSMOBILE AURORA 2003 Owners Manual
[x] Cancel search | Manufacturer: OLDSMOBILE, Model Year: 2003, Model line: AURORA, Model: OLDSMOBILE AURORA 2003Pages: 387, PDF Size: 18.05 MB
Page 87 of 387
ACC (Accessory): This position lets you use your
electrical accessories such as power windows, power
sunroof (option), radio and the windshield wipers.
ON: This is the position the switch returns to after you
start your engine and release the switch. This is the
position for normal driving. Even when the engine is not
running, you can use
ON to operate your electrical
accessories and
to display some instrument panel
warning lights.
START: This position starts your engine. When the
engine starts, release the key. The ignition switch will
return
to ON for normal driving.
Key Reminder Warning
If you leave your key in the OFF ignition position, you
will hear a warning chime when you open the
driver’s door.
Always leave your key in
OFF. If you leave it in any
other position, you will drain the battery power.
Retained Accessory Power (RAP)
After you turn the ignition off and remove the key, you
will still have power
to accessories such as the
power windows, audio steering wheel controls, clock,
sunroof (option), accessory power outlet and the
radio for up
to 10 minutes. The instrument panel cluster
lights will stay on for
a few seconds, then go out.
Once you open a door, the power will shut off.
Starting Your Engine
Move your shift lever to PARK (P) or NEUTRAL (N).
Your engine won’t start in any other position
- that’s a
safety feature. To restart when you’re already moving,
use NEUTRAL
(N) only.
Notice: Don’t try to shift to PARK (P) if your
vehicle is moving.
If you do, you could damage the
transaxle. Shift to PARK (P) only when your
vehicle is stopped.
1. With your foot off the accelerator pedal, turn your
ignition key
to START. When the engine starts, let
go of the key. The idle speed will go down as
your engine gets warm.
Notice: Holding your key in START for longer than
15 seconds at a time will cause your battery to
be drained much sooner. And the excessive heat
can damage your starter motor. Wait about
15
seconds between each try to help avoid draining
your battery
or damaging your starter.
2. If it doesn’t start within 10 seconds, hold your key in
START for about
10 seconds at a time until your
engine starts. Wait about
15 seconds between
each
try.
2-24
ProCarManuals.com
Page 114 of 387
3 Instrument Panel
Instrument Panel Overview .............................. -3-2
Hazard Warning Flashers
................................ 3-4
Other Warning Devices
................................... 3-5
Horn
............................................................. 3-5
Tilt Wheel
..................................................... 3-5
Turn SignaVMultifunction Lever
......................... 3-6
Exterior Lamps
............................................. 3-14
Interior Lamps
.............................................. 3-17
Accessory Power Outlets
............................... 3-21
Ashtrays and Cigarette Lighter
........................ 3-22
Climate Controls
............................................ 3.23
Automatic Climate Control System
.................. 3-23
Outlet Adjustment
......................................... 3-27
Steering Wheel Climate Controls
..................... 3-28
Climate Controls Personalization
..................... 3.29
Warning Lights, Gages and Indicators
............. 3-30
Instrument Panel Cluster
............................... -3-31
Speedometer and Odometer
........................... 3-32
I acnorneier .-..
Safety Belt Reminder Light ............................. 3-33
Air Bag Readiness Light
................................ 3-34
Battery Warning Light
.................................... 3.35
Brake System Warning Light
.......................... 3.35
Anti-Lock Brake System Warning Light
............. 3-36
- n no .................................................
Traction Control System (TCS) Warning Light ... 3.37
Traction Control System Active Light
............... 3.38
Engine Coolant Temperature Gage
.................. 3.38
Oil Pressure Light
......................................... 3.42
Cruise Control Light
...................................... 3.43
Fuel Gage
................................................... 3.44
Driver Information Center
(DIC) ....................... 3.45
DIC Warnings and Messages
......................... 3.50
DIC Vehicle Personalization
............................ 3.52
Audio System(s)
............................................. 3.59
Setting the Time
........................................... 3.59
Radio with Cassette and CD
.......................... 3.60
Navigation/Radio System
............................... 3.69
Trunk-Mounted CD Changer
........................... 3-70
Personal Choice Radio Controls
...................... 3.73
Theft-Deterrent Feature
.................................. 3.73
Audio Steering Wheel Controls
....................... 3.74
Care of Your Cassette Tape Player
................. 3-74
Care of Your CDs
......................................... 3-75
Care
of Your CD Player ................................ 3-76
Malfunction Indicator
Lamp
............................. 3.39
I I...I-.-L--A.- ... n,.-J:, n-, --+in- VI luel awl lull ty I laulu I IGL, G~LIUI I u 1 T '2 7A ......................
Diversity Antenna System .............................. 3.76
Chime Level Adjustment
............................... -3-76
3-
1
ProCarManuals.com
Page 119 of 387

Turn SignaVMultifunction Lever
I
The lever on the left side of the steering column
includes the following:
Turn and Lane-Change Signals
Headlamp High/Low-Beam Changer
Flash-To-Pass
For information on exterior lamps, see “Exterior Lamps”
later in this section.
Turn and Lane-Change Signals
The turn signal has two upward (for right) and two
downward (for left) positions. These positions allow you
to signal either a turn or a lane change.
To signal a turn, move the lever all the way up or down.
When the turn is finished, the lever will return
automatically.
An arrow on the instrument panel cluster will flash in
the direction of the
turn or lane change.
To signal a lane change, just raise or lower the lever
until the arrow starts to flash. Hold
it there until you
complete your lane change. The lever will return
by itself
when you release it.
3-6
ProCarManuals.com
Page 120 of 387

As you signal a turn or a lane change, if the arrows
flash very fast, a bulb may be burned out and
other drivers won’t see your turn signal.
If a bulb is burned out, replace
it to help avoid an
accident.
If the arrows don’t go on at all when you signal a turn,
check the fuse (see
Fuses and Circuit Breakers on
page
5-92 ) and check for burned-out bulbs.
Turn Signal On Chime
If your turn signal is left on for more than 0.8 miles
(1.3 km), a chime will sound at each flash of the turn
signal and the DIC will display the TURN SIGNAL
ON?
reminder message. To turn off the chime and
message, move the turn signal lever to the
off position.
To turn off the DIC message while the turn signal is
still active, press any button on the DIC. See
Driver
information Center (DE) on page 3-45 for more
information.
Headlamp High/Low-Beam Changer
To change the headlamps from low beam to high, push
the lever away from you until you hear a click. Then
release it.
When the high beams are
on, this light on the
instrument panel cluster
will also be on.
If the fog lamps are on when you turn on the high-beam
headlamps, the fog lamps will turn
off. The fog lamps
will turn back on when you turn
off the high-beam
headlamps.
3-7
ProCarManuals.com
Page 121 of 387

Flash-to-Pass
This feature lets you use your high-beam headlamps to
signal a driver in front
of you that you want to pass.
It works even
if your headlamps are off.
To use it, pull the turn signal lever toward you.
Your high-beam headlamps will turn on. They’ll stay on
as long as you hold the lever there. Release the
lever
to turn them off.
If your headlamps are on, and on high beam, your
headlamps will switch to low beam when the lever is
released.
To get back to high beam, push the lever away
from you.
Windshield Wipers
The lever on the right side of your steering column
operates your windshield wipers.
If your windshield wipers are on for more than
six
seconds while you are driving, the low-beam headlamps,
instrument panel cluster backlighting and the taillamps
will turn on. For more information see “Wiper-Activated
Headlamps” under
Exterior Lamps on page 3-14.
3-8
ProCarManuals.com
Page 125 of 387

Resuming a Set Speed
Setting the cruise control at a desired speed and then
applying the brake will end the cruise control function.
Once you’re going about
25 mph (40 km/h) or more, you
can briefly push the cruise control lever up to RES-ACC
(Resume-Accelerate) to reset. This returns you to
the desired preset speed.
Remember,
if you hold the lever up at RES-ACC, the
vehicle will accelerate until you release the lever
or apply the brake.
So unless you want to go faster,
don’t hold the lever at RES-ACC.
Increasing Speed While Using Cruise
Control
1.
2.
3.
4.
Push the cruise control switch, located on the right
side of the steering column at the end of the lever,
in to
ON.
Get up to the speed you want.
Push the lever down to SET-CST (Coast) and
release it. The CRUISE light on the instrument
panel cluster will come on.
Take your foot
off the accelerator pedal. There are
three ways to go to a higher speed:
Use the accelerator pedal to go to a higher speed.
Push the lever down, then release the lever and
the accelerator pedal. You’ll now cruise at the higher
speed.
Move the cruise lever up to RES-ACC. Hold it there
until you reach a desired speed and then release
the lever.
3-1 2
ProCarManuals.com
Page 128 of 387
Wiper-Activated Headlamps
This feature turns on the low-beam headl,amps,
instrument panel cluster backlighting and taillamps after
the windshield wipers have been in use for
approximately six seconds. To operate, the exterior
lamps control must be in AUTO and it must be
dark enough outside.
When the exterior lamps control is in OFF or the
parking lamp position and the windshield wiper control
is on (LO, HI or INT), the HEADLAMPS SUGGESTED
message
will appear on the DIC.
When you turn the key to OFF, the wiper-activated
headlamps will immediately turn off. The wiper-activated
headlamps will also turn off
if you turn the exterior
lamps control to OFF or turn off the windshield wipers.
Headlamps on Reminder
If the exterior lamps control is left on, you’ll hear a
warning chime when you turn the ignition off, remove
the key from the ignition and open the driver’s door.
nrr..+;mrr bllmm:mre* I n--IcI uayrllIIG IIUIIIIIII~ Lalllpa
Daytime Running Lamps (DRL) can make it easier for
others to see the front of your vehicle during the
day. DRL can be helpful
in many different driving
conditions, but they can be especially helpful in the short
periods after
dawn and before s~Jnset. FL!!!~ f~jnctiona!
daytime running lamps are required on all vehicles
first sold in Canada. A
light sensor on top of the instrument panel makes the
DRL work,
so be sure it isn’t covered.
The DRL system will make your high-beam headlamps
come on at reduced brightness in daylight when the
following conditions are met:
The ignition is on,
the exterior lamps control is off, and
e the transaxle is not in PARK (P).
When the DRL are on, only your high-beam headlamps
will be on. The parking lamps, taillamps, sidemarker
and other lamps won’t be on.
With your headlamp control in AUTO when it is dark
enough outside, your low-beam headlamps will
automatically come on. The other lamps that turn on
with your headlamps will also turn on. When it is bright
enough outside, the regular lamps will go
off, and
your high-beam headlamps change to the reduced
brightness of DRL.
To turn off all exterior lighting at night when you are
parked, turn the exterior lamps control all the way toward
OFF. The DRL will turn on automatically and the
HEADLAMPS SUGGESTED message will be displayed
on the DIC when you move the transaxle out of
PARK (P).
3-1 5
ProCarManuals.com
Page 130 of 387

Exterior Lighting Battery Saver
If the exterior lamps control has been left on, the
exterior lamps will turn
off approximately 10 minutes
after the ignition is turned to
OFF and any door
has been opened. This protects against draining the
battery in case you have accidentally left the headlamps
or parking lamps on. If you need to leave the lamps
on for more than
10 minutes, use the exterior lamps
control to turn the lamps back on after the ignition has
been turned to
OFF and any door has been opened.
Interior Lamps
Instrument Panel Brightness
This feature controls the brightness of the instrument
panel lights.
.. .. .. ' The knob for this feature is
located on the driver's side I .. ..
Turn the knob clockwise to brighten the instrument
panel cluster lights and displays. Turn the knob
counterclockwise to dim the instrument panel cluster
iignts and dispiays.
If it is day and your parking lamps are on, the instrument
panel cluster lights and displays will come on at
full
intensity and will not be adjustable. If it is dark enough
outside and your parking lamps are on, the instrument
the door switches will come on, and can also be
adjusted. pane!
cluster lights and displays
a.nd the backlighting for
3-1 7
ProCarManuals.com
Page 144 of 387
Instrument Panel Cluster
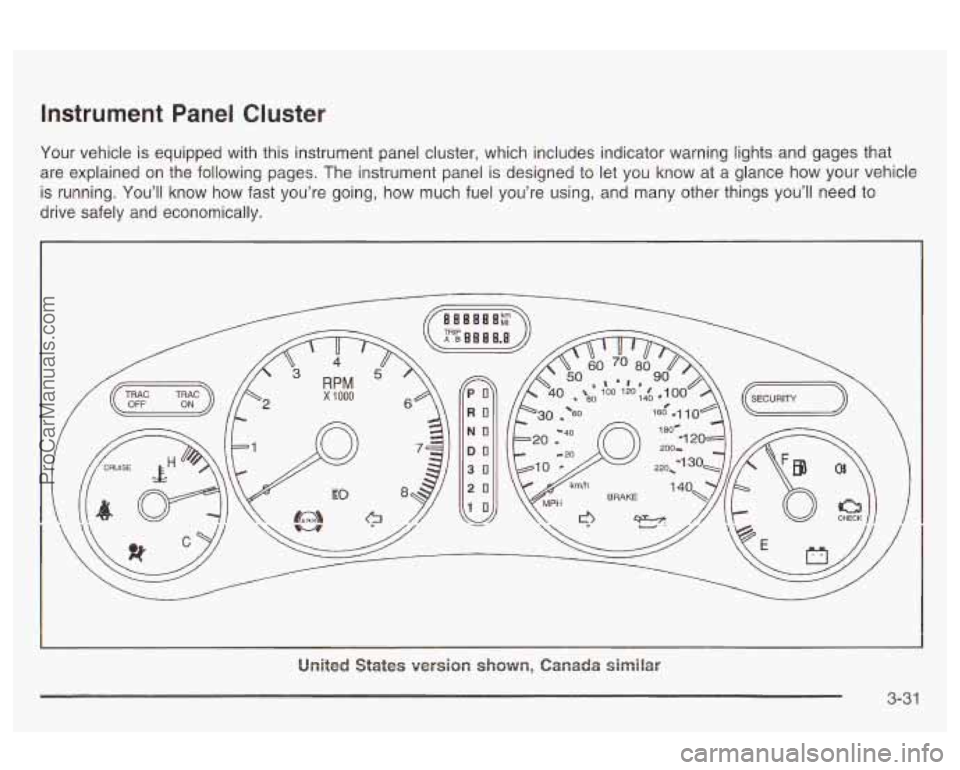
Your vehicle is equipped with this instrument panel cluster, which includes indicator warning lights and gages that
are explained on the following pages. The instrument panel is designed to let you know at a glance how your vehicle
is running. You’ll know how fast you’re going, how much fuel you’re using, and many other things you’ll need to
drive safely and economically.
PO
RO
NO
DO
30
20
10
United States version shown, Canada similar
3-3 1
ProCarManuals.com
Page 145 of 387
Speedometer and Odometer
Your speedometer lets you see your speed in both
miles per hour (mph) and kilometers per hour (km/h).
Your odometer shows how far your vehicle has
been driven, in either miles (used in the United States)
, or kilometers (used in Canada).
The speedometer shows a top speed of
140 mph
(220 km/h). This is not intended to be the vehicle’s top
speed.
You may wonder what happens
if your vehicle needs a
new odometer installed. If the new one can be set to
the mileage total of the old odometer, then it must
be. But
if it can’t, then it’s set at zero and a label must
be put on the driver’s door to show the old mileage
reading when the new odometer was installed.
Trip Odometers
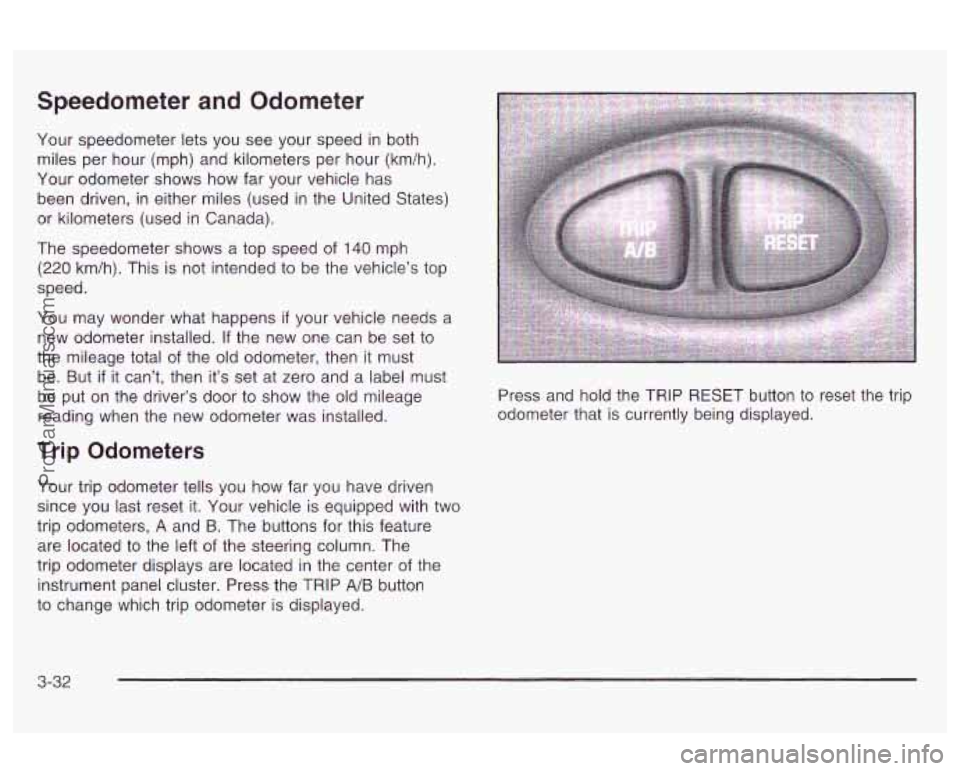
Your trip odometer tells you how far you have driven
since you last reset it. Your vehicle is equipped with two
trip odometers,
A and B. The buttons for this feature
are located to the left
of the steering column. The
trip odometer displays are located in the center of the
instrument panel cluster. Press the TRIP
A/B button
to change which trip odometer is displayed. Press and
hold the TRIP RESET button to reset the trip
odometer that is currently being displayed.
3-32
ProCarManuals.com