instrument panel OLDSMOBILE BRAVADA 1998 Owner's Manual
[x] Cancel search | Manufacturer: OLDSMOBILE, Model Year: 1998, Model line: BRAVADA, Model: OLDSMOBILE BRAVADA 1998Pages: 380, PDF Size: 19.2 MB
Page 202 of 380

Following Distance Making Turns
Stay at least twice as far behind the vehicle ahead as you
would when driving your vehicle without a trailer. This
can help you avoid situations that. require heavy braking
and sudden turns.
Passing
You’ll need more passing distance up ahead when
you’re towing
a trailer. And, because you’re a good deal
longer, you’ll need
to go much farther beyond the
passed vehicle before you can return to your lane.
Backing Up
Hold the bottom of the steering wheel with one hand.
Then, to move the trailer to the left, just move that hand
to the left.
To move the trailer to the right, move your
hand to the right. Always back up slowly and, if
possible, have someone guide you.
NOTICE:
Making very sharp turns while trailering could
cause the trailer
to come in contact with the
vehicle. Your vehicle could be damaged. Avoid
making very sharp turns while trailering.
When you’re turning with a trailer, make wider turns than
normal.
Do this so your trailer won’t strike soft shoulders,
curbs, road signs, trees or other objects. Avoid jerky or sudden maneuvers. Signal well
in advance.
Turn Signals When Towing a Trailer
When you tow a trailer, your vehicle has to have extra
wiring and a heavy-duty turn signal flasher (included
in
the optional trailering package).
The arrows on your instrument panel will flash
whenever you signal
a turn or lane change. Properly
hooked up, the trailer lamps will also flash, telling other
drivers you’re about to
turn, change lanes or stop.
4-50
ProCarManuals.com
Page 203 of 380

When towing a trailer, the arrows on your instrument
panel will flash for turns even if the bulbs on the trailer
are burned out. Thus, you may think drivers behind you
are seeing your signal when they are not. It’s important
to check occasionally to be sure the trailer bulbs
are
still working.
Driving On Grades
Reduce speed and shift to a lower gear before you start
down a long or steep downgrade. If you don’t shift
down, you might have to use your brakes
so much that
they would get hot and no longer work well.
On a long uphill grade, shift down and reduce your speed to around
45 mph (70 km/h) to reduce the
possibility of engine and transmission overheating.
You should use THIRD
(3) when towing a trailer.
Operating your vehicle in THIRD
(3) when towing a
trailer will minimize heat buildup and extend the life
of
your transmission.
Parking on Hills
You really should not park your vehicle, with a trailer
attached, on a hill.
If something goes wrong, your rig
could start to move. People can be injured, and both
your vehicle and the trailer can be damaged.
But if you ever have to park your rig on a hill, here’s
how to do it:
1. Apply your regular brakes, but don’t shift into
PARK (P) yet. Then turn your wheels into the
curb
if facing downhill or into traffic if facing uphill.
2. Have someone place chocks under the trailer wheels.
3. When the wheel chocks are in place, release the
regular brakes until the chocks absorb the load.
4. Reapply the regular brakes. Then apply your parking
5. Release the regular brakes.
brake and shift into
PARK
(P).
4-51
ProCarManuals.com
Page 219 of 380

Engine Overheating
You will find a coolant temperature gage on your
vehicle's instrument panel. See "Gages" in the Index.
1 [f Steam Is Coming From Your Engine
Steam from an overheated engine can burn you
badly, even if you just open the hood. Stay away
from the engine if you see or hear steam coming
from it. Just turn it off and get everyone away
from the vehicle until it
cools down. Wait until
there is no sign
of steam or coolant before you
open the hood.
If you keep driving when your engine is
overheated, the liquids in it can catch fire.
You or
others could be badly burned. Stop your engine if
it overheats, and get out of the vehicle until the
engine is
cool.
I NOTICE: I
If your engine catches fire because you keep
driving with no coolant, your vehicle can be
badly damaged. The costly repairs would not be
covered
by your warranty.
5-13
ProCarManuals.com
Page 246 of 380

Be sure the posted octane is at least 87. If the octane is
less than 87, you may get a heavy knocking noise when
you drive.
If it’s bad enough, it can damage your engine.
If you’re using fuel rated at 87 octane or higher and you
hear heavy knocking, your engine needs service. But
don’t worry
if you hear a little pinging noise when
you’re accelerating or driving up
a hill. That’s normal,
and
you don’t have to buy a higher octane fuel to get rid
of pinging. It’s the heavy, constant knock that means
you have a problem.
If your vehicle is certified to meet California Emission
Standards (indicated on the underhood emission control
label), it is designed to operate on fuels that meet
California specifications.
If such fuels are not available
in states adopting California emissions standards, your
vehicle
will operate satisfactorily on fuels meeting
federal specifications, but emission control system
performance may be affected. The malfunction indicator lamp
on your instrument
panel may turn on and/or your vehicle may fail a
smog-check test.
If this occurs, return to your authorized
GM retailer for diagnosis to determine the cause
of
failure. In the event it is determined that the cause of the
condition
is the type of fuels used, repairs may not be
covered by your warranty.
Some gasolines that are not reformulated for
low
emissions contain an octane-enhancing additive called
tnethylcyclopentadienyl manganese tricarbonyl (MMT);
ask your service station operator whether or not
his fuel
contains MMT. General Motors does not recommend the
use of such gasolines.
If fuels containing MMT are used,
spark plug life may be reduced and your emission
control system performance may be affected. The
malfunction indicator lamp on your instrument panel
may turn on.
If this occurs, return to your authorized
GM retailer for service.
6-4
ProCarManuals.com
Page 251 of 380

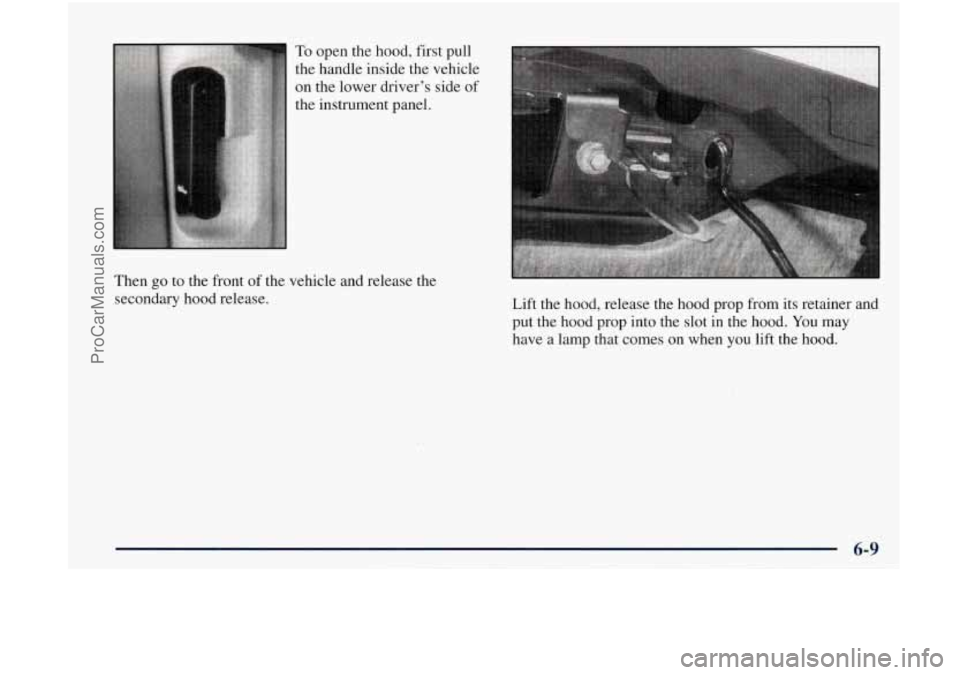
To open the hood, first pull
the handle inside the vehicle
on the lower driver’s side of
the instrument panel.
Then
go to the front of the vehicle and release the
secondary hood release. Lift the hood, release the hood prop from its retainer and
put the hood prop into the slot in the hood.
You may
have a lamp that comes on when you lift the hood.
6-9
ProCarManuals.com
Page 289 of 380

Cleaning Leather
Use a soft cloth with lukewarm water and a mild soap or
saddle soap and wipe dry
with a soft cloth. Then, let the
leather dry naturally.
Do not use heat to dry.
0 For stubborn stains. use a leather cleaner. See your
retailer for this product.
Ncwr use oils, varnishes? solvent-based or abrasive
cleaners. furniture polish or shoe polish
on leather.
Soiled or stained leather should be cleaned
immediately.
If dirt is allowed to work into the
finish. it can 11arm the leather.
Cleaning the Top of the Instrument Panel
Use only mild soap and water to clean the top surfaces
of the instrument panel. Sprays containing silicones or
waxes may cause annoying reflections
in the windshield
and even make
it difficult to see through the windshield
under certain conditions.
Cleaning Interior Plastic Components
Use only a mild soap and water solution on a soft
cloth or sponge. Comnlercial cleaners may affect the
surface finish.
Care of Safety Belts
Keep belts clean and dry.
I
A CAUTION:
Do not bleach!! dye safety belts. If you do, it
may severely weaken them. In
a crash, they
might not
be able to provide adequate protection.
Clean safety belts only with mild soap and
lukewarm water.
Cleaning Glass Surfaces
Glass should be cleaned often. GM Glass Cleaner (GM
Part
No. 1050427) or a liquid household glass cleaner
will remove normal tobacco smoke and dust films on
interior
glass.
Don't use abrasive cleaners on glass, because they may
cause scratches. Avoid placing decals
on the inside rear
window, since they may have to be scraped
off later. If
abrasive cleaners are used on the inside of the rear
window, an electric defogger element may be damaged.
Any temporary license should not be attached across the
defogger grid.
- 6-47
ProCarManuals.com
Page 294 of 380

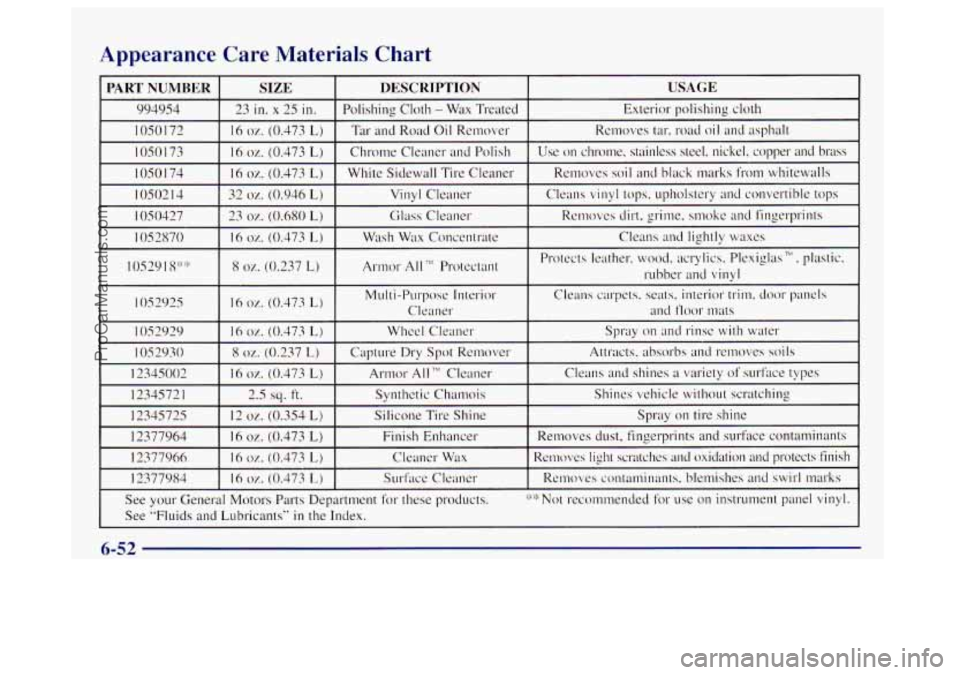
Appearance Care Materials Chart
I2377984 16 0%. (0.473 L) Surface Cleaner Rcmoves contaminants, blemishes and swirl marks
See your General Motors Parts Department for these products. .&*-I* Not recommended for use on instrument panel vinyl.
See
“Fluids and Lubricants” in the Index.
.:. . ,
6-52
ProCarManuals.com
Page 295 of 380

Vehicle Identification Number (VIN)
ENGINE A98 f ASSEMBLY
CODE A MODEL YEAR
PLANT
-
This is the legal identifier for your vehicle. It appears on
a plate in the front corner of the instrument panel, on the
driver's side. You can see
it if YOLI look through the
windshield from outside your vehicle. The
VIN also
appears on the Vehicle Certification and Service Parts
labels and the certificates
of title and registration.
Engine Identification
The 8th character in your VIN is the engine code. This
code
will help you identify your engine, specifications
and replacement parts.
Service Parts Identification Label
You'll find this label on the inside of the glove box. It's
very helpful if you ever need to order parts. On this
label is:
YOLI~ VIN,
the model designation.
a list of all production options and
special equipment.
Be sure that this label is not removecl from the vehicle.
ProCarManuals.com
Page 297 of 380

Fuses and Circuit Breakers
The wiring circuits in your vehicle are protected from
short circuits
by a combination of fuses and circuit
breakers. This greatly reduces the chance of fires caused
by electrical problems.
Look at the silver-colored band inside the f~~se. If the
band is broken or melted, replace the fuse. Be sure you
replace a bad fuse with a new one of the identical size
and rating.
If you ever have a problem on the road and don’t have a
spare fuse, you can borrow one that has the same
amperage. Just
pick some feature of your vehicle that
you can get along without
-- like the radio or cigarette
lighter
-- and use its fuse, if it is the correct amperage.
Replace
it as soon as you can.
Instrument Panel Fuse Block
The fuse block is at the
driver’s end
of the
instrument panel,
Remove the cover by turning the fastener to the left.
Extra fuses and
the fuse extractor are provided in the
cover.
To reinstall the fuse panel cover, push in and turn
the fastener to the right.
ProCarManuals.com
Page 298 of 380

FuseKircuit Usage
Breaker
A Not Used
B Not Used
1 Headlamp Switch, Body Control
Module, Headlamp Relay
FuseKircuit
Breaker
2
3
4
8
9
10
11
12
Usage
Cigarette Lighter, Data Link
Connector
Cruise Control Module and
Switch, Body Control Module,
Heated Seats
Gages, Body Control Module,
Instrument Panel Cluster
Interior Lights
Not Used Power Outside Mirror, Power
Lock Relay
Courtesy Lamps, Battery Run-Down Protection
HVAC Control Head (Manual)
Turn
Signal
Cluster, Engine Control Module Parking Lamps, Power Window
Switch, Body Control Module,
Ashtray Lamp
ProCarManuals.com