automatic transmission Oldsmobile Bravada 2003 s User Guide
[x] Cancel search | Manufacturer: OLDSMOBILE, Model Year: 2003, Model line: Bravada, Model: Oldsmobile Bravada 2003Pages: 410, PDF Size: 20.1 MB
Page 251 of 410

If You Do Decide To Pull A Trailer
If you do, here are some important points:
There are many different laws, including speed limit
restrictions, having
to do with trailering. Make sure
your rig will be legal, not only where you live
but also where you’ll be driving.
A good source for
this information can be state or provincial police.
Consider using a sway control
if your trailer will
weigh
4,000 Ibs. (1 816 kg) or less. You should
always use a sway control
if your trailer will weigh
more than
4,000 Ibs. (1 816 kg). You can ask a
hitch dealer about sway controls.
Don’t tow a trailer at all during the first
500 miles
(800 km) your new vehicle is driven. Your engine,
axle or other parts could be damaged.
Then, during the first 500 miles (800 km) that you
tow a trailer, don’t drive over
50 mph (80 km/h)
and don’t make starts at full throttle. This helps your
engine and other parts of your vehicle wear in
at
the heavier loads.
With an automatic transmission, you can
tow in
DRIVE (D). You may want to shift the transmission
to
THIRD (3) or, if necessary, a lower gear
selection
if the transmission shifts too often e.g.
under heavy loads and/or hilly conditions.
Three important considerations have to
do with weight:
the weight of the trailer,
the weight of the trailer tongue
@ and the weight on your vehicle’s tires.
4-46
Page 256 of 410
Backing Up
Hold the bottom of the steering wheel with one hand.
Then,
to move the trailer to the left, just move that hand
to the left.
To move the trailer to the right, move your
hand to the right. Always back up slowly and,
if possible,
have someone guide you.
Making Turns
Notice: Making very sharp turns while trailering
could cause the trailer to
come in contact with the
vehicle. Your vehicle could be damaged. Avoid
making very sharp turns while trailering.
When you’re turning with a trailer, make wider turns
than normal. Do this
so your trailer won’t strike
soft shoulders, curbs, road signs, trees or other objects.
Avoid jerky or sudden maneuvers. Signal well in
advance.
Turn Signals When Towing a Trailer
The arrows on your instrument panel will flash whenever
you signal a turn or lane change. Properly hooked up,
the trailer lamps will also flash, telling other drivers
you’re about to turn, change lanes or stop. When towing a trailer,
the arrows on your instrument
panel will flash for turns even
if the bulbs on the trailer
are burned out. Thus, you may think drivers behind
you are seeing your signal when they are not. It’s important to check occasionally to be sure the trailer
bulbs are still working.
Driving On Grades
Reduce speed and shift to a lower gear before you start
down a long or steep downgrade.
If you don’t shift
down, you might have to use your brakes
so much that
they would get hot and no longer work well.
You can tow in DRIVE
(D). You may want to shift the
transmission to THIRD
(3) or a lower gear, under heavy
loads or hilly conditions.
When towing at high altitude on steep uphill grades,
consider the following: Engine coolant will boil at a lower
temperature than at normal altitudes. If you turn your
engine
off immediately after towing at high altitude
on steep uphill grades, your vehicle may show signs
similar to engine overheating, To avoid this, let the
engine run while parked (preferably on level ground)
with the automatic transmission in PARK (P) for a
few minutes before turning the engine
off. If you do get
the overheat warning, see
Engine Overheating on
page 5-24.
4-5 1
Page 257 of 410
Par1 . on Hills
You really should not park your vehicle, with a
trailer attached,
on a hill. If something goes
wrong, your
rig could start to move. People
can be injured, and both your vehicle and the
trailer can be damaged.
When You Are Ready to Leave After
Parking on a
Hill
1. Apply your regular brakes and hold the pedal down
while you:
But
if you ever have to park your rig on a hill, here’s
how to do it:
1. Apply your regular brakes, but don’t shift into
PARK (P) yet. When parking uphill, turn your wheels
away from the curb. When parking downhill, turn
your wheels into the curb.
2. Have someone place chocks under the trailer
wheels.
3. When the wheel chocks are in place, release the
4. Reapply the regular brakes. Then apply your
regular brakes until
the chocks absorb the load.
parking brake, and then shift into PARK
(P).
5. Release the regular brakes.
start your engine,
shift into a gear, and
release the parking brake.
2. Let up on the brake pedal.
3. Drive slowly until the trailer is clear of the chocks.
4. Stop and have someone pick up and store the
chocks.
Maintenance When Trailer Towing
Your vehicle will need service more often when you’re
pulling a trailer. See the Maintenance Schedule for more
on this. Things that are especially important in trailer
operation are automatic transmission fluid (don’t overfill),
engine oil, axle lubricant, belt, cooling system and
brake system. Each
of these is covered in this manual,
and the Index will help you find them quickly.
If
you’re trailering, it’s a good idea to review these sections
before you start your trip.
Check periodically
to see that all hitch nuts and bolts
are tight.
4-52
Page 260 of 410
Section 5 Service and Appearance Care
............................................................ Service 5.3
Doing Your Own Service Work
......................... 5-4
Adding Equipment to the Outside of Your
Vehicle 5.4
Fuel 5.5
......................................................
................................................................
Gasoline Octane ............................................ 5.5
Gasoline Specifications
.................................... 5.5
California Fuel
............................................... 5.6
Filling Your lank
............................................ 5-7
Filling a Portable Fuel Container
....................... 5-9
Checking Things Under the Hood .................... 5-10
Hood Release
.............................................. 5-10
Engine Compartment Overview
....................... 5-12
Engine
Oil ................................................... 5-13
Engine Air Cleaner/Filter
............................... 5-18
Automatic Transmission Fluid
......................... 5-20
Engine Coolant
............................................. 5-22
Radiator Pressure Cap
.................................. 5-24
Engine Overheating
....................................... 5-24
Cooling System
............................................ 5-26
Engine Fan Noise
.................................. 5-32
Power Steering Fluid
.................... ..... 5-33
....................................................... Additives 5.6
Fuels in Foreign Countries
............................... 5-6 Windshield
Washer Fluid
................................ 5-33
Brakes
........................................................ 5-34
Battery
........................................................ 5-38
Jump Starting
.......... ............................. 5-39
All-Wheel Drive ............. ......................... 5-44
Rear Axle ....................................................... 5-46
Bulb Replacement .......................................... 5.47
Taillamps and Turn Signal Lamps
................... 5.47
Replacement Bulbs
....................................... 5.48
Windshield Wiper Blade Replacement .............. 5.49
.............................................................. Tires 5.52
Inflation
.. lire Pressure ................................ 5.53
lire Inspection and Rotation
........................... 5.53
Buying New Tires
......................................... 5.56
Uniform Tire Quality Grading
.......................... 5.57
Wheel Replacement
...................................... 5.58
lire Chains
.................................................. 5.60
Accessory Inflator
......................................... 5.60
If a lire Goes Flat ........................................ 5.61
When It
Is Time
for New Tires ....................... 5-55
Wheel Alignment and lire Balance
.................. 5-58
Changing a Flat lire
..................................... 5-62
5-
1
Page 272 of 410
A. Coolant Recovery Tank
B. Engine Air CleanedFilter
C. Windshield Washer Fluid Reservoir
D. Engine Air Cleaner/Filter Indicator (If Equipped)
E. Power Steering Fluid Reservoir
F. Automatic Transmission Dipstick
G. Engine Oil Dipstick
H. Radiator Pressure Cap
I. Engine Oil Fill Cap
J. Remote Negative (-) Terminal Marked “GND”
K. Brake Master Cylinder
L. Battery
M. Engine Compartment Fuse Block Before closing
the hood, be sure all filler caps are on
properly. Then lift the hood to relieve pressure on
the hood prop. Remove the hood prop from its slot in
the hood and return the prop to its retainer. Then pull the
hood down firmly to close. It will latch when dropped
from
6 to 8 inches (15 to 20 cm) without pressing on
the hood.
Engine Oil
You should check your engine oil level regularly; this is
an added reminder.
5-1 3
Page 279 of 410
Automatic Transmission Fluid
When to Check and Change
A good time to check your automatic transmission fluid
level is when the engine oil is changed.
Change both the fluid and filter every
50,000 miles
(83
000 km) if the vehicle is mainly driven under one or
more of these conditions:
In heavy city traffic where the outside temperature
9 In hilly or mountainous terrain.
0 When doing frequent trailer towing.
regularly
reaches
90°F (32°C) or higher.
Uses such as found in taxi, police or delivery
If you do not use your vehicle under any of these
conditions, change the fluid and filter every
100,000 miles (1 66 000 km).
service.
How to Check
Because this operation can
be a little difficult, you may
choose
to have this done at the dealership service
department.
If you do it yourself, be sure to follow all the instructions
here, or you could get a false reading on the dipstick.
Notice: Too much or too little fluid can damage
your transmission.
Too much can mean that some
of the fluid could come out and fall on hot engine
part or exhaust system parts, starting
a fire.
Too little fluid could cause the transmission to
overheat.
Be sure to get an accurate reading if you
check your transmission fluid.
Wait at least 30 minutes before checking the
transmission fluid level
if you have been driving:
When outside temperatures are above
90°F (32°C).
At high speed for quite a while.
In heavy traffic-especially in hot weather
While pulling a trailer.
To get the right reading, the fluid should be at normal
operating temperature, which is 180°F
to 200°F
(82°C to 93°C).
5-20
Page 280 of 410
Get the vehicle warmed up by driving about 15 miles
(24 km) when outside temperatures are above 50°F
(10OC). If it's colder than 50°F (IOOC), drive the vehicle
in
THIRD (3) until the engine temperature gage
moves and then remains steady for
10 minutes.
A cold fluid check can be made after the vehicle has
been sitting for eight hours or more with the engine
off,
but this is used only as a reference. Let the engine
run at idle for five minutes
if outside temperatures are
50°F (10°C) or more. If it's colder than 50°F (IOOC), you
may have to idle the engine longer. Should the fluid
level be low during this cold check, you
must check the
fluid hot before adding fluid. Checking the fluid hot
will give you a more accurate reading of the fluid level.
Checking the Fluid Level
Prepare your vehicle as follows:
0 Park your vehicle on a level place. Keep the engine
running.
With the parking brake applied, place the shift lever
in PARK (P).
With your foot on the brake pedal, move the shift
lever through each gear range, pausing for about
three seconds in each range. Then, position the shift
lever in PARK
(P).
Let the engine run at idle for three minutes or more. Then,
without shutting
off the engine, follow these steps:
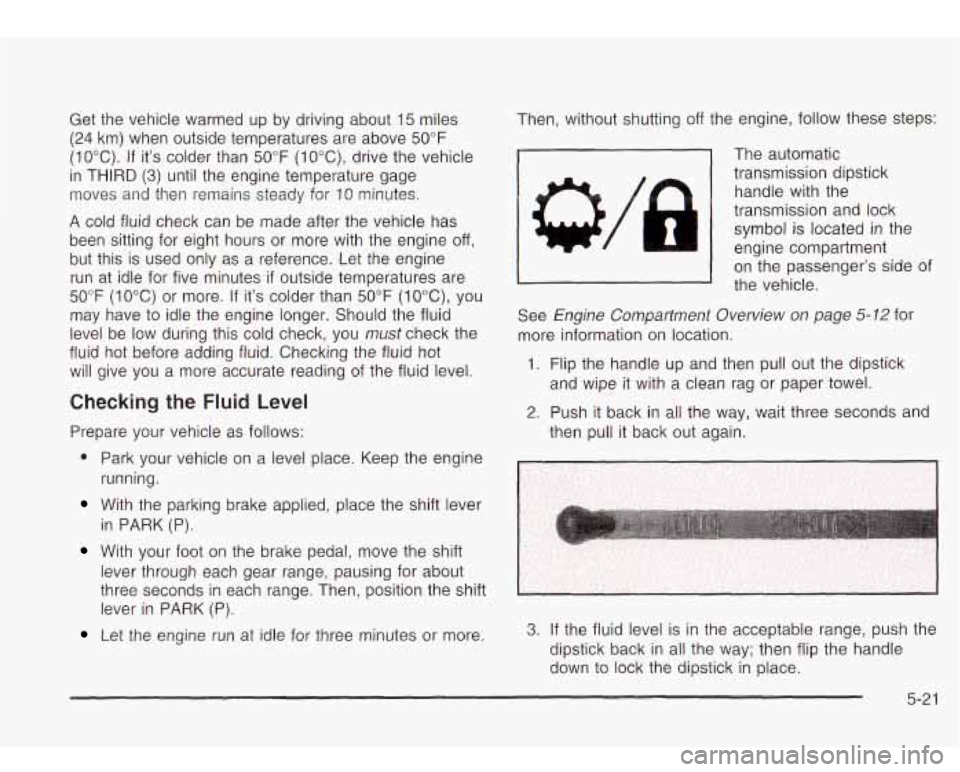
-1 The automatic
transmission dipstick
handle with the
transmission and lock
symbol is located in the
engine compartment
I I on the passenger's side of
the vehicle.
See
Engine Compartment Overview on page 5-12 for
more information on location.
1. Flip the handle up and then pull out the dipstick
and wipe it with a clean rag or paper towel.
2. Push it back in all the way, wait three seconds and
then pull it back out again.
3. If the fluid level is in the acceptable range, push the
dipstick back
in all the way; then flip the handle
down to lock the dipstick in place.
5-21
Page 281 of 410
How to Add Fluid
Refer to the Maintenance Schedule to determine what
kind of transmission fluid
to use. See Part D:
Recommended Fluids and Lubricants on page 6- 17.
Add fluid only after checking the transmission fluid while
it is hot.
(A cold check is used only as a reference.) If
the fluid level is low, add only enough of the proper fluid
to bring the level up
to the HOT area for a hot check.
It doesn’t take much fluid, generally less than one
pint (0.5 L).
Don’t overfill.
Notice: We recommend you use only fluid labeled
DEXRON@
-111, because fluid with that label is
made especially for your automatic transmission.
Damage caused by fluid other than DEXRON@
-111 is
not covered by your new vehicle warranty.
After adding fluid, recheck the fluid level as
described under “How
to Check”.
When the correct fluid level is obtained, push the
dipstick back
in all the way; then flip the handle
down
to lock the dipstick in place.
Engine Coolant
The cooling system in your vehicle is filled with
DEX-COOL@ engine coolant. This coolant is designed
to remain in your vehicle for 5 years or 150,000 miles
(240 000 km), whichever occurs first, if you add
only DEX-COOL@ extended life coolant. The following explains
your cooling system and how
to
add coolant when it is low. If you have a problem
with engine overheating, see
Engine Overheating on
page 5-24.
A 50/50 mixture of clean, drinkable water and
DEX-COOL@ coolant will:
Give freezing protection down to -34°F (-37°C).
Give boiling protection up to 265°F (129°C).
Protect against rust and corrosion.
Help keep the proper engine temperature.
Let the warning lights and gages work as they
should.
Notice: When adding coolant, it is important that
you use only
DEX-COOL@ (silicate-free) coolant.
If coolant other than DEX-COOL@ is added to
the system, premature engine, heater core or
radiator corrosion may result. In addition, the engine
coolant will require change sooner
-- at 30,000 miles
(50,000 km) or 24 months, whichever occurs first.
Damage caused by the
use of coolant other
than DEX-COOL@
is not covered by your new
vehicle warranty.
5-22
Page 298 of 410
Jump Starting
If your battery has run down, you may want to use
another vehicle and some jumper cables to start your
vehicle. But please use the following steps
to do it
safely.
can be dangerous
* They contain acid that can burn you.
0 They contain gas that can explode or
* They contain enough electricity to
If you don’t follow these steps exactly, some
Notice: Ignoring these steps could result in costly
damage to your vehicle that wouldn’t be covered
by your warranty.
Trying to start your vehicle by pushing or pulling
it
won’t work, and it could damage your vehicle.
1. Check the other vehicle. It must have a 12-volt
battery with
a negative ground system.
Notice: If the other system isn’t a 12-volt system
with a negative ground, both vehicles can be damaged.
2. Get the vehicles close enough so the jumper cables
can reach, but be sure the vehicles aren’t touching
each other. If they are, it could cause a ground
connection you don’t want.
You wouldn’t be able to
start your vehicle, and the bad grounding could
damage the electrical systems.
To avoid the possibility of the vehicles rolling, set
the parking brake firmly on both vehicles involved in
the jump start procedure. Put an automatic
transmission in
PARK (P) or a manual transmission
in NEUTRAL before setting the parking brake. If
you have a four- wheel-drive vehicle, be sure
the transfer case is not in NEUTRAL.
Notice: If you leave your radio on, it could be badly
damaged. The repairs wouldn’t be covered by
your warranty.
3. Turn off the ignition on both vehicles. Unplug
unnecessary accessories plugged into the cigarette
lighter or accessory power outlets (if equipped).
Turn
off the radio and all lamps that aren’t needed.
This will avoid sparks and help
to save both
batteries. And it could save your radio!
5-39
Page 353 of 410
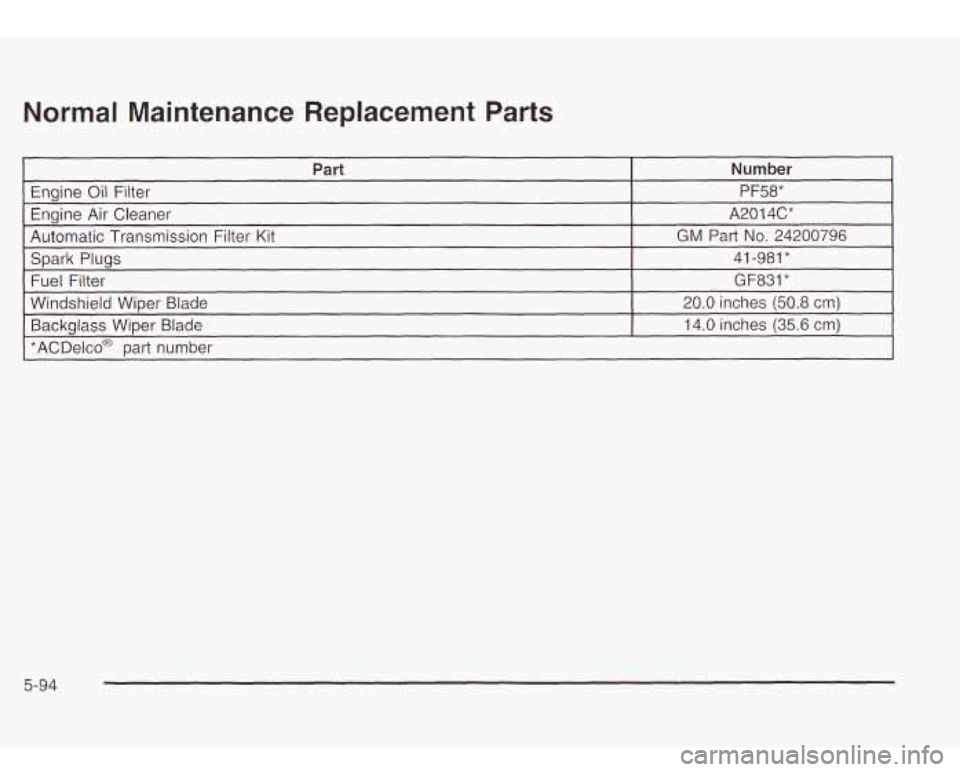
Normal Maintenance Replacement Parts
Part
GM Part No. 24200796
Automatic Transmission Filter Kit A201 4C*
Engine Air Cleaner P F58*
Engine
Oil Filter Number
~~ ~
Spark Plugs
*ACDelco@ part
number 14.0
inches
(35.6 em) Backglass Wiper Blade
20.0 inches (50.8 cm)
Windshield Wiper Blade
GF831* Fuel Filter 41
-981
*
5-94