Oldsmobile Bravada 2003 Owner's Manuals
Bravada 2003
Oldsmobile
Oldsmobile
https://www.carmanualsonline.info/img/31/9574/w960_9574-0.png
Oldsmobile Bravada 2003 Owner's Manuals
Trending: bulb, suspension, CD changer, jump cable, interior lights, odometer, air conditioning
Page 301 of 410
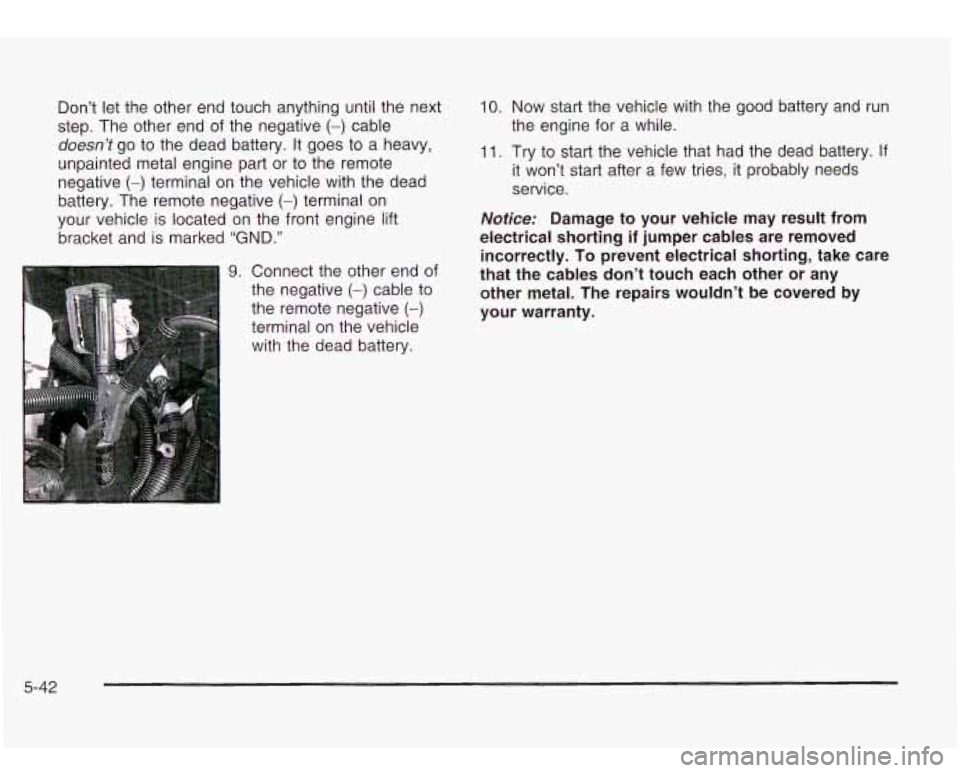
Don’t let the other end touch anything until the next
step. The other end of the negative
(-) cable
doesn’t go to the dead battery. It goes to a heavy,
unpainted metal engine part or to the remote
negative
(-) terminal on the vehicle with the dead
battery. The remote negative
(-) terminal on
your vehicle is located on the front engine lift
bracket and is marked
“GND.”
9. Connect the other end of
the negative
(-) cable to
1 the remote negative (-)
terminal on the vehicle
with the dead battery.
10. Now start the vehicle with the good battery and run
the engine for a while.
11. Try to start the vehicle that had the dead battery. If
it Won’t start after a few tries, it probably needs
service.
Notice: Damage to your vehicle may result from
electrical shorting
if jumper cables are removed
incorrectly. To prevent electrical shorting, take care
that the cables don’t touch each other or any
other metal. The repairs wouldn’t be covered by
your warranty.
5-42
Page 302 of 410
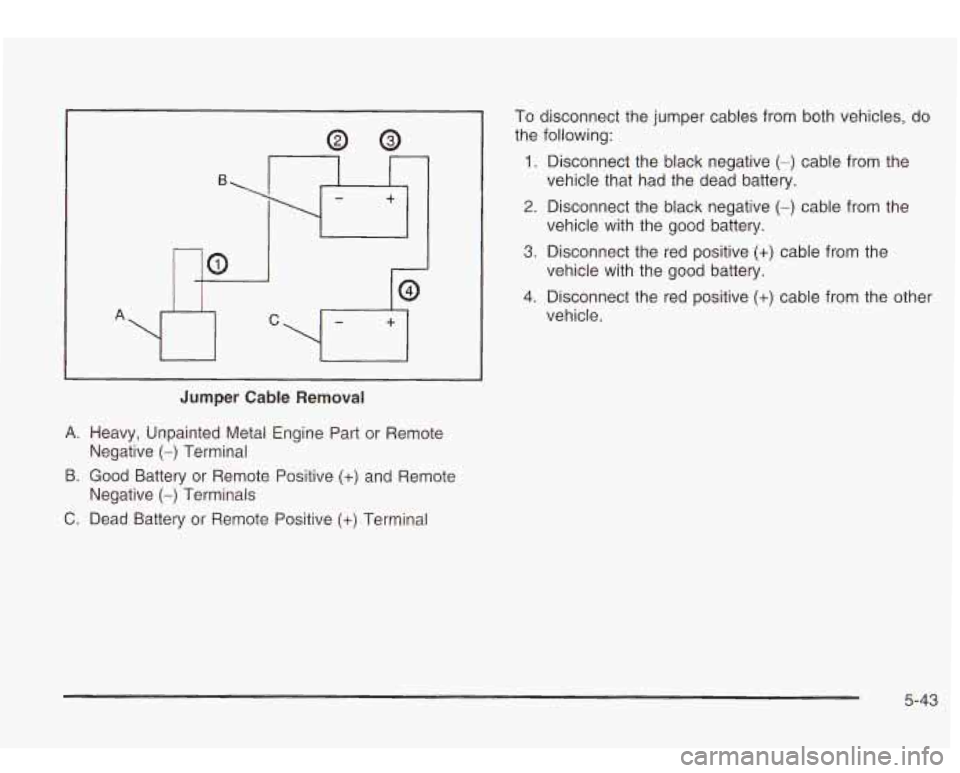
Jumper Cable Removal
A. Heavy, Unpainted Metal Engine Part or Remote
9. Good Battery or Remote Positive (+) and Remote
C. Dead Battery or Remote Positive (+) Terminal
Negative
(-) Terminal
Negative
(-) Terminals
To disconnect the jumper cables from both vehicles, do
the following:
1. Disconnect the black negative (-) cable from the
vehicle that had the dead battery.
2. Disconnect the black negative (-) cable from the
vehicle with the good battery.
3. Disconnect the red positive
(+) cable from the
4. Disconnect the red positive
(+) cable from the other
vehicle with the
good battery.
vehicle.
5-43
Page 303 of 410
All-Wheel Drive
Lubricant checks in this section also apply to these
vehicles. However, there are
two additional systems that
need lubrication.
Transfer Case
When to Check Lubricant
Refer to the Maintenance Schedule to determine how
often to check the lubricant. See
Part C: Periodic
Maintenance Inspections on page
6- 15.
How to Check Lubricant
To get an accurate
reading, the vehicle should
be on a level surface.
If the level is below the bottom of the filler plug hole,
you’ll need
to add some lubricant. Add enough lubricant
to raise the level
to the bottom of the filler plug hole.
Use care not to overtighten the plug.
What to Use
Refer to the Maintenance Schedule to determine what
kind
of lubricant to use. See Part D: Recommended
Fluids and Lubricants on page
6- 17.
Front Axle
When to Check and Change Lubricant
Refer to the Maintenance Schedule to determine how
often to check the lubricant and when to change it.
5-44
Page 304 of 410
How to Check Lubricant
To get an accurate reading, the vehicle should be on a
level surface. If
the level is below the bottom of the filler plug hole,
you may need to add some lubricant.
When the differential is cold, add enough lubricant to
raise the level to
1/2 inch (12 mm) below the filler plug
hole.
When the differential is at operating temperature
(warm), add enough lubricant to raise the level to the
bottom
of the filler plug hole.
What to Use
Refer to the Maintenance Schedule to determine what
kind
of lubricant to use. See Part D: Recommended
Fluids
and Lubricants on page 6-1 7.
5-45
Page 305 of 410
Rear Axle
When to Check Lubricant
Refer to the Maintenance Schedule to determine how
often to check the lubricant.
How to Check Lubricant
To get an accurate reading, the vehicle should be on a
level surface.
The proper level is from
0 to 3/8 inch (0 to 10 mm)
below the
bottom of the filler plug hole.
What to Use
Refer to the Maintenance Schedule to determine what
kind of lubricant
to use. See Part D: Recommended
Fluids and Lubricants on page
6-17.
5-46
Page 306 of 410
Bulb Replacement
For the type of bulbs, see Replacement Bulbs on
page
5-48.
For any bulb changing procedure not listed in this
section, contact your dealer.
Taillamps and Turn Signal Lamps
1. Open the liftgate.
3. Pull the assembly away from the vehicle.
2. Remove
from the the
two screws
lamp assembly.
4. 5.
6.
7.
8.
Unclip the wiring harness (A) and remove the three
socket retaining screws
(B).
Remove the socket by releasing the retaining tabs.
Holding the socket, pull the bulb
to release it
from the socket.
Push the new bulb into the socket until it clicks.
Reinstall the socket and screws.
5-47
Page 307 of 410
9. Reconnect the wiring harness.
10. Reinstall the lamp assembly and tighten the screws.
11. Close the liftgate.
Replacement Bulbs
Exterior Lamp
31 57 Taillamps
Bulb Number
Rear Turn Signal Lamps I 31 57
For any bulb not listed here, contact your dealer.
5-48
Page 308 of 410
Windshield Wiper Blade Replacement
Windshield wiper blades should be inspected at least
twice a year for wear or cracking.
See
Normal Maintenance Replacement Parts on
page 5-94 for the proper type of replacement blade.
Notice: Use care when removing or installing
a blade assembly. Accidental bumping can cause
the arm
to fall back and strike the windshield.
1. To remove the old wiper blades, lift the wiper arm
until it locks into a vertical position.
A. Blade Assembly
B. Arm Assembly
C. Locking Tab
D. Blade Pivot
E. Hook Slot
F. Arm Hook
5-49
Page 309 of 410
2. Press down on the blade assembly pivot locking
tab. Pull down on the blade assembly to release it
from the wiper arm hook.
3. Remove the insert from the blade assembly. The
insert has two notches at one end that are locked
by the bottom claws of the blade assembly.
At
the notched end, pull the insert from the blade
assembly.
0
I W
4. To install the new wiper insert, slide the insert (D),
notched end last, into the end with two blade
claws (A). Slide the insert all the way through the
blade claws at the opposite end
(6). The plastic
caps
(C) will be forced off as the insert is fully
inserted.
5. Be sure that the notches are locked by the bottom
claws. Make sure that all other claws are properly
locked on both sides of the insert slots.
5-50
Page 310 of 410
A
I
I
B C
-
A. Claw in Notch
B. Correct Installation
C. Incorrect Installation
6. Put the blade assembly pivot in the wiper arm hook.
Pull up until the pivot locking tab locks
in the
hook slot.
7. Carefully lower the wiper arm and blade assembly
onto the windshield.
Backglass Wiper Blade Replacement
See Windshield Wiper Blade Replacement on page 5-49
in this section for instructions on how to change the
backglass wiper blade. The backglass wiper blade will
not lock in a vertical position like the windshield
wiper blade,
so care should be used when pulling it
away from the vehicle.
5-51
Trending: power steering, ground clearance, snow chains, start stop button, fuse, Differential fluid, wiper fluid


