OLDSMOBILE SILHOUETTE 1994 User Guide
Manufacturer: OLDSMOBILE, Model Year: 1994, Model line: SILHOUETTE, Model: OLDSMOBILE SILHOUETTE 1994Pages: 276, PDF Size: 15.82 MB
Page 11 of 276
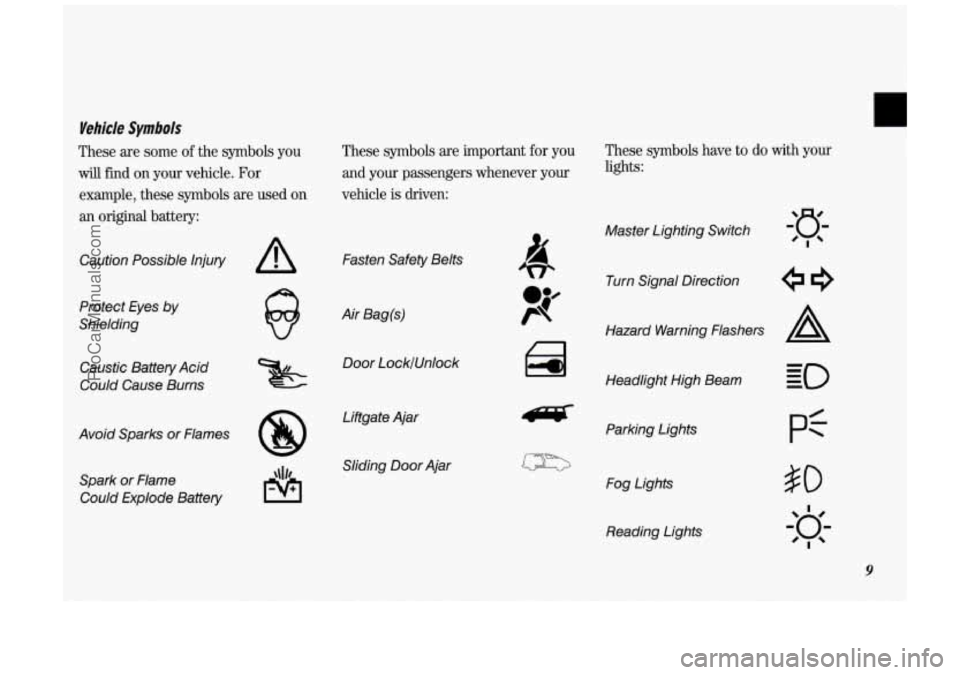
Vehicle Symbols
These are some of the symbols you
will find on your vehicle. For
example, these symbols are used
on
an original battery: These symbols are important
for you
and your passengers whenever your
vehicle
is driven:
Caution Possible Injury
Protect Eyes
by
Shielding
Caustic Battery Acid
Could Cause Burns
Avoid Sparks or Flames Spark or Flame Could Explode Battery
A
8
Fasten Safety Belts
Air Bag(s) Door LockfUnlock
Liftgate Ajar Sliding
Door Ajar
These symbols have to do with your
lights:
Master Lighting Switch
Turn Signal Direction
Hazard Warning Flashers
A
Headlight High Beam Parking Lights
Fog Lights Reading Lights
pf
9
ProCarManuals.com
Page 12 of 276
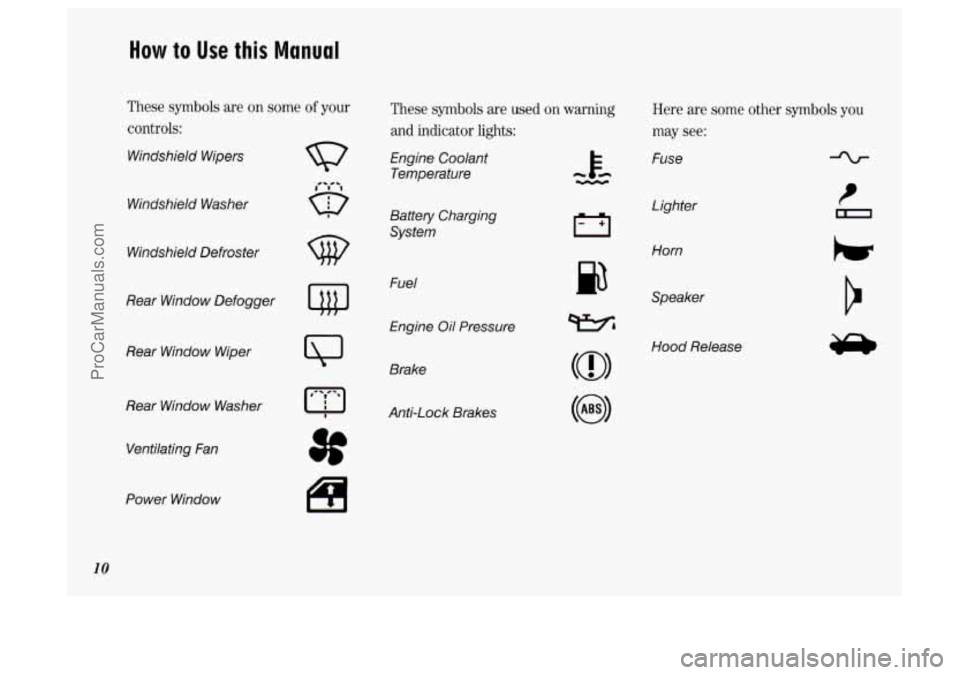
How to Use this Manual
These symbols are on some of your
controls:
Windshield Wipers
Windshield Washer
w
Windshield Defroster
Rear Window Defogger
Rear Window Wiper
Rear Window Washer Ventilating Fan
Power Window
10
3f
These symbols are used on warning
and indicator lights:
Engine Coolant Temperature
Battery Charging
System
Fuel
Engine
Oil Pressure
Brake
AntXock Brakes
p3
Here are some other symbols you
may see:
Fuse
Lighter
Horn
Speaker
Hood Release
ProCarManuals.com
Page 13 of 276
.......
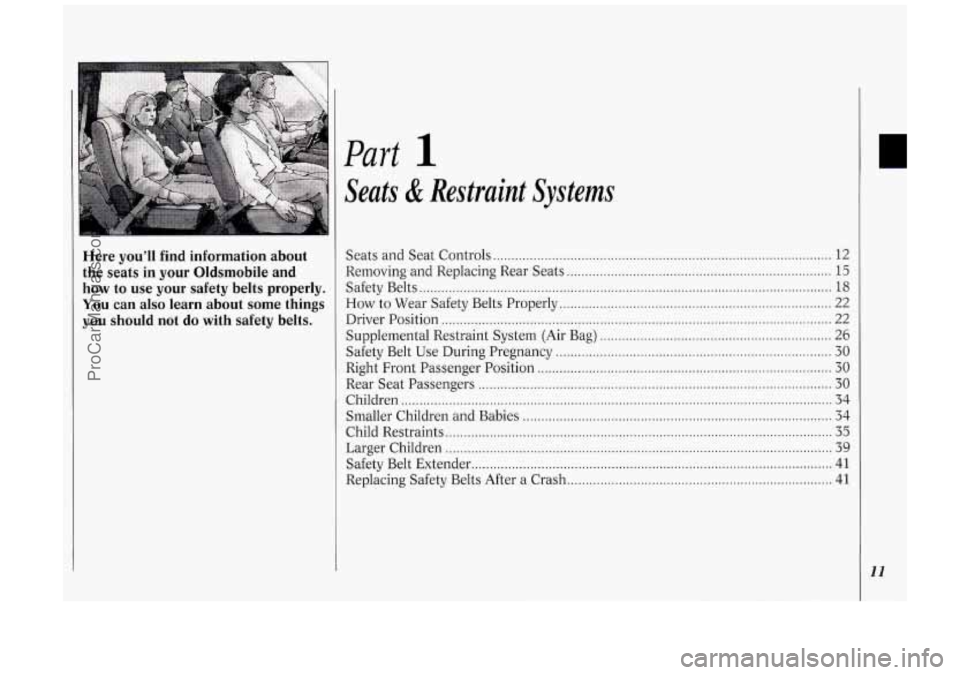
Here you’ll find information about
the seats in your Oldsmobile and
how to use your safety belts properly
.
You can also learn about some things
you should not do with safety belts
.
Part 1
Seats & Restraint Systems
Seats and Seat Controls ........................................................................\
.................... 12
Removing and Replacing Rear Seats
........................................................................\
15
Safety Belts ........................................................................\
........................................ 18
How to Wear Safety Belts Properly ........................................................................\
.. 22
Driver Position
........................................................................\
.................................. 22
Supplemental Restraint System (Air Bag)
............................................................... 26
Safety Belt Use During Pregnancy
........................................................................\
... 30
Right Front Passenger Position ........................................................................\
........ 30
Rear Seat Passengers ........................................................................\
........................ 30
Children ........................................................................\
............................................. 34
Smaller Children and Babies ........................................................................\
............ 34
Child Restraints ........................................................................\
................................. 35
Larger Children ........................................................................\
................................. 39
Safety Belt Extender ........................................................................\
.......................... 41
Replacing Safety Belts After a Crash ... .... .................................................................. 41
ProCarManuals.com
Page 14 of 276
Seats & Restraint Systems
12
Seats and Seat Controls
This section tells you about the seats-
how to adjust them, take them out, put
them back in, and fold them up and
down.
........... ...................... ., . . ............ ...................... . ........... ..... :
Manual Front Seats
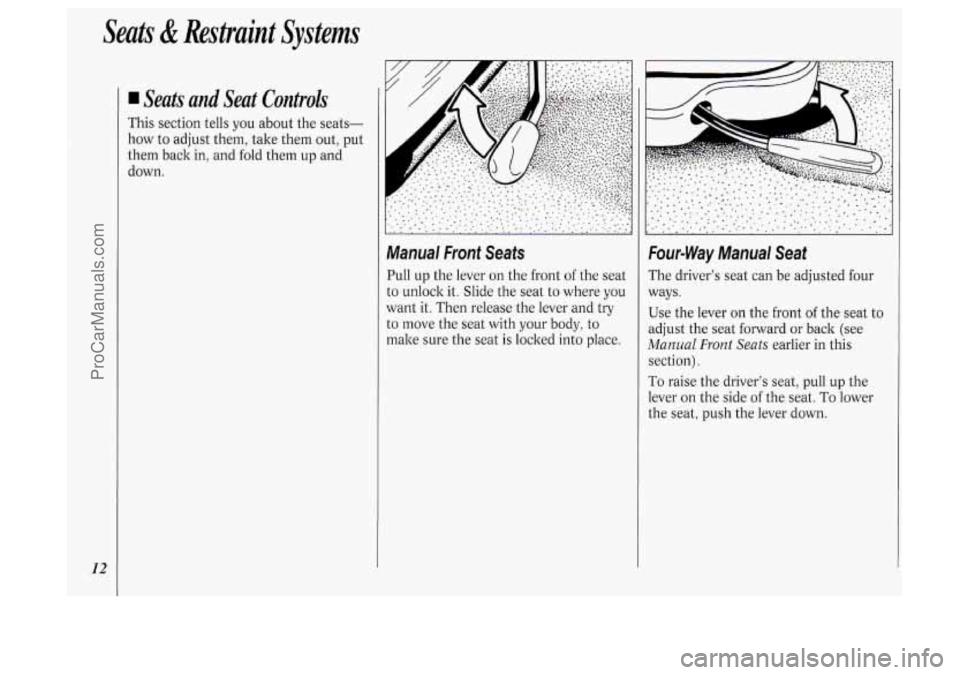
Pull up the lever on the front of the seat
to unlock it. Slide the seat to where you
want it. Then release the lever and try
to move the seat with your body, to
make sure the seat is locked into place.
Four-Way Manual Seat
The driver’s seat can be adjusted four
ways.
Use the lever
on the front of the seat to
adjust the seat forward or
back (see
Manual Front Seats earlier in this
section).
To raise the driver’s seat, pull up the
lever
on the side of the seat. To lower
the seat, push the lever down.
ProCarManuals.com
Page 15 of 276
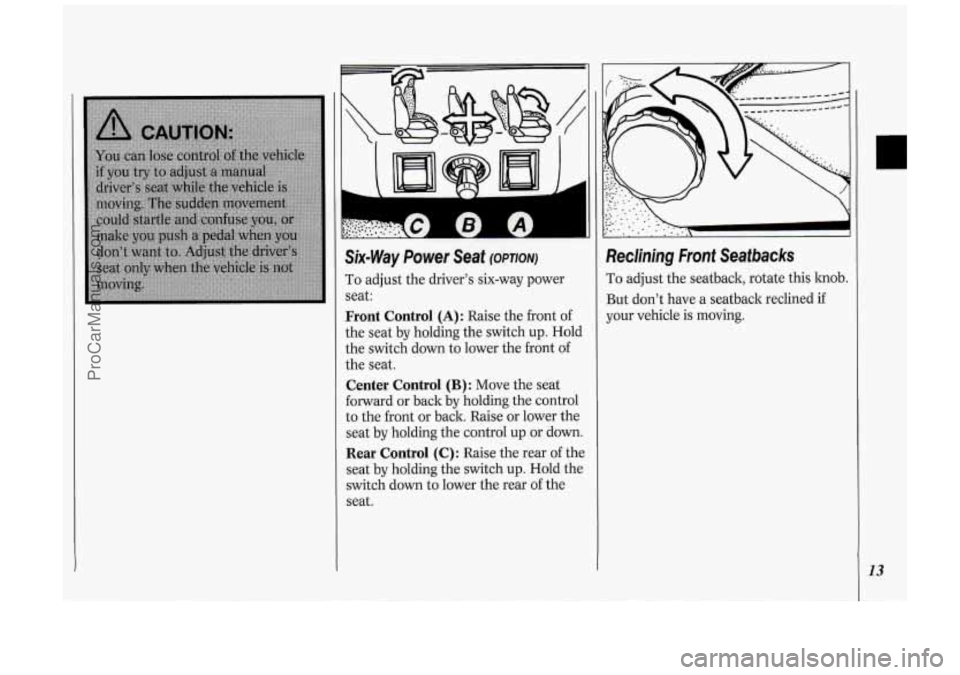
Six-Way Power Seat (OPTION)
To adjust the driver’s six-way power
seat:
Front Control (A) : Raise the front of
the seat by holding the switch
up. Hold
the switch down to lower the front of
the seat.
Center Control (B): Move the seat
forward or back by holding the control
to the front or back. Raise or lower the
seat by holding the control up or down.
Rear Control (C): Raise the rear of the
seat by holding the switch up. Hold the
switch down to lower the rear of the
seat.
Reclining Front Seatbacks
To adjust the seatback, rotate this hob.
But don’t have a seatback reclined
if
your vehicle is moving.
13
ProCarManuals.com
Page 16 of 276
Seats & Restraint Svstems J
14
I
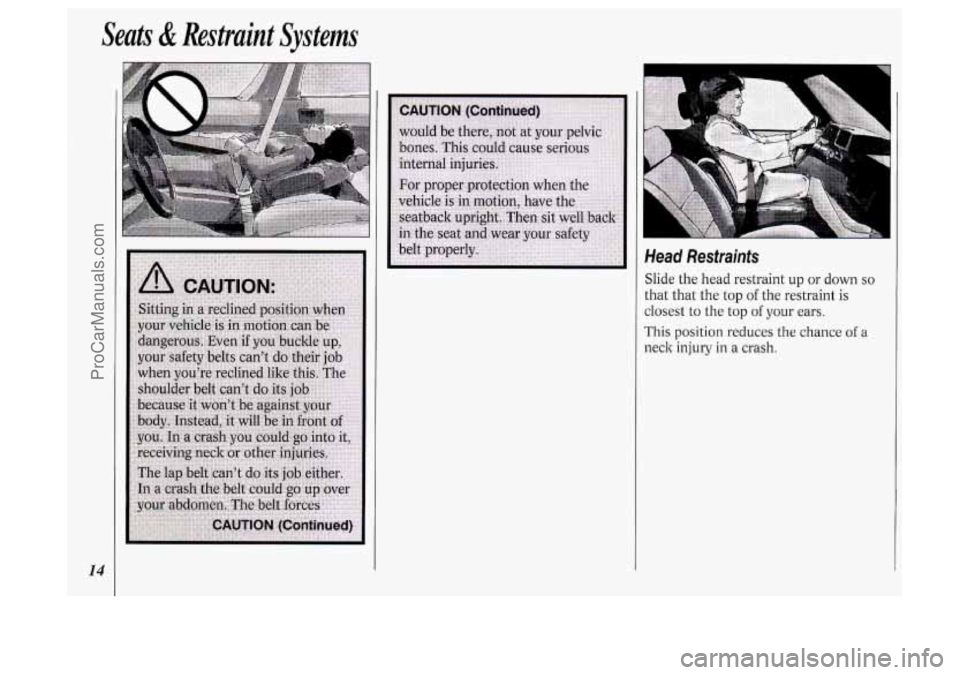
Head Restraints
Slide the head restraint up or down so
that that the top of the restraint is
closest to the top of your ears.
This position reduces the chance of a
neck injury in a crash.
ProCarManuals.com
Page 17 of 276
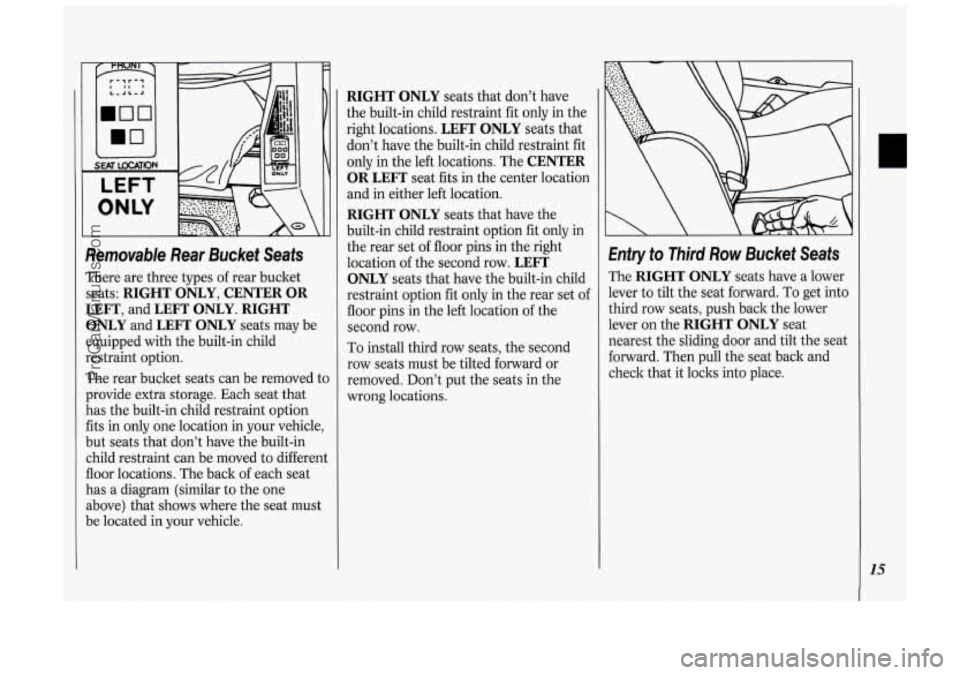
Removable Rear Bucket Seats
There are three types of rear bucket
seats:
RIGHT ONLY, CENTER OR
LEFT, and LEFT ONLY. RIGHT
ONLY
and LEFT ONLY seats may be
equipped with the built-in child
restraint option.
The rear bucket seats can be removed to
provide extra storage. Each seat that
has the built-in child restraint option
fits in only one location in your vehicle,
but seats that don’t have the built-in
child restraint can be moved to different
floor locations. The back of each seat
has a diagram (similar to the one
above) that shows where the seat must
be located in your vehicle.
RIGHT ONLY seats that don’t have
the built-in child restraint fit only in the
right locations.
LEFT ONLY seats that
don’t have the built-in child restraint fit
only in the left locations. The
CENTER
OR LEFT
seat fits in the center location
and in either left location.
RIGHT ONLY seats that have the
built-in child restraint option fit only in
the rear set of floor pins in the right
location of the second row.
LEFT
ONLY
seats that have the built-in child
I restraint option fit only in the rear set of
floor pins in the left location of the
second row.
To install third row seats, the second
row seats must be tilted forward or
removed. Don’t put the seats in the
wrong locations.
Entry to Third Row Bucket Seats
The RIGHT ONLY seats have a lower
lever to tilt the seat forward.
To get into
third row seats, push back the lower
lever on the
RIGHT ONLY seat
nearest the sliding door and tilt the seat
forward. Then pull the seat back and
check that it locks into place.
0
15
ProCarManuals.com
Page 18 of 276
Seats & Restraint Systems
16
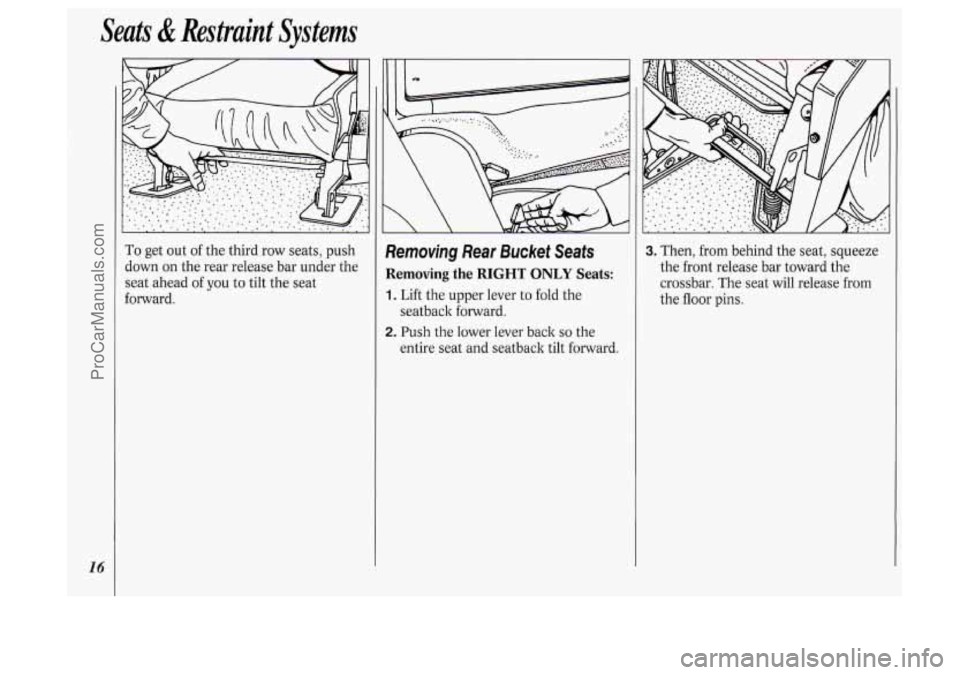
To get out of the third row seats, push
down on the rear release bar under the
seat ahead
of you to tilt the seat
forward.
Removing Rear Bucket Seats
Removing the RIGHT ONLY Seats:
1. Lift the upper lever to fold the
2. Push the lower lever back so the
seatback forward.
entire seat and seatback tilt forward.
3. Then, from behind the seat, squeeze
the front release bar toward the
crossbar. The seat will release from
the floor pins.
ProCarManuals.com
Page 19 of 276
I. G
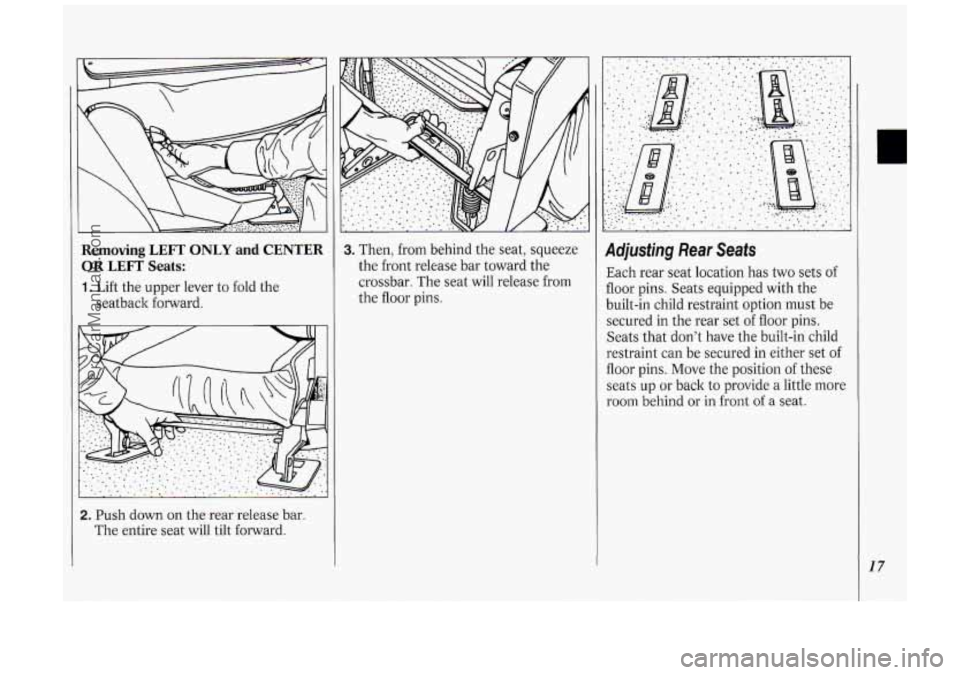
Removing LEFT ONLY and CENTER
OR LEFT Seats:
1. Lift the upper lever to fold the
seatback forward.
2. Push down on the rear release bar
The entire seat will tilt forward.
3. Then, from behind the seat, squeeze
the front release bar toward the
crossbar. The seat will release from
the floor pins. adjusting Rear Seats
Each rear seat location has two sets of
floor pins. Seats equipped with the
built-in child restraint option must be
secured in the rear set of floor pins.
Seats that don’t have the built-in child
restraint can be secured in either set of
floor pins. Move the position
of these
seats up or back to provide a little more
room behind or in front of a seat.
17
ProCarManuals.com
Page 20 of 276

Seats & Restraint Systems
18
1 CAUTION -
Zeplacing Rear Bucket Seats
:allow the diagram on the back of the
eats to replace the seats in their proper
xation.
;ee
Removable Rear Bucket Seats
arlier in this part.
Ion‘t try to place the seats in baclnvard,
lecause they won’t latch that way.
1. With the entire seat tilted forward,
place the front hooks
of the seat latch
onto the front floor pins.
2. Firmly press the rear hooks onto the
rear floor pins. The seat should lock
into position.
3. Lift the upper lever and pull up on
the seatbacls. until it loclts upright.
4. Push and pull on the seat to check
that it is locked.
5. Check to see that you have put the
seats into the proper location,
according
to the label on each seat. If
not, the seats may not latch properly,
and your passengers may not have the
proper safety belt.
Safety Belts: Zkey%e For
Everyone
This part of the manual tells you how to
use safety belts properly. It also tells
you some things you should not do with
safety belts.
And it explains the Supplemental
Restraint System, or “air bag” system.
ProCarManuals.com