display OLDSMOBILE SILHOUETTE 1998 Owners Manual
[x] Cancel search | Manufacturer: OLDSMOBILE, Model Year: 1998, Model line: SILHOUETTE, Model: OLDSMOBILE SILHOUETTE 1998Pages: 444, PDF Size: 23.2 MB
Page 128 of 444
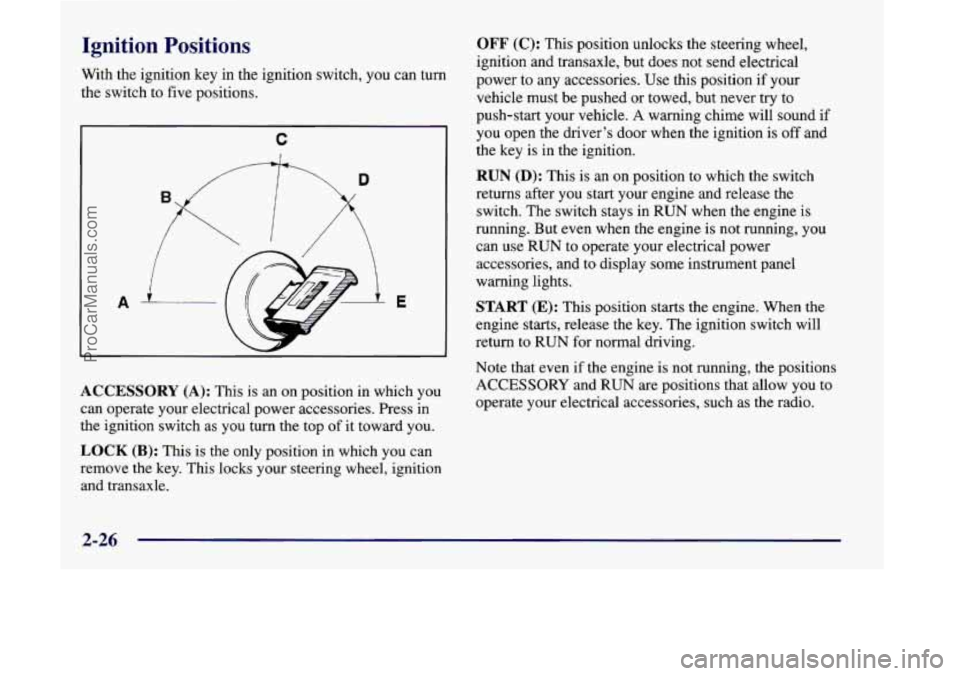
Ignition Positions
With the ignition key in the ignition switch, you can turn
the switch to five positions.
C
ACCESSORY (A): This is an on position in which you
can operate your electrical power accessories. Press in
the ignition switch as you turn the top
of it toward you.
LOCK (B): This is the only position in which you can
remove the key. This locks your steering wheel, ignition
and transaxle.
OFF (C): This position unlocks the steering wheel,
ignition and transaxle, but does not send electrical
power to any accessories. Use this position if your
vehicle must be pushed or towed, but never try to
push-start your vehicle.
A warning chime will sound if
you open the driver’s door when the ignition is off and
the key is in the ignition.
RUN (D): This is an on position to which the switch
returns after you start your engine and release the
switch.
The switch stays in RUN when the engine is
running. But
even when the engine is not running, you
can use RUN to operate your electrical power
accessories, and to display some instrument panel
warning lights.
START (E): This position starts the engine. When the
engine starts, release the key. The ignition switch will
return to RUN for normal driving.
Note that even
if the engine is not running, the positions
ACCESSORY and RUN are positions that allow you to
operate your electrical accessories, such as the radio.
2-26
ProCarManuals.com
Page 188 of 444
Tachometer
‘ -3
*2 I-;1
R
-0 77
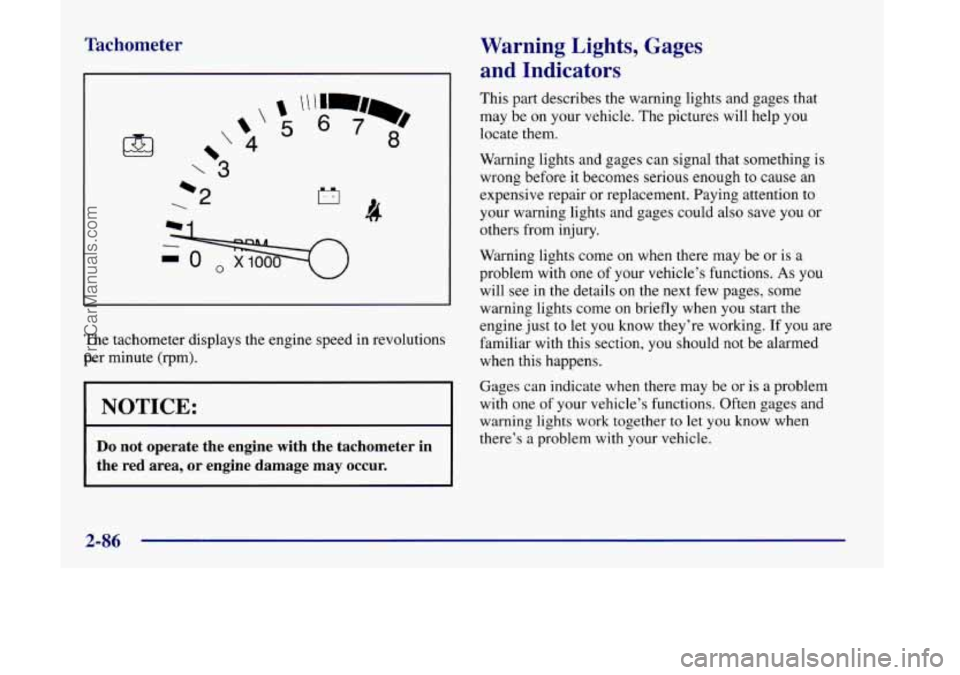
The tachometer displays the engine speed in revolutions
per minute (rpm).
I NOTICE: I
Do not operate the engine with the tachometer in
the red area, or engine damage may occur.
Warning Lights, Gages
and Indicators
This part describes the warning lights and gages that
may be
on your vehicle. The pictures will help you
locate them.
Warning lights and gages can signal that something is
wrong before it becomes serious enough to cause an
expensive repair or replacement. Paying attention to
your warning lights and gages could also save you or
others from injury.
Warning lights come on when there may be or is a
problem with one
of your vehicle’s functions. As you
will see in the details on the next few pages, some
warning lights come on briefly when you start the
engine just to let you know they’re working.
If you are
familiar with this section, you should not be alarmed
when this happens.
Gages can indicate when there may be or is a problem
with one of your vehicle’s functions. Often gages and
warning lights work together
to let you know when
there’s a problem with your vehicle.
2-86
ProCarManuals.com
Page 201 of 444

Driver Information Center (DIC) (Option) Mode Button (MODE): Press this button to
cycle through three modes of operation
-- Off,
Compass/Temperature mode and Trip
Computer mode.
In the Trip Computer mode, pressing the MODE
button cycles through the five displays. Press the
MODE button after the last Trip Computer display to
return the DIC to the
OFF mode.
Off: No driver information is displayed in this mode
of operation.
Temperature/Compass Mode: One of eight compass
readings and the outside temperature are displayed. If
the temperature is below
38 OF (3 O C), the temperature
reading will toggle between displaying the outside
temperature and the word “ICE” for two minutes.
The DIC will show information about the vehicle and
the surroundings.
EnglishMetric Button (EM): You can change the
display to a metric or English reading at any time
by
pressing EM
Compass Variance
Compass variance is the difference between magnetic
north and geographic north. In some areas
of the
country, the difference is great enough to cause the
compass to give false readings.
If this occurs, the
compass variance must be set.
2-99
ProCarManuals.com
Page 202 of 444

Setting the Variance The display will show all the display segments for half a
second
to acknowledge the change in zone number.
Turn the ignition on and cycle the DIC to the
Compass/Temperature mode. Press both the
EM and
MODE buttons for approximately five seconds. The last
entered variance zone number will be displayed. Press the
EM button until the proper variance number, as shown on
the map, is showing. Press
the MODE button to set the
new variance zone and resume normal operation.
Automatic Compass Calibration
The compass is self-calibrating which eliminates the
need to manually set the compass. When the vehicle is
new, the calibration process may not be complete. In
these cases the calibration symbol,
C, will be displayed
where the compass reading is normally displayed.
To calibrate the compass, in an area free from large metal
objects, make three
360" turns. The calibration symbol
will turn
off and the compass reading will be displayed.
Manual Compass Calibration
If the compass appears erratic and the calibration
symbol does not appear, you must manually put the
compass into the calibration mode.
Turn the ignition on and cycle the DIC to the
Compassflemperature mode. Press both the
E/M and
MODE buttons for at least 10 seconds until the
calibration symbol appears. Release both buttons and
complete three
360" turns in an area free from large
metal objects. The calibration symbol will turn off and
the compass reading will be displayed.
2-100
ProCarManuals.com
Page 203 of 444

Error Displays
An error of the vehicle’s speed sensor or fuel sender
In the absence of vehicle communications, a double
will
cause
-E- to be displayed.
dash
“--” is displayed.
Trip Computer
There are five trip computer displays which may be
stepped through by pushing the MODE button. The
information will appear in the following order:
Average Fuel Economy (AVG ECON): This shows
the average fuel economy since the last reset.
Instantaneous Fuel Economy (INST ECON):
This shows fuel economy for the most recent second
of driving.
Trip Range (RANGE): This shows the estimated
distance that can be traveled with the remaining fuel.
The fuel economy used to calculate range is based on
the last few hours of driving.
0 Trip Fuel Used (FUEL USED): This shows the
accumulated fuel used since the last reset.
Average Speed (AVG SPEED): This shows the
average speed since the last reset.
Resetting the Trip Computer
Press and hold the MODE and EM buttons for at least
two seconds. The reset is acknowledged with the display
showing all segments on for a period of half a second.
A reset can only be done in AVG ECON, FUEL USED
and AVG SPEED displays. Resetting affects all three
displays regardless
of which display you are in.
2-101
ProCarManuals.com
Page 214 of 444
AM-FM Stereo with Cassette Tape Player
and Automatic Tone Control
Playing the Radio
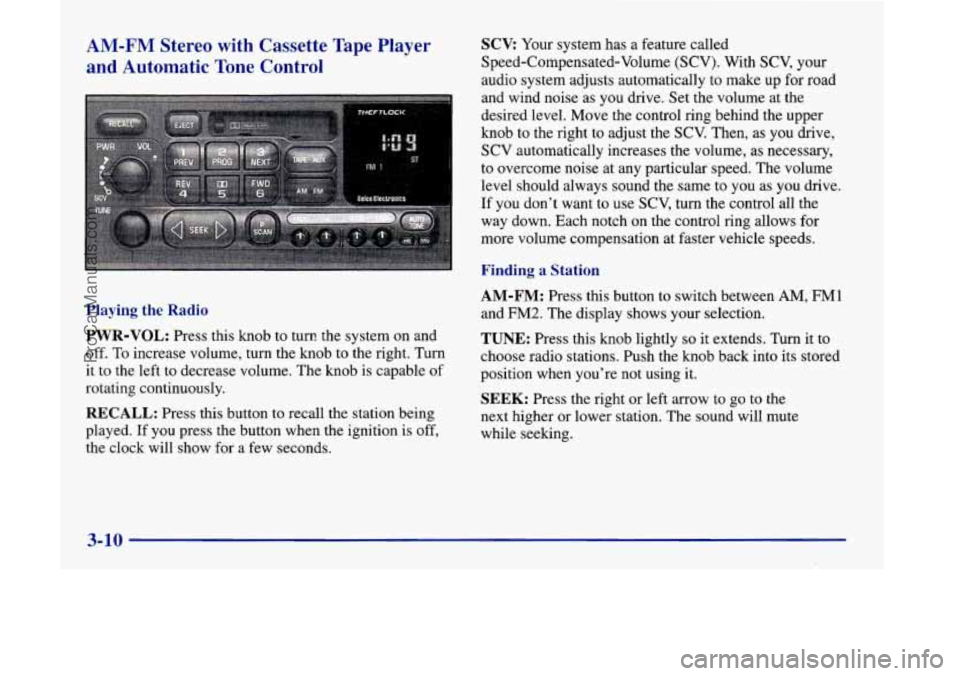
PWR-VOL:
Press this knob to turn the system on and
off. To increase volume, turn the knob to the right. Turn
it to the left
to decrease volume. The knob is capable of
rotating continuously.
RECALL: Press this button to recall the station being
played.
If you press the button when the ignition is off,
the clock will show for a few seconds.
SCV: Your system has a feature called
Speed-Compensated-Volume (SCV). With
SCV, your
audio system adjusts automatically to make up for road
and wind noise as
you drive. Set the volume at the
desired level. Move the control ring behind the upper
knob to the right to adjust the SCV. Then, as
you drive,
SCV automatically increases the volume,
as necessary,
to overcome noise at any particular speed. The volume
level should always sound the same to you as you drive.
If you don’t want to use SCV, turn the control all the
way down. Each notch
on the control ring allows for
more volume compensation at faster vehicle speeds.
Finding a Station
AM-FM:
Press this button to switch between AM, FM1
and FM2. The display shows your selection.
TUNE: Press this knob lightly so it extends. Turn it to
choose radio stations. Push the knob back into its stored
position when you’re not using
it.
SEEK: Press the right or left arrow to go to the
next higher or lower station. The sound will mute
while seeking.
3-10
ProCarManuals.com
Page 215 of 444
SCAN: Press one of the SEEK arrows for two seconds,
and SCAN will appear in the display. Use SCAN to
listen to stations for a few seconds. The radio will go to
a station, stop for a few seconds, then go on to the next
station. Press
SEEK again to stop scanning. The sound
will mute while scanning.
PUSHBUTTONS: The six numbered pushbuttons let
you return to your favorite stations. You can set up to
18 stations (six AM, six FMl and six FM2). Just:
1.
2.
3.
4.
5.
6.
Turn the radio on.
Press AM-FM to select the band.
Tune in the desired station.
Press AUTO TONE to select the equalization that
best suits the type of station selected.
Press and hold one of the six numbered buttons. The
sound will mute. When it returns, release the button.
Whenever you press that numbered button, the
station you set will return and the AUTO TONE
equalization that you selected will also be
automatically selected for that button.
Repeat the steps for each pushbutton.
PSCAN: Press this button to listen to each of your
favorite stations stored on your pushbuttons for a few
seconds. The radio will scan through each of the stations
stored on your pushbuttons, except those stations with
weak reception. The AUTO TONE setting stored for
that pushbutton will be automatically chosen. Press
P.SCAN or one
of the pushbuttons again to stop
scanning. P.SCAN will be displayed whenever the tuner
is in the P.SCAN mode. The channel number (P1
-P6)
will appear momentarily just before the frequency is
displayed. In FM mode, this function will scan through
both FM1 and FM2 preset stations and FM1 or
FM2 will
appear on the display.
Setting the Tone
BASS:
Press this knob lightly so it extends. Turn the
knob to the right to increase bass and to the left to
decrease bass. When you use this control, the radio’s
AUTO TONE setting will switch to manual and the
AUTO TONE display will
go blank.
TREB: Press this knob lightly so it extends. Turn the
knob to the right to increase treble and to the left to
decrease treble. When you use this control, the radio’s
AUTO TONE setting will switch to manual and the
AUTO TONE display will
go blank. If a station is weak
or noisy, you may want to decrease
the treble.
3-11
ProCarManuals.com
Page 216 of 444
Push these knobs back into their stored positions when
you’re not using them.
AUTO TONE: This feature allows you to choose preset
bass and treble equalization settings designed for
country/western, classical, news, rock, pop and jazz
stations.
CN will appear on the display when you first
press AUTO TONE. Each time you press it, another
setting will appear on the display. Press
it again after
JAZZ appears and the AUTO TONE display will go
blank. Tone control will return to the BASS and TREB
knobs. Also, if you use the BASS and TREB knobs,
control will return to them and the AUTO TONE
display will
go blank. Use PUSHBUTTONS to program
AUTO TONE.
Adjusting the Speakers
BAL:
Press this knob lightly so it extends. Turn the
knob to the right for the right speakers and
to the left for
the left speakers. The middle position balances the
sound between the speakers.
FADE: Press this knob lightly so it extends. Turn the
knob
to the right to adjust the sound to the front
speakers and to the left for the rear speakers. The middle
position balances the sound between the speakers.
Push these knobs back into their stored positions when
you’re not using them.
Playing a Cassette Tape
Your tape player is built to work best with tapes that are
30 to 45 minutes long on each side. Tapes longer than
that are
so thin they may not work well in this player. If
a tape is inserted when the ignition is on but the radio is
off, the tape will begin playing. A tape symbol is shown
in the center of the graphic display whenever a tape is
inserted. When a tape is active, the tape symbol will be
accompanied by a direction arrow.
While the tape is playing, use the
VOL, AUTO TONE,
BAL, FADE, BASS and TREB controls just as you do
for the radio. Other controls may have different
functions when a tape is inserted. The display will show
the tape symbol and an arrow to show which side of the
tape is playing.
If you hear nothing or hear just a garbled sound, it may
not be in squarely. Press EJECT to remove the tape and
start over.
The player is able
to detect a tight or broken tape, and
will eject the tape. The radio will go back to playing the
last station selected.
The player automatically senses the cassette for metal or
Cr02 and sets the pre-emphasis. Anytime a tape is
inserted, the top side is selected
to play first.
3-12
ProCarManuals.com
Page 217 of 444
PREV (1): Press this button or the left SEEK arrow to
go to the previous selection on the tape if the current
selection has been playing for less than eight seconds. If
the PREV button is pressed and the current selection has
been playing for more than eight seconds, it will
go to
the beginning of the current selection. Your tape must
have at least three seconds
of silence between each
selection for PREV
or SEEK to work. The tape direction
arrow blinks during PREV or SEEK operation. The
sound will mute during PREV or SEEK operation. Press
this button or one
of the SEEK arrows again to return to
normal play.
PROG (2): Press this button to play the other side of
the tape.
NEXT (3): Press this button or the right SEEK arrow to go
to the next selection on the tape.
If you hold the button or
press it more than once, the player will continue moving
forward through the
tape. Your tape must have at least three
seconds
of silence between each selection for NEXT or
SEEK to work. The tape direction arrow blinks during
NEXT or SEEK operation. The sound will mute during
NEXT or SEEK operation. Press this button or one of the
SEEK mows again to return to normal play.
REV (4): Press this button to reverse the tape rapidly.
Press it again to return
to playing speed. The radio will
play the last-selected station while the tape reverses.
00 (5): Press this button to reduce background noise.
Note that the double-D symbol will appear on the display.
Dolby Noise Reduction is manufactured under a license
from Dolby Laboratories Licensing Corporation. Dolby
and the double-D symbol are trademarks of Dolby
Laboratories Licensing Corporation.
FWD (6): Press this button to advance quickly to
another part
of the tape. Press the button again to return
to playing speed. The radio will play the last-selected
station while the tape advances.
AM-FM: Press this button to play the radio when a tape
is
in the player.
TAPE AUX: Press this button to change to the tape
function when the radio is on. The tape symbol with an
arrow will appear on the display when the tape
is active.
If your system is equipped with a remote playback
device, pressing this button a second time will allow the
remote device to play.
EJECT Press this button to remove the tape. The radio
will play. EJECT may be activated with either the
ignition or radio
off. Cassettes may be loaded with the
radio off if this button
is pressed first. If you leave a
cassette tape in the player while listening to the radio, it
may become warm.
3-13
ProCarManuals.com
Page 218 of 444

CLN: If this message appears on the display, the
cassette tape player needs to be cleaned. It will still play
tapes, but you should clean it as
soon as possible to
prevent damage to the tapes and player. See “Care of
Your Cassette Tape Player”
in the Index. After you clean
the player, press and hold EJECT for five seconds to
reset the
CLN indicator. The radio will display --- to
show the indicator was reset.
CD Adapter Kits
It is possible to use a CD adapter kit with your cassette
tape player after activating the bypass feature on your
tape player.
To activate the bypass feature, use the following steps:
1. Turn the ignition to RUN or ACCESSORY.
2. Turn the radio off.
3. Press and hold the TAPE AUX button for five
seconds. The tape symbol on the display will flash
for two seconds, indicating the feature is active.
4. Insert the adapter. It will power up the radio and
begin playing.
This override routine will remain active until EJECT
is pressed.
AM-FM Stereo with Compact Disc Player
and Automatic Tone Control (If Equipped)
Playing the Radio
PWR-VOL:
Press this knob to turn the system on and
off. To increase volume, turn the knob to the right. Turn
it to the left to decrease volume. The knob is capable
of
rotating continuously.
RECALL: Press this button to recall the station being
played.
If you press the button when the ignition is off,
the clock will show for a few seconds.
3-14
ProCarManuals.com