light OLDSMOBILE SILHOUETTE 1998 Manual Online
[x] Cancel search | Manufacturer: OLDSMOBILE, Model Year: 1998, Model line: SILHOUETTE, Model: OLDSMOBILE SILHOUETTE 1998Pages: 444, PDF Size: 23.2 MB
Page 310 of 444
I NOTICE:
Spinning your wheels can destroy parts of your
vehicle as well as the tires. If you spin the wheels
too fast while shifting your transaxle back and
forth, you can destroy your transaxle.
For information about using tire chains on your vehicle,
see “Tire Chains” in the Index.
Rocking Your Vehicle To Get It Out
First, turn your steering wheel left and right. That will
clear the area around your front wheels. If your vehicle
has traction control,
you should turn your traction
control system
off. (See “Traction Control System” in
the Index.) Then shift back and forth between
REVERSE (R) and a forward gear, spinning the wheels
as little as possible. Release the accelerator pedal while
you shift, and press lightly on the accelerator pedal
when the transaxle is in gear.
If that doesn’t get you out
after a few tries, you may need to be towed out.
If you
do need to be towed out, see “Towing Your Vehicle” in
the Index.
5-36
ProCarManuals.com
Page 317 of 444

Be careful not to spill gasoline. Clean gasoline from
painted surfaces as
soon as possible. See “Cleaning the
Outside
of Your Vehicle” in the Index.
When you put the cap back on,
turn it to the right
(clockwise) until you hear a clicking sound. Make sure
you fully install the cap. The diagnostic system can
determine
if the fuel cap has been left off or improperly
installed. This would allow fuel to evaporate into the
atmosphere. See “Malfunction Indicator Lamp” in
the Index.
.
NOTICE:
If you need a new cap, be sure to get the right
type. Your retailer can get one for you.
If you get
the wrong type,
it may not fit properly. This may
cause your malfunction indicator lamp to light
and your fuel tank and emissions system may be
damaged. See “Malfunction Indicator Lamp” in
the Index.
Filling a Portable Fuel Container
Never fill a portable fuel container while it is in
your vehicle. Static electricity discharge from the
container can ignite the gasoline vapor. You can
be badly burned and your vehicle damaged if this
occurs.
To help avoid injury to you and others:
Dispense gasoline only into
approved containers.
Do not fiil a container while it is inside a
vehicle, in a vehicle’s trunk, pickup bed or
on any surface other than the ground.
inside of the
fill opening before operating
the nozzle. Contact should be maintained
until the filling is complete.
Bring the fill nozzle in contact with the
Don’t smoke while pumping gasoline.
6-7
ProCarManuals.com
Page 321 of 444

Before closing the hood, be sure all the filler caps are on
properly. Then lift the hood
to relieve pressure on the
hood prop. Remove the hood prop from the slot in the
hood and return the prop to its retainer. Then just let the
hood down and close it firmly.
Underhood Lamp (If Equipped)
Your underhood lamp will go on when you open
the hood.
Engine Oil
LEVEL
If the low oil level light on
the instrument panel comes
on, it means you need to
check your engine oil level
right away.
For more information, see
“Low Oil Level Light” in the
Index. You should check your engine oil level regularly;
this is an added reminder.
It’s a good idea to check your engine oil every time you
get fuel. In order to get an accurate reading, the oil must
be warm and
the vehicle must be on level ground. The
engine
oil dipstick is located at the front of the
engine compartment, near the center. The dipstick
handle has
a bright, yellow loop design for
easy identification.
Turn off the engine and give the oil a few minutes to
drain back into the oil pan. If you don’t, the oil dipstick
might not show the actual level.
6-11
ProCarManuals.com
Page 331 of 444
Engine Coolant
The cooling s stem in your vehicle is filled with
DEX-COOL engine coolant. This coolant is designed
to remain in your vehicle for
5 years or 150,000 miles
(240 000 lunb whichever occurs first, if you add only
DEX-COOL extended life coolant.
J
The following explains your cooling system and how
to add coolant when it is low. If you have a problem
with engine overheating, see “Engine Overheating” in
the Index.
A 50/50 mixture of water and DEX-COOL@
coolant will:
Give freezing protection down to -34°F (-37°C).
0 Give boiling protection up to 265 OF (1 29 O C).
Protect against rust and corrosion.
Help keep the proper engine temperature.
Let the warning lights and gages work as
they should.
NOTICE:
When adding coolant, it is important that you
use only
DEX-COOL@ (silicate-free) coolant.
If coolant other than DEX-COOL is added to
the system, premature engine, heater core or
radiator corrosion may result. In addition, the
engine coolant will require change sooner
-- at
30,000 miles (50 000 km) or 24 months,
whichever occurs
first. Damage caused by the
use of coolant other than DEX-COOL@ is not
covered by your new vehicle warranty.
6-21
ProCarManuals.com
Page 333 of 444

Checking Coolant
The engine coolant reservoir is located on the driver’s
side
of the vehicle, above the air cleaner.
When your engine
is cold, the coolant level should be
at
FULL COLD, or a little higher. When your engine
is warm, the level should be above the
FULL COLD
mark, or a little higher.
Adding Coolant
If this light comes on, it
means you’re low on
engine coolant.
If you need more coolant, add the proper DEX-COOL@
coolant mixture at the coolant recovery tank.
-
Turning the radiator pressure cap when the
engine and radiator are hot can allow steam and
scalding liquids to blow out and burn you badly.
With the coolant recovery tank, you will almost
never have
to add coolant at the radiator. Never
turn the radiator pressure cap
-- even a little --
when the engine and radiator are hot.
6-23
ProCarManuals.com
Page 338 of 444
BRAKE
United States Canadian
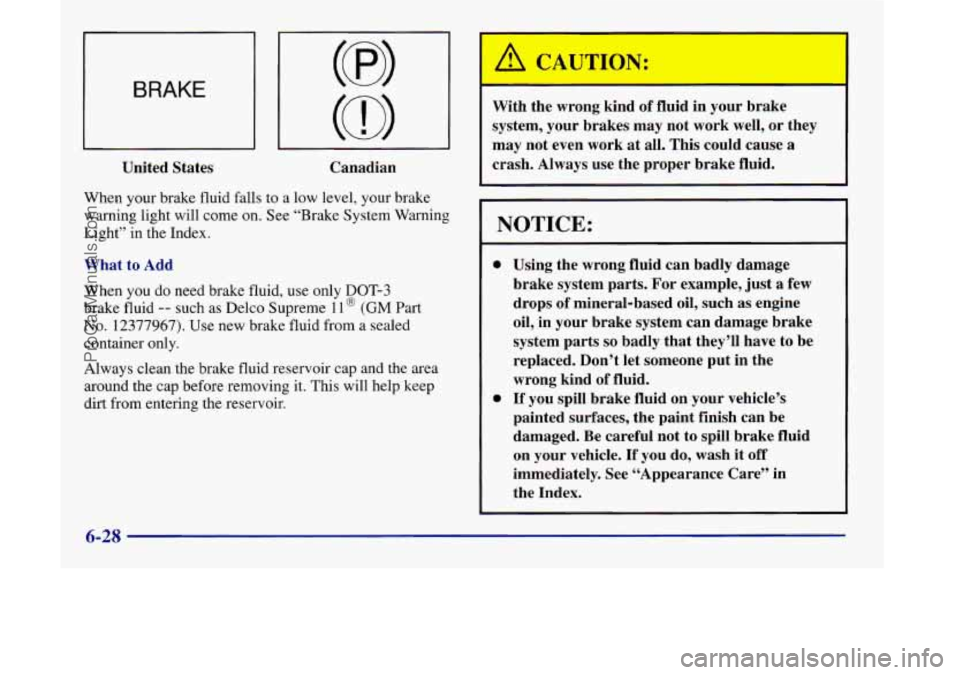
When your brake fluid falls to a low level, your brake
warning light will come on. See “Brake System Warning
Light” in the Index.
What to Add
When
you do need brake fluid, use only DOT-3
brake fluid -- such as Delco Supreme 1 1 @ (GM Part
No. 12377967). Use new brake fluid from a sealed
container only.
Always clean the brake fluid reservoir cap and the area
around the cap before removing it. This will help keep
dirt from entering the reservoir. With the wrong kind
of fluid in your brake
system, your brakes may not work well, or they
may not even work at all. This could cause
a
crash. “1 Always use the proper brake fluid.
NOTICE:
0
0
Using the wrong fluid can badly damage
brake system parts. For example, just
a few
drops of mineral-based oil, such as engine
oil, in your brake system can damage brake
system parts
so badly that they’ll have to be
replaced. Don’t let someone put in the
wrong kind of fluid.
If you spill brake fluid on your vehicle’s
painted surfaces, the paint finish can be
damaged. Be careful not to spill brake fluid
on your vehicle.
If you do, wash it off
immediately. See “Appearance Care” in
the Index.
6-28
ProCarManuals.com
Page 339 of 444
Brake Wear
Your vehicle has front disc brakes and rear drum brakes.
Disc brake pads have built-in wear indicators that
make a high-pitched warning sound when the brake
pads are worn and new pads are needed. The sound may
come and go or be heard all the time your vehicle is
moving (except when you are pushing
on the brake
pedal firmly).
I A CAUTION:
The brake wear warning sound means that soon
your brakes won’t work well. That could lead to
an accident. When you hear the brake wear
warning sound, have your vehicle serviced.
NOTICE:
Continuing to drive with worn-out brake pads
could result in costly brake repair.
Some driving conditions or climates may cause a brake
squeal when the brakes are first applied
or lightly
applied. This does not mean something is wrong with
your brakes.
Properly torqued wheel nuts are necessary to help
prevent brake pulsation. When tires are rotated, inspect
brake pads for wear and evenly torque wheel nuts in
the proper sequence
to GM specifications.
Your rear drum brakes don’t have wear indicators, but
if you ever hear
a rear brake rubbing noise, have the
rear brake linings inspected immediately. Also, the rear
brake drums should be removed and inspected each time
the tires are removed for rotation or changing. When
you have the front brake pads replaced, have the rear
brakes inspected, too.
Brake linings should always be replaced as complete
axle sets.
See “Brake System Inspection’’ in Section
7 under
Part
C “Periodic Maintenance Inspections.”
Brake Pedal Travel
See your retailer if the brake pedal does not return to
normal height, or if there is a rapid increase in pedal
travel. This could be a sign of brake trouble.
6-29
ProCarManuals.com
Page 353 of 444

CAUTION:
Mixing tires could cause you to lose control while
driving.
If you mix tires of different sizes or types
(radial and bias-belted tires), the vehicle may not
handle properly, and you could have a crash.
Using tires of different sizes may also cause
damage to your vehicle. Be sure to use the same
size and type tires on all wheels.
It’s all right to drive with your compact spare,
though. It was developed for use on your vehicle.
i A CAUTION: I
I If you use bias-ply tires on your vehicle, the
wheel rim flanges could develop cracks after
many miles of driving.
A tire and/or wheel could
fail suddenly, causing a crash. Use only radial-ply
tires with the wheels
on your vehicle.
Uniform Tire Quality Grading
The following information relates to the system
developed by the United States National Highway
Traffic Safety Administration, which grades tires by
treadwear, traction and temperature performance. (This
applies only to vehicles sold in the United States.) The
grades are molded on the sidewalls
of most passenger
car tires. The Uniform Tire Quality Grading system
does not apply to deep tread, winter-type snow tires,
space-saver or temporary use spare tires, tires with
nominal rim diameters of
10 to 12 inches (25 to 30 cm),
or to some limited-production tires.
While the tires available on General Motors passenger
cars and light trucks may vary with respect to these
grades, they must also conform to Federal safety
requirements and additional General Motors Tire
Performance Criteria
(TPC) standards.
6-43
ProCarManuals.com
Page 364 of 444
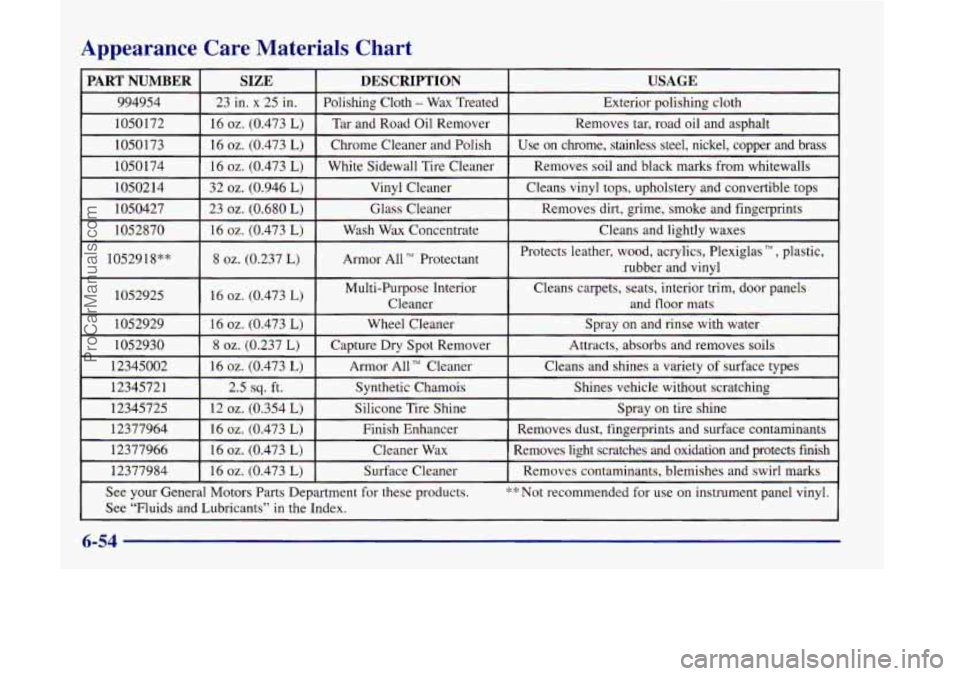
Appearance Care Materials Chart
PART NUMBER USAGE DESCRIPTION
SIZE
994954
Exterior polishing cloth
Polishing Cloth - Wax Treated 23 in. x 25 in.
1050 172
Cleans and lightly waxes
Wash Wax Concentrate
16
oz. (0.473 L) 1052870 Removes dirt, grime, smoke and fingerprints
Glass Cleaner
23 oz. (0.680 L) 1050427 Cleans vinyl tops, upholstery and convertible tops
Vinyl Cleaner 32
02. (0.946 L) 1050214 Removes soil and black marks from whitewalls White Sidewall Tir\
e Cleaner
16
oz. (0.473 L) 1050174 Use on chrome, stainless steel, nickel, copper and brass
Chrome Cleaner and Polish 16
oz. (0.473 L) 1050173 Removes tar, road oil and asphalt
Tar and Road Oil Remover 16
oz. (0.473 L)
1 ~ 1052918** I 8 oz. (0.237 L) I Armor All TM Protectant Protects leather, wood, acrylics, Plexiglas T’, plastic,
rubber and vinyl
6-54
ProCarManuals.com
Page 367 of 444

Fuses and Circuit Breakers
The wiring circuits in your vehicle are protected from
short circuits by a combination of fuses, circuit breakers
and fusible thermal links.
Look at the silver-colored band inside the fuse. If the
band is broken or melted, replace the fuse. Be sure you
replace a bad fuse with a new one
of the identical size
and rating.
If you ever have a problem on the road and don’t have a
spare fuse, you can borrow one that has the same
amperage
or use one of the spare fuses in the underhood
fuse and relay center. Just pick some feature of your
vehicle that
you can get along without -- like the radio
or cigarette lighter -- and use its fuse, if it is the right
amperage. Replace it as soon as you can.
There are two fuse blocks in your vehicle: the
instrument panel fuse block and
the underhood fuse and
relay center.
Instrument Panel Fuse Block
The instrument panel fuse
block is to the right of the
glove
box. Pull the door
open to access the
instrument panel fuse block.
ProCarManuals.com