display OLDSMOBILE SILHOUETTE 2003 Service Manual
[x] Cancel search | Manufacturer: OLDSMOBILE, Model Year: 2003, Model line: SILHOUETTE, Model: OLDSMOBILE SILHOUETTE 2003Pages: 466, PDF Size: 21.55 MB
Page 250 of 466
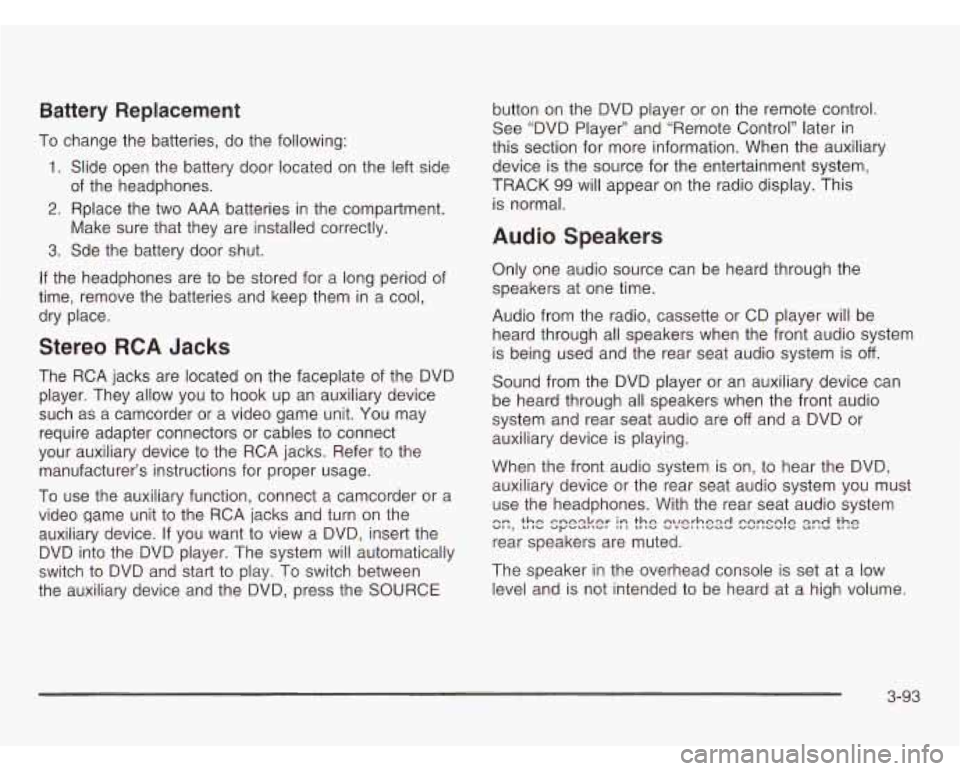
Battery Replacement
To change the batteries, do the following:
1. Slide open the battery door located on the left side
2. Rplace the two AAA batteries in the compartment.
3. Sde the battery door shut.
of
the headphones.
Make sure that they are installed correctly.
If the headphones are to be stored for a long period of
time, remove the batteries and keep them
in a cool,
dry place.
Stereo RCA Jacks
The RCA jacks are located on the faceplate of the DVD
player. They allow you to hook up an auxiliary device
such as a camcorder or a video game unit. You may
require adapter connectors or cables to connect
your auxiliary device to the RCA jacks. Refer to the
manufacturer’s instructions for proper usage.
To use the auxiliary function, connect a camcorder or a
video game unit to the RCA jacks and turn on the
auxiliary device. If you want to view a DVD, insert the
DVD into the DVD player. The system will automatically
switch to DVD and start
to play. To switch between
the auxiliary device and the DVD, press the SOURCE button
on the DVD player or on the remote control.
See “DVD Player” and “Remote Control’’ later in
this section for more information. When the auxiliary
device is the source for the entertainment system,
TRACK
99 will appear on the radio display. This
is normal.
Audio Speakers
Only one audio source can be heard through the
speakers at one time.
Audio from the radio, cassette or
CD player will be
heard through all speakers when the front audio system
is being used and the rear seat audio system is
off.
Sound from the DVD player or an auxiliary device can
be heard through all speakers when the front audio
system and rear seat audio are
off and a DVD or
auxiliary device
is playing.
When the front audio system
is on, to hear the DVD,
auxiliary device or the rear seat audio system you must
use the headphones. With the rear seat audio system
rear speakers are muted.
c::, the spesker I:: the !?/e!-hex! C2rrSClE 2zd the
The speaker in the overhead console is set at a low
level and is not intended to be heard at a high volume.
3-93
Page 253 of 466
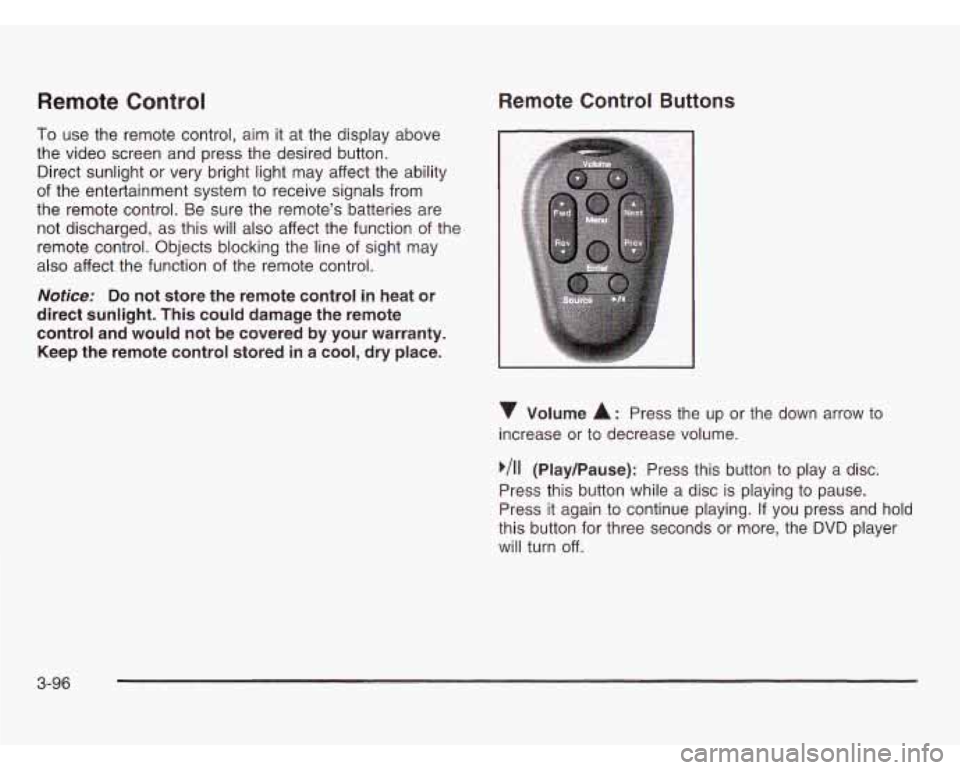
Remote Control
To use the remote control, aim it at the display above
the video screen and press the desired button.
Direct sunlight or very bright light may affect the ability
of the entertainment system to receive signals from
the remote control. Be sure the remote’s batteries are
not discharged, as this will also affect the function of the
remote control. Objects blocking the line of sight may
also affect the function of the remote control.
Notice: Do not store the remote control in heat or
direct sunlight. This could damage the remote
control and would not be covered by your warranty.
Keep the remote control stored in a cool, dry place.
Remote Control Buttons
Volume A: Press the up or the down arrow to
increase or to decrease volume.
,/I1 (Play/Pause): Press this button to play a disc.
Press this button while a disc is playing to pause.
Press it again to continue playing.
If you press and hold
this button for three seconds or more, the DVD player
will turn off.
3-96
Page 257 of 466
Rear Seat Audio (RSA)
(With Entertainment System)
This feature allows rear seat passengers to listen to
and control any of the music sources: radio, cassette
tapes and
CDs. However, the rear seat passengers
can only control the music sources that the front seat
passengers are not listening to. For example, rear
seat passengers may listen to a cassette tape or
CD
through headphones while the driver listens to the radio
through the front speakers. The rear seat passengers
have control of the volume for each set of headphones.
Be aware that the front seat audio controls always
have priority over the
RSA controls. If the front seat
passengers switch the source for the main radio
to a remote source, the
RSA will play the same remote
source. The rear speakers will be muted when the
RSA power is turned on. You may operate the RSA
functions even when the main radio is off.
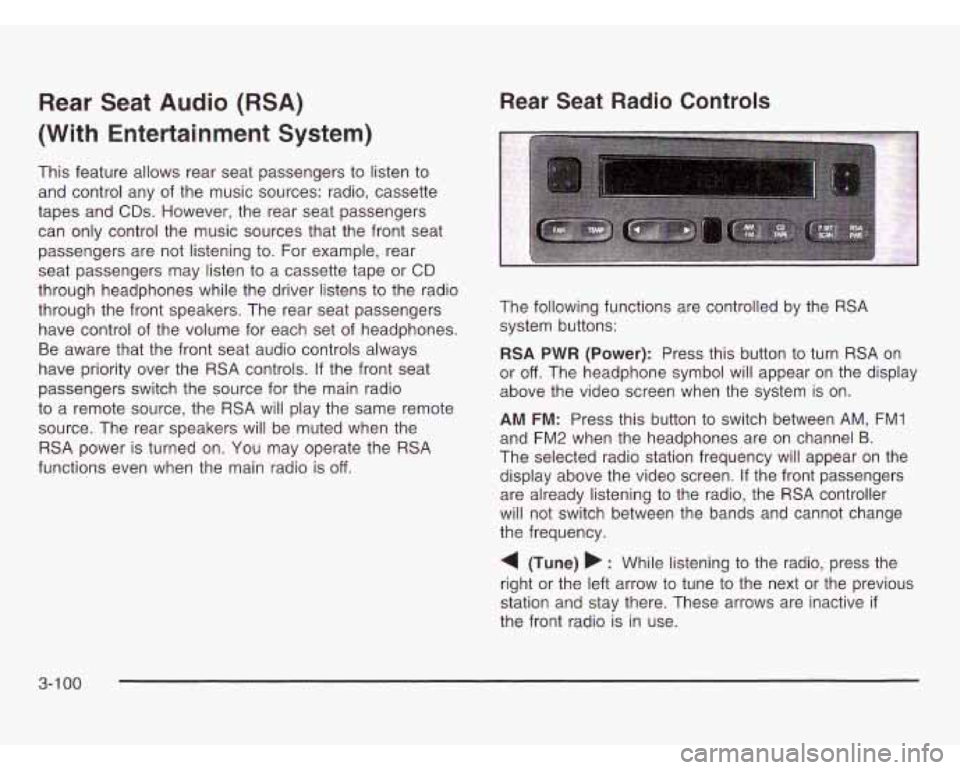
The following functions are controlled by the RSA
system buttons:
RSA PWR (Power): Press this button to turn RSA on
or
off. The headphone symbol will appear on the display
above the video screen when the system is on.
AM FM: Press this button to switch between AM, FM1
and FM2 when the headphones are on channel B.
The selected radio station frequency will appear on the
display above the video screen.
If the front passengers
are already listening to the radio, the
RSA controller
will not switch between the bands and cannot change
the frequency.
4 (Tune) b : While listening to the radio, press the
right or the left arrow to tune to the next or the previous
station and stay there. These arrows are inactive
if
the front radio is in use.
3-1 00
Page 258 of 466
While listening to a cassette tape, press the right arrow to
hear the next selection on the tape. Press the left arrow to
go back to the previous selection. These arrows are
inactive
if the tape mode on the front radio is in use.
While listening to a CD, press the right arrow to hear the
next track on the CD. Press the left arrow to go back to
the start of the current track (if more than eight seconds
have played). These arrows are inactive
if the CD mode
on the front radio is in use.
P.SET SCAN (Preset
Scan): The front passengers
must be listening to something different for each of
these functions to work:
Press and hold this button to scan through the
preset radio stations set on the pushbuttons on the
main radio. The radio will go to a preset station
stored on your pushbuttons, play for a few seconds,
then go on to the next preset station. This feature
will only scan the presets that are in the selected
band. The selected radio station frequency will
appear on the display above the video screen.
Przss this !x::sn zgzi;; tz step scznzizcj pi-esek
If your vehicle is equipped with the AM-FM Radio
with Cassette Tape and Compact Disc Player
with Radio Data System (RDS) and Automatic Tone
Control, press this button to go to the other side
of the tape when a cassette tape is playing.
0 If your vehicle has the AM-FM Radio with Six-Disc
Compact Disc Player with Equalization and Radio
Data System (RDS), press this button to switch
to playing a different CD when multiple CDs
are loaded into the CD player.
CD TAPE: Press this button to switch between playing
a cassette tape, a compact disc, a DVD or an auxiliary
device when the headphones are on channel
B. If one
of the devices is not loaded, the system will skip
over the device when this button is pressed.
Theft-Deterrent Feature
THEFTLOCK@ is designed to discourage theft of your
radio. The feature works automatically by learning
a portion of the Vehicle Identification Number
(VIN).
If the radio is moved to a different vehicle, it will
not operate and LOCKED will be displayed.
When the radio and vehicle are turned
off, your radio
may have a blinking red light that indicates that
THEFTLQCK IC 2rme.l.
With THEFPLOCK activated, your radio will not operate
if stolen.
3-1 01
Page 259 of 466
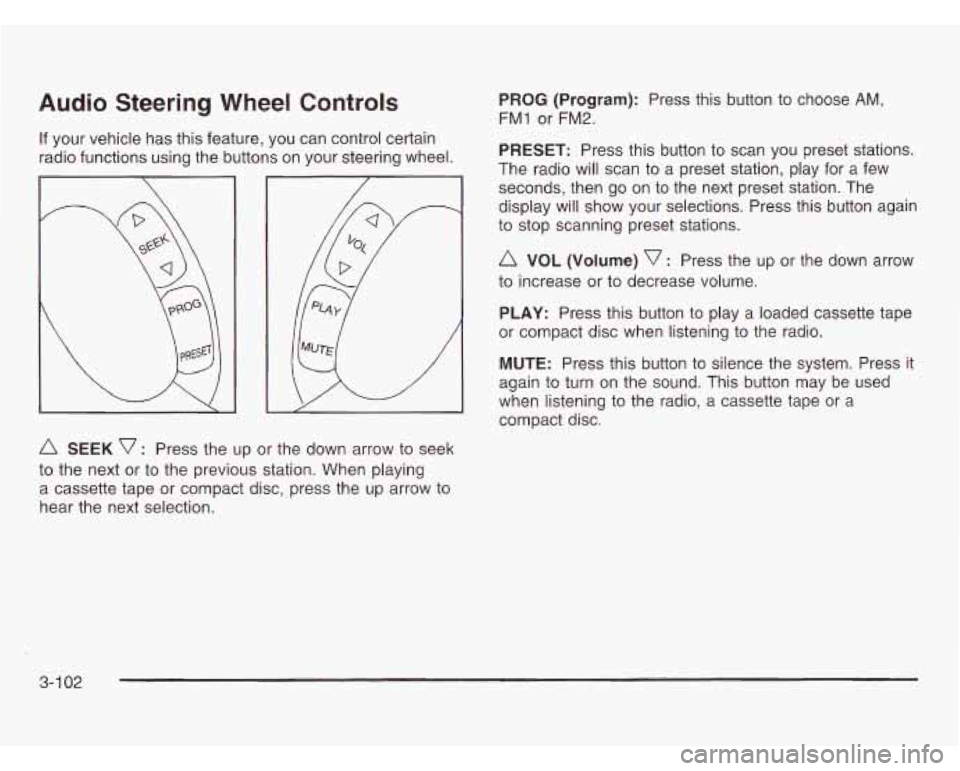
Audio Steering Wheel Controls
If your vehicle has this feature, you can control certain
radio functions using the buttons on your steering wheel.
A SEEK v : Press the up or the down arrow to seek
to the next or to the previous station. When playing
a cassette tape
or compact disc, press the up arrow to
hear the next selection.
PROG (Program): Press this button to choose AM,
FM1 or FM2.
PRESET: Press this button to scan you preset stations.
The radio will scan to a preset station, play for a few
seconds, then go on to the next preset station. The
display will show your selections. Press this button again
to stop scanning preset stations.
A VOL (Volume) v : Press the up or the down arrow
to increase or to decrease volume.
PLAY: Press this button to play a loaded cassette tape
or compact disc when listening to the radio.
MUTE: Press this button to silence the system. Press it
again to turn on the sound. This button may be used
when listening to the radio, a cassette tape or a
compact disc.
3-1 02
Page 260 of 466
DVD Distortion
You may experience video distortion when operating
cellular phones, scanners, CB radios, Global Position
Systems (GPS)*, two-way radios, mobile fax, or
wal kie talkies.
It may be necessary to turn
off the DVD player when
operating one of these devices in or near the vehicle.
*Excludes the Onstar@ System.
Understanding Radio Reception
AM
The range for most AM stations is greater than for FM,
especially at night. The longer range, however, can
cause stations to interfere with each other. AM can pick
up noise from things like storms and power lines. Try
reducing the treble to reduce this noise
if you ever get it.
FM
FM stereo will give you the best sound, but FM signals
will reach only about
10 to 40 miles (16 to 65 km).
Tall buildings or hills can interfere with
FM signals,
causing the sound to come and go.
Care of Your Cassette Tape Player
A tape player that is not cleaned regularly can cause
reduced sound quality, ruined cassettes or a damaged
mechanism. Cassette tapes should be stored
in their
cases away from contaminants, direct sunlight and
extreme heat. If they aren’t, they may not operate
properly or may cause failure
of the tape player.
Your tape player should be cleaned regularly after
every
50 hours of use. Your radio may display CLEAN
to indicate that you have used your tape player for
50 hours without resetting the tape clean timer.
If this message appears on the display, your cassette
tape player needs to be cleaned. It will still play
tapes, but you should clean it as soon as possible
to prevent damage to your tapes and player. If you
notice a reduction in sound quality, try a known good
cassette to see
if the tape or the tape player is at fault.
If this other cassette has no improvement in sound
quality, clean the tape player.
For best results, use a scrubbing action, non-abrasive
cieaning casseiie wirn pads wnicn scrub tne tape
head as the hubs of the cleaner cassette turn.
The recommended cleaning cassette is available
through your dealership.
3-1 03
Page 261 of 466
The broken tape detection feature of your cassette
tape player may identify the cleaning cassette as
a damaged tape, in error. To prevent the cleaning
cassette from being ejected, use the following steps:
1. Turn the ignition on.
2. Turn the radio off.
3. Press and hold the TAPE CD button for five
seconds. READY will appear on the display and
a cassette symbol will flash for five seconds.
4. Insert the scrubbing action cleaning cassette.
5. Eject the cleaning cassette after the manufacturer’s
recommended cleaning time.
After the cleaning cassette is ejected, the broken tape
detection feature will be active again.
You may also choose a non-scrubbing action, wet-type
cleaner which uses a cassette with a fabric belt to
clean the tape head. This type of cleaning cassette will
not eject on its own. A non-scrubbing action cleaner
may not clean as thoroughly as the scrubbing type
cleaner. The use of a non-scrubbing action, dry-type
cleaning cassette is not recommended. After you
clean the player, press and hold the EJT
button for five seconds to reset the CLEAN indicator.
The radio will display CLEANED to show the indicator
was reset.
Cassettes are subject to wear and the sound quality
may degrade over time. Always make sure the cassette
tape is in good condition before you have your tape
player serviced.
Care of Your CDs and DVDs
Handle discs carefully. Store them in their original cases
or other protective cases and away from direct sunlight
and dust. If the surface of a disc is soiled, dampen
a clean, soft cloth in a mild, neutral detergent solution
and clean it, wiping from the center to the edge.
Be sure never to touch the side without writing when
handling discs. Pick up discs by grasping the outer
edges or the edge of the hole and the outer edge.
Care of Your CD and DVD Player
The use of CD lens cleaner discs is not advised, due to
the risk of contaminating the lens of the CD optics
with lubricants internal to the CD mechanism.
3-1 04
Page 325 of 466
How to Reset the Change Engine
Oil Message
The GM Oil Life System calculates when to change your
engine oil and filter based on vehicle use. Anytime your
oil is changed, reset the system
so it can calculate when
the next oil change is required.
If a situation occurs where
you change your oil prior to a change engine oil message
being turned on, reset the system.
1. With the ignition key in RUN but the engine off,
repeatedly push the tripheset button until OIL is
displayed on the Driver Information Center (DIC).
2. Once OIL is displayed, push and hold the tripheset
button for five seconds. The number will disappear
and be replaced by
100 (indicating 100% oil life
remaining).
3. Turn the key to OFF.
If the change engine oil message comes back on,
the engine oil life monitor has not reset. Repeat the
procedure.
What to Do with Used Oil
Used engine oil contains certain elements that may be
unhealthy for your skin and could even cause cancer.
Don’t let used oil stay on your skin for very long.
Clean your skin and nails with soap and water, or a
good hand cleaner. Wash or properly dispose of
clothing or rags containing used engine oil. See the
manufacturer’s warnings about the use and disposal
of oil products.
Used oil can be a threat to the environment. If you
change your own oil, be sure to drain all the oil from
the filter before disposal. Never dispose of oil by putting
it in the trash, pouring it on the ground, into sewers,
or into streams or bodies of water. Instead, recycle it
by taking it to a place that collects used oil.
If you
have a problem properly disposing of your used oil,
ask your dealer, a service station or a local recycling
center for help.
5-1 8
Page 406 of 466
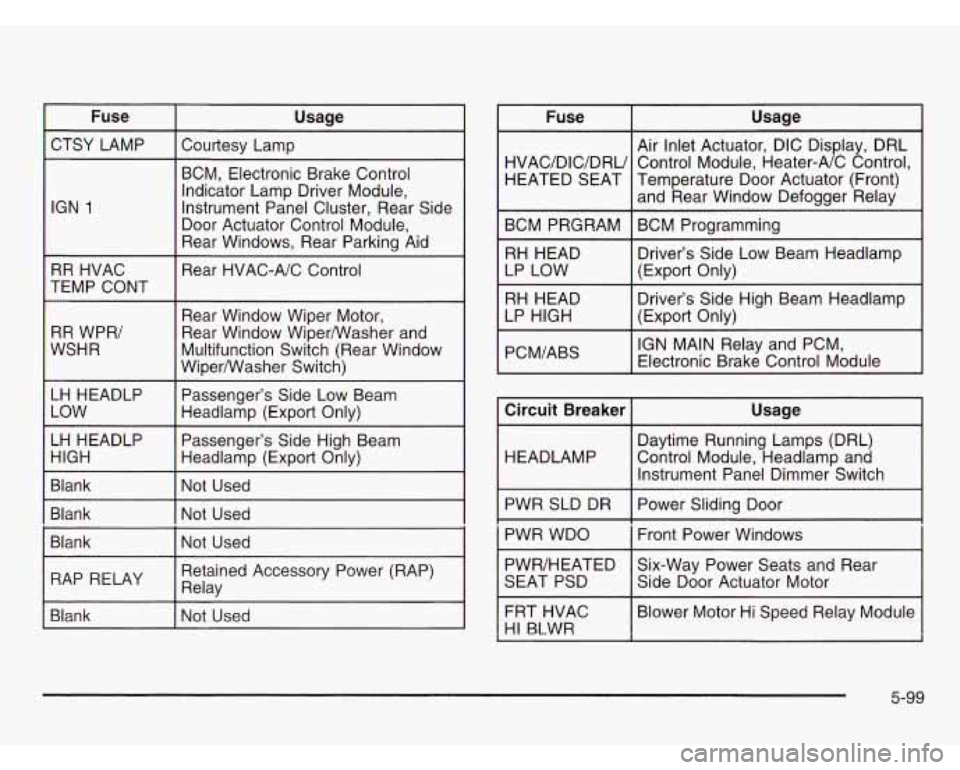
Fuse Usage
CTSY LAMP Courtesy Lamp
IGN
1
~~ ~ ~~____
BCM, Electronic Brake Control
Indicator Lamp Driver Module,
Instrument Panel Cluster, Rear Side
Door Actuator Control Module,
Rear Windows, Rear Parking Aid
~~
RR HVAC
TEMP CONT
RR WPR/
WSHR Rear
HVAC-A/C Control
Rear Window Wiper Motor,
Rear Window WiperNVasher and
Multifunction Switch (Rear Window
Wiper/Washer Switch)
LH HEADLP Passenger’s Side Low Beam
I Headlamp (Export Only)
Passenger’s Side High Beam
Headlamp (Export Only)
I Blank I Not Used
I Blank I Not Used
Blank Not Used
I
I RAP RELAY I Relay Retained Accessory Power (RAP) I
Blank l-Nat Used Fuse
Usage
Air Inlet Actuator, DIC Display, DRL
HVAC/DIC/DRU Temperature Door Actuator (Front) HEATED SEAT
Control
Module, Heater-A/C Control,
and Rear Window Defogger Relay
BCM PRGRAM BCM Programming
RH HEAD Driver’s Side Low Beam Headlamp
LP LOW (Export Only)
RH HEAD
(Export Only)
I LP HIGH Driver’s
Side High Beam Headlamp
PCM/ABS
I IGN MAIN Relay and PCM,
Electronic Brake Control Module
Circuit Breaker
I Usage
I 1
Daytime Running Lamps (DRL)
HEADLAMP Control Module, Headlamp and
Instrument Panel Dimmer Switch
PWR SLD DR
I Power Sliding Door
PWR WDO
i Front Power Windows i
PWR/HEATED Six-Way Power Seats and Rear
SEAT PSD
I Side Door Actuator Motor
FRT HVAC
I Blower Motor Hi Speed Relay Module
HI B4WR I
5-99
Page 408 of 466
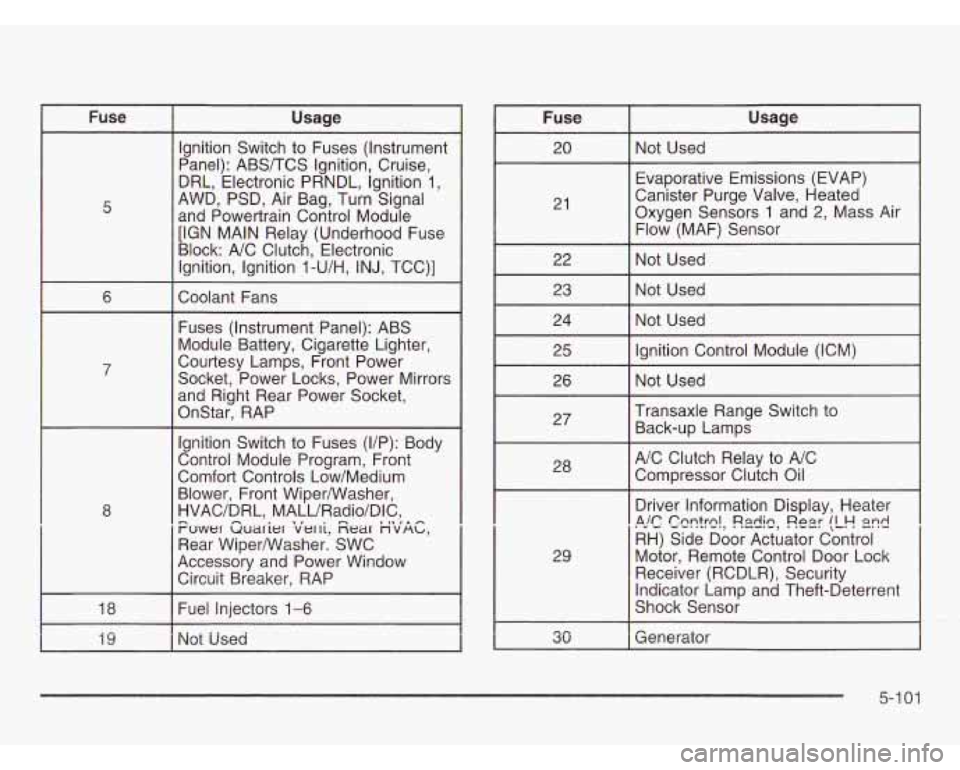
Fuse Usage
5 Ignition
Switch to Fuses (Instrument
Panel): ABS/TCS Ignition, Cruise,
DRL, Electronic PRNDL, Ignition 1,
AWD, PSD, Air Bag, Turn Signal
and Powertrain Control Module
[IGN MAIN Relay (Underhood Fuse
Block: A/C Clutch, Electronic
Ignition, Ignition
l-U/H, INJ, TCC)]
I 6 I Coolant Fans I
Fuses (Instrument Panel): ABS
Module Battery, Cigarette Lighter,
Courtesy Lamps, Front Power
Socket, Power Locks, Power Mirrors
and Right Rear Power Socket,
OnStar, RAP
Ignition Switch to Fuses (VP): Body
Control Module Program, Front
Comfort Controls Low/Medium
Blower, Front WiperANasher,
HVAC/DRL, MALURadio/DIC,
Puwer Guarier iierri, Zear nvnb,
Rear Wiper/Washer. SWC
Accessory and Power Window Circuit Breaker, RAP
I I. ,n -
I 18 I Fuel Injectors 1-6 I
Fuse Usage
21 Evaporative Emissions (EVAP)
Canister Purge Valve, Heated
Oxygen Sensors 1 and 2, Mass Air
Flow (MAF) Sensor
I 22 I Not Used I
23 I Not Used
I 24 I Not Used I
I 25 I Ignition Control Module (ICM) I
I
26 I Not Used I
I 27 I
Transaxle Range Switch to
Back-up Lamps
I 28 I
A/C Clutch Relay to A/C
Compressor Clutch Oil
29
I I’ *ulc CQr?!!3!, !?.ldiQ, Re2r !L!-! 2nd , I
Driver Information Display, Heater
RH) Side Door Actuator Control
Motor, Remote Control Door Lock
Receiver (RCDLR), Security
Indicator Lamp and Theft-Deterrent
Shock Sensor
5-1
01