ECO mode OLDSMOBILE SILHOUETTE 2003 Owners Manual
[x] Cancel search | Manufacturer: OLDSMOBILE, Model Year: 2003, Model line: SILHOUETTE, Model: OLDSMOBILE SILHOUETTE 2003Pages: 466, PDF Size: 21.55 MB
Page 82 of 466

When an air baa jnflates, there is dust in the
air. This dust could cause breathing problems
for people with a history of asthma or other breathing trouble.
To avoid this, everyone in
the vehicle should get out as soon as it is safe
to do
so. If you have breathing problems but
can’t get out of the vehicle after an air bag
inflates, then get fresh air by opening a
window or a door.
If you experience breathing
problems following an air bag deployment,
you should seek medical attention.
In many crashes severe enough to inflate an air bag,
windshields are broken by vehicle deformation.
Additional windshield breakage may also occur from
the right front passenger air bag.
Air bags are designed to inflate only once. After an
air bag inflates, you’ll need some new parts for
your air bag system. If you don’t get them, the air
bag system won’t be there to help protect you
in another crash.
A new system will include air bag
manual for your vehicle covers the need to replace
other parts.
modules and possibly other parts. The service
Your vehicle is equipped with an electronic frontal
sensor, which helps the sensing system distinguish
between a moderate frontal impact and a more
severe frontal impact. Your vehicle is also equipped
with a crash sensing and diagnostic module,
which records information about the frontal air bag
system. The module records information about
the readiness of the system, when the system
commands air bag inflation and driver’s safety belt
usage at deployment. The module
also records
speed, engine
RPM, brake and throttle data.
Let only qualified technicians work on your air bag
systems. Improper service can mean that an air
bag system won’t work properly. See your dealer
for service.
Notice: If you damage the covering for the driver’s
or the right front passenger’s air bag, or the air
bag covering on the driver’s and right front
passenger’s seatback, the bag may not work
properly. You may have to replace the air bag
module
in the steering wheel, both the air bag
module and the instrument panel for the right front
passenger’s air bag, or both the air bag module
and seatback for the driver’s and right front
passenger’s side impact air bag.
Do not open or
break the air bag coverings.
1 -75
Page 135 of 466
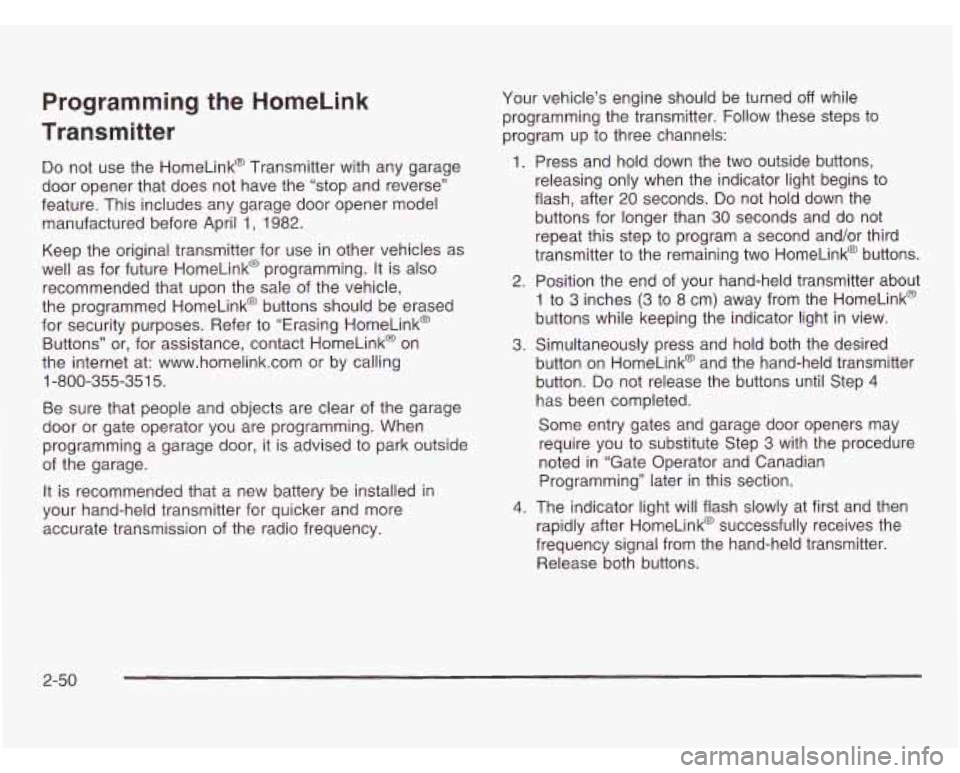
Programming the HomeLink
Transmitter
Do not use the HomeLink@ Transmitter with any garage
door opener that does not have the “stop and reverse”
feature. This includes any garage door opener model
manufactured before April
1, 1982.
Keep the original transmitter for use in other vehicles as
well as for future HomeLink@ programming. It is also
recommended that upon the sale of the vehicle,
the programmed HomeLink@ buttons should be erased
for security purposes. Refer to “Erasing HomeLink@
Buttons” or, for assistance, contact HomeLink@ on
the internet at: www.homelink.com or by calling
Be sure that people and objects are clear of the garage
door or gate operator you are programming. When
programming a garage door, it is advised to park outside
of the garage.
It is recommended that a new battery be installed in
your hand-held transmitter for quicker and more
accurate transmission of the radio frequency.
1-800-355-351
5. Your
vehicle’s engine should be turned
off while
programming the transmitter. Follow these steps to
program up to three channels:
1. Press and hold down the two outside buttons,
releasing only when the indicator light begins to
flash, after 20 seconds.
Do not hold down the
buttons for longer than 30 seconds and do not
repeat this step to program a second and/or third
transmitter to the remaining
two HomeLink@ buttons.
2. Position the end of your hand-held transmitter about
1 to 3 inches (3 to
8 cm) away from the HomeLink@
buttons while keeping the indicator light in view.
3. Simultaneously press and hold both the desired
button on HomeLink@ and the hand-held transmitter
button.
Do not release the buttons until Step 4
has been completed.
Some entry gates and garage door openers may
require you to substitute Step 3 with the procedure
noted in “Gate Operator and Canadian
Programming” later in this section.
4. The indicator light will flash slowly at first and then
rapidly after HomeLink@ successfully receives the
frequency signal from the hand-held transmitter.
Release both buttons.
2-50
Page 137 of 466
Gate Operator and Canadian
Programming
Canadian radio-frequency laws require transmitter
signals to “time out” or quit after several seconds of
transmission. This may not be long enough for
HomeLink@ to pick up the signal during programming.
Similarly, some
U.S. gate operators are manufactured to
“time out” in the same manner.
If you live in Canada, or you are having difficulty
programming a gate operator by using the “Programming
HomeLink@” procedures (regardless of where you live),
replace Step
3 under “Programming HomeLink@’ with
the following:
Continue to press and hold the HomeLink@ button while
you press and release every two seconds (cycle)
your hand-held transmitter until the frequency signal has
been successfully accepted by HomeLinkO. The
indicator light will flash slowly at first and then rapidly.
Proceed with Step
4 under “Programming HomeLink@“
to complete.
Using HomeLink@
Press and hold the appropriate HomeLink@ button for
at least half of a second. The indicator light will come on
while the signal is being transmitted.
Erasing HomeLink@ Buttons
To erase programming from the three buttons do the
following:
1. Press and hold down the two outside buttons until
the indicator light begins to flash, after
20 seconds.
2. Release both buttons. Do not hold for longer than
30 seconds.
HomeLink@ is now in the train (learning) mode and can
be programmed at any time beginning with Step
2
under “Programming HomeLink@.”
Individual buttons can not be erased, but they can be
reprogrammed. See “Reprogramming a Single
HomeLink@ Button” next.
2-52
Page 148 of 466
Entering Programming Mode
To program features, your vehicle must be in the
programming mode. Follow these steps:
1. The content theft-deterrent system must be
disarmed. See
Content Theft-Deterrent on
page
2-27.
2. Remove the BCM PRGRM fuse from the instrument
panel fuse block, located to the right of the glove
box. See Fuses and Circuit Breakers on page 5-96.
3. Close the driver’s door
4. Turn the ignition key to ACCESSORY.
5. Count the number of chimes you hear. You will
hear two to four chimes depending on the features
your vehicle is equipped with. Refer to the chart
shown previously.
You can now program your choices.
To exit the programming mode, follow the steps listed
under
Exiting Programming Mode on page 2-71.
Delayed Illumination and
Exit Lighting
This feature allows you to customize the interior lamps
when entering and exiting the vehicle.
Programmable Modes
Mode 1: Both Features Off (The interior lamps will
turn on or
off at the same instant that a door is opened
or closed.)
Mode
2: Delayed Illumination Only (The interior lamps
will stay on for about
25 seconds after all the doors
and liftgate are closed, or until you lock the doors.)
Mode
3: Exit Lighting Only (The interior lamps will
come on whenever you remove the key from the
ignition and stay on for about
25 seconds, or until
you lock the doors.)
Mode
4: Both Features On (This combines
Modes 2 and 3.)
2-63
Page 150 of 466
Before your vehicle was shipped from the factory,
it was programmed in Mode
3. The mode to which the
vehicle was programmed may have been changed since
it left the factory.
To determine the mode to which
your vehicle is programmed or to program your vehicle
to a different mode, do the following:
1. Follow the instructions for Entering Programming
Mode on page 2-63.
2. Press LOCK on the power door lock switch.
3. Count the number of chimes you hear.
The number of chimes indicates the vehicle’s
current programmed mode. (If you do not wish to
change the current mode, you can either exit
the programming mode by following the instructions
later in this section or program the next feature
available on your vehicle.)
4. Press LOCK to change the current mode.
5. Press LOCK until you hear the number of chimes
corresponding
to the mode selection you want.
The mode you selected is
now set. You can either exit
the programming mode by following the instructions
later in this section or program the next feature available
on your vehicle.
Last Door Locking and Lockout
Deterrent
This feature allows you to customize the automatic
locking of the doors when exiting the vehicle.
Programmable Modes
Mode 1: Both Features Off (Doors will always lock
immediately when you press LOCK on the power door
lock switch or the remote keyless entry transmitter.)
Mode
2: Lockout Deterrent Only (If you leave your key
in the ignition with the driver’s door open, you won’t
be able to lock the doors with the power door locks.)
Mode
3: Last Door Closed Locking Only (If the power
door lock switch or the remote keyless entry transmitter
is used to lock the vehicle while any door or the
liftgate is open, you will hear three chimes. The doors
will not lock. Five seconds after the last door is
closed, all doors and the liftgate will lock.)
Mode
4: Both Features On (This combines
Modes
2 and 3.)
2-65
Page 151 of 466
Before your vehicle was shipped from the factory,
it was programmed in Mode
4. The mode to which the
vehicle was programmed may have been changed since
it left the factory. To determine the mode to which
your vehicle is programmed or to program your vehicle
to a different mode, do the following:
1. Follow the instructions for Entering Programming
Mode on page
2-63.
2. Press UNLOCK on the power door lock switch.
3. Count the number of chimes you hear.
The number of chimes indicates the vehicle’s
current programmed mode.
(If you do not wish to
change the current mode, you can either exit
the programming mode by following the instructions
later in this section or program the next feature
available on your vehicle.)
4. Press UNLOCK to change the current mode.
5. Press UNLOCK until you hear the number of chimes
corresponding to the mode selection you want.
The mode you selected is now set. You can either exit
the programming mode by following the instructions
later in this section or program the next feature available
on your vehicle.
Remote Driver Unlock Control
This feature allows you to customize the UNLOCK
button on the remote keyless entry transmitter.
Programmable Modes
Mode 1: Remote All Doors Unlock (When you press
UNLOCK on your remote keyless entry transmitter,
all doors and the liftgate will unlock.)
Mode
2: Remote Driver’s Door Unlock Only
(When you press UNLOCK on your remote keyless
entry transmitter once, the driver’s door will unlock.
When you press UNLOCK on your remote keyless entry
transmitter again within five seconds, all doors and
the liftgate will unlock.)
Before your vehicle was shipped from the factory,
it was programmed in Mode 2. The mode to which the
vehicle was programmed may have been changed since
it left the factory. To determine the mode to which
your vehicle is programmed or to program your vehicle
to
a different mode, do the following:
1. Follow the instructions for Entering Programming
Mode on page
2-63.
2. Press UNLOCK on the remote keyless entry
transmitter.
2-66
Page 153 of 466
Mode 3: Exterior Lamps Flash and Horn Sounds
When you use the remote keyless entry transmitter
to lock your vehicle, the horn will sound and your
parking lamps will flash to let you know the
command has been received.
When you use the remote keyless entry transmitter
to unlock your vehicle or operate your optional
power sliding door(s), your parking lamps will flash
to let you know the command has been received.
Mode
4: Exterior Lamps Flash and Horn Sounds
(on second LOCK press)
When you use the remote keyless entry transmitter
to lock your vehicle, your parking lamps will flash
to let you know the command has been received.
The horn will sound and your parking lamps
will flash
if you press the LOCK button again
within five seconds.
When you use the remote keyless entry transmitter
to unlock your vehicle or operate your optional
power sliding door(s), your parking lamps will flash
to let you know the command has been received. Before your vehicle
was shipped from the factory,
it was programmed in Mode
4. The mode to which the
vehicle was programmed may have been changed since
it left the factory.
To determine the mode to which
your vehicle is programmed or to program your vehicle
to a different mode, do the following:
1. Follow the instructions for Entering Programming
2. Press LOCK on the remote keyless entry
3. Count the number of chimes you hear.
Mode on page 2-63.
transmitter.
The number
of chimes indicates the vehicle’s
current programmed mode. (If you
do not wish to
change the current mode, you can either exit
the programming mode by following the instructions
later in this section or program the next feature
available on your vehicle.)
4. Press LOCK to change the current mode.
5. Press LOCK until you hear the number of chimes
corresponding to the mode selection you want.
The mode you selected is now set. You can either exit
the programming mode by following the instructions
later in this section or program the next feature available
on your vehicle.
2-68
Page 183 of 466
a (Outside Air): Press this button to turn the
outside air mode on or
off. When this mode is on,
outside air will circulate throughout your vehicle.
When this mode is on, an indicator light in the button
will come on to let you know that
it is activated.
The outside air mode can be used with all modes, but
it
cannot be used with the recirculation mode.
a (Recirculation): This mode keeps outside air
from coming in the vehicle. It can be used to prevent
outside air and odors from entering your vehicle or help
heat or cool the air inside your vehicle more quickly.
Press this button to turn the recirculation mode on or
off.
When the button is pressed, an indicator light will
come on. The air-conditioning compressor also comes
on. The recirculation mode can be used with vent
and bi-level modes, but it cannot be used with floor,
defog, defrost or outside air modes.
Temperature Control: Turn the center knob clockwise
or counterclockwise to increase or decrease the air
temperature inside your vehicle.
e A/C (Air Conditioning): Press this button to turn
the air-conditioning system on or
off. When A/C is
pressed, an indicator light in the button will come on
to let you know that air conditioning
is activated. You may
notice a slight change in engine performance
when the air-conditioning compressor shuts
off and
turns on again. This is normal. The system is designed
to make adjustments to help with fuel economy while
still maintaining the selected temperature.
On hot days, open the windows to let hot inside air
escape; then close them. This helps to reduce the time
it takes for your vehicle to cool down. It also helps
the system to operate more efficiently.
For quick cool down on hot days,
do the following:
1. Select the vent mode.
2. Select the recirculation mode.
3. Select A/C.
4. Select the coolest temperature.
5. Select the highest fan speed.
Using these settings together for long periods of time
may cause the air inside of your vehicle to become
too dry. To prevent this from happening, after the
air inside of your vehicle has cooled, turn the
recirculation mode
off.
The air-conditioning system removes moisture from the
air,
so you may sometimes notice a small amount of
water dripping underneath your vehicle while idling
or after turning off the engine. This is normal.
3-26
Page 186 of 466
a (Outside Air): Press this button to turn the
outside air mode on or
off. When this mode is on,
outside air will circulate throughout your vehicle.
When this mode is on, an indicator light in the button
will come on to let you know that it is activated.
The outside air mode can be used with all modes,
but it cannot be used with the recirculation mode.
(Recirculation): This mode keeps outside air
from coming in the vehicle. It can be used to prevent
outside air and odors from entering your vehicle or help
heat or cool the air inside your vehicle more quickly.
Press this button to turn the recirculation mode on or
off.
When the button is pressed, an indicator light will
come on. The air-conditioning compressor also comes
on. The recirculation mode can be used with vent
and bi-level modes, but it cannot be used with floor,
defog, defrost or outside air modes.
Temperature Control: Use the driver’s and
passenger’s temperature levers to increase or decrease
the air temperature inside your vehicle.
a A/C (Air Conditioning): Press this button to turn
the air-conditioning system on or off. When
A/C is
pressed, an indicator light in the button will come on
to let you know that air conditioning is activated. You may
notice a slight change in engine performance
when the air-conditioning compressor shuts
off and
turns
on again. This is normal. The system is designed
to make adjustments to help with fuel economy while
still maintaining the selected temperature.
On hot days, open the windows to let hot inside air
escape; then close them. This helps to reduce the time
it takes for your vehicle to cool down. It also helps
the system to operate more efficiently.
For quick cool down on hot days, do the following:
1. Select the vent mode.
2. Select the recirculation mode.
3. Select
A/C.
4. Select the coolest temperature.
5. Select the highest fan speed.
Using these settings together for long periods of time
may cause the air inside of your vehicle to become
too dry. To prevent this from happening, after the
recirculation mode
off.
The air-conditioning system removes moisture from the
air,
so you may sometimes notice a small amount of
water dripping underneath your vehicle while idling
or after turning
off the engine. This is normal.
gr inside cf )mIr \/ehic!e hzs ccs!ed, tllrn the
3-29
Page 218 of 466
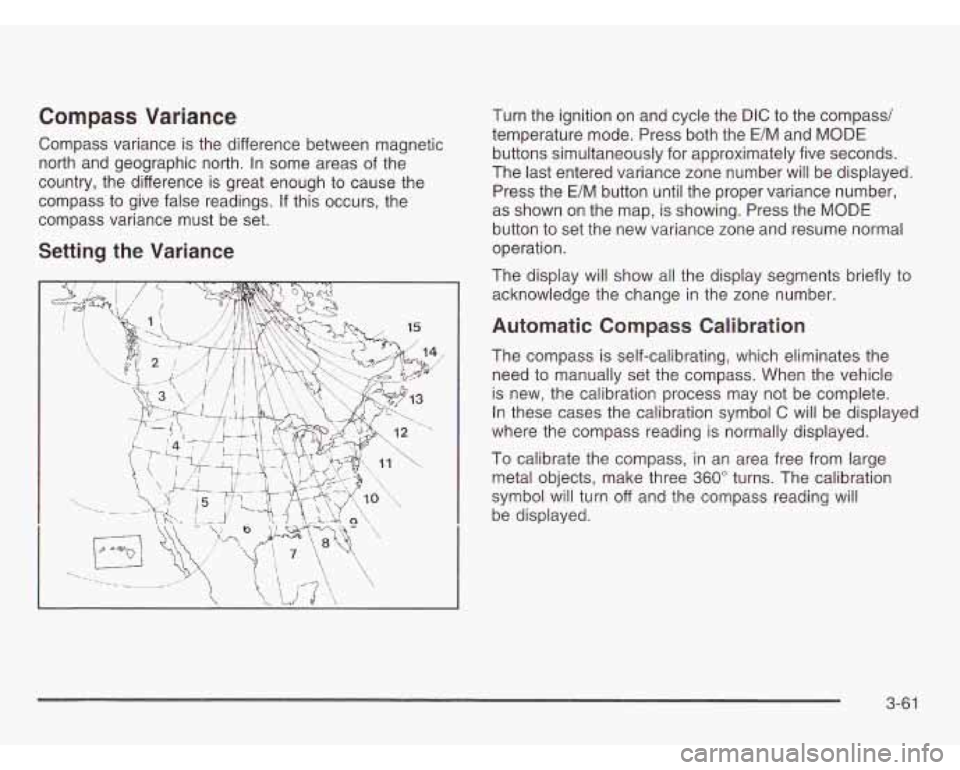
Compass Variance
Compass variance is the difference between magnetic
north and geographic north. In some areas of the
country, the difference is great enough to cause the
compass to give false readings. If this occurs, the
compass variance must be set.
Setting the Variance
t ('7
Turn the ignition on and cycle the DIC to the compass/
temperature mode. Press both the
E/M and MODE
buttons simultaneously for approximately five seconds.
The last entered variance zone number will be displayed.
Press the E/M button until the proper variance number,
as shown on the map, is showing. Press the MODE
button to set the new variance zone and resume normal
operation.
The display will show all the display segments briefly to
acknowledge the change
in the zone number.
Automatic Compass Calibration
The compass is self-calibrating, which eliminates the
need to manually set the compass. When the vehicle
is new, the calibration process may not be complete.
In these cases the calibration symbol C will be displayed
where the compass reading is normally displayed.
To calibrate the compass, in an area free from large
metal objects, make three
360" turns. The calibration
symbol will turn
off and the compass reading will
be displayed.
3-6 1