spare tire OLDSMOBILE SILHOUETTE 2003 Owners Manual
[x] Cancel search | Manufacturer: OLDSMOBILE, Model Year: 2003, Model line: SILHOUETTE, Model: OLDSMOBILE SILHOUETTE 2003Pages: 466, PDF Size: 21.55 MB
Page 156 of 466
Before your vehicle was shipped from the factory,
it was programmed in Mode
1. The mode to which the
vehicle was programmed may have been changed since
it left the factory. To determine the mode to which
your vehicle is programmed or to program your vehicle
to a different mode, do the following:
1. Follow the instructions for Entering Programming
Mode on page
2-63.
2. Insert your spare key fully into any door key
cylinder and turn it to the unlock position.
This step is necessary to prevent accidental
programming of this feature to Mode
2. Do not
program this feature to Mode
2 without first
reading Mode
2 entirely. The door key cylinder
must remain in the unlock position during
Steps
2 through 4.
3. Press the button with the horn symbol on the
remote keyless entry transmitter.
4. Count the number of chimes you hear.
The number of chimes indicates the vehicle's
curreni programmed mode.
(ii you ao not wish io
change the current mode, you can either exit
the programming mode by following the instructions
later in this section or program the next feature
available on your vehicle.)
5. Press the panic button to change the current mode.
6. Press the panic button until you hear the number
of chimes corresponding to the mode selection
you want.
7. Remove your key from the door key cylinder.
The mode you selected is now set. You can either exit
the programming mode by following the instructions
next in this section or program the next feature available
on your vehicle.
Exiting Programming Mode
To exit programming mode, turn the key from
ACCESSORY to
OFF and put the BCM PRGRM fuse
back into the instrument panel fuse block.
After programming a feature, you can exit the
programming mode at anytime.
Also, if your vehicle
is equipped with the content theft-deterrent system,
remember to arm the svstem before exitinq.
2-71
Page 216 of 466
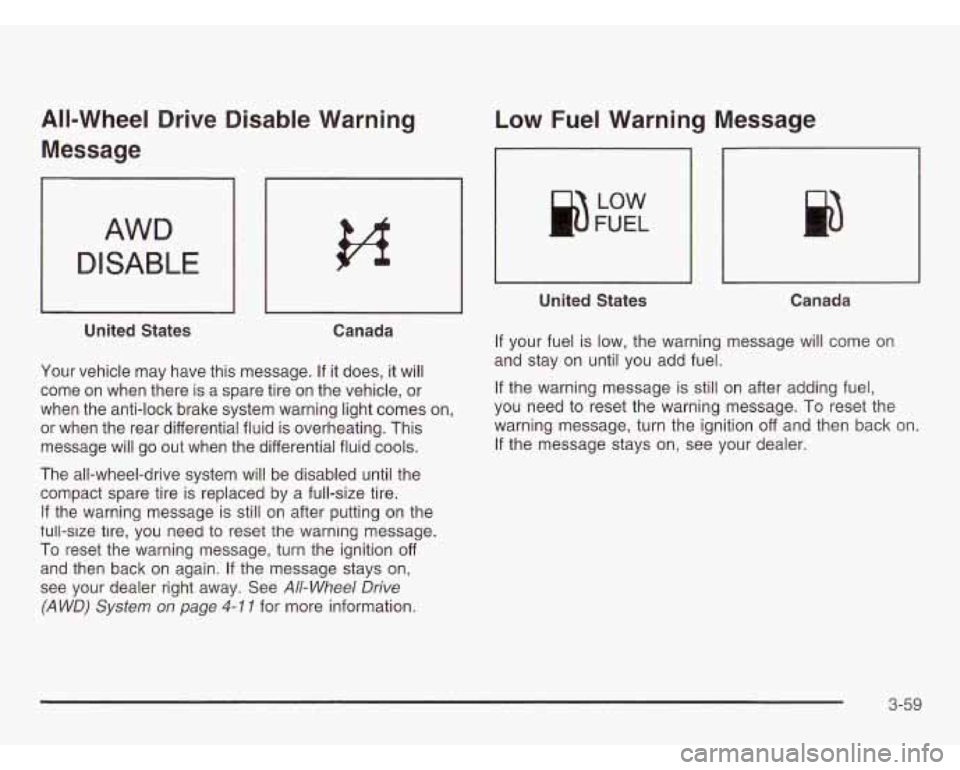
All-Wheel Drive Disable Warning
Message
AWD
DISABLE
I I I I
United States Canada
Your vehicle may have this message. If
it does, it will
come on when there is a spare tire on the vehicle, or
when the anti-lock brake system warning light comes on,
or when the rear differential fluid is overheating. This
message will go out when the differential fluid cools.
The all-wheel-drive system will be disabled until the
compact spare tire is replaced by a full-size tire.
If the warning message is still on after putting on the
tull-slze tire, you need to reset the warning message.
To reset the warning message, turn the ignition
off
and then back on again. If the message stays on,
see your dealer right away. See
All-Wheel Drive
(A WD)
System on page 4-1 I for more information.
Low Fuel Warning Message
I
United States Canada
If your fuel is low, the warning message will come on
and stay on until you add fuel.
If the warning message is still on after adding fuel,
you need to reset the warning message. To reset the
warning message, turn the ignition off and then back on.
If the message stays on, see your dealer.
3-59
Page 308 of 466
Section 5 Service and Appearance Care
Service ............................................................ 5.3
Doing Your Own Service Work
......................... 5.3
Adding Equipment to the Outside
of
Your Vehicle .............................................. 5-4
Fuel
.............................................................. -5-5
Gasoline Octane
............................................ 5-5
Gasoline Specifications
................................... 5-5
California Fuel
............................................... 5-6
Additives
....................... .... ......... 5-6
Fuels in Foreign Countries
........... ..... 5-7
Filling Your Tank
............................ ..... 5-7
Filling a Portable Fuel Container
.................... 5-9
Checking Things Under the
Hood .................. -5-1 0
Hood Release .............................................. 5-10
Engine Compartment Overview ....................... 5-12
Engine Oil
................................................... 5-14
Engine Air CleanedFilter
................................ 5-19
Automatic Transaxle Fluid
.............................. 5-20
Radiator Pressure Cap
............................... 5-26
Engine Overheating
.................................... 5-26
Cooling System
............................. , ....... 5-29
Power Steering Fluid .................. , ....... 5-37
Windshield Washer Fluid
................. , ....... 5-38
Brakes
.......................... .... ........ 5-39
r.--.:.-- ---I-.- b CI lyll IC uuvlal I1 4-LU c r)r) .............................................
Battery ........................................................ 5.43
Jump Starting
............................................... 5-44
All-Wheel Drive
.............................................. 5-50
Bulb Replacement .......................................... 5-52
Halogen Bulbs
.............................. ......... 5-52
Front Turn Signal, Sidemarker and
Taillamps, Turn Signal, Stoplamps and
Headlamps
...................................... ..... 5-52
Parking Lamps
.............................. ..... 5-54
Replacement Bulbs
....................................... 5-57
Back-up Lamps
......................................... 5-56
Windshield Wiper Blade Replacement
.............. 5-58
Tires
.............................................................. 5-60
Inflation
- Tire Pressure ................................ 5-61
Tire Inspection and Rotation
........................... 5-62
When It
Is Time for New Tires ....................... 5-63
Buying New Tires
......................................... 5-64
Uniform Tire Quality Grading
.......................... 5-65
Wheel Alignment and Tire Balance
.................. 5-66
Wheel Replacement
...................................... 5-66
Tire Chains
.................................................. 5-67
Accessory Inflator
......................................... 5-68
If a Tire Goes Flat ........................................ 5-69
Changing a Flat Tire ..................................... 5-70
Compact Spare Tire ...................................... 5-86
5- 1
Page 368 of 466
Inflation - Tire Pressure
The Certificationflire label, which is on the rear edge ot
the driver’s door, shows the correct inflation pressures
for your tires when they’re cold. “Cold” means your
vehicle has been sitting for at least three hours or driven
no more than
1 mile (1.6 km).
Notice: Don’t let anyone tell you that underinflation
or overinflation is all right. It’s not. If your tires
don’t have enough air (underinflation), you can get
the following:
Too much flexing
Too much heat
Tire overloading
Bad wear
Bad handling
Bad fuel economy If your tires have too much air (overinflation),
you can get the following:
Unusual wear
e Bad handling
Rough ride
Needless damage from road hazards
When to Check
Check your tires once a month or more.
Don’t forget your compact spare tire.
It should be at
60 psi (420 kPa).
How to Check
Use a good quality pocket-type gage to check tire
pressure.
You can’t tell if your tires are properly inflated
simply by looking at them. Radial tires may look
properly inflated even when they’re underinflated.
Be sure to put the valve caps back on the valve stems.
moisture.
TL-. L-1.- .-Y^..^Y L l--l,- L.. I<--.-:.-- ^..I A:.A ...-A I I ICY I ICI~ PI GVCI 11 IcaRa uy nt;cpI ~y uut UII c ar IU
5-6 1
Page 369 of 466
Tire Inspection and Rotation
Tires should be rotated every 7,500 miles (12 500 km).
Any time you notice unusual wear, rotate your tires
as soon as possible and check wheel alignment. Also
check for damaged tires or wheels. See
When It Is Time
for New Tires on page
5-63 and Wheel Replacement
on page
5-66 for more information.
Make sure the spare tire is stored securely. Push, pull,
and then try to rotate or turn the tire,
If it moves, use the
folding wrench to tighten the cable. See
Changing a Flat
Tire on page
5-70.
The purpose of regular rotation is to achieve more
uniform wear for all tires on the vehicle. The first rotation
is the most important. See “Part A: Scheduled
Maintenance Services,” in Section
6, for scheduled
rotation intervals.
I,‘
/I
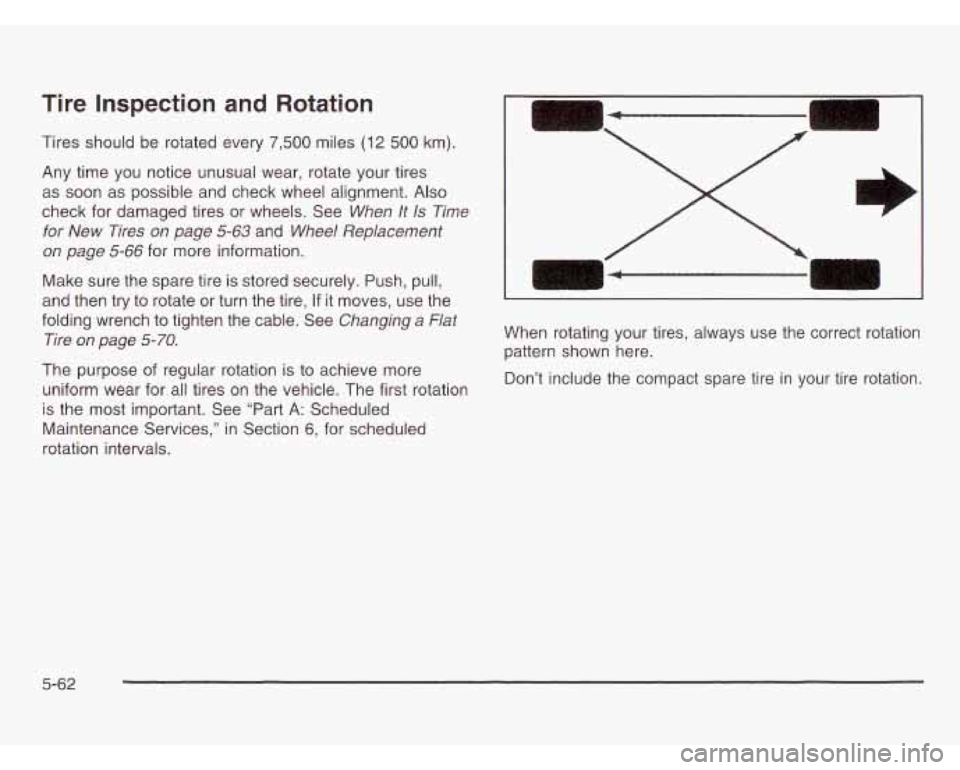
When rotating your tires, always use the correct rotation
pattern shown here.
Don’t include the compact spare tire in your tire rotation.
5-62
Page 371 of 466
Buying New Tires
To find out what kind and size of tires you need, look at
the Certificationflire label.
The tires installed on your vehicle when it was new had a
Tire Petformance Criteria Specification (TPC Spec)
number on each tire’s sidewall. When you get new tires,
get ones with that same TPC Spec number. That way
your vehicle will continue to have tires that are designed
to give proper endurance, handling, speed rating,
traction, ride and other things during normal service on
your vehicle. If your tires have an all-season tread design,
the TPC number will be followed by an
“MS” (for mud
and snow).
If you ever replace your tires with those not having a
TPC Spec number, make sure they are the same
size, load range, speed rating and construction type
(bias, bias-belted or radial) as your original tires. Mixing tires coul-.
Lause you to lose control
while driving. If you mix tires of different sizes
or types (radial and bias-belted tires), the
vehicle may not handle properly, and you
could have a crash. Using tires
of different
sizes may also cause damage to your vehicle.
Be sure to use the same size and type tires on
all wheels. It’s
all right to drive with your
compact spare temporarily,
it was developed
for use on your vehicle. See “Compact Spare
Tire”
in the index.
If you use bias-ply
1 1s on your vehicle, the
wheel rim flanges could develop cracks after
many miles
of driving. A tire and/or wheel
could fail suddenly, causing
a crash. Use only
radial-ply tires with the wheels on your vehicle.
5-64
Page 372 of 466
Uniform Tire Quality Grading
Quality grades can be found where applicable on the
tire sidewall between tread shoulder and maximum
section width. For example:
Treadwear 200 Traction AA Temperature A
The following information relates to the system
developed by the United States National Highway
Traffic Safety Administration, which grades tires by
treadwear, traction and temperature performance.
(This applies only to vehicles sold in the United States.)
The grades are molded on the sidewalls of most
passenger car tires. The Uniform Tire Quality Grading
system does not apply to deep tread, winter-type
snow tires, space-saver or temporary use spare tires,
tires with nominal rim diameters of 10 to
12 inches
(25 to 30 cm), or to some limited-production tires.
While the tires available on General Motors passenger
cars and light trucks may vary with respect to these
grades, they must also conform to federal safety
Performance Criteria (TPC) standards.
-.-A -A-l:*:---l fi,,,,,I ill^+-”, T:”- It=~Ullt=lllelltb allu ~UUI~IUIIQI UCIICI~~ lvlulula I IIG
Treadwear
The treadwear grade is a comparative rating based on
the wear rate of the tire when tested under controlled
conditions on a specified government test course.
For example, a tire graded 150 would wear one and
a half (1
5) times as well on the government course as
a tire graded 100. The relative performance of tires
depends upon the actual conditions of their use,
however, and may depart significantly from the norm
due to variations in driving habits, service practices and differences in road characteristics and climate.
Traction - AA, A, 9, C
The traction grades, from highest to lowest, are AA, A,
B, and C. Those grades represent the tire’s ability
to stop on wet pavement as measured under controlled
conditions on specified government test surfaces of
asphalt and concrete. A tire marked C may have poor
traction performance. Warning: The traction grade
assigned to this tire is based on straight-ahead braking
traction tests, and does not include acceleration,
wrrlerir~ly, ilydlupih1Gl^ly, wr pea“ tIdwuI I cII la1 c~wz;I 1aL1t-a. ._ - - 1. A..- -A: - .- -L. -+--:-+:--
5-65
Page 378 of 466
Removing the Spare Tire and Tools
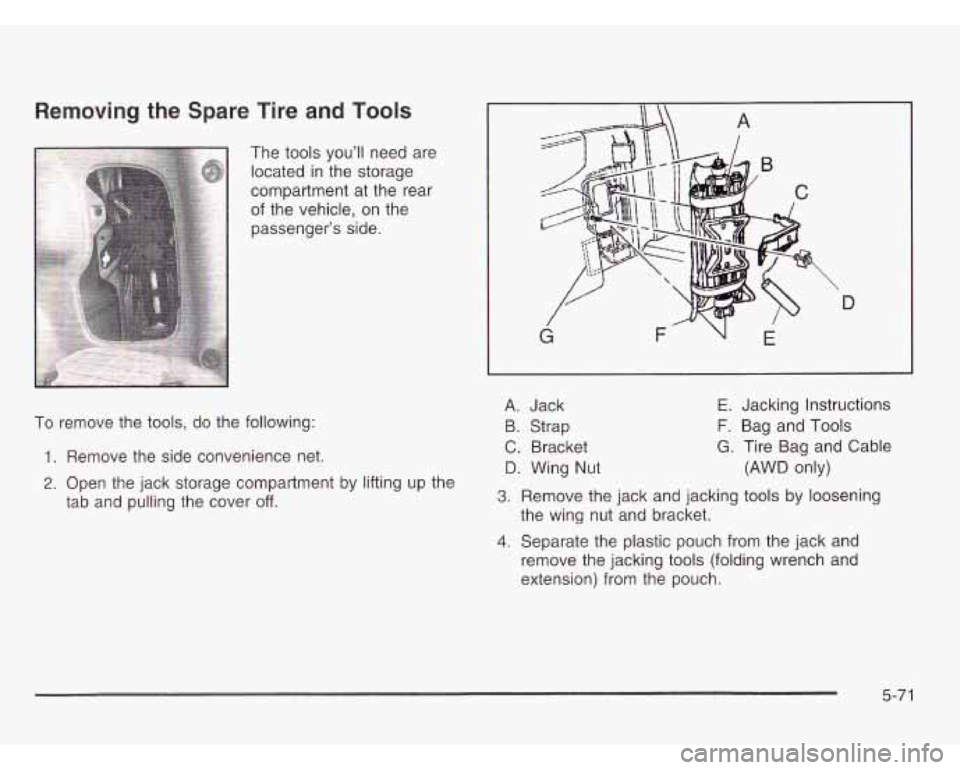
To remove the tools, do the following:
1. Remove the side convenience net.
2. Open the jack storage compartment by lifting up the
tab and pulling the cover
off.
A. Jack
9. Strap
C. Bracket
D. Wing Nut
E. Jacking Instructions
F. Bag and Tools
G. Tire Bag and Cable
(AWD only)
3. Remove the jack and jacking tools by loosening
the wing nut and bracket.
4. Separate the plastic pouch from the jack and
remove the jacking tools (folding wrench and
extension) from the pouch.
5-71
Page 379 of 466
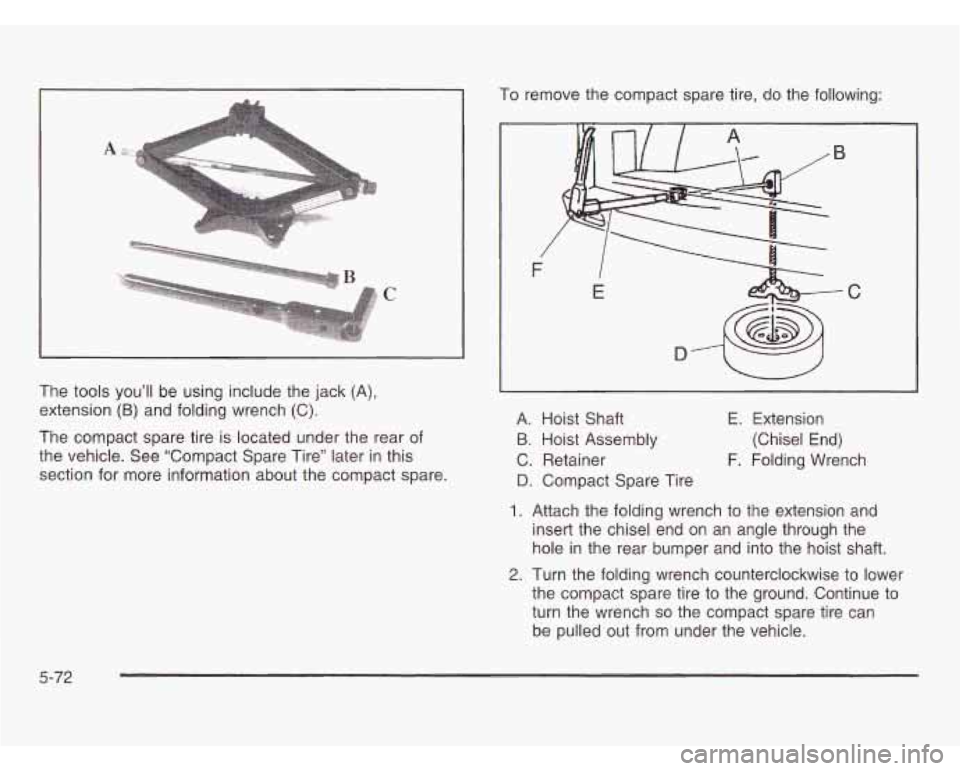
C
The tools you’ll be using include the jack (A),
extension
(B) and folding wrench (C).
The compact spare tire is located under the rear of
the vehicle. See “Compact Spare Tire” later in this
section for more information about the compact spare. To
remove the compact spare tire, do the following:
B
-C
A. Hoist Shaft
B. Hoist Assembly
C. Retainer
D. Compact Spare Tire E. Extension
(Chisel End)
F. Folding Wrench
I. Attach the folding wrench to the extension and
insert the chisel end on an angle through the
hole in the rear bumper and into the hoist shaft.
2. Turn the folding wrench counterclockwise to lower
the compact spare tire to the ground. Continue to
turn the wrench
so the compact spare tire can
be pulled out from under the vehicle.
5-72
Page 380 of 466
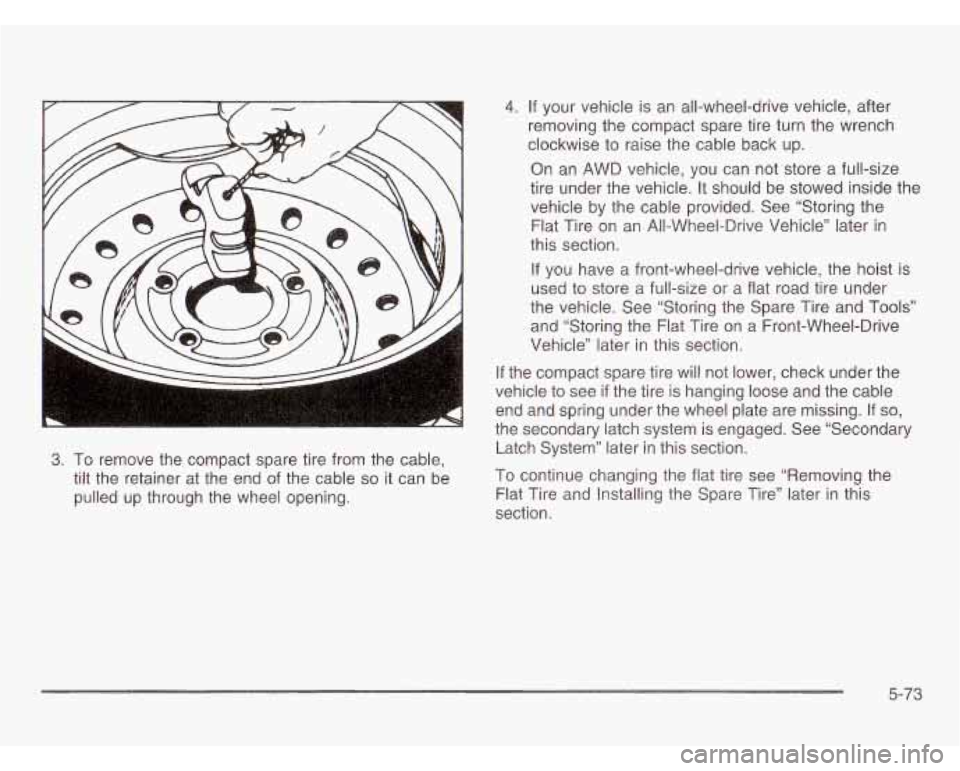
3. To remove the compact spare tire from the cable,
tilt the retainer at the end
of the cable so it can be
pulled up through the wheel opening.
-. If your vehicle is an all-wheel-drive vehicle, after
removing the compact spare tire turn the wrench
clockwise to raise the cable back up.
On an AWD vehicle, you can not store
a full-size
tire under the vehicle. It should be stowed inside the
vehicle by the cable provided. See “Storing the
Flat Tire on an All-Wheel-Drive Vehicle” later
in
this section.
If you have a front-wheel-drive vehicle, the hoist is
used to store a full-size or a flat road tire under
the vehicle. See “Storing the Spare Tire and
Tools”
and “Storing the Flat Tire on a Front-Wheel-Drive
Vehicle” later
in this section.
If the compact spare tire will not lower, check under the
vehicle to see
if the tire is hanging loose and the cable
end and spring under the wheel plate are missing. If
so,
the secondary latch system is engaged. See “Secondary
Latch System” later
in this section.
To continue changing the flat tire see “Removing the
Flat Tire and Installing the Spare Tire” later in this
section.
5-73