Engine compartment Oldsmobile Silhouette 2004 Owner's Manuals
[x] Cancel search | Manufacturer: OLDSMOBILE, Model Year: 2004, Model line: Silhouette, Model: Oldsmobile Silhouette 2004Pages: 462, PDF Size: 3.1 MB
Page 4 of 462

Vehicle Damage Warnings
Also, in this book you will ®nd these notices:
Notice:These mean there is something that could
damage your vehicle.
A notice will tell you about something that can damage
your vehicle. Many times, this damage would not be
covered by your warranty, and it could be costly. But the
notice will tell you what to do to help avoid the
damage.
When you read other manuals, you might see CAUTION
and NOTICE warnings in different colors or in different
words.
You'll also see warning labels on your vehicle. They use
the same words, CAUTION or NOTICE.
Vehicle Symbols
Your vehicle has components and labels that use
symbols instead of text. Symbols, used on your vehicle,
are shown along with the text describing the operation
or information relating to a speci®c component, control,
message, gage or indicator.
If you need help ®guring out a speci®c name of a
component, gage or indicator, reference the following
topics:
·Seats and Restraint Systems in Section 1
·Features and Controls in Section 2
·Instrument Panel Overview in Section 3
·Climate Controls in Section 3
·Warning Lights, Gages and Indicators in Section 3
·Audio System(s) in Section 3
·Engine Compartment Overview in Section 5
iv
Page 119 of 462
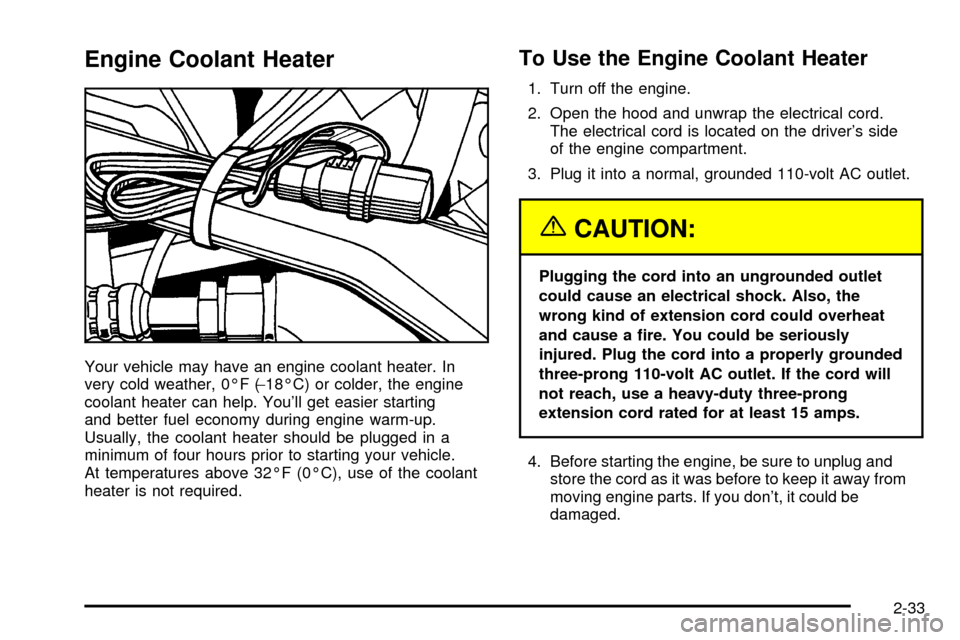
Engine Coolant Heater
Your vehicle may have an engine coolant heater. In
very cold weather, 0ÉF (-18ÉC) or colder, the engine
coolant heater can help. You'll get easier starting
and better fuel economy during engine warm-up.
Usually, the coolant heater should be plugged in a
minimum of four hours prior to starting your vehicle.
At temperatures above 32ÉF (0ÉC), use of the coolant
heater is not required.
To Use the Engine Coolant Heater
1. Turn off the engine.
2. Open the hood and unwrap the electrical cord.
The electrical cord is located on the driver's side
of the engine compartment.
3. Plug it into a normal, grounded 110-volt AC outlet.
{CAUTION:
Plugging the cord into an ungrounded outlet
could cause an electrical shock. Also, the
wrong kind of extension cord could overheat
and cause a ®re. You could be seriously
injured. Plug the cord into a properly grounded
three-prong 110-volt AC outlet. If the cord will
not reach, use a heavy-duty three-prong
extension cord rated for at least 15 amps.
4. Before starting the engine, be sure to unplug and
store the cord as it was before to keep it away from
moving engine parts. If you don't, it could be
damaged.
2-33
Page 122 of 462

AUTOMATIC OVERDRIVE (D):This position is for
normal driving. If you need more power for passing,
and you are:
·Going less than 35 mph (55 km/h), push your
accelerator pedal about halfway down.
·Going about 35 mph (55 km/h) or more, push
the accelerator all the way down.
You will shift down to the next gear and have
more power.
Notice:Driving your vehicle if you notice that it is
moving slowly or not shifting gears as you increase
speed may damage the transaxle. Have your vehicle
serviced right away. You can drive in SECOND (2)
when you are driving less than 35 mph (55 km/h)
and AUTOMATIC OVERDRIVE (D) for higher speeds
until then.
Warm-Up Shift
Your vehicle has a computer controlled transaxle
designed to warm up the engine faster when the outside
temperature is 35ÉF (2ÉC) or colder. You may notice
that the transaxle will shift at a higher vehicle speed until
the engine is warmed up. This is a normal condition
designed to provide heat to the passenger compartment
and defrost the windows more quickly. See
Climate
Control System on page 3-28for more information.THIRD (3):This position is also used for normal driving,
but it offers more power and lower fuel economy than
AUTOMATIC OVERDRIVE (D).
Here are some times you might choose THIRD (3)
instead of AUTOMATIC OVERDRIVE (D):
·When driving on hilly, winding roads
·When towing a trailer, so there is less shifting
between gears
·When going down a steep hill
SECOND (2):This position gives you more power but
lower fuel economy than THIRD (3). You can use
SECOND (2) on hills. It can help control your speed as
you go down steep mountain roads, but then you
would also want to use your brakes off and on.
Notice:Driving in SECOND (2) for more than
25 miles (40 km) or at speeds over 55 mph (90 km/h)
may damage the transaxle. Also, shifting into
SECOND (2) at speeds above 65 mph (105 km/h) can
cause damage. Drive in THIRD (3) or AUTOMATIC
OVERDRIVE (D) instead of SECOND (2).
2-36
Page 157 of 462

Instrument Panel Overview...............................3-4
Hazard Warning Flashers................................3-6
Other Warning Devices...................................3-7
Horn.............................................................3-7
Tilt Wheel.....................................................3-7
Turn Signal/Multifunction Lever.........................3-8
Exterior Lamps.............................................3-16
Interior Lamps..............................................3-18
Switchbanks.................................................3-23
Instrument Panel Switchbank..........................3-23
Overhead Console Switchbank.......................3-24
Ultrasonic Rear Parking Assist (URPA)............3-24
Accessory Power Outlets...............................3-27
Climate Controls............................................3-28
Climate Control System.................................3-28
Dual Climate Control System..........................3-31
Outlet Adjustment.........................................3-34
Rear Climate Control System
(Without Entertainment System)...................3-34
Rear Climate Control System
(With Entertainment System).......................3-36
Passenger Compartment Air Filter...................3-39
Warning Lights, Gages and Indicators.............3-41
Instrument Panel Cluster................................3-42
Speedometer and Odometer...........................3-43Safety Belt Reminder Light.............................3-44
Air Bag Readiness Light................................3-45
Brake System Warning Light..........................3-46
Anti-Lock Brake System Warning Light.............3-47
Traction Control System (TCS)
Warning Light...........................................3-47
Engine Coolant Temperature Gage..................3-48
Malfunction Indicator Lamp.............................3-49
Fuel Gage...................................................3-52
Message Center.............................................3-53
Service Traction System
Warning Message......................................3-53
Traction Active Message................................3-54
Engine Coolant Temperature
Warning Message......................................3-54
Charging System Indicator Message................3-55
Low Oil Pressure Message............................3-55
Change Engine Oil Message..........................3-56
Power Sliding Door Warning Message.............3-57
Door Ajar Warning Message...........................3-57
Rear Hatch Ajar Warning Message..................3-58
PASS-Key
žIII Security Message....................3-58
All-Wheel Drive Disable
Warning Message......................................3-59
Low Fuel Warning Message...........................3-59
Section 3 Instrument Panel
3-1
Page 286 of 462
Then, shut the engine off and close the window almost
all the way to preserve the heat. Start the engine
again and repeat this only when you feel really
uncomfortable from the cold. But do it as little as
possible. Preserve the fuel as long as you can. To help
keep warm, you can get out of the vehicle and do
some fairly vigorous exercises every half hour or so
until help comes.
If You Are Stuck: In Sand, Mud,
Ice or Snow
In order to free your vehicle when it is stuck, you will
need to spin the wheels, but you do not want to
spin your wheels too fast. The method known as
ªrockingº can help you get out when you are stuck,
but you must use caution.
{CAUTION:
If you let your tires spin at high speed, they can
explode, and you or others could be injured.
And, the transaxle or other parts of the vehicle
can overheat. That could cause an engine
CAUTION: (Continued)
CAUTION: (Continued)
compartment ®re or other damage. When you
are stuck, spin the wheels as little as possible.
Do not spin the wheels above 35 mph
(55 km/h) as shown on the speedometer.
Notice:Spinning your wheels can destroy parts
of your vehicle as well as the tires. If you spin the
wheels too fast while shifting your transaxle
back and forth, you can destroy your transaxle.
See ªRocking Your Vehicle To Get It Out.º
For information about using tire chains on your vehicle,
see
Tire Chains on page 5-74.
Rocking Your Vehicle To Get It Out
First, turn your steering wheel left and right. That will
clear the area around your front wheels. If your vehicle
has traction control, you should turn your traction
control system off. See
Traction Control System (TCS)
on page 4-8. Then shift back and forth between
REVERSE (R) and a forward gear, spinning the
wheels as little as possible. Release the accelerator
pedal while you shift, and press lightly on the
accelerator pedal when the transaxle is in gear.
4-30
Page 303 of 462

Service............................................................5-3
Doing Your Own Service Work.........................5-3
Adding Equipment to the Outside
of Your Vehicle...........................................5-4
Fuel................................................................5-4
Gasoline Octane............................................5-4
Gasoline Speci®cations....................................5-5
California Fuel...............................................5-5
Additives.......................................................5-6
Fuels in Foreign Countries...............................5-6
Filling Your Tank............................................5-7
Filling a Portable Fuel Container.......................5-9
Checking Things Under the Hood....................5-10
Hood Release..............................................5-10
Engine Compartment Overview.......................5-12
Engine Oil...................................................5-13
Engine Air Cleaner/Filter................................5-18
Automatic Transaxle Fluid..............................5-19
Engine Coolant.............................................5-22
Radiator Pressure Cap..................................5-25
Engine Overheating.......................................5-25
Cooling System............................................5-28
Power Steering Fluid.....................................5-36
Windshield Washer Fluid................................5-37
Brakes........................................................5-38Battery........................................................5-41
Jump Starting...............................................5-42
All-Wheel Drive..............................................5-48
Bulb Replacement..........................................5-50
Halogen Bulbs..............................................5-50
Headlamps..................................................5-50
Front Turn Signal, Sidemarker and
Parking Lamps..........................................5-52
Taillamps, Turn Signal, Stoplamps and
Back-up Lamps.........................................5-54
Replacement Bulbs.......................................5-56
Windshield Wiper Blade Replacement..............5-56
Tires..............................................................5-58
In¯ation - Tire Pressure.................................5-67
Tire Inspection and Rotation...........................5-68
When It Is Time for New Tires.......................5-70
Buying New Tires.........................................5-70
Uniform Tire Quality Grading..........................5-71
Wheel Alignment and Tire Balance..................5-73
Wheel Replacement......................................5-73
Tire Chains..................................................5-74
Accessory In¯ator.........................................5-74
If a Tire Goes Flat........................................5-76
Changing a Flat Tire.....................................5-76
Compact Spare Tire......................................5-91
Section 5 Service and Appearance Care
5-1
Page 314 of 462
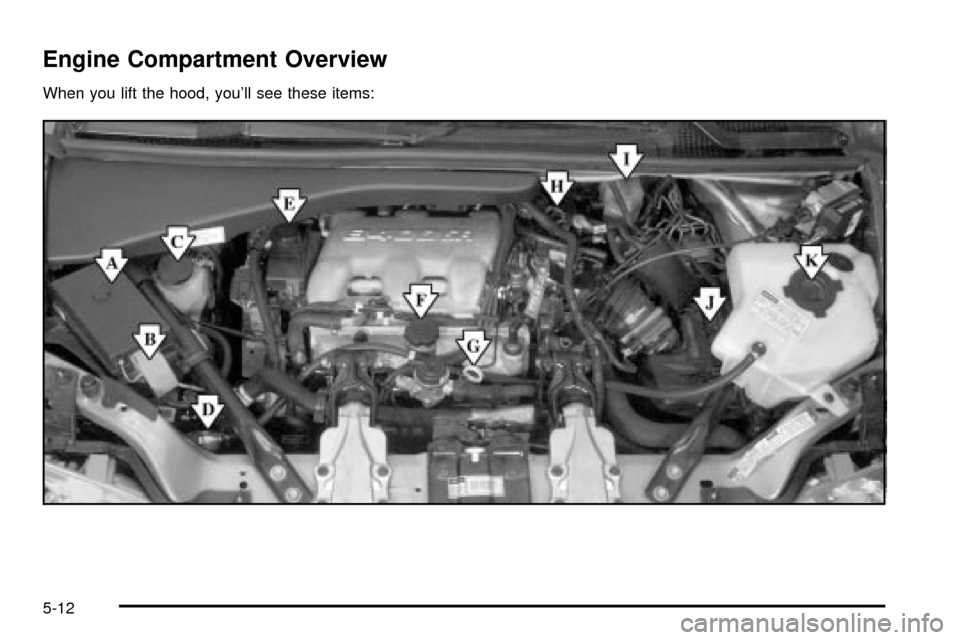
Engine Compartment Overview
When you lift the hood, you'll see these items:
5-12
Page 315 of 462

A. Underhood Fuse Block.
SeeFuses and Circuit Breakers on page 5-101.
B. Remote Positive (+) Terminal.
See
Jump Starting on page 5-42.
C. Windshield Washer Fluid Reservoir.
See
Windshield Washer Fluid on page 5-37.
D. Radiator Pressure Cap.
See
Radiator Pressure Cap on page 5-25.
E. Power Steering Fluid Reservoir.
See
Power Steering Fluid on page 5-36.
F. Engine Oil Fill Cap.
See
Engine Oil on page 5-13.
G. Engine Oil Dipstick.
See
Engine Oil on page 5-13.
H. Transaxle Fluid Dipstick.
See
Automatic Transaxle Fluid on page 5-19.
I. Brake Master Cylinder Reservoir.
See
Brakes on page 5-38.
J. Engine Air Cleaner/Filter.
See
Engine Air Cleaner/Filter on page 5-18.
K. Coolant Recovery Tank.
See
Cooling System on page 5-28.
Engine Oil
Checking Engine Oil
It is a good idea to check your engine oil every time you
get fuel. In order to get an accurate reading, the oil
must be warm and the vehicle must be on level ground.
The engine oil dipstick handle is a yellow loop. See
Engine Compartment Overview on page 5-12for
the location of the engine oil dipstick.
Turn off the engine and give the oil several minutes to
drain back into the oil pan. If you don't, the oil
dipstick might not show the actual level.
Pull out the dipstick and clean it with a paper towel or
cloth, then push it back in all the way. Remove it again,
keeping the tip down, and check the level.
5-13
Page 316 of 462
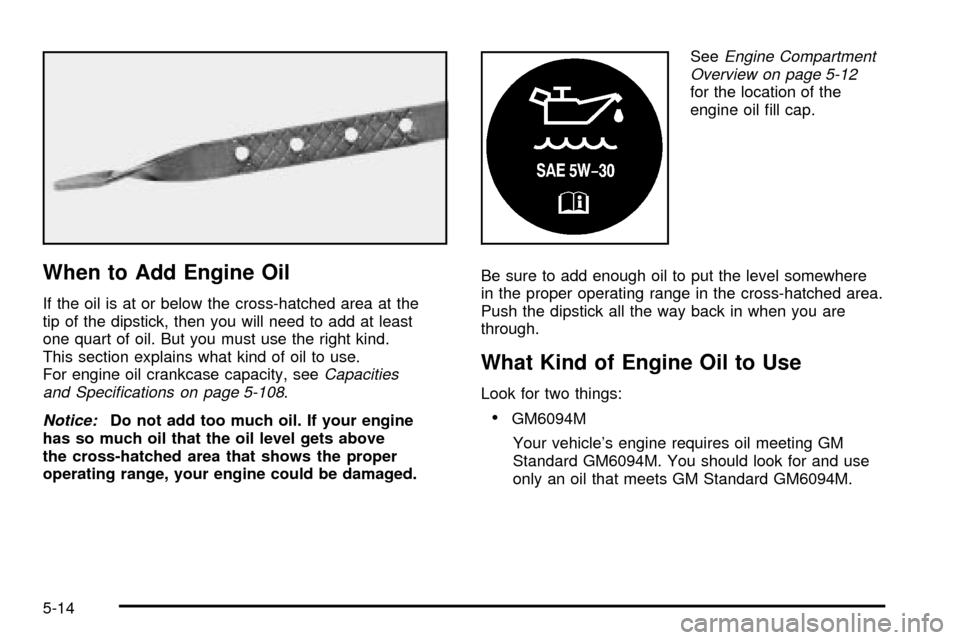
When to Add Engine Oil
If the oil is at or below the cross-hatched area at the
tip of the dipstick, then you will need to add at least
one quart of oil. But you must use the right kind.
This section explains what kind of oil to use.
For engine oil crankcase capacity, see
Capacities
and Speci®cations on page 5-108.
Notice:Do not add too much oil. If your engine
has so much oil that the oil level gets above
the cross-hatched area that shows the proper
operating range, your engine could be damaged.See
Engine Compartment
Overview on page 5-12
for the location of the
engine oil ®ll cap.
Be sure to add enough oil to put the level somewhere
in the proper operating range in the cross-hatched area.
Push the dipstick all the way back in when you are
through.
What Kind of Engine Oil to Use
Look for two things:
·GM6094M
Your vehicle's engine requires oil meeting GM
Standard GM6094M. You should look for and use
only an oil that meets GM Standard GM6094M.
5-14
Page 320 of 462
Engine Air Cleaner/Filter
SeeEngine Compartment Overview on page 5-12for
the location of the engine air cleaner/®lter.
When to Inspect the Engine Air
Cleaner/Filter
Inspect the air cleaner/®lter at every oil change and
replace it at the ®rst oil change after 25,000 miles
(40 000 km). See
Scheduled Maintenance on page 6-4for more information.
How to Inspect the Engine Air
Cleaner/Filter
To inspect the air cleaner/®lter, remove the ®lter from
the vehicle and lightly shake the ®lter to release
loose dust and dirt. If the ®lter remains caked with dirt,
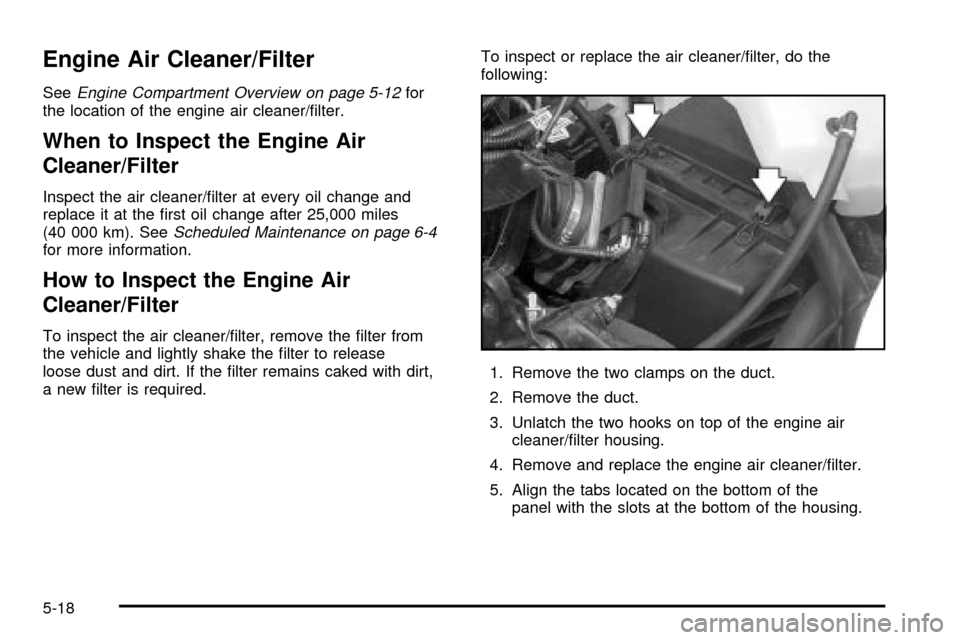
a new ®lter is required.To inspect or replace the air cleaner/®lter, do the
following:
1. Remove the two clamps on the duct.
2. Remove the duct.
3. Unlatch the two hooks on top of the engine air
cleaner/®lter housing.
4. Remove and replace the engine air cleaner/®lter.
5. Align the tabs located on the bottom of the
panel with the slots at the bottom of the housing.
5-18