bores OPEL 1900 1973 Service Manual
[x] Cancel search | Manufacturer: OPEL, Model Year: 1973, Model line: 1900, Model: OPEL 1900 1973Pages: 625, PDF Size: 17.22 MB
Page 152 of 625

ROOF AND SUN ROOF2F-29Installation of Sun Roof Frame1. Slide sun roof frame into lower slot of guide rails,
position fully rearward and reattach guide rails to
roof.NOTE: Be sure guide rail retainers at rear of guide
rails are positioned with their dowels in bores of roof
frame.2. Install upper corner plates and secure in place..
3. Install sun roof panel.
REMOVAL AND INSTALLATION OF VELVET STRIP
ON SUN ROOF OPENING, AND VELVET STRIP AND
WEATHERSTRIP ON REAR OF SUN ROOF PANEL
Removal of Velvet Strip on Sun Roof Opening1. Fully open sun roof.
;2. Carefully pull off velvet strip using solvent to dis-
solve cement. Clean area thoroughly before installing
new velvet strip.
Installation of Velvet Strip On Sun Roof Opening1. Cut away for a distance of 1.5 inch the velvet
material on velvet strip that will be on the outside
when strip is cemented in positioAlso cut off to
this dimension the plastic cord i
not cut away velvet material on
1strip which is to be cemented
2. Using
nitrile vinyl trim adhesive (3M Vinyl Trim
Adhesive, Permalastic Viny1 Trim Adhesive or
equivalent) apply sparingly to both sun roof opening
and side of velvet strip to be cemented.
3. Immediately install new velvet strip and position
so that upper edge of velvet strip is flush with car
roof.4. Clean off excess cement being careful not to con-
tact velvet strip.
Removal of Velvet Strip and Wea’therstrip on Rear
of Sun Roof Panel1. Remove sun roof panel.
2. Carefully detach weatherstrip and velvet strip
from sun roof panel using solvent as required todisdolve cement. Thoroughly clean area before in-
stalling new velvet strip and weatherstrip.
Installing Velvet Strip and Weatherstrip On Rear
of Sun Roof Panel1. Using
nitrile vinyl trim adhesive (3M Vinyl Trim
Adhesive Permalastic Viny1 Trim Adhesive or
equivalent) apply sparingly to vertical and horizontal
contact areas at rear of sun roof panel (see Figure
2F-9) and also to side of velvet strip which will touch sun
roof panel.
REAR OF SUN ROOF PANEL
ICAR ROOF
VELVET STRIP
II
,/ WETRSTRIP 1APPLY CEMENT TO HORIZONTAL AND
VERTICAL SURFACES,TO BOTH SIDES
OF VELVET STRIP AND TO SIDE AND
BOTTOM OF WEATHERSTRIP2F-9
Figure
ZF-9 Installing Velvet Strip and Weatherstrip
on Rear of Sun Roof Panel
2. Immediately install new velvet strip and position
so that top edge of velvet strip is flush with sun roof
panel.
3. Apply cement to outboard edge of velvet strip and
to top and bottom contact surfaces of weatherstrip,
and install weatherstrip in position.
4. Clean off excess cement being careful not to con-
tact velvet strip.
5. Install sun roof panel.
REMOVAL AND INSTALLATION OF REAR GUIDES
AND CABLE
Removal of Rear Guides and Cable
1. Remove sun roof panel.
2. Crank rear lifter guides fully rearward and then
remove crank handle and cable crank.
Page 245 of 625
46. 141973 OPEL SERVICE MANUAL
2. Install rear pinion bearing outer race (without
shims) using installer J-7818 and driver handle
J-8092. See Figure 4B-12.
3. To determine the correct pinion depth setting use
the following procedures:
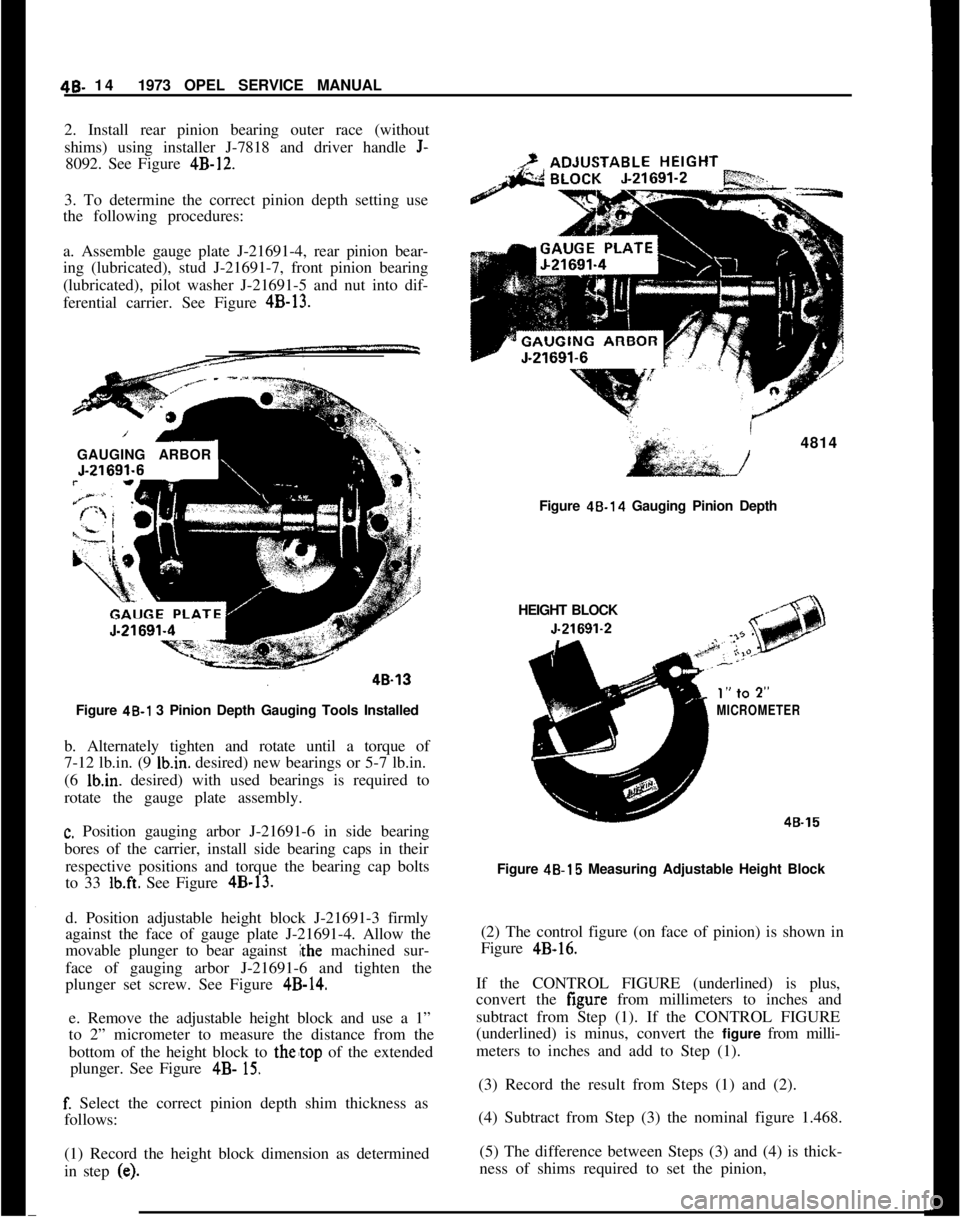
a. Assemble gauge plate J-21691-4, rear pinion bear-
ing (lubricated), stud J-21691-7, front pinion bearing
(lubricated), pilot washer J-21691-5 and nut into dif-
ferential carrier. See Figure 4B-13.
‘1GAUGING ARBOR
Figure 48-l 3 Pinion Depth Gauging Tools Installed
b. Alternately tighten and rotate until a torque of
7-12 lb.in. (9 Ibin. desired) new bearings or 5-7 lb.in.
(6 lb.in. desired) with used bearings is required to
rotate the gauge plate assembly.
c. Position gauging arbor J-21691-6 in side bearing
bores of the carrier, install side bearing caps in their
respective positions and torque the bearing cap bolts
to 33
lb.ft. See Figure 4B-13.
d. Position adjustable height block J-21691-3 firmly
against the face of gauge plate J-21691-4. Allow the
movable plunger to bear against
#the machined sur-
face of gauging arbor J-21691-6 and tighten the
plunger set screw. See Figure
4B-14.e. Remove the adjustable height block and use a 1”
to 2” micrometer to measure the distance from the
bottom of the height block to
thetop of the extended
plunger. See Figure
4B- 15.
f. Select the correct pinion depth shim thickness as
follows:
(1) Record the height block dimension as determined
in step
(e).
I4814
/Figure 48.14 Gauging Pinion Depth
HEIGHT BLOCK
MICROMETER
48-15Figure 4B-15 Measuring Adjustable Height Block
(2) The control figure (on face of pinion) is shown in
Figure
4B-16.If the CONTROL FIGURE (underlined) is plus,
convert the figure from millimeters to inches and
subtract from Step (1). If the CONTROL FIGURE
(underlined) is minus, convert the figure from milli-
meters to inches and add to Step (1).
(3) Record the result from Steps (1) and (2).
(4) Subtract from Step (3) the nominal figure 1.468.
(5) The difference between Steps (3) and (4) is thick-
ness of shims required to set the pinion,
Page 247 of 625
48. 16
1973 OPEL SERVICE MANUAL
protruding to install the pinion preload nut. Do
not use Installer J-22938 to adjust pinion preload.
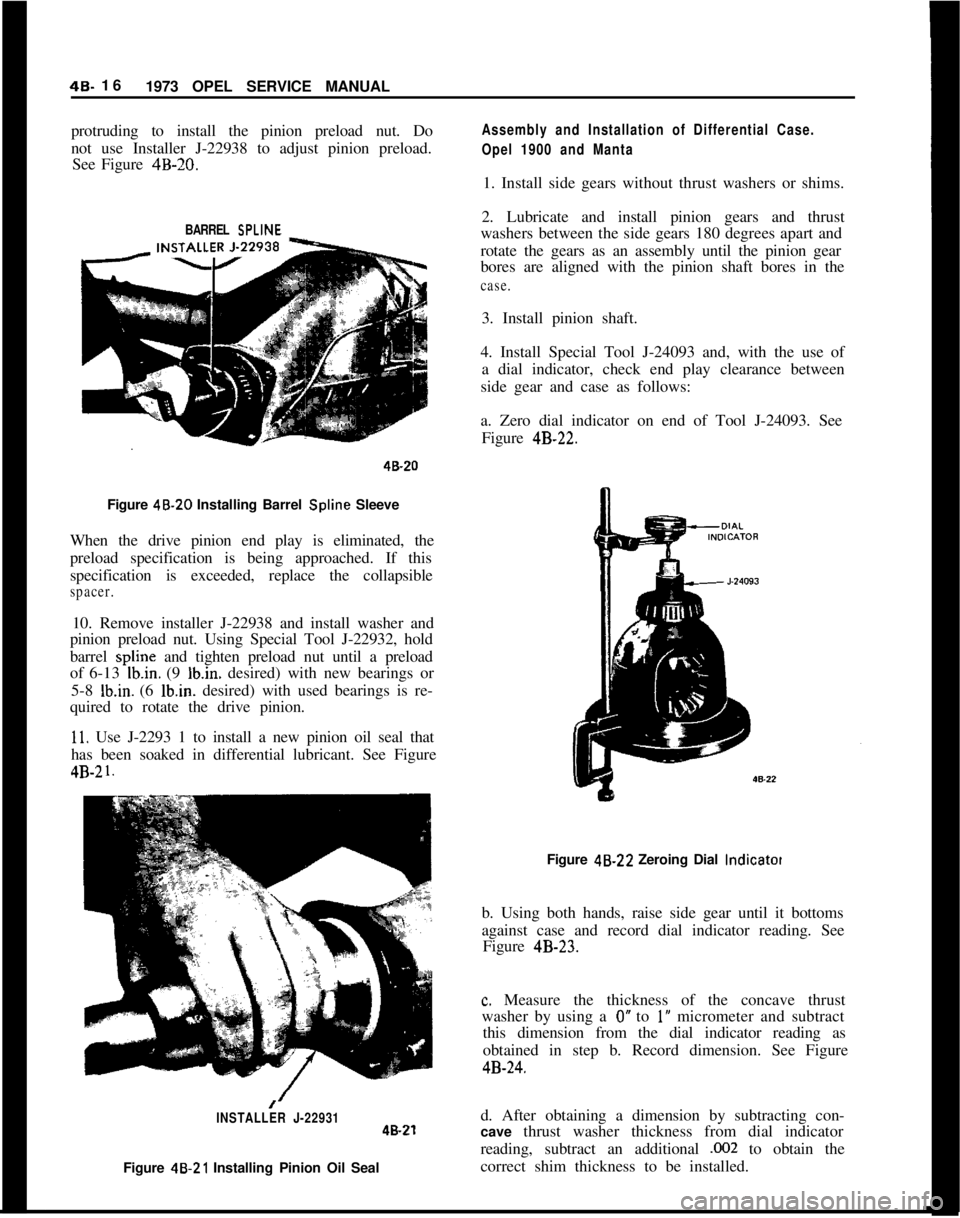
See Figure 4B-20.
Assembly and Installation of Differential Case.
Opel 1900 and Manta1. Install side gears without thrust washers or shims.
BARREL SPLINE2. Lubricate and install pinion gears and thrust
washers between the side gears 180 degrees apart and
rotate the gears as an assembly until the pinion gear
bores are aligned with the pinion shaft bores in the
case.3. Install pinion shaft.
4. Install Special Tool J-24093 and, with the use of
a dial indicator, check end play clearance between
side gear and case as follows:
40-20a. Zero dial indicator on end of Tool J-24093. See
Figure 4B-22.
Figure 48.20 Installing Barrel Spline Sleeve
When the drive pinion end play is eliminated, the
preload specification is being approached. If this
specification is exceeded, replace the collapsible
spacer.10. Remove installer J-22938 and install washer and
pinion preload nut. Using Special Tool J-22932, hold
barrel spline and tighten preload nut until a preload
of 6-13
Ib.in. (9 Ibin. desired) with new bearings or
5-8
Ib.in. (6 lb.in. desired) with used bearings is re-
quired to rotate the drive pinion.
11. Use J-2293 1 to install a new pinion oil seal that
has been soaked in differential lubricant. See Figure4B-2
1.Figure 48.22 Zeroing Dial
lndicatotb. Using both hands, raise side gear until it bottoms
against case and record dial indicator reading. See
Figure 4B-23.
c. Measure the thickness of the concave thrust
washer by using a
0” to 1’ micrometer and subtract
this dimension from the dial indicator reading as
obtained in step b. Record dimension. See Figure
4B-24.
/INSTALLER J-22931d. After obtaining a dimension by subtracting con-48-21cave thrust washer thickness from dial indicator
reading, subtract an additional
,002 to obtain the
Figure 46.21 Installing Pinion Oil Sealcorrect shim thickness to be installed.
Page 249 of 625
48. 181973 OPEL SERVICE MANUAL
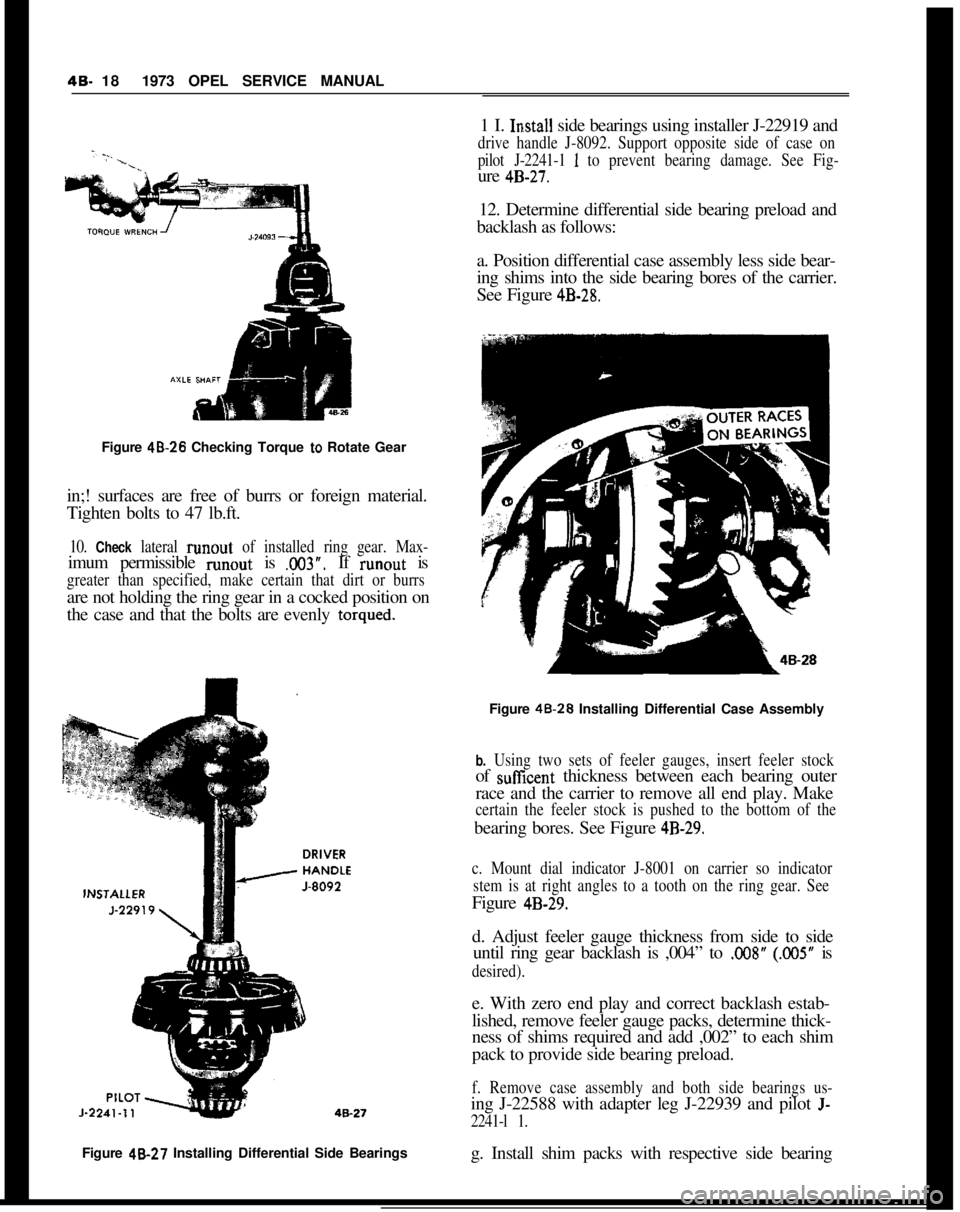
Figure 48.26 Checking Torque
to Rotate Gear
in;! surfaces are free of burrs or foreign material.
Tighten bolts to 47 lb.ft.
10. Check lateral runout of installed ring gear. Max-imum permissible runout is
.003”. If runout is
greater than specified, make certain that dirt or burrsare not holding the ring gear in a cocked position on
the case and that the bolts are evenly
torqued.Figure 48-27 Installing Differential Side Bearings
g. Install shim packs with respective side bearing1 I.
In.stall side bearings using installer J-22919 and
drive handle J-8092. Support opposite side of case on
pilot J-2241-1
1 to prevent bearing damage. See Fig-ure
4B-27.12. Determine differential side bearing preload and
backlash as follows:
a. Position differential case assembly less side bear-
ing shims into the side bearing bores of the carrier.
See Figure
4B-28.Figure 48.28 Installing Differential Case Assembly
b. Using two sets of feeler gauges, insert feeler stockof suffcent thickness between each bearing outer
race and the carrier to remove all end play. Make
certain the feeler stock is pushed to the bottom of thebearing bores. See Figure
4B-29.
c. Mount dial indicator J-8001 on carrier so indicator
stem is at right angles to a tooth on the ring gear. SeeFigure
4B-29.d. Adjust feeler gauge thickness from side to side
until ring gear backlash is ,004” to
.OO8” (.005” is
desired).e. With zero end play and correct backlash estab-
lished, remove feeler gauge packs, determine thick-
ness of shims required and add ,002” to each shim
pack to provide side bearing preload.
f. Remove case assembly and both side bearings us-ing J-22588 with adapter leg J-22939 and pilot
J-
2241-l 1.
Page 250 of 625
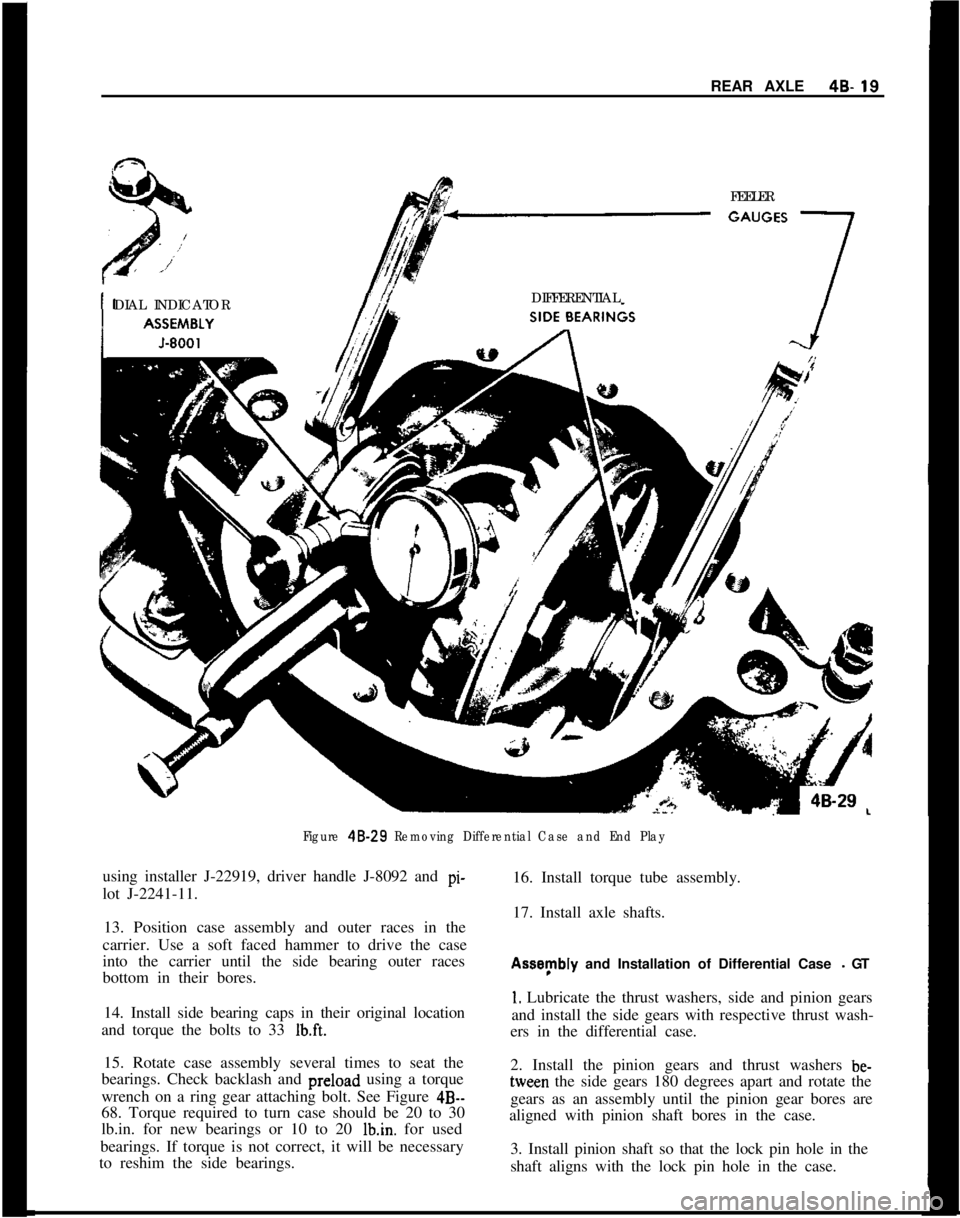
REAR AXLE48.19FEELER
DIAL INDICATORDIFFERENTIAL
Figure 48.29 Removing Differential Case and End Playusing installer J-22919, driver handle J-8092 and pi-
lot J-2241-11.16. Install torque tube assembly.
17. Install axle shafts.
13. Position case assembly and outer races in the
carrier. Use a soft faced hammer to drive the case
into the carrier until the side bearing outer races
bottom in their bores.Assynbly and Installation of Differential Case
- GT
14. Install side bearing caps in their original location
and torque the bolts to 33
Ib.ft.
1. Lubricate the thrust washers, side and pinion gears
and install the side gears with respective thrust wash-
ers in the differential case.
15. Rotate case assembly several times to seat the
bearings. Check backlash and preload using a torque
wrench on a ring gear attaching bolt. See Figure
4B--68. Torque required to turn case should be 20 to 30
lb.in. for new bearings or 10 to 20 Ibin. for used
bearings. If torque is not correct, it will be necessary
to reshim the side bearings.2. Install the pinion gears and thrust washers be-tween the side gears 180 degrees apart and rotate the
gears as an assembly until the pinion gear bores are
aligned with pinion shaft bores in the case.
3. Install pinion shaft so that the lock pin hole in the
shaft aligns with the lock pin hole in the case.
Page 252 of 625
REAR AXLE48.21FEELER
DIFFERENTIAL
DIAL INDICATOR
SIDE BEARINGS
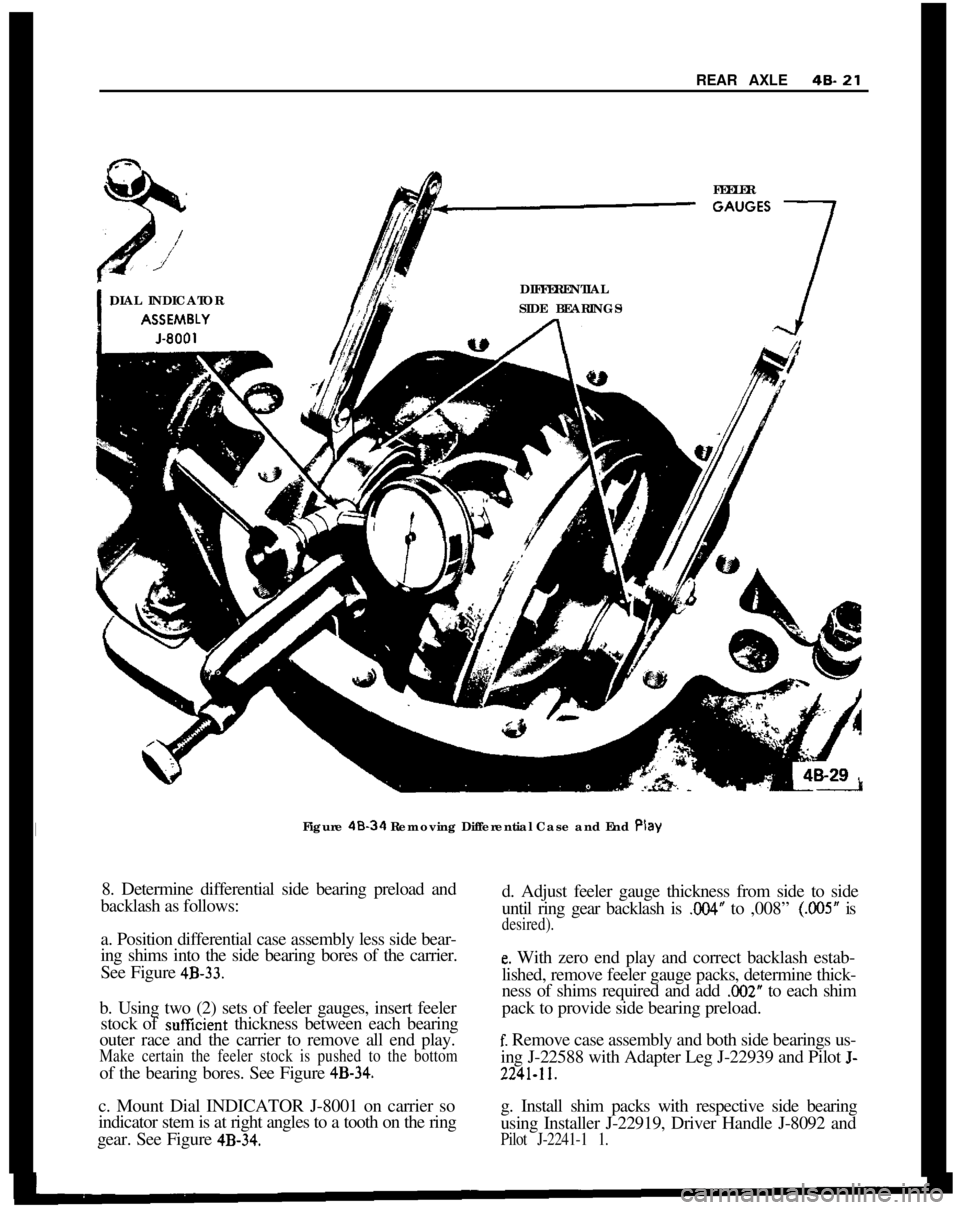
Figure 48.34 Removing Differential Case and End
Play8. Determine differential side bearing preload and
backlash as follows:d. Adjust feeler gauge thickness from side to side
until ring gear backlash is
004” to ,008” (.005” is
desired).a. Position differential case assembly less side bear-
ing shims into the side bearing bores of the carrier.
See Figure
4B-33.b. Using two (2) sets of feeler gauges, insert feeler
stock of sufficient thickness between each bearing
outer race and the carrier to remove all end play.
Make certain the feeler stock is pushed to the bottomof the bearing bores. See Figure
4B-34.
e. With zero end play and correct backlash estab-
lished, remove feeler gauge packs, determine thick-
ness of shims required and add
.002” to each shim
pack to provide side bearing preload.
f. Remove case assembly and both side bearings us-
ing J-22588 with Adapter Leg J-22939 and Pilot
J-
2241-11.c. Mount Dial INDICATOR J-8001 on carrier sog. Install shim packs with respective side bearing
indicator stem is at right angles to a tooth on the ring
using Installer J-22919, Driver Handle J-8092 and
gear. See Figure
4B-34.Pilot J-2241-1 1.
Page 253 of 625
48. 221973 OPEL SERVICE MANUAL
9. Position
case assembly and outer races in the car-
rier. Use a soft-faced hammer to drive the case into
the carrier until the side bearing outer races bottom
in their bores.
10. Install side bearing caps in their original location
and torque the bolts to 33
lb.ft.IN. LB. TORQUL
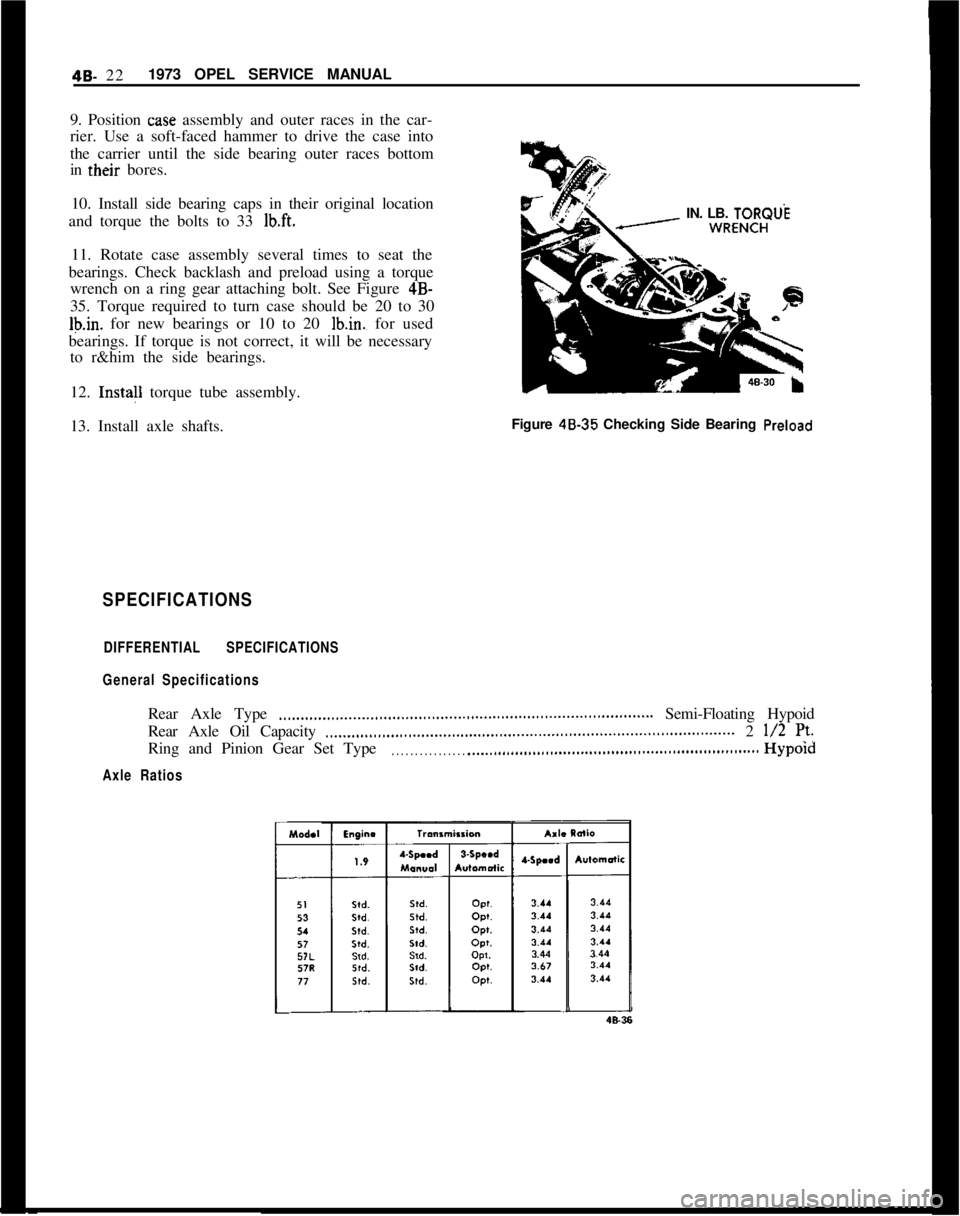
11. Rotate case assembly several times to seat the
bearings. Check backlash and preload using a torque
wrench on a ring gear attaching bolt. See Figure 4B-
35. Torque required to turn case should be 20 to 30
Ib.in. for new bearings or 10 to 20 lb.in., for used
bearings. If torque is not correct, it will be necessary
to r&him the side bearings.
12. Insta!l torque tube assembly.
13. Install axle shafts.Figure 48.35 Checking Side Bearing
Preload
SPECIFICATIONS
DIFFERENTIAL SPECIFICATIONS
General SpecificationsRear Axle Type
.,,...,,,...,,_...._..,,...,,,...,,,....,,.,...,,.,,...,,..,,,........................ Semi-Floating Hypoid
Rear Axle Oil Capacity
..____,,...,,,...,.,..,............,,..,,..,,................................................. 2 l/2 7’.Ring and Pinion Gear Set Type
. . . . . . . . . . . . . . . . . .._................................................................Hypold
Axle Ratios
Page 269 of 625
5B- 10 1973 OPEL SERVICE MANUAL
DISC BRAKES
CONTENTS
Subject
DESCRIPTION AND OPERATION:
Description. . . . . . . . . . . . . . . . . . . . . . . . . . . . . . . . . . . . . . . . . . . . . . . . . . . . . . . . . . . . . . . . . . . . . . . . . . . .Operation
. . . . . . . . . . . . . . . . . . . . . . . . . . . . . . . . . . . . . . . . . . . . . . . . . . . . . . . . . . . * . . . . . . . . . . . . . . . . . .DIAGNOSIS:
DiscBrakeTroubleDiagnosis. . . . . . . . . . . . . . . . . . . . . . . . . . . . . . . . . . . . . . . .MAINTENANCE AND ADJUSTMENTS:
Disc Brake Maintenance
. . . . . . . . . . . . . . . . . . . . . . . . . . . . . . . . . . . . . . . . . . . . . . . .Checking Disc Brake Friction Pads for Wear
. . . . . . . . . .Replacing Friction Pads
Checking Brake Disc for Lateral
Runout. . . . . . . . . . . . . . . . . .MAJOR REPAIR:
RemovingandInstallingBrakeCaliper. . . . . . . . . . . . . . . . . . . . . .Removing and Installing Brake Disc
. . . . . . . , . . . . . . . . . . . . . . . . . .
RemovingandInstallingBrakeDiscShield. . . . . . . . . . . . . .Disassembly and Assembly of Brake Caliper
. . . . . . . . . .SPECIFICATIONS:
Disc Brake Specifications
. . . . . . . . . . . . . . . . . . . . . . . . . . . . . . . . . . . . . . . . . . . . . .Page No.
58-1058-l
1
58-12
58-15
SB-15
5&17
56-17
58-17
58-195519
58-21
DESCRIPTION AND OPERATION
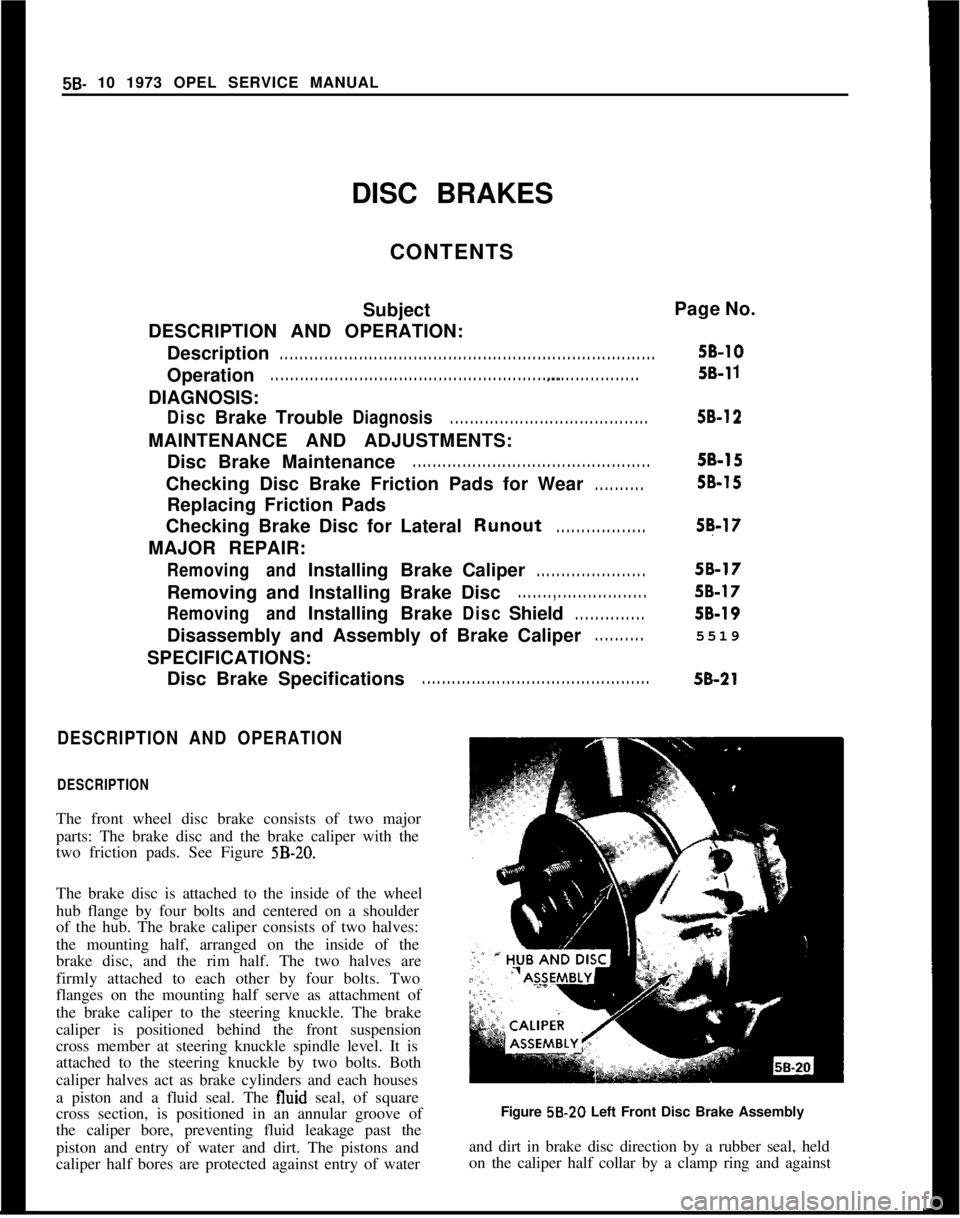
DESCRIPTIONThe front wheel disc brake consists of two major
parts: The brake disc and the brake caliper with the
two friction pads. See Figure
5B-20.The brake disc is attached to the inside of the wheel
hub flange by four bolts and centered on a shoulder
of the hub. The brake caliper consists of two halves:
the mounting half, arranged on the inside of the
brake disc, and the rim half. The two halves are
firmly attached to each other by four bolts. Two
flanges on the mounting half serve as attachment of
the brake caliper to the steering knuckle. The brake
caliper is positioned behind the front suspension
cross member at steering knuckle spindle level. It is
attached to the steering knuckle by two bolts. Both
caliper halves act as brake cylinders and each houses
a piston and a fluid seal. The fluid seal, of square
cross section, is positioned in an annular groove of
the caliper bore, preventing fluid leakage past the
piston and entry of water and dirt. The pistons and
caliper half bores are protected against entry of waterFigure 58.20 Left Front Disc Brake Assembly
and dirt in brake disc direction by a rubber seal, held
on the caliper half collar by a clamp ring and against
Page 270 of 625
DISC BRAKES5B- 11
rLF 5.2. RUBBER FLUID SEALS6.3. HOLLOW PISTONS7.
AL5
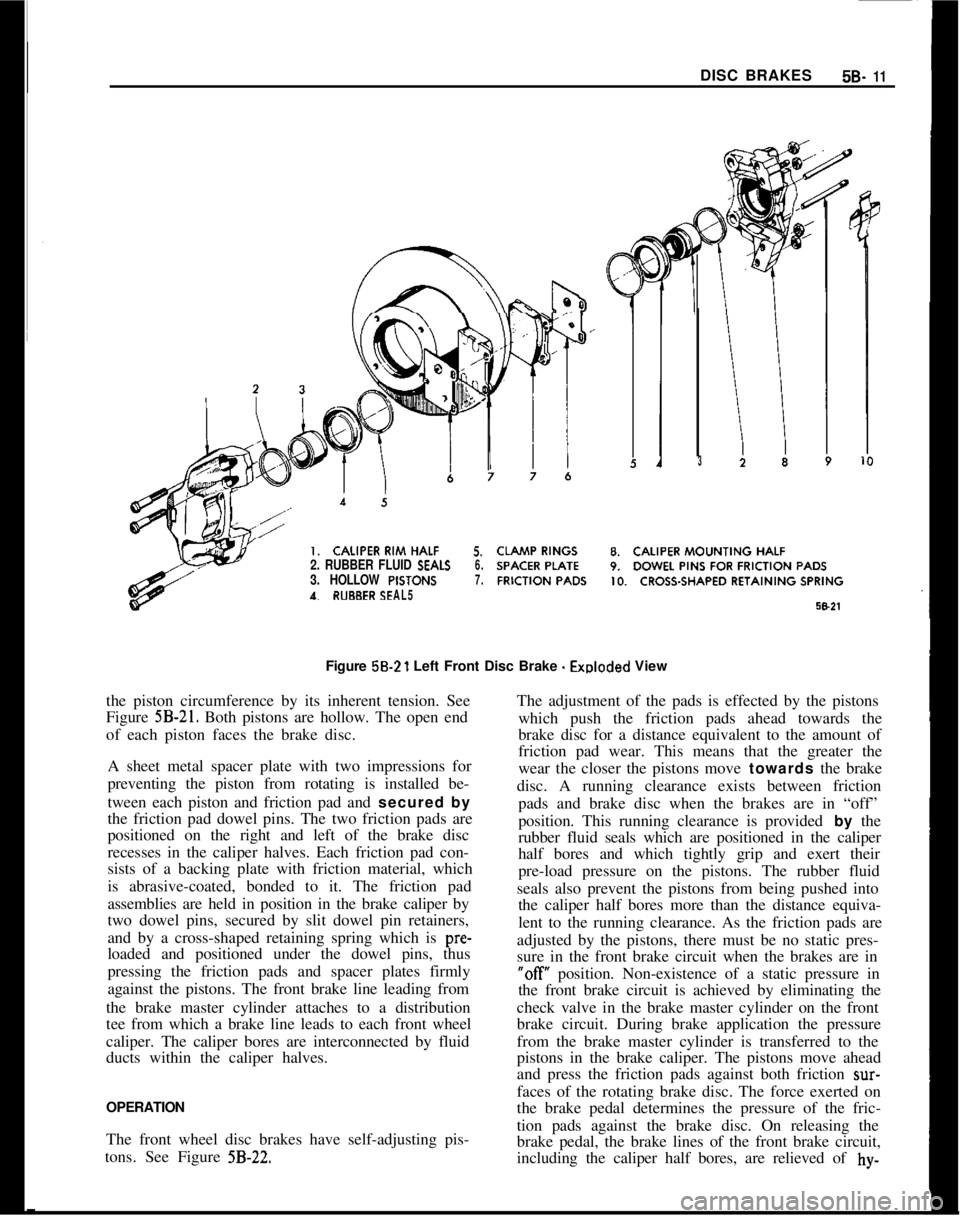
3Figure 58.21 Left Front Disc Brake
- Emloded View
the piston circumference by its inherent tension. See
Figure
5B-21. Both pistons are hollow. The open end
of each piston faces the brake disc.
A sheet metal spacer plate with two impressions for
preventing the piston from rotating is installed be-
tween each piston and friction pad and secured by
the friction pad dowel pins. The two friction pads are
positioned on the right and left of the brake disc
recesses in the caliper halves. Each friction pad con-
sists of a backing plate with friction material, which
is abrasive-coated, bonded to it. The friction pad
assemblies are held in position in the brake caliper by
two dowel pins, secured by slit dowel pin retainers,
and by a cross-shaped retaining spring which is pre-
loaded and positioned under the dowel pins, thus
pressing the friction pads and spacer plates firmly
against the pistons. The front brake line leading from
the brake master cylinder attaches to a distribution
tee from which a brake line leads to each front wheel
caliper. The caliper bores are interconnected by fluid
ducts within the caliper halves.
The front wheel disc brakes have self-adjusting pis-
tons. See Figure
5B-22.The adjustment of the pads is effected by the pistons
which push the friction pads ahead towards the
brake disc for a distance equivalent to the amount of
friction pad wear. This means that the greater the
wear the closer the pistons move towards the brake
disc. A running clearance exists between friction
pads and brake disc when the brakes are in “off”
position. This running clearance is provided by the
rubber fluid seals which are positioned in the caliper
half bores and which tightly grip and exert their
pre-load pressure on the pistons. The rubber fluid
seals also prevent the pistons from being pushed into
the caliper half bores more than the distance equiva-
lent to the running clearance. As the friction pads are
adjusted by the pistons, there must be no static pres-
sure in the front brake circuit when the brakes are in“OR position. Non-existence of a static pressure in
the front brake circuit is achieved by eliminating the
check valve in the brake master cylinder on the front
brake circuit. During brake application the pressure
from the brake master cylinder is transferred to the
pistons in the brake caliper. The pistons move ahead
and press the friction pads against both friction
SW-faces of the rotating brake disc. The force exerted on
the brake pedal determines the pressure of the fric-
tion pads against the brake disc. On releasing the
brake pedal, the brake lines of the front brake circuit,
including the caliper half bores, are relieved of
hy-OPERATION
Page 271 of 625
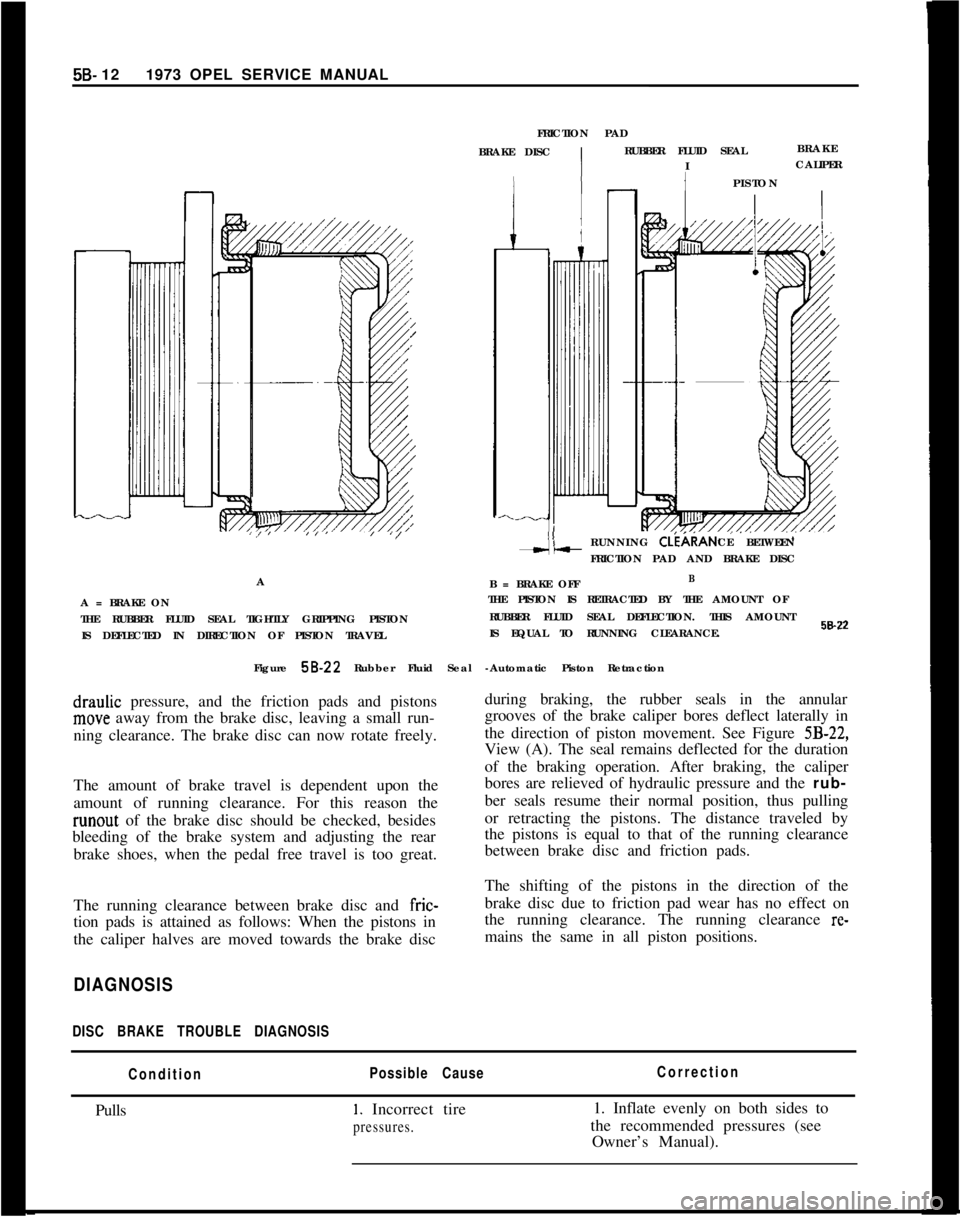
5B- 121973 OPEL SERVICE MANUAL
A = BRAKE ON
THE RUBBER FLUID SEAL TIGHTLY GRIPPING PISTON
IS DEFLECTED IN DIRECTION OF PISTON TRAVELAFRICTION PAD
BRAKE DISCRUBBER FLUID SEALBRAKE
IICALIPER
IPISTON
I
CE BETWEEN RUNNING CLEARAN
FRICTION PAD AND BRAKE DISC
B = BRAKE OFFBTHE PISTON IS RETRACTED BY THE AMOUNT OF
RUBBER FLUID SEAL DEFLECTION. THIS AMOUNT
IS EQUAL TO RUNNING CLEARANCE.SBZZ
Figure 58-22 Rubber Fluid Seal -Automatic Piston Retractiondraulic pressure, and the friction pads and pistonsmove away from the brake disc, leaving a small run-
ning clearance. The brake disc can now rotate freely.
The amount of brake travel is dependent upon the
amount of running clearance. For this reason therunout of the brake disc should be checked, besides
bleeding of the brake system and adjusting the rear
brake shoes, when the pedal free travel is too great.during braking, the rubber seals in the annular
grooves of the brake caliper bores deflect laterally in
the direction of piston movement. See Figure
5B-22,View (A). The seal remains deflected for the duration
of the braking operation. After braking, the caliper
bores are relieved of hydraulic pressure and the rub-
ber seals resume their normal position, thus pulling
or retracting the pistons. The distance traveled by
the pistons is equal to that of the running clearance
between brake disc and friction pads.
The running clearance between brake disc and
fric-tion pads is attained as follows: When the pistons in
the caliper halves are moved towards the brake discThe shifting of the pistons in the direction of the
brake disc due to friction pad wear has no effect on
the running clearance. The running clearance re-mains the same in all piston positions.
DIAGNOSIS
DISC BRAKE TROUBLE DIAGNOSIS
ConditionPulls
Possible Cause
I. Incorrect tire
pressures.Correction1. Inflate evenly on both sides to
the recommended pressures (see
Owner’s Manual).