turn signal OPEL COMBO 2010 Owners Manual
[x] Cancel search | Manufacturer: OPEL, Model Year: 2010, Model line: COMBO, Model: OPEL COMBO 2010Pages: 212, PDF Size: 2.49 MB
Page 13 of 212
7
In Brief
Picture no: 18475s.tif
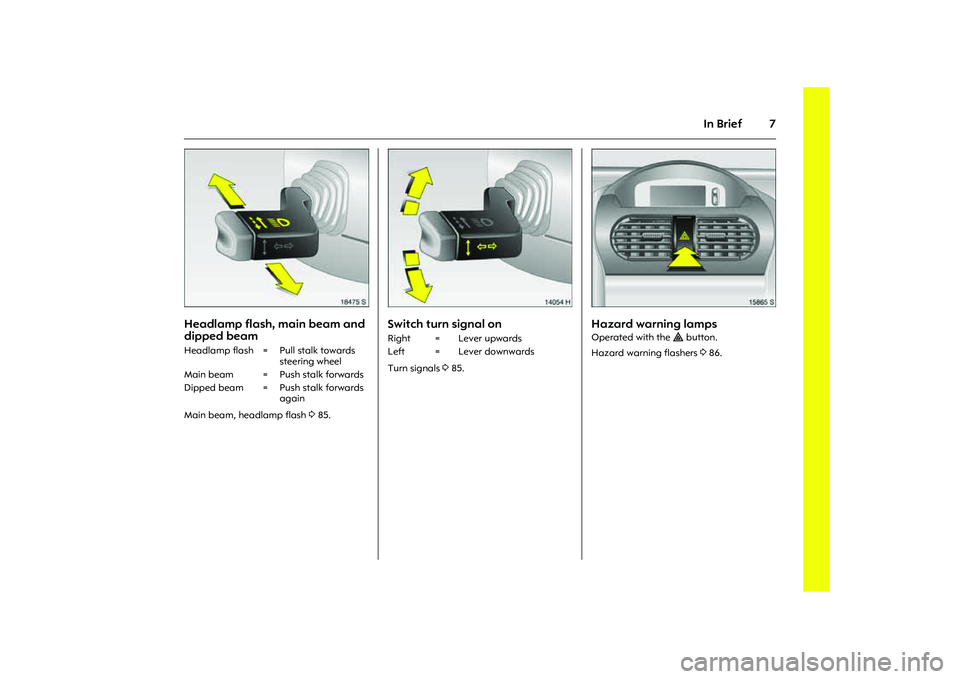
Headlamp flash, main beam and
dipped beam Main beam, headlamp flash 385.
Picture no: 14054h.tif
Switch turn signal onTurn signals 385.
Picture no: 15865s.tif
Hazard warning lamps Operated with the ¨ button.
Hazard warning flashers 386. Headlamp flash = Pull stalk towards
steering wheel
Main beam = Push stalk forwards
Dipped beam = Push stalk forwards
again
Right = Lever upwards
Left = Lever downwards
Page 15 of 212
9
In Brief
Page
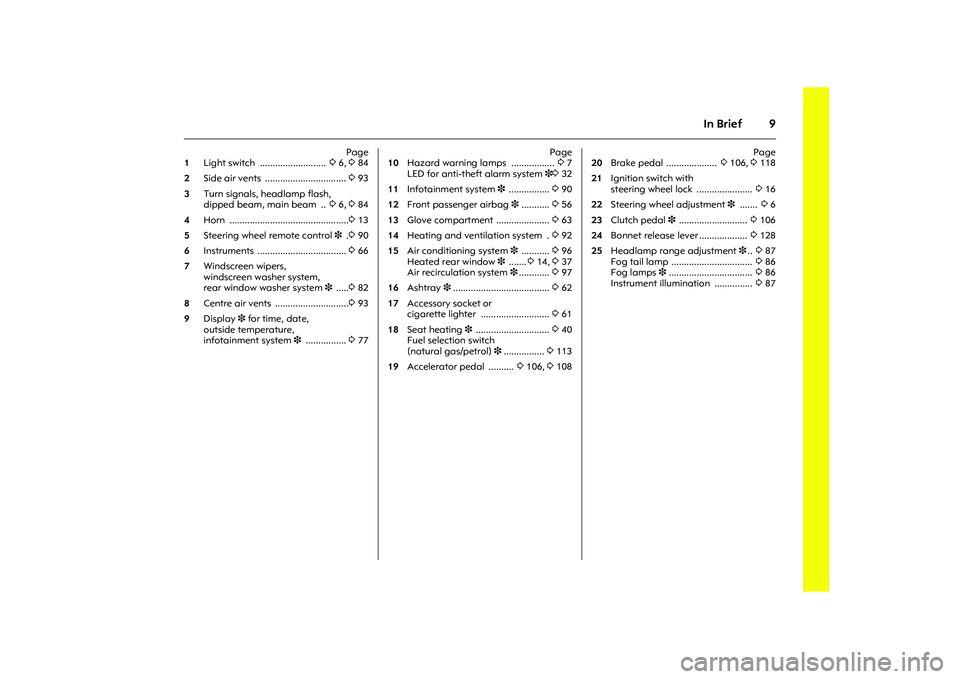
1Light switch .......................... 36, 384
2Side air vents ................................ 393
3Turn signals, headlamp flash,
dipped beam, main beam .. 36, 384
4Horn ...............................................313
5 Steering wheel remote control 3 .390
6Instruments ................................... 366
7 Windscreen wipers,
windscreen washer system,
rear window washer system 3 .....382
8Centre air vents .............................393
9Display 3 for time, date,
outside temperature,
infotainment system 3 ................ 377Page
10Hazard warning lamps ................. 37
LED for anti-theft alarm system 3332
11 Infotainment system 3 ................ 390
12 Front passenger airbag 3 ........... 356
13Glove compartment ..................... 363
14Heating and ventilation system . 392
15 Air conditioning system 3 ........... 396
Heated rear window 3 .......314, 337
Air recirculation system 3............ 397
16
Ashtray 3...................................... 362
17Accessory socket or
cigarette lighter ........................... 361
18 Seat heating 3 ............................. 340
Fuel selection switch
(natural gas/petrol) 3................ 3113
19Accelerator pedal .......... 3106, 3108Page
20Brake pedal .................... 3106, 3118
21Ignition switch with
steering wheel lock ...................... 316
22 Steering wheel adjustment 3 ....... 36
23 Clutch pedal 3 ........................... 3106
24Bonnet release lever ................... 3128
25 Headlamp range adjustment 3.. 387
Fog tail lamp ................................ 386
Fog lamps 3 ................................. 386
Instrument illumination ............... 387
Page 17 of 212
11
In Brief
Page
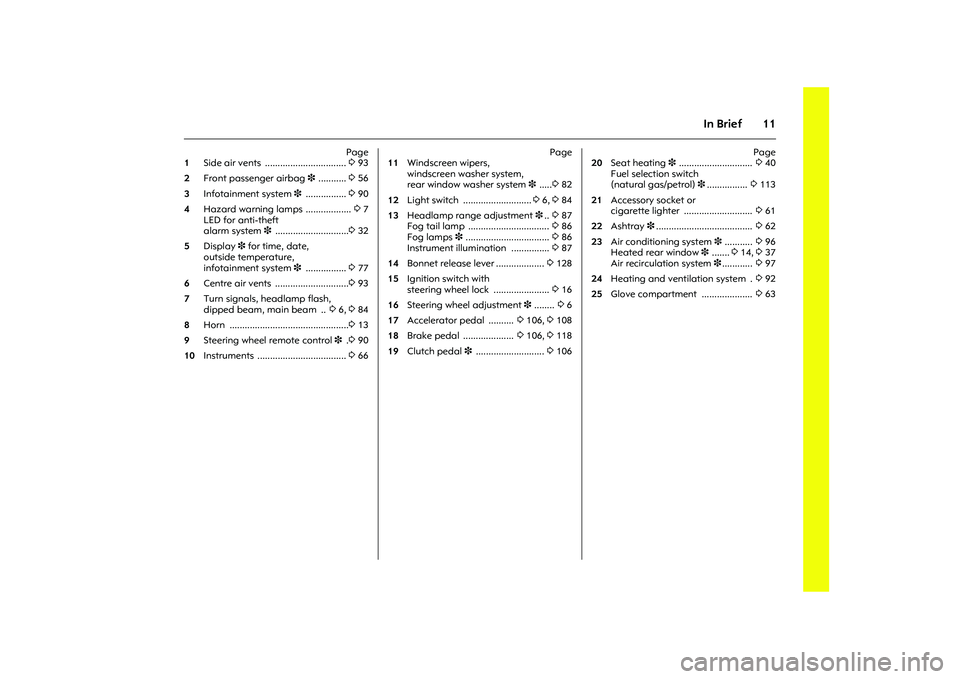
1Side air vents ................................ 393
2 Front passenger airbag 3 ........... 356
3 Infotainment system 3 ................ 390
4Hazard warning lamps .................. 37
LED for anti-theft
alarm system 3 .............................332
5Display 3 for time, date,
outside temperature,
infotainment system 3 ................ 377
6Centre air vents .............................393
7Turn signals, headlamp flash,
dipped beam, main beam .. 36, 384
8Horn ...............................................313
9 Steering wheel remote control 3 .390
10Instruments ................................... 366Page
11 Windscreen wipers,
windscreen washer system,
rear window washer system 3 .....382
12Light switch ...........................36, 384
13 Headlamp range adjustment 3.. 387
Fog tail lamp ................................ 386
Fog lamps 3 ................................. 386
Instrument illumination ............... 387
14Bonnet release lever ................... 3128
15Ignition switch with
steering wheel lock ...................... 316
16 Steering wheel adjustment 3 ........ 36
17Accelerator pedal .......... 3106, 3108
18Brake pedal .................... 3106, 3118
19 Clutch pedal 3 ........................... 3106Page
20 Seat heating 3 ............................. 340
Fuel selection switch
(natural gas/petrol) 3................ 3113
21Accessory socket or
cigarette lighter ........................... 361
22 Ashtray 3...................................... 362
23 Air conditioning system 3 ........... 396
Heated rear window 3 .......314, 337
Air recirculation system 3............ 397
24Heating and ventilation system . 392
25Glove compartment .................... 363
Page 18 of 212
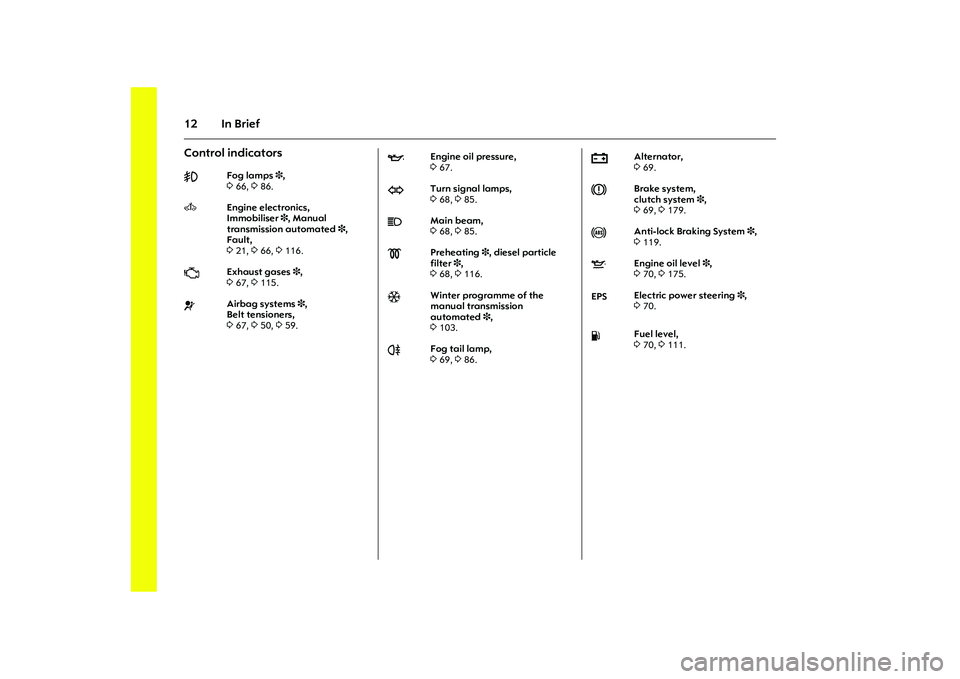
12 In BriefControl indicators >
Fog lamps 3,
366, 386.
A
Engine electronics,
Immobiliser3, Manual
transmission automated 3,
Fault,
321, 366, 3116.
Z
Exhaust gases 3,
367, 3115.
v
Airbag systems 3,
Belt tensioners,
367, 350, 359.
I
Engine oil pressure,
367.
O
Turn signal lamps,
368, 385.
C
Main beam,
368, 385.
!
Preheating 3, diesel particle
filter 3,
368, 3116.
T
Winter programme of the
manual transmission
automated 3,
3103.
r
Fog tail lamp,
369, 386.
p
Alternator,
369.
R
Brake system,
clutch system 3,
369, 3179.
u
Anti-lock Braking System 3,
3119.
S
Engine oil level 3,
370, 3175.
EPSElectric power steering 3,
370.
Y
Fuel level,
370, 3111.
Page 39 of 212

33
Keys, doors, windows
Picture no: 18094s.tif
Opening and closing the luggage
compartment 3 when the anti-theft
alarm system is enabled
1. To unlock:
Tailgate:
Turn key clockwise all the way
past the horizontal position. The tailgate
is unlocked and monitoring of the
passenger compartment and vehicle tilt
are disabled.
Picture no: 18120s.tif
Leaf doors:
Turn key anticlockwise all the
way past the vertical position. The leaf
doors are unlocked and monitoring of
the passenger compartment and vehicle
tilt are disabled.
2. Open the tailgate or leaf doors.
3. Close the tailgate or leaf doors.
4. To lock: Turn key back to horizontal or
vertical position. Monitoring of the
interior and vehicle tilt is enabled after
approx. 10 seconds. Note
zModifications to the passenger
compartment, such as fitting seat
covers, could hinder the function of
passenger compartment monitoring.
zSwitch off passenger compartment
monitoring of the interior of the parked
vehicle is being heated.
Alarm
When triggered, the alarm gives off an
acoustic signal (horn) and a visual signal
(hazard warning flashers). The number
and duration of the alarms are stipulated
by legislation.
The alarm can be silenced by pressing a
button on the remote control or by
switching on the ignition. The anti-theft
alarm system is deactivated at the same
time.
Page 74 of 212
68 InstrumentsO
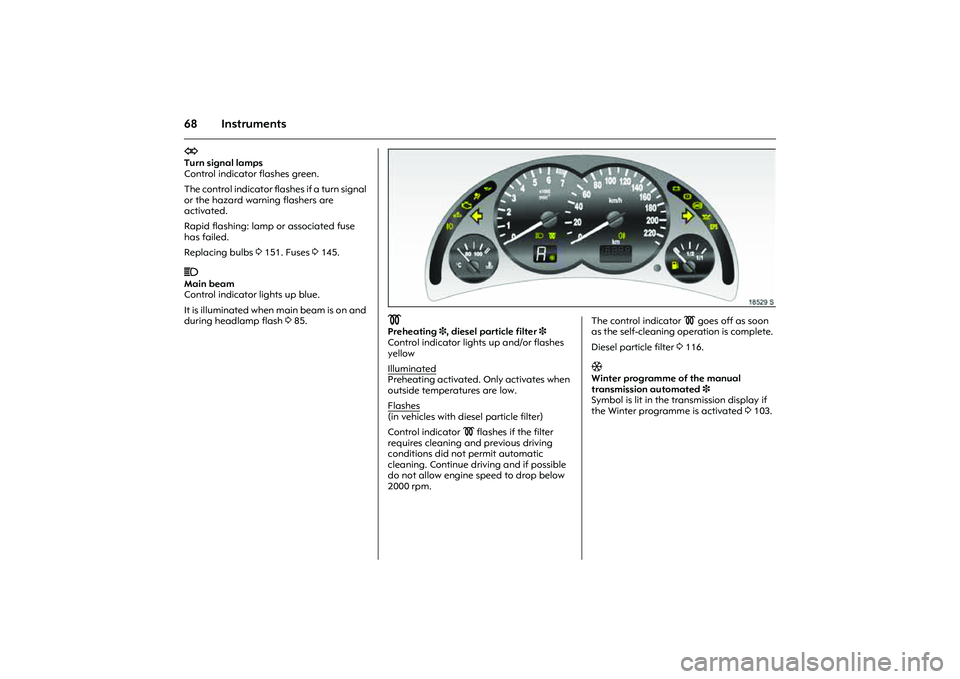
Turn signal lamps
Control indicator flashes green.
The control indicator flashes if a turn signal
or the hazard warning flashers are
activated.
Rapid flashing: lamp or associated fuse
has failed.
Replacing bulbs 3151. Fuses 3145.
C
Main beam
Control indicator lights up blue.
It is illuminated when main beam is on and
during headlamp flash 385.
Picture no: 18529s.tif
!
Preheating3, diesel particle filter 3
Control indicator lights up and/or flashes
yellow
Illuminated
Preheating activated. Only activates when
outside temperatures are low.
Flashes
(in vehicles with diesel particle filter)
Control indicator ! flashes if the filter
requires cleaning and previous driving
conditions did not permit automatic
cleaning. Continue driving and if possible
do not allow engine speed to drop below
2000 rpm.
Picture no:
The control indicator ! goes off as soon
as the self-cleaning operation is complete.
Diesel particle filter 3116.T
Winter programme of the manual
transmission automated3
Symbol is lit in the transmission display if
the Winter programme is activated 3103.
Page 88 of 212
82 InstrumentsSetting display mode 3
Display brightness is independent of
vehicle lighting. Settings are made as
follows:
Select menu item Day / Night from the
Settings menu.
The options are displayed.
Automatic: Adapted based on vehicle
lighting.
Always day design: Black text on light
background.
Always night design: White text on dark
background.
Selections are indicated by a o in front of
the menu item.
Ignition logic 3
Setting, see infotainment system
instructions.
Warning buzzersWhen starting the engine or while driving:
zif seat belt 3 is not fastened.
zIf the speed programmed at the
factory3 is exceeded.
zIf the car has automated manual
transmission 3 and the driver’s door is
opened when the engine is running, a
gear is engaged and the foot brake is
not depressed.
When parking the vehicle and opening
the driver’s door:
zwhen the ignition key is in the ignition
switch.
zwith parking lamps or dipped beam on.
zif the turn signal lever is engaged.
Picture no: 14055h.tif
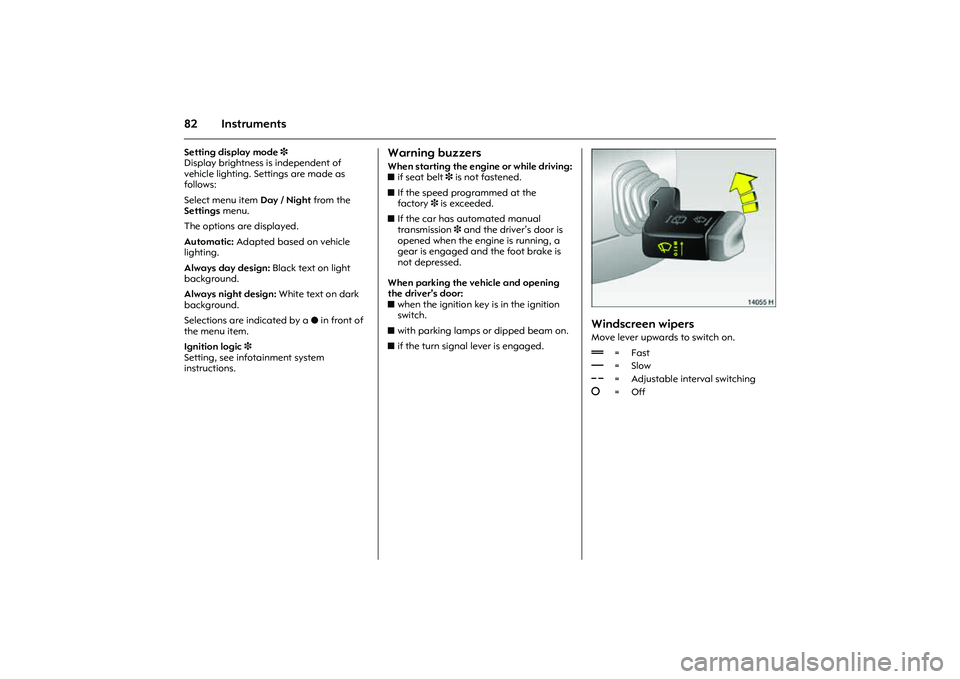
Windscreen wipers Move lever upwards to switch on.
&=Fast
%=Slow
$= Adjustable interval switching
§=Off
Page 90 of 212
84 LightingLighting
Picture no: 13718s.tif
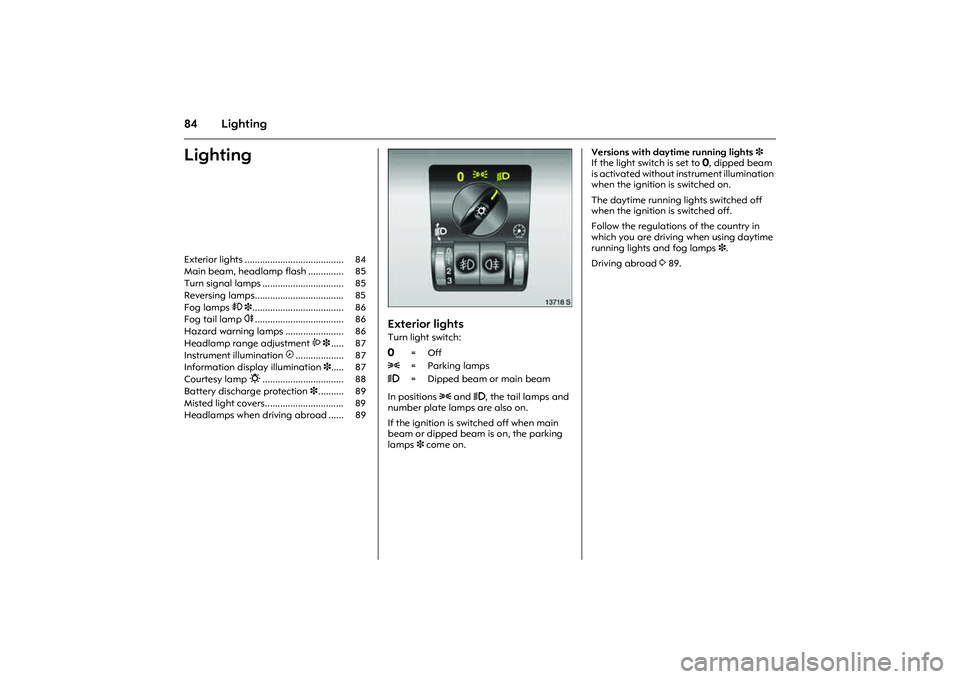
Exterior lightsTurn light switch:
In positions 8 and 9, the tail lamps and
number plate lamps are also on.
If the ignition is switched off when main
beam or dipped beam is on, the parking
lamps 3 come on. Versions with daytime running lights 3
If the light switch is set to 7, dipped beam
is activated without instrument illumination
when the ignition is switched on.
The daytime running lights switched off
when the ignition is switched off.
Follow the regulations of the country in
which you are driving when using daytime
running lights and fog lamps 3.
Driving abroad 3 89. Exterior lights ....................................... 84
Main beam, headlamp flash .............. 85
Turn signal lamps ................................ 85
Reversing lamps................................... 85
Fog lamps > 3.................................... 86
Fog tail lamp r................................... 86
Hazard warning lamps ....................... 86
Headlamp range adjustment ? 3..... 87
Instrument illumination k................... 87
Information display illumination 3..... 87
Courtesy lamp 0................................ 88
Battery discharge protection 3.......... 89
Misted light covers............................... 89
Headlamps when driving abroad ...... 89 7=Off
8= Parking lamps
9= Dipped beam or main beam
Page 91 of 212
85
Lighting
Picture no: 18475s.tif
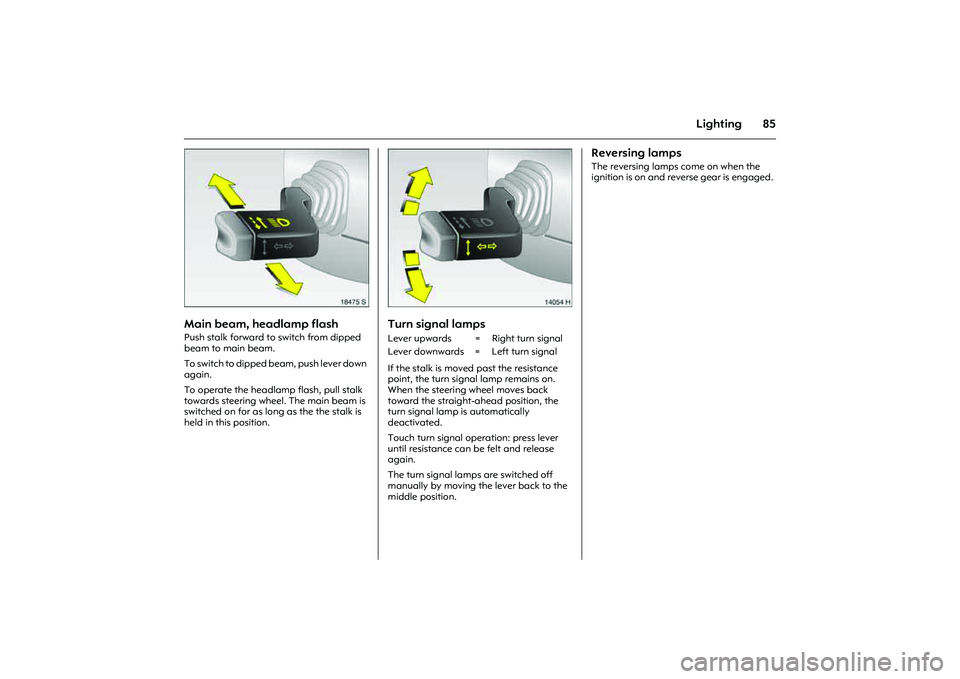
Main beam, headlamp flash Push stalk forward to switch from dipped
beam to main beam.
To switch to dipped beam, push lever down
again.
To operate the headlamp flash, pull stalk
towards steering wheel. The main beam is
switched on for as long as the the stalk is
held in this position.
Picture no: 14054h.tif
Turn signal lamps If the stalk is moved past the resistance
point, the turn signal lamp remains on.
When the steering wheel moves back
toward the straight-ahead position, the
turn signal lamp is automatically
deactivated.
Touch turn signal operation: press lever
until resistance can be felt and release
again.
The turn signal lamps are switched off
manually by moving the lever back to the
middle position.
Reversing lamps The reversing lamps come on when the
ignition is on and reverse gear is engaged.
Lever upwards = Right turn signal
Lever downwards = Left turn signal
Page 133 of 212

127
Driving and operation
Picture no: 13228s.tif
Driving characteristics, towing tips
In the case of trailers/caravans with brakes,
attach breakaway stopping cable to eye.
Before attaching the trailer/caravan,
lubricate the ball of the trailer/caravan
towing device. However, do not lubricate
the ball if a stabiliser, which acts on the
coupling ball, is being used to damp
hunting.
Check caravan/trailer lighting before
starting to drive. The fog tail lamps on the
vehicle are deactivated when towing a
caravan or trailer. Caravans/trailers with LED turn signals
require a provision that make bulb
replacement as with standard bulbs
possible.
Handling is greatly influenced by the
loading of the trailer/caravan. Loads
should therefore be secured so that they
cannot slip and be placed in the centre of
the trailer/caravan if possible, i.e. above
the axle.
In the case of trailers with low driving
stability, do not exceed a speed of
80 km/h; the use of a friction-type
stabiliser is highly recommended.
If the trailer/caravan starts to sway, drive
more slowly, do not attempt to correct the
steering and brake sharply if necessary.
If it is necessary to apply the brakes fully,
depress the brake pedal as hard as
possible.
Remember that the braking distance for
vehicles towing caravans/trailers with and
without brake is always greater than that
for vehicles not towing a caravan/trailer. When driving downhill, drive in the same
gear as if driving uphill and drive at a
similar speed.
Adjust tyre pressure to the value specified
for full load 3121, 3191.