check engine OPEL CORSA 2009 User Guide
[x] Cancel search | Manufacturer: OPEL, Model Year: 2009, Model line: CORSA, Model: OPEL CORSA 2009Pages: 284, PDF Size: 4.96 MB
Page 164 of 284

158 Driving and operation
Picture no: 18540t.tif
We recommend not stopping driving
during cleaning, and not switching off the
ignition. Cleaning is fa stest at high engine
revs and high loads.
Picture no: 18545s.tif
The control indicator
! goes off as soon as
the self-cleaning operation is complete. Maintenance
Have all maintenance work carried out at
the specified intervals. We recommend
that you entrust this work to your Opel
Partner, who has proper equipment and
trained personnel available. Electronic
testing systems permit rapid diagnosis and
remedy of faults. This way you can be
certain that all components of the vehicle’s
electrical, injection and ignition systems
operate correctly, that your vehicle has a
low level of pollutant emission and that the
catalytic converter system will have a long
service life.
You are thereby making an important
contribution towards keeping the air clean
and compliance with emissions legislation.
Checking and adjustment of the fuel-
injection and ignition systems is included in
the inspection. For this reason, you should
have all maintenance work carried out at
the intervals specified in your Service and
Warranty Booklet.
Back to overview
Page 171 of 284
165
Driving and operation
Picture no: 17206t.tif
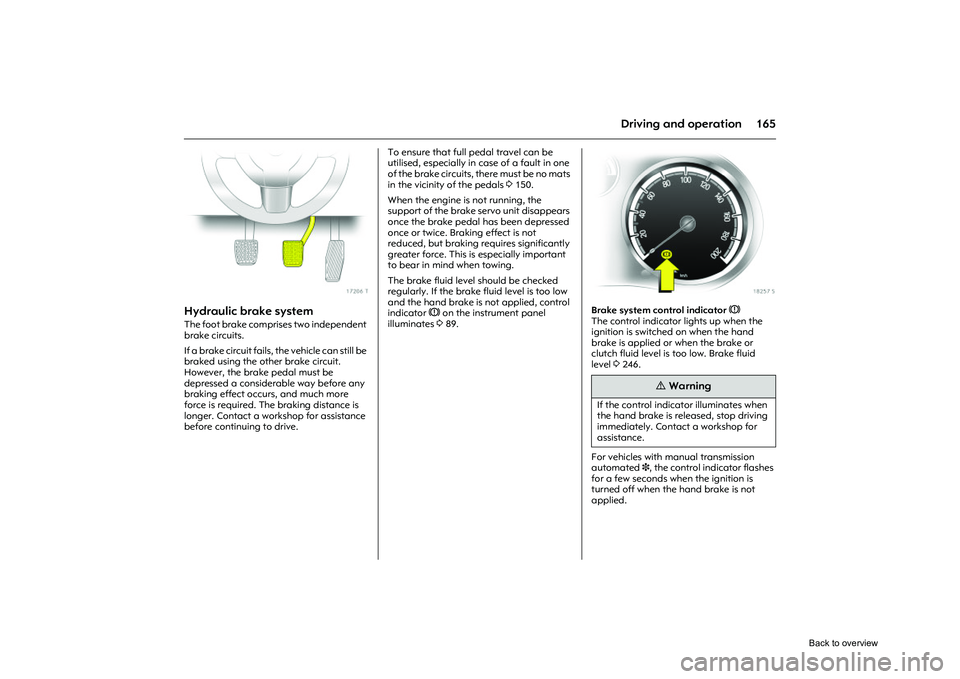
Hydraulic brake system The foot brake comprises two independent
brake circuits.
If a brake circuit fails, the vehicle can still be
braked using the other brake circuit.
However, the brake pedal must be
depressed a considerable way before any
braking effect occurs, and much more
force is required. The braking distance is
longer. Contact a workshop for assistance
before continuing to drive. To ensure that full
pedal travel can be
utilised, especially in case of a fault in one
of the brake circuits, there must be no mats
in the vicinity of the pedals 3150.
When the engine is not running, the
support of the brake servo unit disappears
once the brake pedal has been depressed
once or twice. Braking effect is not
reduced, but braking requires significantly
greater force. This is especially important
to bear in mind when towing.
The brake fluid level should be checked
regularly. If the brake fluid level is too low
and the hand brake is not applied, control
indicator R on the instrument panel
illuminates 389.
Picture no: 18257s.tif
Brake system control indicator R
The control indicator lights up when the
ignition is switched on when the hand
brake is applied or when the brake or
clutch fluid level is too low. Brake fluid
level 3246.
For vehicles with manual transmission
automated 3, the control indicator flashes
for a few seconds when the ignition is
turned off when the hand brake is not
applied.
9
Warning
If the control indicator illuminates when
the hand brake is released, stop driving
immediately. Contact a workshop for
assistance.
Back to overview
Page 172 of 284
166 Driving and operationAnti-lock brake system (ABS
u)
ABS prevents the wheels from locking.
ABS starts to regulate brake pressure as
soon as a wheel shows a tendency to lock.
The vehicle remains steerable, even during
hard braking.
For optimum braking, keep the brake
pedal fully depressed throughout the
braking process, despite the fact that the
pedal is pulsating. Do not reduce the
pressure on the pedal.
Picture no: 18258s.tif
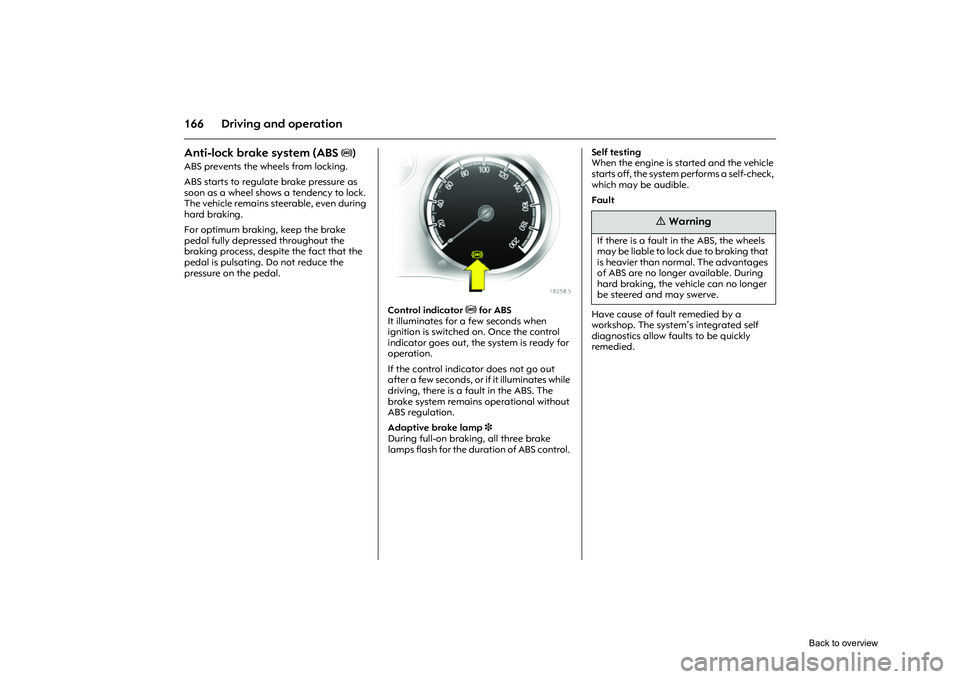
Control indicator u for ABS
It illuminates for a few seconds when
ignition is switched on. Once the control
indicator goes out, the system is ready for
operation.
If the control indica tor does not go out
after a few seconds, or if it illuminates while
driving, there is a fault in the ABS. The
brake system remains operational without
ABS regulation.
Adaptive brake lamp 3
During full-on braking, all three brake
lamps flash for the duration of ABS control. Self testing
When the engine is started and the vehicle
starts off, the system performs a self-check,
which may be audible.
Fault
Have cause of fault remedied by a
workshop. The system’s integrated self
diagnostics allow faults to be quickly
remedied.
9
Warning
If there is a fault in the ABS, the wheels
may be liable to lock due to braking that
is heavier than normal. The advantages
of ABS are no longer available. During
hard braking, the vehicle can no longer
be steered and may swerve.
Back to overview
Page 195 of 284
189
Driving and operation
Driving characteristics, towing tips
Before attaching the trailer/caravan,
lubricate the ball of the trailer/caravan
towing device. However, do not lubricate
the ball if a stabiliser, which acts on the
coupling ball, is being used to damp
hunting.
Check caravan/traile r lighting before
starting to drive. The fog tail lamps on the
vehicle are deactivated when towing a
caravan or trailer.
Trailers with LED turn signals must have a
provision enables lamp monitoring for
commercial bulbs.
Ultrasonic parking sensors 3 are
deactivated in towing mode.
Handling is greatly influenced by the
loading of the trailer/caravan. Loads
should therefore be secured so that they
cannot slip and be placed in the centre of
the trailer/caravan if possible, i.e. above
the axle.
For trailers with low directional control and
for caravans with a permissible gross
vehicle weight of more than 1000 kg, a
speed of 80 km/h must not be exceeded;
use of a roll damper in accordance with the
friction principle is urgently recommended. If the trailer/caravan starts to sway, drive
more slowly, do not attempt to correct the
steering and brake sharply if necessary.
If it is necessary to apply the brakes fully,
depress the brake pedal as hard as
possible.
Remember that the braking distance for
vehicles towing caravans/trailers with and
without brake is always greater than that
for vehicles not towing a caravan/trailer.
When driving downhill, drive in the same
gear as if driving uphill and drive at a
similar speed.
Adjust tyre pressure to the value specified
for full load
3264. Starting on inclines
For vehicles with manual transmission, the
most favourable engine speed when
starting off on an incline is between
2500 and 3000 rpm for petrol engines and
between 2000 and 2200 rpm for diesel
engines. Hold engine speed constant,
engage clutch gradually (let slip), release
hand brake and open throttle. If possible,
the engine speed should not drop during
this procedure.
In vehicles with automatic transmission
3
and manual transmission automated 3 it is
sufficient to give full throttle in D or
(in automatic mode) 3.
Before starting off under extreme
operating conditions, switch off
unnecessary consumers.
Back to overview
Page 197 of 284
191
Self-help, vehicle care
Picture no: 18191s.tif
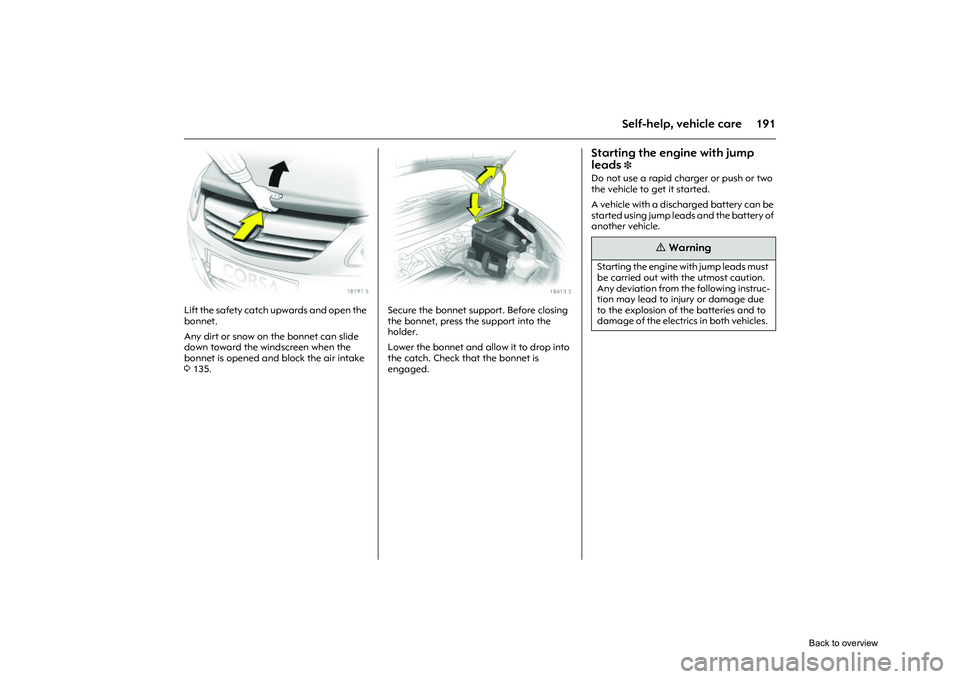
Lift the safety catch upwards and open the
bonnet.
Any dirt or snow on the bonnet can slide
down toward the windscreen when the
bonnet is opened and block the air intake
3135.
Picture no: 18413s.tif
Secure the bonnet support. Before closing
the bonnet, press the support into the
holder.
Lower the bonnet and allow it to drop into
the catch. Check that the bonnet is
engaged.
Starting the engine with jump
leads
3
Do not use a rapid charger or push or two
the vehicle to get it started.
A vehicle with a discha rged battery can be
started using jump leads and the battery of
another vehicle.
9
Warning
Starting the engine with jump leads must
be carried out with the utmost caution.
Any deviation from the following instruc-
tion may lead to injury or damage due
to the explosion of the batteries and to
damage of the electrics in both vehicles.
Back to overview
Page 236 of 284
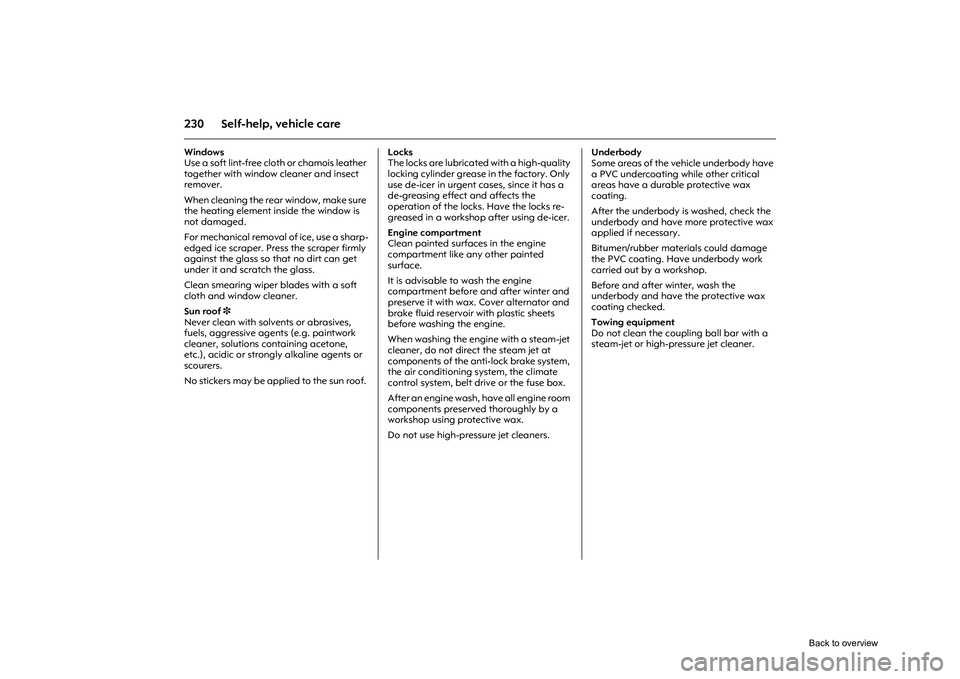
230 Self-help, vehicle careWindows
Use a soft lint-free cloth or chamois leather
together with window cleaner and insect
remover.
When cleaning the rear window, make sure
the heating element inside the window is
not damaged.
For mechanical removal of ice, use a sharp-
edged ice scraper. Press the scraper firmly
against the glass so that no dirt can get
under it and scratch the glass.
Clean smearing wiper blades with a soft
cloth and window cleaner.
Sun roof 3
Never clean with solvents or abrasives,
fuels, aggressive agents (e.g. paintwork
cleaner, solutions containing acetone,
etc.), acidic or strongly alkaline agents or
scourers.
No stickers may be applied to the sun roof. Locks
The locks are lubricated with a high-quality
locking cylinder grease
in the factory. Only
use de-icer in urgent cases, since it has a
de-greasing effect and affects the
operation of the locks. Have the locks re-
greased in a workshop after using de-icer.
Engine compartment
Clean painted surfaces in the engine
compartment like any other painted
surface.
It is advisable to wash the engine
compartment before and after winter and
preserve it with wax. Cover alternator and
brake fluid reservoir with plastic sheets
before washing the engine.
When washing the engine with a steam-jet
cleaner, do not direct the steam jet at
components of the anti-lock brake system,
the air conditioning system, the climate
control system, belt drive or the fuse box.
After an engine wash, have all engine room
components preserved thoroughly by a
workshop using protective wax.
Do not use high-pressure jet cleaners. Underbody
Some areas of the vehicle underbody have
a PVC undercoating while other critical
areas have a durable protective wax
coating.
After the underbody is washed, check the
underbody and have more protective wax
applied if necessary.
Bitumen/rubber materials could damage
the PVC coating. Have underbody work
carried out by a workshop.
Before and after winter, wash the
underbody and have the protective wax
coating checked.
Towing equipment
Do not clean the coupling ball bar with a
steam-jet or high-pressure jet cleaner.
Back to overview
Page 239 of 284
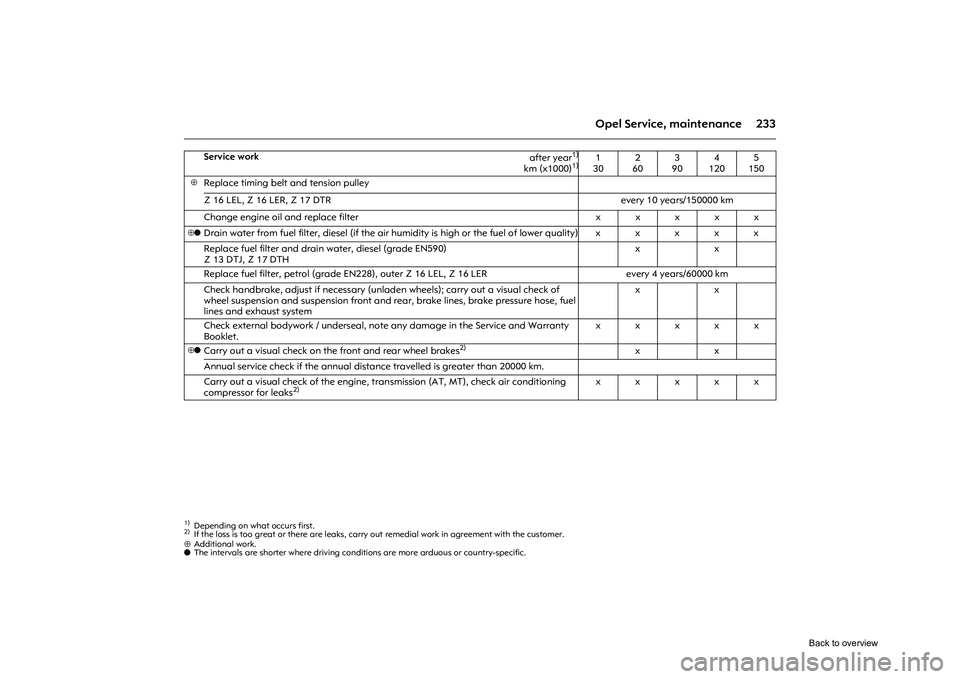
233
Opel Service, maintenance
⊕ Additional work.
o The intervals are shorter where driving conditions are more arduous or country-specific.
Service work
after year
1)
km (x1000)
1)
1)Depending on what occurs first.
1
30 2
60 3
90 4
120 5
150
⊕
Replace timing belt and tension pulley
Z 16 LEL, Z 16 LER, Z 17 DTR every 10 years/150000 km
Change engine oil and replace filter xxxxx
⊕o
Drain water from fuel filter, diesel (if the air humidity is high or the fuel of lower quality)xxxxx
Replace fuel filter and drain water, diesel (grade EN590)
Z 13 DTJ, Z 17 DTH xx
Replace fuel filter, petrol (g rade EN228), outer Z 16 LEL, Z 16 LER every 4 years/60000 km
Check handbrake, adjust if necessary (unl aden wheels); carry out a visual check of
wheel suspension and suspension front and re ar, brake lines, brake pressure hose, fuel
lines and exhaust system xx
Check external bodywork / underseal, note any damage in the Service and Warranty
Booklet. xxxxx
⊕o
Carry out a visual check on the front and rear wheel brakes
2)
2)If the loss is too great or there are leaks, carry
out remedial work in agreement with the customer.
xx
Annual service check if the annual distance travelled is greater than 20000 km.
Carry out a visual check of the engine, tran smission (AT, MT), check air conditioning
compressor for leaks
2)
xxxxx
Back to overview
Page 240 of 284
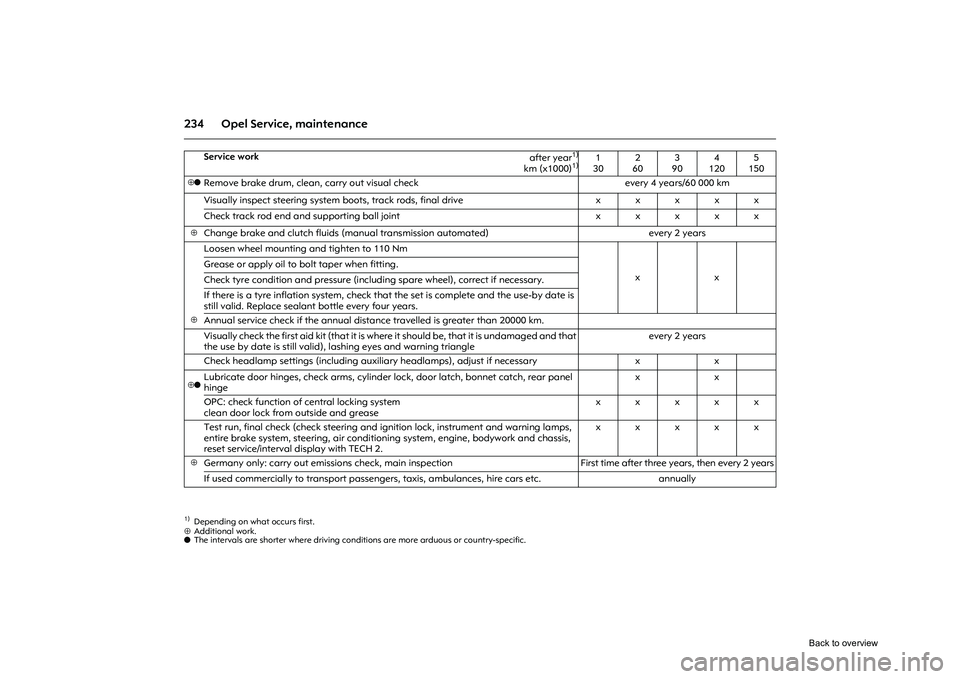
234 Opel Service, maintenance⊕Additional work.
o The intervals are shorter where driving conditions are more arduous or country-specific.
Service work
after year
1)
km (x1000)
1)
1)Depending on what occurs first.
1
30 2
60 3
90 4
120 5
150
⊕o
Remove brake drum, clean, carry out visual check every 4 years/60 000 km
Visually inspect steering system boots, track rods, final drive xxxxx
Check track rod end and supporting ball joint xxxxx
⊕
Change brake and clutch fluids (manual transmission automated) every 2 years
Loosen wheel mounting and tighten to 110 Nm
xx
Grease or apply oil to
bolt taper when fitting.
Check tyre condition and pressure (inclu ding spare wheel), correct if necessary.
If there is a tyre inflation system, check that the set is complete and the use-by date is
still valid. Replace sealant bottle every four years.
⊕
Annual service check if the annual distance travelled is greater than 20000 km.
Visually check the first aid kit (that it is wher e it should be, that it is undamaged and that
the use by date is still valid), lashing eyes and warning triangle every 2 years
Check headlamp settings (including auxi liary headlamps), adjust if necessary x x
⊕o
Lubricate door hinges, check arms, cylinder lo ck, door latch, bonnet catch, rear panel
hinge xx
OPC: check function of central locking system
clean door lock from outside and grease xxxxx
Test run, final check (check steering and ig nition lock, instrument and warning lamps,
entire brake system, steering, air conditioni ng system, engine, bodywork and chassis,
reset service/interval display with TECH 2. xxxxx
⊕
Germany only: carry out emissions check, main inspection
First time after three years, then every 2 years
If used commercially to transport passengers, taxis, ambulances, hire cars etc. annually
Back to overview
Page 242 of 284
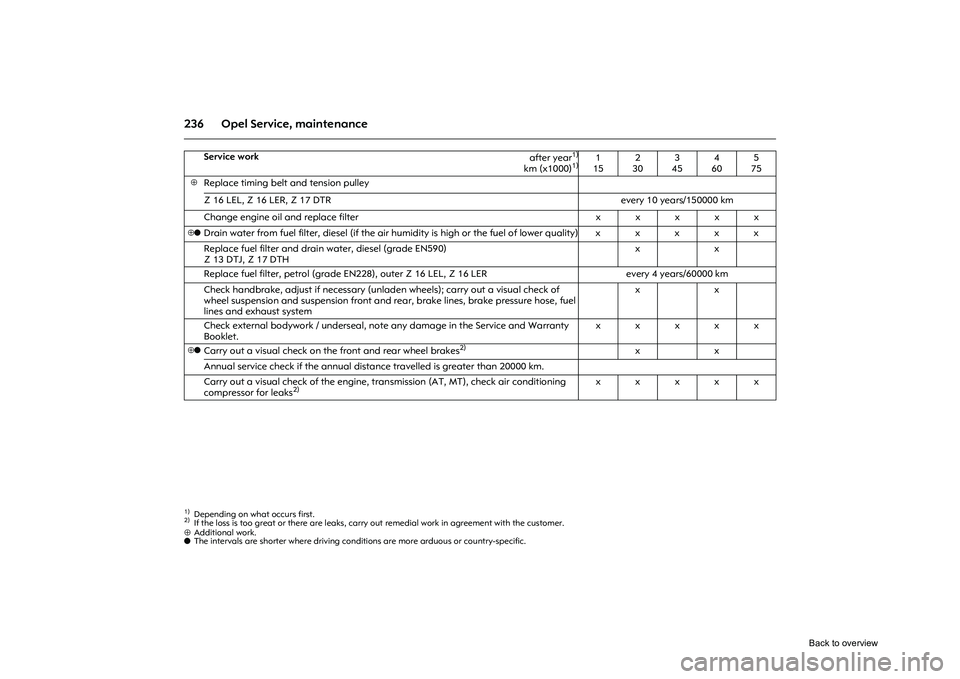
236 Opel Service, maintenance⊕Additional work.
o The intervals are shorter where driving conditions are more arduous or country-specific.
Service work
after year
1)
km (x1000)
1)
1)Depending on what occurs first.
1
15 2
30 3
45 4
60 5
75
⊕
Replace timing belt and tension pulley
Z 16 LEL, Z 16 LER, Z 17 DTR every 10 years/150000 km
Change engine oil and replace filter xxxxx
⊕o
Drain water from fuel filter, diesel (if the air humidity is high or the fuel of lower quality)xxxxx
Replace fuel filter and drain water, diesel (grade EN590)
Z 13 DTJ, Z 17 DTH xx
Replace fuel filter, petrol (g rade EN228), outer Z 16 LEL, Z 16 LER every 4 years/60000 km
Check handbrake, adjust if necessary (unl aden wheels); carry out a visual check of
wheel suspension and suspension front and re ar, brake lines, brake pressure hose, fuel
lines and exhaust system xx
Check external bodywork / underseal, note any damage in the Service and Warranty
Booklet. xxxxx
⊕o
Carry out a visual check on the front and rear wheel brakes
2)
2)If the loss is too great or there are leaks, carry
out remedial work in agreement with the customer.
xx
Annual service check if the annual distance travelled is greater than 20000 km.
Carry out a visual check of the engine, tran smission (AT, MT), check air conditioning
compressor for leaks
2)
xxxxx
Back to overview
Page 243 of 284
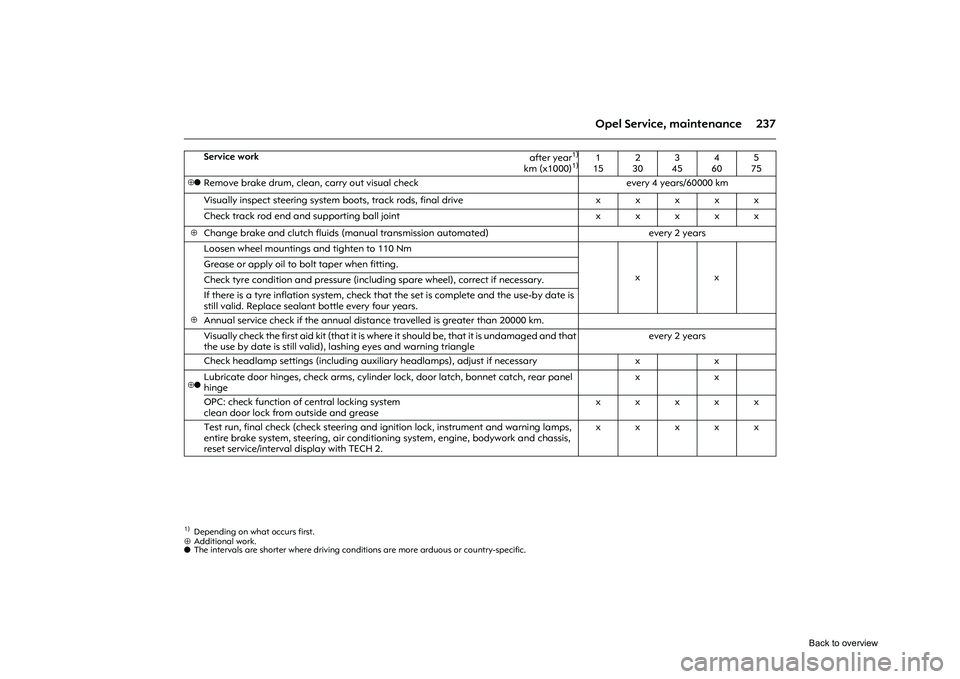
237
Opel Service, maintenance
⊕ Additional work.
o The intervals are shorter where driving conditions are more arduous or country-specific.
Service work
after year
1)
km (x1000)
1)
1)Depending on what occurs first.
1
15 2
30 3
45 4
60 5
75
⊕o
Remove brake drum, clean, carry out visual check every 4 years/60000 km
Visually inspect steering system boots, track rods, final drive xxxxx
Check track rod end and supporting ball joint xxxxx
⊕
Change brake and clutch fluids (manual transmission automated) every 2 years
Loosen wheel mountings and tighten to 110 Nm
xx
Grease or apply oil to
bolt taper when fitting.
Check tyre condition and pressure (inclu ding spare wheel), correct if necessary.
If there is a tyre inflation system, check that the set is complete and the use-by date is
still valid. Replace sealant bottle every four years.
⊕
Annual service check if the annual distance travelled is greater than 20000 km.
Visually check the first aid kit (that it is wher e it should be, that it is undamaged and that
the use by date is still valid), lashing eyes and warning triangle every 2 years
Check headlamp settings (including auxi liary headlamps), adjust if necessary x x
⊕o
Lubricate door hinges, check arms, cylinder lo ck, door latch, bonnet catch, rear panel
hinge xx
OPC: check function of central locking system
clean door lock from outside and grease xxxxx
Test run, final check (check steering and ig nition lock, instrument and warning lamps,
entire brake system, steering, air conditioni ng system, engine, bodywork and chassis,
reset service/interval display with TECH 2. xxxxx
Back to overview