engine OPEL FRONTERA 1998 Workshop Manual
[x] Cancel search | Manufacturer: OPEL, Model Year: 1998, Model line: FRONTERA, Model: OPEL FRONTERA 1998Pages: 6000, PDF Size: 97 MB
Page 1162 of 6000

6E–45 ENGINE DRIVEABILITY AND EMISSIONS
060RW218
Menu
The following table shows, which functions are used
the available equipment versions.
060RW228
DTC Modes
060RW229
On OBD passenger cars there are five options available
in Tech 2 DTC mode to display the enhanced information
available. A description of the new modes, DTC Info
follows. After selecting DTC, the following menu
appears:
DTC Info
Freeze Frame
Fail Records (not all applications)
Clear Info
Page 1163 of 6000

6E–46
ENGINE DRIVEABILITY AND EMISSIONS
060RW223
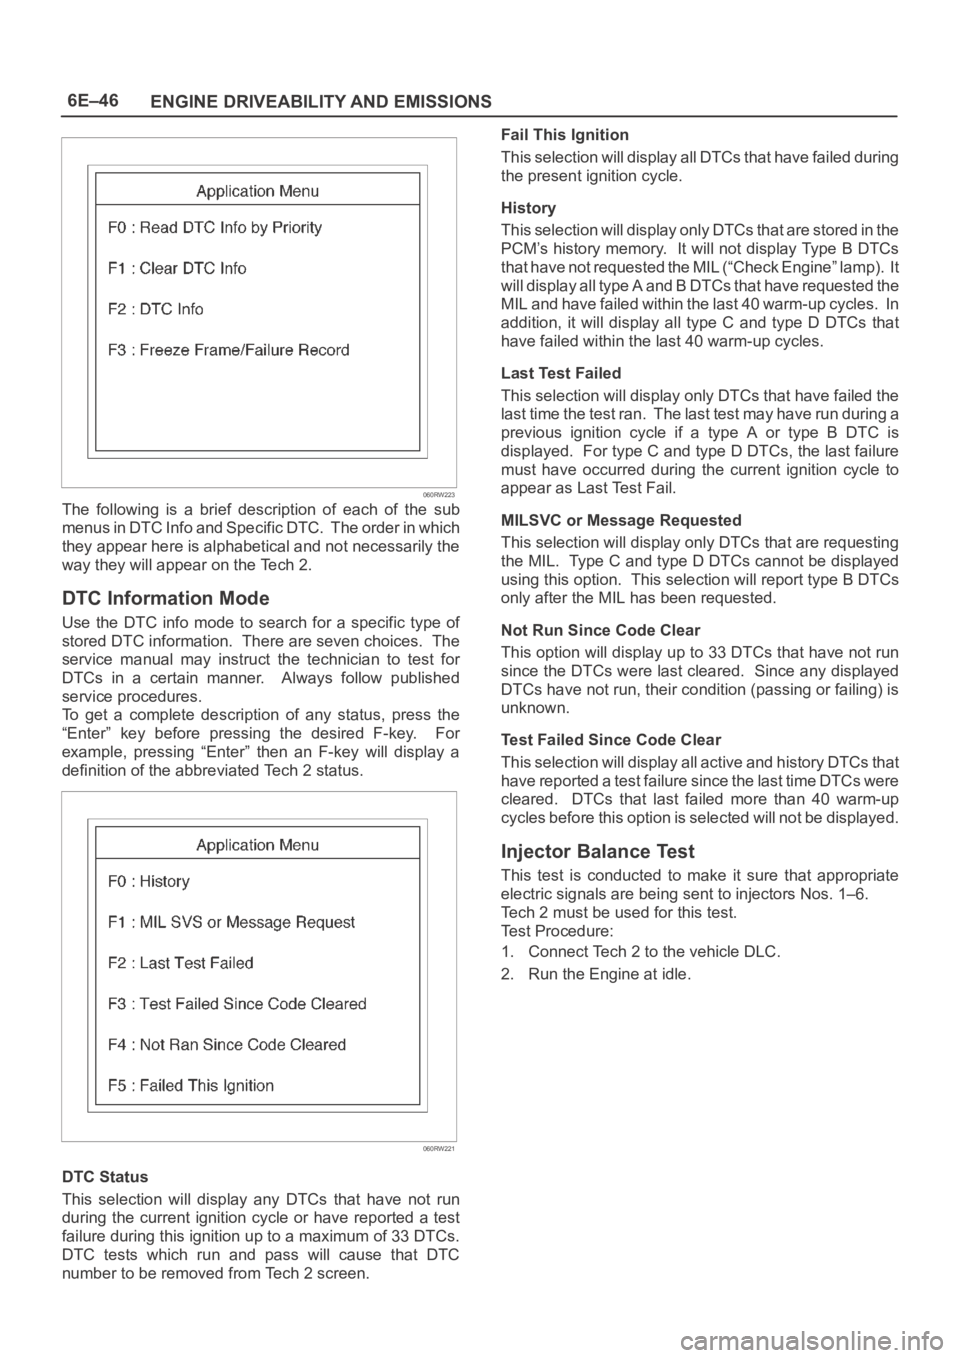
The following is a brief description of each of the sub
menus in DTC Info and Specific DTC. The order in which
they appear here is alphabetical and not necessarily the
way they will appear on the Tech 2.
DTC Information Mode
Use the DTC info mode to search for a specific type of
stored DTC information. There are seven choices. The
service manual may instruct the technician to test for
DTCs in a certain manner. Always follow published
service procedures.
To get a complete description of any status, press the
“Enter” key before pressing the desired F-key. For
example, pressing “Enter” then an F-key will display a
definition of the abbreviated Tech 2 status.
060RW221
DTC Status
This selection will display any DTCs that have not run
during the current ignition cycle or have reported a test
failure during this ignition up to a maximum of 33 DTCs.
DTC tests which run and pass will cause that DTC
number to be removed from Tech 2 screen.Fail This Ignition
This selection will display all DTCs that have failed during
the present ignition cycle.
History
This selection will display only DTCs that are stored in the
PCM’s history memory. It will not display Type B DTCs
that have not requested the MIL (“Check Engine” lamp). It
will display all type A and B DTCs that have requested the
MIL and have failed within the last 40 warm-up cycles. In
addition, it will display all type C and type D DTCs that
have failed within the last 40 warm-up cycles.
Last Test Failed
This selection will display only DTCs that have failed the
last time the test ran. The last test may have run during a
previous ignition cycle if a type A or type B DTC is
displayed. For type C and type D DTCs, the last failure
must have occurred during the current ignition cycle to
appear as Last Test Fail.
MILSVC or Message Requested
This selection will display only DTCs that are requesting
the MIL. Type C and type D DTCs cannot be displayed
using this option. This selection will report type B DTCs
only after the MIL has been requested.
Not Run Since Code Clear
This option will display up to 33 DTCs that have not run
since the DTCs were last cleared. Since any displayed
DTCs have not run, their condition (passing or failing) is
unknown.
Test Failed Since Code Clear
This selection will display all active and history DTCs that
have reported a test failure since the last time DTCs were
cleared. DTCs that last failed more than 40 warm-up
cycles before this option is selected will not be displayed.
Injector Balance Test
This test is conducted to make it sure that appropriate
electric signals are being sent to injectors Nos. 1–6.
Tech 2 must be used for this test.
Test Procedure:
1. Connect Tech 2 to the vehicle DLC.
2. Run the Engine at idle.
Page 1164 of 6000

6E–47 ENGINE DRIVEABILITY AND EMISSIONS
3. Select F3: Miscellaneous Test in the Application
Menu.
060RW228
4. Select F7: Injector Balance Test in the Miscellaneous
Te s t .
060RX006
5. Select injector number and push “injector off” of soft
key.
060RW230
6. Make sure of engine speed change.
7. In the engine speed whose change has been
confirmed, the injector electric circuit can be regard
as normal.
As for the engine speed whose change has not been
confirmed, the injector electric circuit or the injector
proper is faulty.
EGR Control Test
This test is conducted check EGR valve for its working.
Tech 2 must be used for this test.
Test Procedure:
1. Connect Tech 2 to the vehicle DLC.
2. Run the Engine at idle.
3. Select F3: Miscellaneous Test in the Application
Menu.
060RW228
Page 1165 of 6000

6E–48
ENGINE DRIVEABILITY AND EMISSIONS
4. Select F5: EGR Control Test in the Miscellaneous
Te s t .
060RX008
5. Instruct EGR Valve to check a data list.
060RW234
6. If change in the data list shows a normal valve.
Idle Air Control System Test
This test is conducted check IAC system for its working.
Tech 2 must be used for this test.
Test Procedure:
1. Connect Tech 2 to the vehicle DLC.
2. Run the Engine at idle.3. Select F3: Miscellaneous Test in the Application
Menu.
060RW228
4. Select F3: IAC System Test in the Miscellaneous
Te s t .
060RX007
Page 1166 of 6000

6E–49 ENGINE DRIVEABILITY AND EMISSIONS
5. Select F1: IAC Control Test.
060RW235
6. Instruct IAC system to check a data list.
060RW233
F0: RPM Control
060RW232
F2: IAC Reset
060RW231
7. If change in the data list shows a normal IAC.
Page 1167 of 6000

6E–50
ENGINE DRIVEABILITY AND EMISSIONS
Primary System-Based Diagnostic
Primary System-Based Diagnostic
There are primary system-based diagnostics which
evaluate system operation and its effect on vehicle
emissions. The primary system-based diagnostics are
listed below with a brief description of the diagnostic
function:
Oxygen Sensor Diagnosis
The fuel control heated oxygen sensors (Bank 1 HO2S 1
and Bank 2 HO2S 1) are diagnosed for the following
conditions:
Inactive signal (output steady at bias voltage – approx.
450 mV)
Signal fixed high
Signal fixed low
If the oxygen sensor pigtail wiring, connector or terminal
are damaged, the entire oxygen sensor assembly must
be replaced. DO NOT attempt to repair the wiring,
connector or terminals. In order for the sensor to function
properly, it must have clean reference air provided to it.
This clean air reference is obtained by way of the oxygen
sensor wire(s). Any attempt to repair the wires, connector
or terminals could result in the obstruction of the
reference air and degrade oxygen sensor performance.
Refer to
On-Vehicle Service, Heated Oxygen Sensors.
Fuel Control Heated Oxygen Sensor
The main function of the fuel control heated oxygen
sensors is to provide the control module with exhaust
stream oxygen content information to allow proper fueling
and maintain emissions within mandated levels. After it
reaches operating temperature, the sensor will generate
a voltage, inversely proportional to the amount of oxygen
present in the exhaust gases. The control module uses
the signal voltage from the fuel control heated oxygen
sensors while in closed loop to adjust fuel injector pulse
width. While in closed loop, the PCM can adjust fuel
delivery to maintain an air/fuel ratio which allows the best
combination of emission control and driveability.
HO2S Heater
Heated oxygen sensors are used to minimize the amount
of time required for closed loop fuel control to begin
operation and to allow accurate catalyst monitoring. The
oxygen sensor heater greatly decreases the amount of
time required for fuel control sensors (Bank 1 HO2S 1 and
Bank2 HO2S 1) to become active. Oxygen sensor
heaters are required to maintain a sufficiently high
temperature which allows accurate exhaust oxygen
content readings further away from the engine.
Fuel Trim System Monitor Diagnostic
Operation
Fuel Trim System Monitor Diagnostic
Operation
This system monitors the averages of short-term and
long-term fuel trim values. If these fuel trim values stay at
their limits for a calibrated period of time, a malfunction is
indicated. The fuel trim diagnostic compares the
averages of short-term fuel trim values and long-term fuel
trim values to rich and lean thresholds. If either value is
within the thresholds, a pass is recorded. If both values
are outside their thresholds, a rich or lean DTC will be
recorded.
The fuel trim system diagnostic also conducts an intrusive
test. This test determines if a rich condition is being
caused by excessive fuel vapor from the EVAP canister.
In order to meet OBD requirements, the control module
uses weighted fuel trim cells to determine the need to set
a fuel trim DTC. A fuel trim DTC can only be set if fuel trim
counts in the weighted fuel trim cells exceed
specifications. This means that the vehicle could have a
fuel trim problem which is causing a problem under
certain conditions (i.e., engine idle high due to a small
vacuum leak or rough idle due to a large vacuum leak)
while it operates fine at other times. No fuel trim DTC
would set (although an engine idle speed DTC or HO2S
DTC may set). Use a Tech 2 to observe fuel trim counts
while the problem is occurring.
A fuel trim DTC may be triggered by a number of vehicle
faults. Make use of all information available (other DTCs
stored, rich or lean condition, etc.) when diagnosing a fuel
trim fault.
Fuel Trim Cell Diagnostic Weights
N o f u e l t r i m D T C w i l l s e t r e g a r d l e s s o f t h e f u e l t r i m c o u n t s
in cell 0 unless the fuel trim counts in the weighted cells
are also outside specifications. This means that the
vehicle could have a fuel trim problem which is causing a
problem under certain conditions (i.e. engine idle high due
to a small vacuum leak or rough due to a large vacuum
leak) while it operates fine at other times. No fuel trim
DTC would set (although an engine idle speed DTC or
HO2S DTC may set). Use a Tech 2 to observe fuel trim
counts while the problem is occurring.
Page 1168 of 6000

6E–51 ENGINE DRIVEABILITY AND EMISSIONS
On-Board Diagnostic (OBD) System Check
TS321119
Circuit Description
The on-board diagnostic system check is the starting
point for any driveability complaint diagnosis. Before
using this procedure, perform a careful visual/physical
check of the PCM and engine grounds for cleanliness and
tightness.
The on-board diagnostic system check is an organized
approach to identifying a problem created by an
electronic engine control system malfunction.
Diagnostic Aids
An intermittent may be caused by a poor connection,
rubbed-through wire insulation or a wire broken inside the
insulation. Check for poor connections or a damaged
harness. Inspect the PCM harness and connector for
improper mating, broken locks, improperly formed or
damaged terminals, poor terminal-to-wire connection,
and damaged harness.
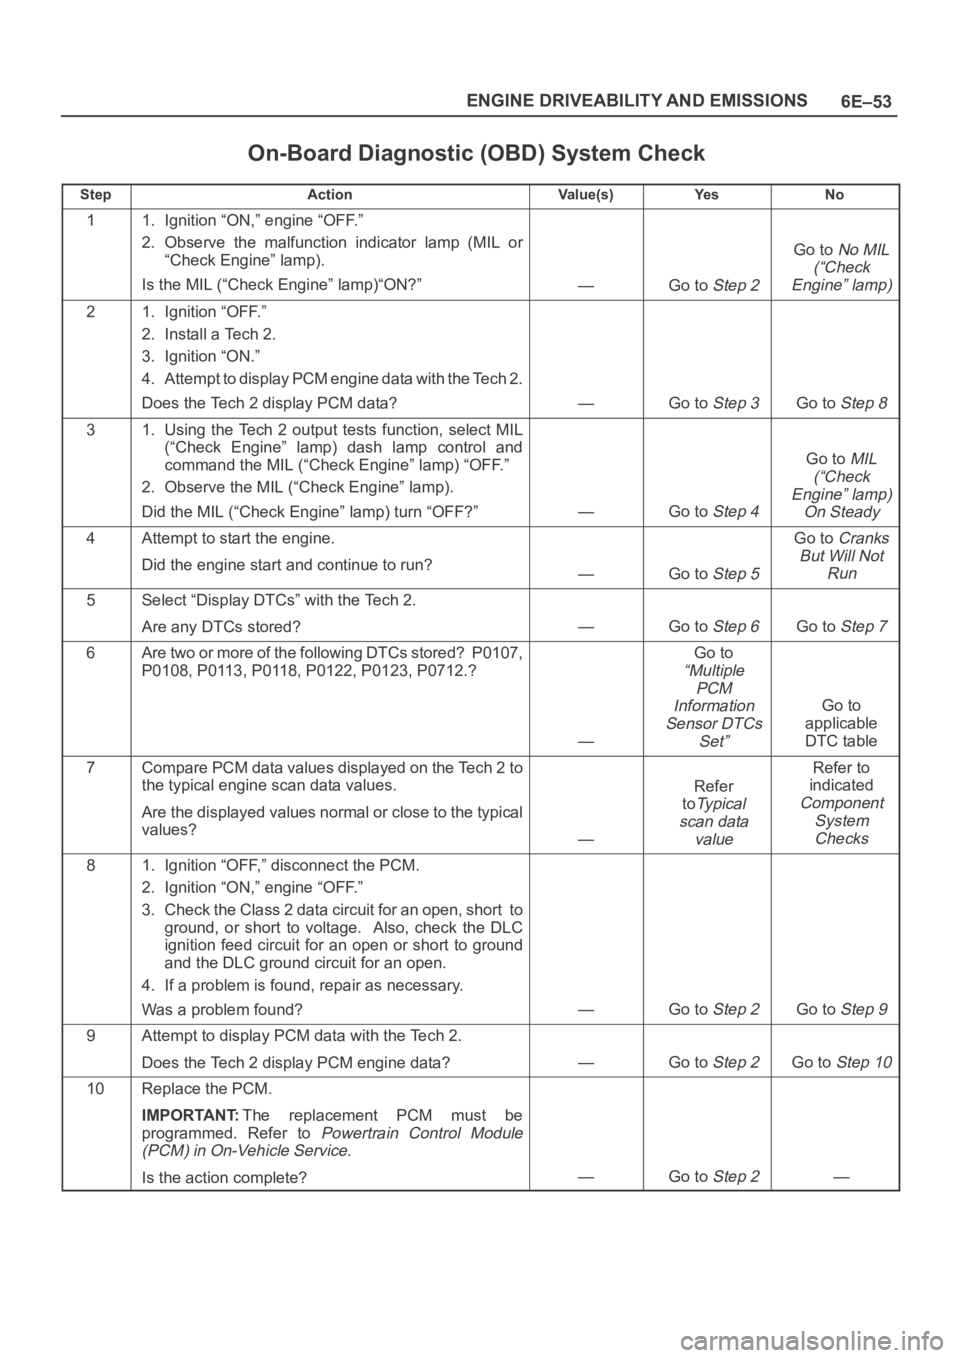
Test Description
Number(s) below refer to the step number(s) on the
Diagnostic Chart:
1. The MIL (“Check Engine” lamp) should be “ON”
steady with the ignition “ON”/engine “OFF.” If not,
Chart A-1 should be used to isolate the malfunction.
2. Checks the Class 2 data circuit and ensures that the
PCM is able to transmit serial data.
3. This test ensures that the PCM is capable of
controlling the MIL (“Check Engine” lamp) and the
MIL (“Check Engine” lamp) driver circuit is not
shorted to ground.
4. If the engine will not start, the
Cranks But Will Not
Run
chart should be used to diagnose the condition.
7. A Tech 2 parameter which is not within the typical
range may help to isolate the area which is causing
the problem.
Page 1169 of 6000

6E–52
ENGINE DRIVEABILITY AND EMISSIONS
10.This vehicle is equipped with a PCM which utilizes
an electrically erasable programmable read only
memory (EEPROM). When the PCM is replaced,
the new PCM must be programmed.
Refer to UBS
98 model year Immobilizer Workshop Manual.
Page 1170 of 6000

6E–53 ENGINE DRIVEABILITY AND EMISSIONS
On-Board Diagnostic (OBD) System Check
StepActionVa l u e ( s )Ye sNo
11. Ignition “ON,” engine “OFF.”
2. Observe the malfunction indicator lamp (MIL or
“Check Engine” lamp).
Is the MIL (“Check Engine” lamp)“ON?”
—Go to Step 2
Go to No MIL
(“Check
Engine” lamp)
21. Ignition “OFF.”
2. Install a Tech 2.
3. Ignition “ON.”
4. Attempt to display PCM engine data with the Tech 2.
Does the Tech 2 display PCM data?
—Go to Step 3Go to Step 8
31. Using the Tech 2 output tests function, select MIL
(“Check Engine” lamp) dash lamp control and
command the MIL (“Check Engine” lamp) “OFF.”
2. Observe the MIL (“Check Engine” lamp).
Did the MIL (“Check Engine” lamp) turn “OFF?”
—Go to Step 4
Go to MIL
(“Check
Engine” lamp)
On Steady
4Attempt to start the engine.
Did the engine start and continue to run?
—Go to Step 5
Go to Cranks
But Will Not
Run
5Select “Display DTCs” with the Tech 2.
Are any DTCs stored?
—Go to Step 6Go to Step 7
6Are two or more of the following DTCs stored? P0107,
P0108, P0113, P0118, P0122, P0123, P0712.?
—
Go to
“Multiple
PCM
Information
Sensor DTCs
Set”
Go to
applicable
DTC table
7Compare PCM data values displayed on the Tech 2 to
the typical engine scan data values.
Are the displayed values normal or close to the typical
values?
—
Refer
to
Ty p i c a l
scan data
value
Refer to
indicated
Component
System
Checks
81. Ignition “OFF,” disconnect the PCM.
2. Ignition “ON,” engine “OFF.”
3. Check the Class 2 data circuit for an open, short to
ground, or short to voltage. Also, check the DLC
ignition feed circuit for an open or short to ground
and the DLC ground circuit for an open.
4. If a problem is found, repair as necessary.
Was a problem found?
—Go to Step 2Go to Step 9
9Attempt to display PCM data with the Tech 2.
Does the Tech 2 display PCM engine data?
—Go to Step 2Go to Step 10
10Replace the PCM.
IMPORTANT:The replacement PCM must be
programmed. Refer to
Powertrain Control Module
(PCM) in On-Vehicle Service.
Is the action complete?—Go to Step 2—
Page 1171 of 6000

6E–54
ENGINE DRIVEABILITY AND EMISSIONS
A/C Clutch Control Circuit Diagnosis
D06RW085
Circuit Description
When air conditioning and blower fan are selected, and if
the system has a sufficient refrigerant charge, a 12-volt
signal is supplied to the A/C request input of the
powertrain control module (PCM). The A/C request
signal may be temporarily canceled during system
operation by the electronic thermostat in the evaporator
case. The electronic thermostat may intermittently
remove the control circuit ground for the A/C thermostat
relay to prevent the evaporator from forming ice. When
the A/C request signal is received by the PCM, the PCM
supplies a ground from the compressor clutch relay if the
engine operating conditions are within acceptable
ranges. With the A/C compressor relay energized,
voltage is supplied to the compressor clutch coil.
The PCM will enable the compressor clutch to engage
whenever A/C has been selected with the engine running,
unless any of the following conditions are present:
The throttle is greater than 90%.
The ignition voltage is below 10.5 volts.
The engine speed is greater than 4500 RPM for 5
seconds or 5400 RPM.
The engine coolant temperature (ECT) is greater than
125
C (257 F).
The intake air temperature (IAT) is less than 5C
(41
F).
The power steering pressure switch signals a cramped
position.
Diagnostic Aids
To diagnose an the intermittent fault, check for the
following conditions:
Poor connection at the PCM–Inspect connections for
backed-out terminals, improper mating, broken locks,
improperly formed or damaged terminals, and poor
terminal-to-wire connection.