width OPEL FRONTERA 1998 Owner's Guide
[x] Cancel search | Manufacturer: OPEL, Model Year: 1998, Model line: FRONTERA, Model: OPEL FRONTERA 1998Pages: 6000, PDF Size: 97 MB
Page 2264 of 6000

TRANSMISSION CONTROL SYSTEM (4L30–E)7A1–19
C07RT006
Class 2 data is also pulse width modulated. Each bit of
information can have one of two lengths: long or short. On
the other hand, UART data bits come in only one length
(short). The pulse width modulation of Class 2 data allows
better utilization of the data line.
The message carried on Class 2 data streams are also
prioritized. This means that if two devices try to
communication on the data line at the same time, only the
higher priority message will continue. The device with the
lower priority message must wait.
NOTE: The Class 2 data wire is always terminal 2 of the
new 16–terminal Data Link Connector (DLC).
16 – Terminal Data Link Connector (DLC)
OBD II standardizes Data Link Connector (DLC)
configurations. The DLC, formerly referred to as the
ALDL, will be a 16–terminal connector found on the lower
left side of the driver’s side instrument panel. All
manufacturers must conform to this 16–terminal
standard.
821RW262
Page 2312 of 6000

TRANSMISSION CONTROL SYSTEM (4L30–E)7A1–67
DTC P1850 Brake Band Apply Solenoid Malfunction
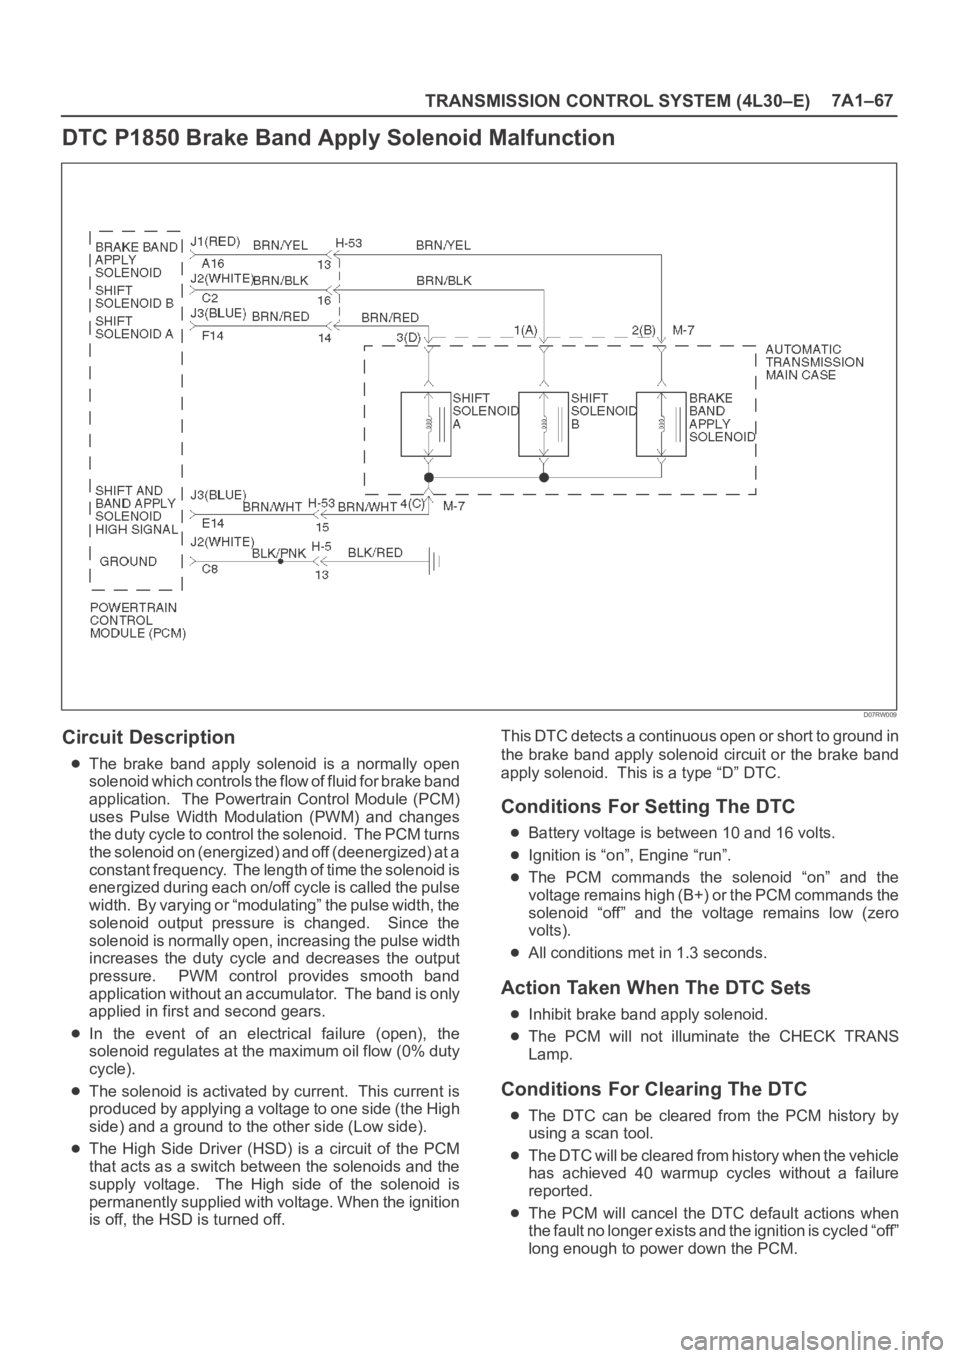
D07RW009
Circuit Description
The brake band apply solenoid is a normally open
solenoid which controls the flow of fluid for brake band
application. The Powertrain Control Module (PCM)
uses Pulse Width Modulation (PWM) and changes
the duty cycle to control the solenoid. The PCM turns
the solenoid on (energized) and off (deenergized) at a
constant frequency. The length of time the solenoid is
energized during each on/off cycle is called the pulse
width. By varying or “modulating” the pulse width, the
solenoid output pressure is changed. Since the
solenoid is normally open, increasing the pulse width
increases the duty cycle and decreases the output
pressure. PWM control provides smooth band
application without an accumulator. The band is only
applied in first and second gears.
In the event of an electrical failure (open), the
solenoid regulates at the maximum oil flow (0% duty
cycle).
The solenoid is activated by current. This current is
produced by applying a voltage to one side (the High
side) and a ground to the other side (Low side).
The High Side Driver (HSD) is a circuit of the PCM
that acts as a switch between the solenoids and the
supply voltage. The High side of the solenoid is
permanently supplied with voltage. When the ignition
is off, the HSD is turned off.This DTC detects a continuous open or short to ground in
the brake band apply solenoid circuit or the brake band
apply solenoid. This is a type “D” DTC.
Conditions For Setting The DTC
Battery voltage is between 10 and 16 volts.
Ignition is “on”, Engine “run”.
The PCM commands the solenoid “on” and the
voltage remains high (B+) or the PCM commands the
solenoid “off” and the voltage remains low (zero
volts).
All conditions met in 1.3 seconds.
Action Taken When The DTC Sets
Inhibit brake band apply solenoid.
The PCM will not illuminate the CHECK TRANS
Lamp.
Conditions For Clearing The DTC
The DTC can be cleared from the PCM history by
using a scan tool.
The DTC will be cleared from history when the vehicle
has achieved 40 warmup cycles without a failure
reported.
The PCM will cancel the DTC default actions when
the fault no longer exists and the ignition is cycled “off”
long enough to power down the PCM.
Page 2601 of 6000

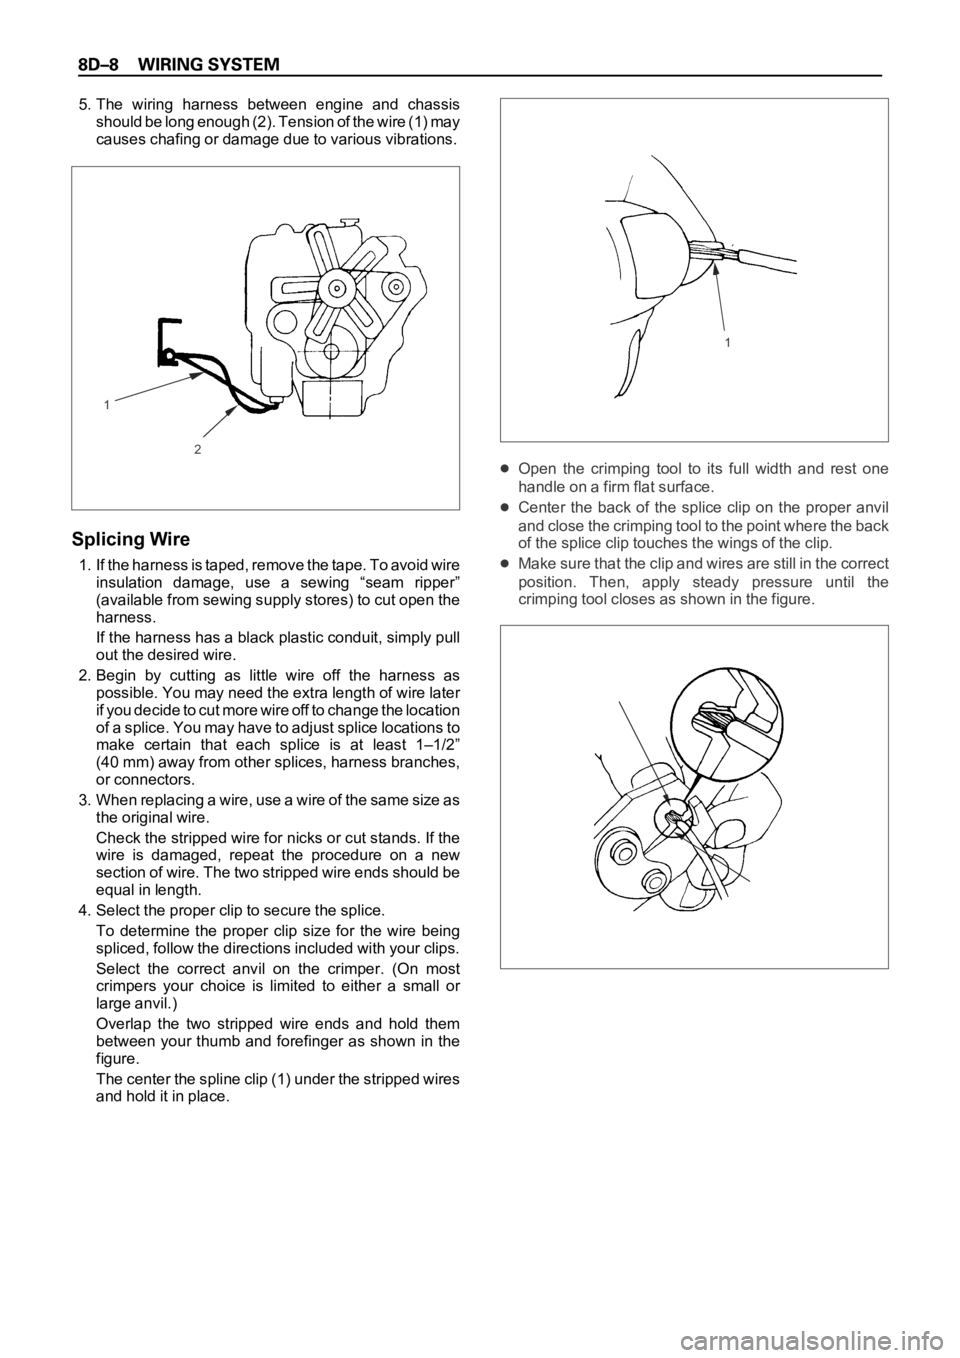
5. The wiring harness between engine and chassis
should be long enough (2). Tension of the wire (1) may
causes chafing or damage due to various vibrations.
Splicing Wire
1. If the harness is taped, remove the tape. To avoid wire
insulation damage, use a sewing “seam ripper”
(available from sewing supply stores) to cut open the
harness.
If the harness has a black plastic conduit, simply pull
out the desired wire.
2. Begin by cutting as little wire off the harness as
possible. You may need the extra length of wire later
if you decide to cut more wire off to change the location
of a splice. You may have to adjust splice locations to
make certain that each splice is at least 1–1/2”
(40 mm) away from other splices, harness branches,
or connectors.
3 . W h e n r e p l a c i n g a w i r e , u s e a w i r e o f t h e s a m e s i z e a s
the original wire.
Check the stripped wire for nicks or cut stands. If the
wire is damaged, repeat the procedure on a new
section of wire. The two stripped wire ends should be
equal in length.
4. Select the proper clip to secure the splice.
To determine the proper clip size for the wire being
spliced, follow the directions included with your clips.
Select the correct anvil on the crimper. (On most
crimpers your choice is limited to either a small or
large anvil.)
Overlap the two stripped wire ends and hold them
between your thumb and forefinger as shown in the
figure.
The center the spline clip (1) under the stripped wires
and hold it in place.
Open the crimping tool to its full width and rest one
handle on a firm flat surface.
Center the back of the splice clip on the proper anvil
and close the crimping tool to the point where the back
of the splice clip touches the wings of the clip.
Make sure that the clip and wires are still in the correct
position. Then, apply steady pressure until the
crimping tool closes as shown in the figure.
2
11
Page 4237 of 6000

4C–31 DRIVE SHAFT SYSTEM
Sleeve Condition
Check and see that there is no wear, damage, or cracking
in the sleeve.
NOTE: Close inspection of the groove and inner gear are
required because those are important parts.
Sleeve Function
412RW011Operate the sleeve with the inner shaft combined with the
clutch gear. If roughness is felt, replace the sleeve.
NOTE: Gear oil should be applied to the contact surface
of gear.
Check the width of sleeve center groove.
Limit: 7.1 mm (0.28 in) max.
412RW022
Clutch Gear Condition
Check and see that there is no wear, damage, cracking,
or any other abnormality in the clutch gear.
Clutch Gear Function
412RW010If there is an abnormality such as roughness when
operated in combination with sleeve, replace the clutch
gear.
NOTE: When inspecting, gear oil should be applied to the
contact surface of gear.
Clutch Gear Journal Diameter
Make sure of the size illustrated.
Limit: 36.98 mm (1.456 in) min.
412RW009
Page 4499 of 6000

6A–3
ENGINE MECHANICAL
General Description
Engine Cleanliness And Care
An automobile engine is a combination of many
machined, honed, polished and lapped surfaces with
tolerances that are measured in the thousandths of a
millimeter (ten thousandths of an inch). Accordingly,
when any internal engine parts are serviced, care and
cleanliness are important. Throughout this section, it
should be understood that proper cleaning and protection
of machined surfaces and friction areas is part of the
repair procedure. This is considered standard shop
practice even if not specifically stated.
A liberal coating of engine oil should be applied to all
friction areas during assembly to protect and lubricate
the surfaces on initial operation.
Whenever valve train components, pistons, piston
rings, connecting rods, rod bearings, and crankshaft
journal bearings are removed for service, they should
be retained in order.
At the time of installation, they should be installed in
the same locations and with the same mating
surfaces as when removed.
Battery cables should be disconnected before any
major work is performed on the engine. Failure to
disconnect cables may result in damage to wire
harness or other electrical parts.
The six cylinders of this engine are identified by
numbers; Right side cylinders 1, 3 and 5, Left side
cylinders 2, 4 and 6, as counted from crankshaft
pulley side to flywheel side.
General Information on Engine Service
The following information on engine service should be
noted carefully, as it is important in preventing damage
and contributing to reliable engine performance:
When raising or supporting the engine for any reason,
do not use a jack under the oil pan. Due to the small
clearance between the oil pan and the oil pump
strainer, jacking against the oil pan may cause
damage to the oil pick–up unit.
The 12–volt electrical system is capable of damaging
circuits. When performing any work where electrical
terminals could possibly be grounded, the ground
cable of the battery should be disconnected at the
battery.
Any time the intake air duct or air cleaner is removed,
the intake opening should be covered. This will
protect against accidental entrance of foreign
material into the cylinder which could cause extensive
damage when the engine is started.
Cylinder Block
The cylinder block is made of aluminum die–cast casting
for 75
V–type six cylinders. It has a rear plate integrated
structure and employs a deep skint. The cylinder liner is
cast and the liner inner diameter and crankshaft journal
diameter are classified into grades. The crankshaft is
supported by four bearings of which width of No.3 bearing
on the body side is different in order to support the thrust
bearing. The bearing cap is made of nodular cast iron and
each bearing cap uses four bolts and two side bolts.
Cylinder Head
The cylinder head, made of aluminum alloy casting
employs a pent–roof type combustion chamber with a
spark plug in the center. The intake and exhaust valves
are placed in V–type design. The ports are cross–flow
type.
Va l v e Tr a i n
Intake and exhaust camshaft on the both side of banks
are driven through an camshaft drive gear by timing belt.
The valves are operated by the camshaft and the valve
clearance is adjusted to select suitable thickness shim.
Intake Manifold
The intake manifold system is composed of the aluminum
cast common chamber and intake manifold attached with
six fuel injectors.
Exhaust Manifold
The exhaust manifold is made of nodular cast iron.
Pistons and Connecting Rods
Aluminum pistons are used after selecting the grade that
meets the cylinder bore diameter. Each piston has two
compression rings and one oil ring. The piston pin is made
of chromium steel is offset 1mm toward the thrust side,
and the thrust pressure of piston to the cylinder wall varies
gradually as the piston travels. The connecting rods are
made of forged steel. The connecting rod bearings are
graded for correct seze selection.
Crankshaft and Bearings
The crankshaft is made of Ductile cast–iron. Pins and
journals are graded for correct size selection for their
bearing.
Engine Lubrication
The oil discharged by a trochoid–type oil pump driven by
the crankshaft is fed through full–flow oil filter and to the oil
gallery provided under the crankshaft bearing cap. The oil
is then led to the crankshaft journals and cylinder head.
The crank pins are lubricated with oil from crankshaft
journals through oil holes. Also, an oil jet is fed to each
cylinder from crankshaft juornals on the connecting rod
for piston cleaning. The oil pan flange is dealed with liquid
packing only; do not deform or damage the flange surface
during removal or installation.
Page 4555 of 6000

6A–59
ENGINE MECHANICAL
Limit: 39.47 mm (1.5539 in)
Exhaust
Standard: 39.30 mm (1.5472 in)
Limit: 39.45 mm (1.5531 in)
014RW047
2. Measure the valve seat contact width. Make the
necessary corrections if the seat contact surface is
damaged or rough or if the contact width wear
exceeds the limit.
Valve seat contact width
Standard: 1.1 mm (0.0433 in)
Limit: 1.7 mm (0.0669 in)
014RS011
Contact Surface Angle on Valve Seat on
Va l v e
1. Measure contact surface angle on valve seat.2. If the measured value exceeds the limit, replace
valve, valve guide and valve seat as a set.
Valve contact surface angle: 45
014RS012
Valve Seat Insert Correction
1. Remove the carbon from the valve seat insert
surface.
2. Use a valve cutter to minimize scratches and other
rough areas. This will bring the contact width back to
the standard value. Remove only the scratches and
rough areas. Do not cut away too much. Take care not
to cut away unblemished areas of the valve seat
surface.
Valve seat angle degree: 90
014RW059
3. Apply abrasive compound to the valve seat insert
surface.
4. Insert the valve into the valve guide.
5.Turn the valve while lapping it to fit the valve seat
insert.
Page 4556 of 6000

6A–60
ENGINE MECHANICAL
6. Check that the valve contact width is correct.
7. Check that the valve seat insert surface is in contact
with the entire circumference of the valve.
014RS014
Valve Seat Insert Replacement
1. Arc weld the rod at several points. Be careful not to
damage the aluminum section.
2. Allow the rod to cool for a few minutes. This will cause
the valve seat to shrink.
3. Strike the rod and pull it out.
014RS015
4. Carefully clean the valve seat press–fit section on the
cylinder head side.
5. Heat the press–fit section with steam or some other
means to cause expansion. Cool the valve seat with
dry ice or some other means.
6. Insert the press–fit section into the valve seat
horizontally.
Standard fitting interference: 0.14 mm–0.09 mm
(0.0055 in–0.0035 in)7. After insertion, use a seat grinder to grind finish the
seating face. Carefully note the seating angle, the
contact width, and the depression.
8. Lap the valve and the seat.
Reassembly
1. Install valve guide (1) to cylinder head. Apply engine
oil to the outside of the valve guide. Using valve guide
replacer 5–8840–2442–0, drive in a new valve guide
from the camshaft side.
2. Install oil controller (3) and spring lower seat (2).
Using oil controller replacer 5–8840–0623–0, drive in
a new oil controller.
014RW058
3. Install valve to valve guide. Before install valve guide
apply engine oil to the outside of the valve stem.
4. Install valve spring to cylinder head. Attach the valve
spring to the lower spring seat. The painted area of
the valve spring should be facing downward.
014RS020
Page 4567 of 6000

6A–71
ENGINE MECHANICAL
NOTE: Do not apply engine oil to the crank case side
bolts.
Main bearing cap bolts.
Torque: 39 Nꞏm (4.0 Kgꞏm/29 lb ft)
Oil gallery fixing bolts.
Torque:
1st step: 29 Nꞏm (3.0 Kgꞏm/21 lb ft)
2nd step 55
65
Crank case side bolts
Torque : 39 Nꞏm (4.0 Kgꞏm/29 lb ft)
NOTE: Do not allow the crankshaft to rotate.
015RS006
10. Remove the main bearing caps in the sequence
shown in the illustration.
015RS004
11. Measure the plastigage width and determine the oil
clearance. If the oil clearance exceeds the specified
limit, replace the main bearings as a set and/or
replace the crankshaft.
Standard : 0.019 mm–0.043 mm
(0.0007 in–0.0017 in)Limit : 0.08 mm (0.0031 in)
015RS008
12. Clean the plastigage from the bearings and the
crankshaft.
Remove the crankshaft and the bearings.
Crankshaft (12) Inspection
Inspect the surface of the crankshaft journal and crank
pins for excessive wear and damage. Inspect the oil seal
fitting surfaces for excessive wear and damage. Inspect
the oil ports for obstructions.
Inspection and Repair
1. Carefully set the crankshaft on the V–blocks. Slowly
rotate the crankshaft and measure the runout. If the
crankshaft runout exceeds the specified limit, the
crankshaft must be replaced.
Runout : 0.04 mm (0.0016 in)
015RS007
Page 4572 of 6000

6A–76
ENGINE MECHANICAL
012RS001
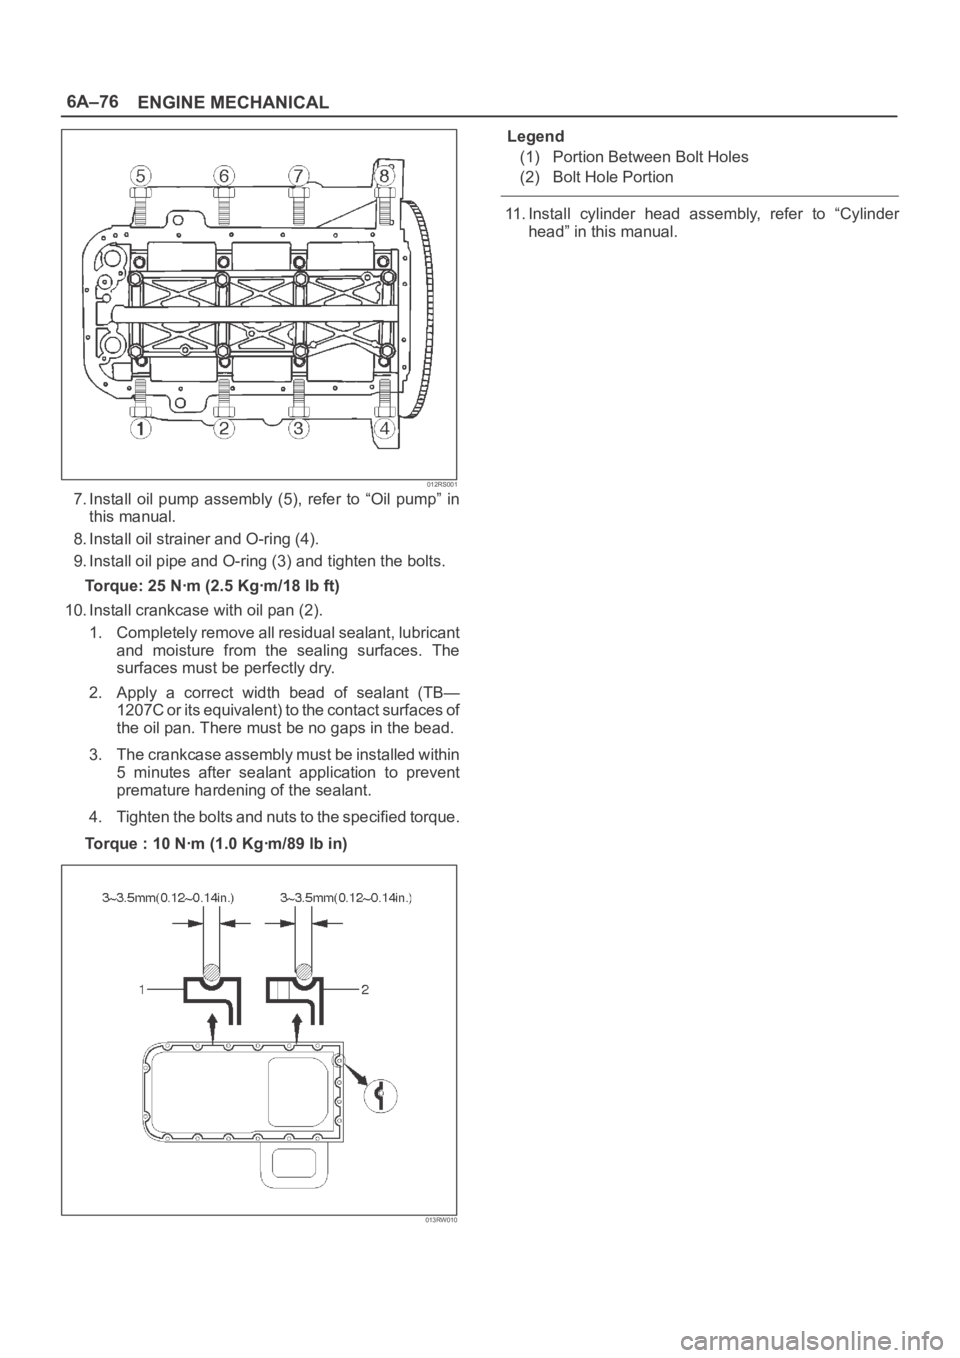
7. Install oil pump assembly (5), refer to “Oil pump” in
this manual.
8. Install oil strainer and O-ring (4).
9. Install oil pipe and O-ring (3) and tighten the bolts.
Torque: 25 Nꞏm (2.5 Kgꞏm/18 lb ft)
10. Install crankcase with oil pan (2).
1. Completely remove all residual sealant, lubricant
and moisture from the sealing surfaces. The
surfaces must be perfectly dry.
2. Apply a correct width bead of sealant (TB—
1207C or its equivalent) to the contact surfaces of
the oil pan. There must be no gaps in the bead.
3. The crankcase assembly must be installed within
5 minutes after sealant application to prevent
premature hardening of the sealant.
4. Tighten the bolts and nuts to the specified torque.
Torque : 10 Nꞏm (1.0 Kgꞏm/89 lb in)
013RW010
Legend
(1) Portion Between Bolt Holes
(2) Bolt Hole Portion
11. Install cylinder head assembly, refer to “Cylinder
head” in this manual.
Page 4578 of 6000

6A–82
ENGINE MECHANICAL
4. Reinstall the rod caps (12) to their original
positions.
Tighten the rod cap nuts.
Torque: 54 Nꞏm (5.5 Kgꞏm/40 lb ft)
NOTE: Do not allow the crankshaft to rotate.
5. Remove the rod caps.
6. Measure the width of the plastigage and
determine the oil clearance. If the oil clearance
exceeds the limit, replace the rod bearing as a
set.
Standard : 0.019 mm–0.043 mm
(0.0007 in–0.0017 in)
Limit : 0.08 mm (0.003 in)
015RS008
7. Clean the plastigage from the bearings and the
crankshaft pins.
Con–rod Bearing Selection
Select and install the new connecting rod bearings,
paying close attention to the connecting rod big end
diameter size mark (1).
NOTE: Take care not to confuse the alignment mark (2)
and the size mark (1) during the installation procedure.
015RS034
1 Size MarkBig end Bore
DiameterCrankshaft Pin
DiameterConnecting Rod
Bearing Thickness
(Reference)Color of
Size
MarkOil Clearance
(Reference)
A56.994-57.000
(2.2439-2.2441)1.512-1.516
(0.0595-0.0597)Ye l l o w0.025-0.054
(0.0010-0.0021)
B56.988-56.994
(2.2436-2.2439)53.922-53.937
(2.1229-2.1235)1.508-1.512
(0.0594-0.0595)Green0.027-0.056
(0.0011-0.0022)
C56.982-56.988
(2.2434-2.2436)1.504-1.508
(0.0592-0.0594)Pink0.029-0.058
(0.0011-0.0023)
Reassembly
1. Install connecting rod
2. Install piston3. Install piston pinApply a thin coat of engine oil to the piston pin. Try to
insert the piston pin into the piston pin hole with
normal finger pressure.
NOTE: When changing piston / connecting rod
combinations, do not change the piston / piston pin
combination and do not reuse the old piston pin.