ESP OPEL GRANDLAND X 2018 Infotainment system
[x] Cancel search | Manufacturer: OPEL, Model Year: 2018, Model line: GRANDLAND X, Model: OPEL GRANDLAND X 2018Pages: 265, PDF Size: 7.5 MB
Page 56 of 265
54Seats, restraintsSeat belts
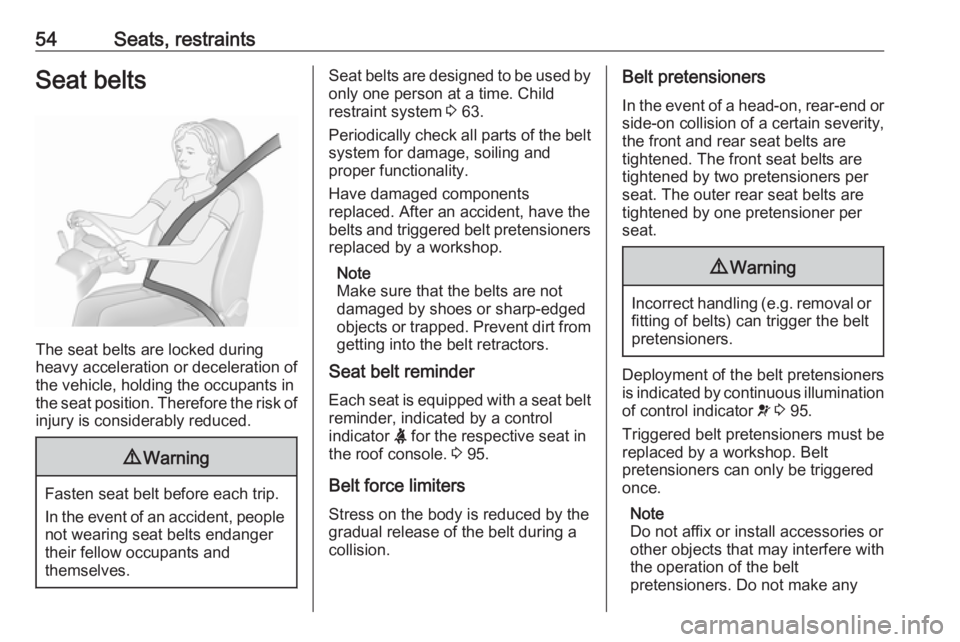
The seat belts are locked during
heavy acceleration or deceleration of
the vehicle, holding the occupants in
the seat position. Therefore the risk of injury is considerably reduced.
9 Warning
Fasten seat belt before each trip.
In the event of an accident, people
not wearing seat belts endanger their fellow occupants and
themselves.
Seat belts are designed to be used by only one person at a time. Child
restraint system 3 63.
Periodically check all parts of the belt
system for damage, soiling and
proper functionality.
Have damaged components
replaced. After an accident, have the
belts and triggered belt pretensioners replaced by a workshop.
Note
Make sure that the belts are not
damaged by shoes or sharp-edged
objects or trapped. Prevent dirt from
getting into the belt retractors.
Seat belt reminder
Each seat is equipped with a seat belt
reminder, indicated by a control
indicator X for the respective seat in
the roof console. 3 95.
Belt force limiters
Stress on the body is reduced by the
gradual release of the belt during a
collision.Belt pretensioners
In the event of a head-on, rear-end or
side-on collision of a certain severity,
the front and rear seat belts are
tightened. The front seat belts are
tightened by two pretensioners per
seat. The outer rear seat belts are
tightened by one pretensioner per
seat.9 Warning
Incorrect handling (e.g. removal or
fitting of belts) can trigger the belt
pretensioners.
Deployment of the belt pretensioners
is indicated by continuous illumination
of control indicator v 3 95.
Triggered belt pretensioners must be replaced by a workshop. Belt
pretensioners can only be triggered
once.
Note
Do not affix or install accessories or
other objects that may interfere with
the operation of the belt
pretensioners. Do not make any
Page 68 of 265
66Seats, restraintsChild restraint installation locations
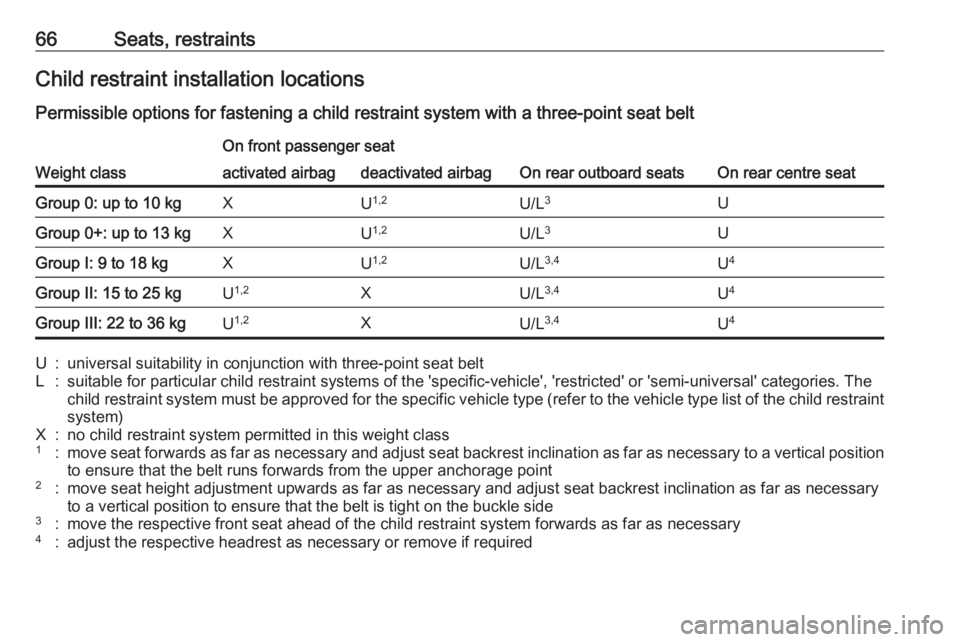
Permissible options for fastening a child restraint system with a three-point seat belt
Weight class
On front passenger seat
On rear outboard seatsOn rear centre seat
activated airbagdeactivated airbagGroup 0: up to 10 kgXU 1,2U/L 3UGroup 0+: up to 13 kgXU1,2U/L 3UGroup I: 9 to 18 kgXU1,2U/L 3,4U4Group II: 15 to 25 kgU1,2XU/L 3,4U4Group III: 22 to 36 kgU1,2XU/L 3,4U4U:universal suitability in conjunction with three-point seat beltL:suitable for particular child restraint systems of the 'specific-vehicle', 'restricted' or 'semi-universal' categories. The
child restraint system must be approved for the specific vehicle type (refer to the vehicle type list of the child restraint
system)X:no child restraint system permitted in this weight class1:move seat forwards as far as necessary and adjust seat backrest inclination as far as necessary to a vertical position to ensure that the belt runs forwards from the upper anchorage point2:move seat height adjustment upwards as far as necessary and adjust seat backrest inclination as far as necessaryto a vertical position to ensure that the belt is tight on the buckle side3:move the respective front seat ahead of the child restraint system forwards as far as necessary4:adjust the respective headrest as necessary or remove if required
Page 70 of 265
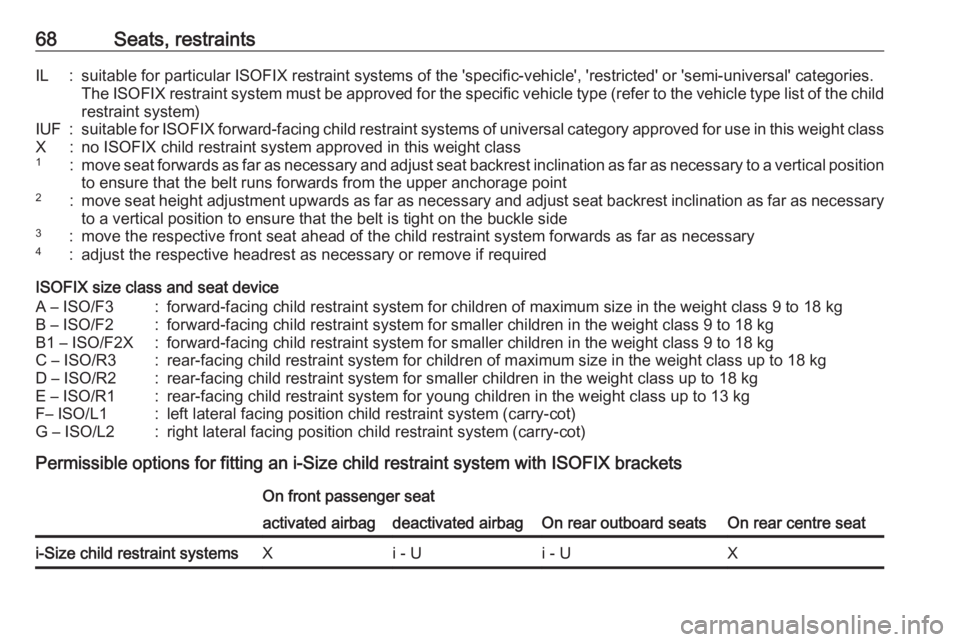
68Seats, restraintsIL:suitable for particular ISOFIX restraint systems of the 'specific-vehicle', 'restricted' or 'semi-universal' categories.
The ISOFIX restraint system must be approved for the specific vehicle type (refer to the vehicle type list of the child restraint system)IUF:suitable for ISOFIX forward-facing child restraint systems of universal category approved for use in this weight classX:no ISOFIX child restraint system approved in this weight class1:move seat forwards as far as necessary and adjust seat backrest inclination as far as necessary to a vertical positionto ensure that the belt runs forwards from the upper anchorage point2:move seat height adjustment upwards as far as necessary and adjust seat backrest inclination as far as necessary
to a vertical position to ensure that the belt is tight on the buckle side3:move the respective front seat ahead of the child restraint system forwards as far as necessary4:adjust the respective headrest as necessary or remove if required
ISOFIX size class and seat device
A – ISO/F3:forward-facing child restraint system for children of maximum size in the weight class 9 to 18 kgB – ISO/F2:forward-facing child restraint system for smaller children in the weight class 9 to 18 kgB1 – ISO/F2X:forward-facing child restraint system for smaller children in the weight class 9 to 18 kgC – ISO/R3:rear-facing child restraint system for children of maximum size in the weight class up to 18 kgD – ISO/R2:rear-facing child restraint system for smaller children in the weight class up to 18 kgE – ISO/R1:rear-facing child restraint system for young children in the weight class up to 13 kgF– ISO/L1:left lateral facing position child restraint system (carry-cot)G – ISO/L2:right lateral facing position child restraint system (carry-cot)
Permissible options for fitting an i-Size child restraint system with ISOFIX brackets
On front passenger seat
On rear outboard seatsOn rear centre seat
activated airbagdeactivated airbagi-Size child restraint systemsXi - Ui - UX
Page 74 of 265
72Storage
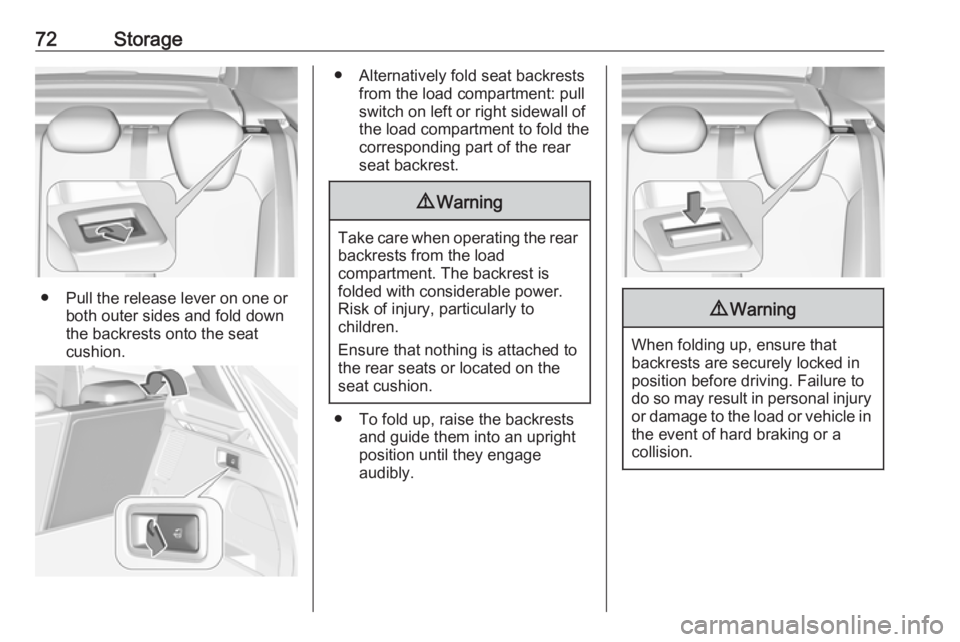
● Pull the release lever on one orboth outer sides and fold down
the backrests onto the seat
cushion.
● Alternatively fold seat backrests from the load compartment: pullswitch on left or right sidewall of
the load compartment to fold the
corresponding part of the rear
seat backrest.9 Warning
Take care when operating the rear
backrests from the load
compartment. The backrest is
folded with considerable power.
Risk of injury, particularly to
children.
Ensure that nothing is attached to
the rear seats or located on the
seat cushion.
● To fold up, raise the backrests and guide them into an upright
position until they engage
audibly.
9 Warning
When folding up, ensure that
backrests are securely locked in
position before driving. Failure to
do so may result in personal injury or damage to the load or vehicle in the event of hard braking or a
collision.
Page 87 of 265
Instruments and controls859Warning
The road surface may already be
icy even though the display
indicates a few degrees above
0 °C.
Clock
Date and time are shown in the Info-
Display.
Info-Display 3 103.
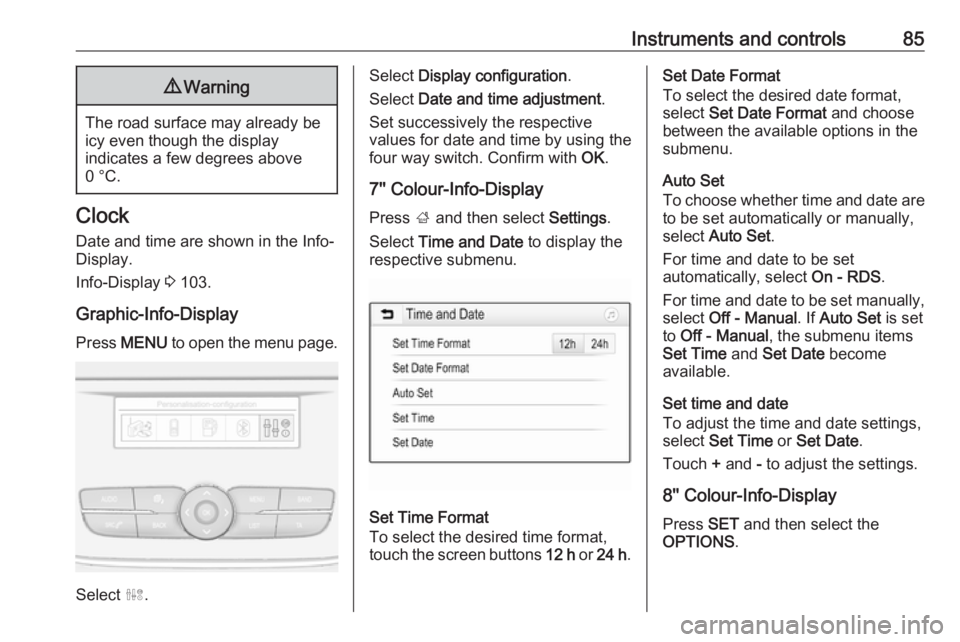
Graphic-Info-Display Press MENU to open the menu page.
Select ˆ.
Select Display configuration .
Select Date and time adjustment .
Set successively the respective
values for date and time by using the
four way switch. Confirm with OK.
7'' Colour-Info-Display
Press ; and then select Settings.
Select Time and Date to display the
respective submenu.
Set Time Format
To select the desired time format,
touch the screen buttons 12 h or 24 h .
Set Date Format
To select the desired date format,
select Set Date Format and choose
between the available options in the
submenu.
Auto Set
To choose whether time and date are
to be set automatically or manually,
select Auto Set .
For time and date to be set
automatically, select On - RDS.
For time and date to be set manually, select Off - Manual . If Auto Set is set
to Off - Manual , the submenu items
Set Time and Set Date become
available.
Set time and date
To adjust the time and date settings, select Set Time or Set Date .
Touch + and - to adjust the settings.
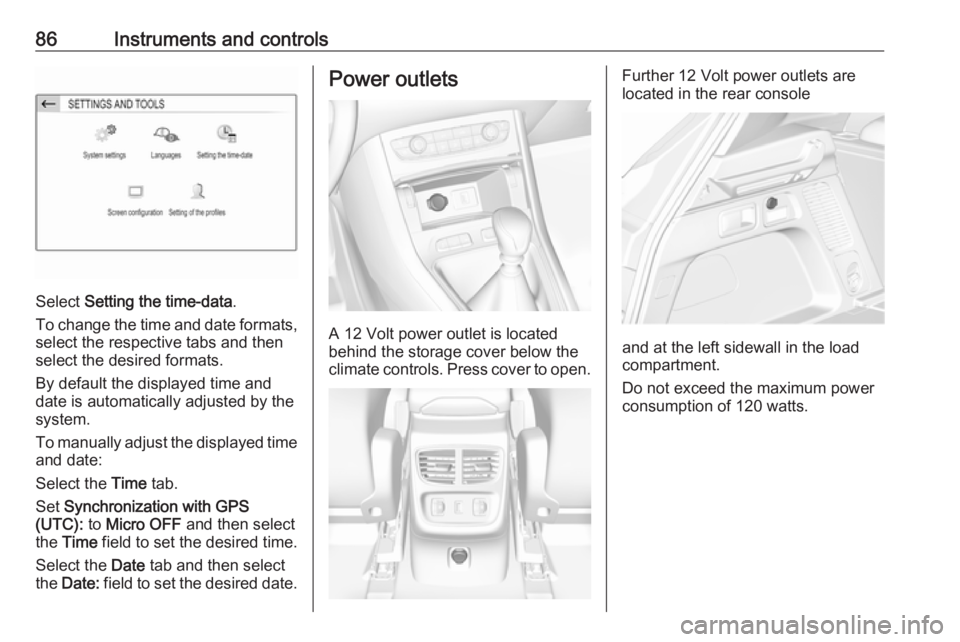
8'' Colour-Info-Display
Press SET and then select the
OPTIONS .
Page 88 of 265
86Instruments and controls
Select Setting the time-data .
To change the time and date formats, select the respective tabs and then
select the desired formats.
By default the displayed time and
date is automatically adjusted by the
system.
To manually adjust the displayed time
and date:
Select the Time tab.
Set Synchronization with GPS
(UTC): to Micro OFF and then select
the Time field to set the desired time.
Select the Date tab and then select
the Date: field to set the desired date.
Power outlets
A 12 Volt power outlet is located
behind the storage cover below the climate controls. Press cover to open.
Further 12 Volt power outlets are
located in the rear console
and at the left sidewall in the load
compartment.
Do not exceed the maximum power
consumption of 120 watts.
Page 97 of 265
Instruments and controls95Turn signal
O illuminates or flashes green.
Illuminates briefly The parking lights are switched on.
Flashes
A turn signal or the hazard warning
flashers are activated.
Rapid flashing: failure of a turn signal
light or associated fuse, failure of turn
signal light on trailer.
Bulb replacement 3 211.
Turn signals 3 120.
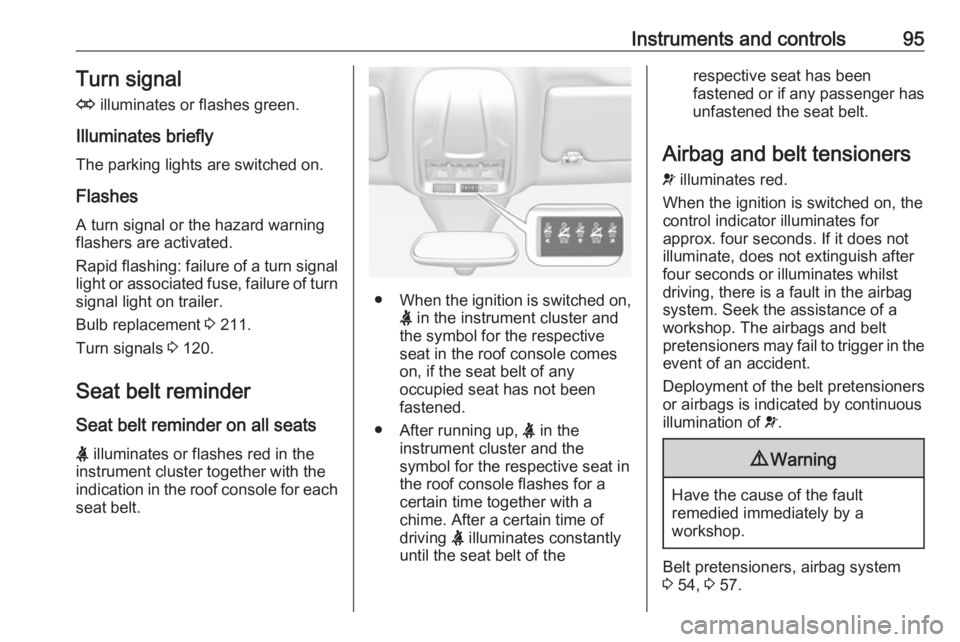
Seat belt reminder
Seat belt reminder on all seats X illuminates or flashes red in the
instrument cluster together with the
indication in the roof console for each
seat belt.
● When the ignition is switched on,
X in the instrument cluster and
the symbol for the respective
seat in the roof console comes
on, if the seat belt of any
occupied seat has not been
fastened.
● After running up, X in the
instrument cluster and the
symbol for the respective seat in
the roof console flashes for a
certain time together with a
chime. After a certain time of
driving X illuminates constantly
until the seat belt of the
respective seat has been
fastened or if any passenger has
unfastened the seat belt.
Airbag and belt tensioners
v illuminates red.
When the ignition is switched on, the
control indicator illuminates for
approx. four seconds. If it does not
illuminate, does not extinguish after
four seconds or illuminates whilst
driving, there is a fault in the airbag
system. Seek the assistance of a
workshop. The airbags and belt
pretensioners may fail to trigger in the event of an accident.
Deployment of the belt pretensioners
or airbags is indicated by continuous
illumination of v.9 Warning
Have the cause of the fault
remedied immediately by a
workshop.
Belt pretensioners, airbag system
3 54, 3 57.
Page 98 of 265
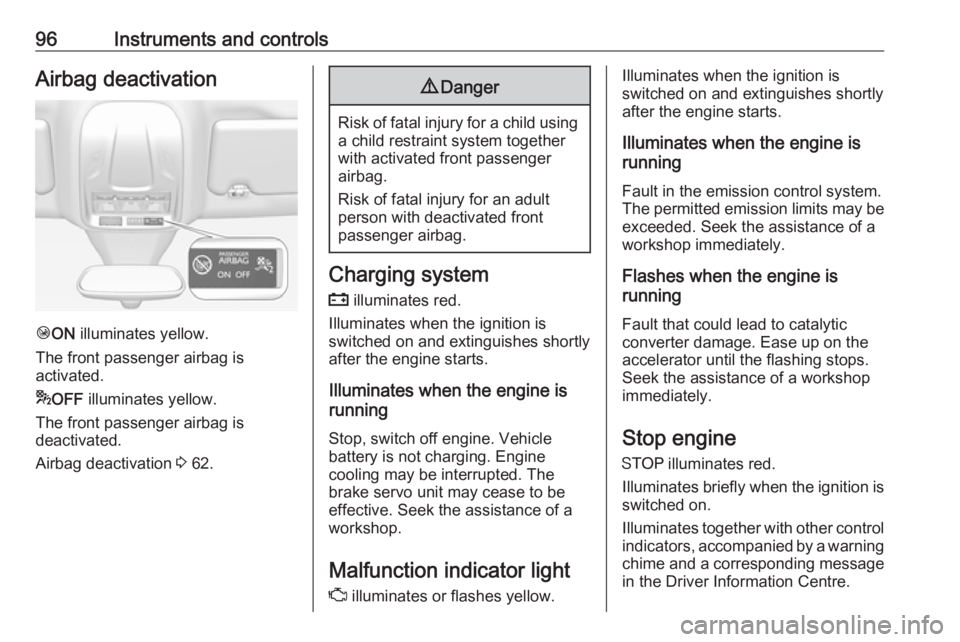
96Instruments and controlsAirbag deactivation
ÓON illuminates yellow.
The front passenger airbag is
activated.
* OFF illuminates yellow.
The front passenger airbag is
deactivated.
Airbag deactivation 3 62.
9 Danger
Risk of fatal injury for a child using
a child restraint system together
with activated front passenger
airbag.
Risk of fatal injury for an adult
person with deactivated front
passenger airbag.
Charging system
p illuminates red.
Illuminates when the ignition is
switched on and extinguishes shortly
after the engine starts.
Illuminates when the engine is
running
Stop, switch off engine. Vehicle
battery is not charging. Engine
cooling may be interrupted. The
brake servo unit may cease to be
effective. Seek the assistance of a
workshop.
Malfunction indicator light Z illuminates or flashes yellow.
Illuminates when the ignition is
switched on and extinguishes shortly
after the engine starts.
Illuminates when the engine is
running
Fault in the emission control system. The permitted emission limits may be exceeded. Seek the assistance of a
workshop immediately.
Flashes when the engine is
running
Fault that could lead to catalytic converter damage. Ease up on the
accelerator until the flashing stops.
Seek the assistance of a workshop
immediately.
Stop engine
Y illuminates red.
Illuminates briefly when the ignition is
switched on.
Illuminates together with other control indicators, accompanied by a warning chime and a corresponding message
in the Driver Information Centre.
Page 106 of 265
104Instruments and controlsPress èäåé to select a menu page.
Press OK to confirm a selection.
Press BACK to exit a menu without
changing a setting.
7'' Colour-Info-Display
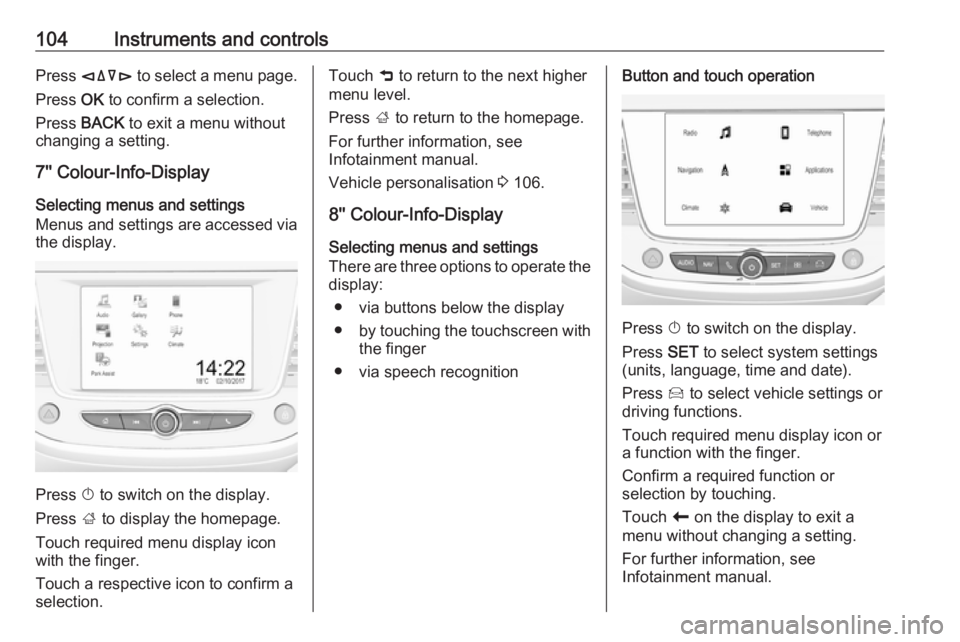
Selecting menus and settings
Menus and settings are accessed via the display.
Press X to switch on the display.
Press ; to display the homepage.
Touch required menu display icon
with the finger.
Touch a respective icon to confirm a
selection.
Touch 9 to return to the next higher
menu level.
Press ; to return to the homepage.
For further information, see Infotainment manual.
Vehicle personalisation 3 106.
8'' Colour-Info-Display
Selecting menus and settings
There are three options to operate the
display:
● via buttons below the display
● by touching the touchscreen with
the finger
● via speech recognitionButton and touch operation
Press X to switch on the display.
Press SET to select system settings
(units, language, time and date).
Press Í to select vehicle settings or
driving functions.
Touch required menu display icon or a function with the finger.
Confirm a required function or
selection by touching.
Touch r on the display to exit a
menu without changing a setting.
For further information, see
Infotainment manual.
Page 109 of 265
Instruments and controls107Select ˆ Personalisation-
configuration , I OK .
Unit settings
Select Display configuration , I OK .
Select Choise of units , I OK .
Select desired settings, I OK .
Language settings
Select Display configuration , I OK .
Select Choise of language , I OK .
Select desired language, I OK .
Vehicle settings
Select Define vehicle parameters , I
OK .
In the corresponding submenus the
following settings can be changed:
● Lighting .
Follow me home headlamps :
Activation and setting duration
time.
Welcome lighting : Activation and
setting duration time.
● Comfort
Ambient lighting : Activation/
Deactivation.Rear wiper in reverse gear :
Activation/Deactivation.
● Vehicle
Unlocking boot only : Activation/
Deactivation.
Plip action : Driver/all doors.
● Driving assistance
Fatigue Detection system :
Activation/Deactivation.
Speed recommendation :
Activation/Deactivation.
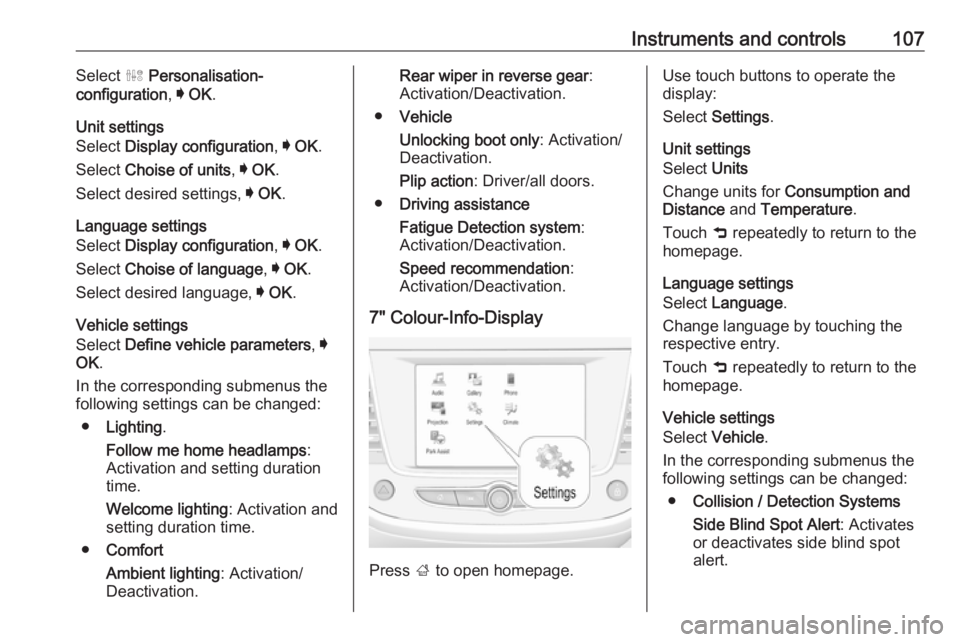
7" Colour-Info-Display
Press ; to open homepage.
Use touch buttons to operate the
display:
Select Settings .
Unit settings
Select Units
Change units for Consumption and
Distance and Temperature .
Touch 9 repeatedly to return to the
homepage.
Language settings
Select Language .
Change language by touching the respective entry.
Touch 9 repeatedly to return to the
homepage.
Vehicle settings
Select Vehicle .
In the corresponding submenus the
following settings can be changed:
● Collision / Detection Systems
Side Blind Spot Alert : Activates
or deactivates side blind spot
alert.