OPEL GT 2012 Owners Manual
Manufacturer: OPEL, Model Year: 2012, Model line: GT, Model: OPEL GT 2012Pages: 190, PDF Size: 2.46 MB
Page 141 of 190
14 1Self-help, vehicle care
Electrical system
Fuses
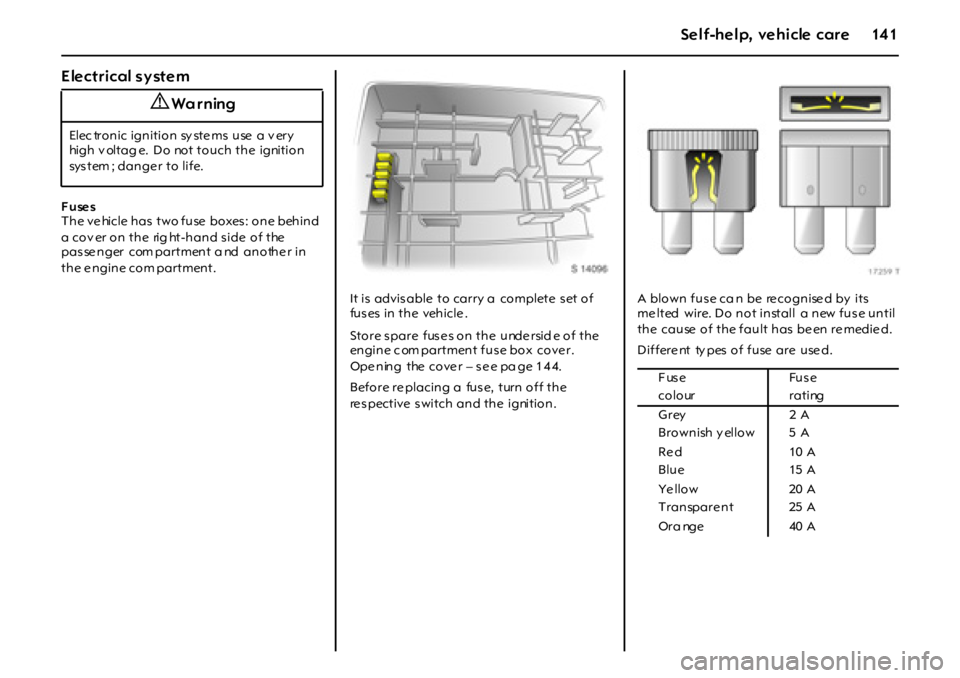
The vehicle has two fuse boxes: one behind
a cov er on the rig ht-hand side of the
pas se nger com partment a nd anothe r in
the e ngine com partment.
It is advisable to carry a complete set of
fuses in the vehicle.
St o r e s p a r e f us e s o n t h e u nde r si d e o f t h e
engine c om partment fus e box cove r.
Opening the cover – see pa ge 144.
Before re placing a fus e, turn off the
re spective switch and the ignition.A blown fus e ca n be re cognise d by its
me lted wire. Do not install a new fus e until
the cause of the fault has be en re medie d.
Differe nt ty pes of fuse are use d.
9 Wa r ning
Elec tronic ignition sy ste ms use a v ery
high v oltag e. Do not touch the ignition
sys t em ; da n g e r t o l i f e.
Fuse Fuse
c o l o ur r a t i ng
Grey 2 A
Brownish y ellow 5 A
Re d 10 A
Blue 15 A
Ye llo w 20 A
Transpare nt 25 A
Or a nge 40 A
Page 142 of 190
142 Self-help, vehicle care
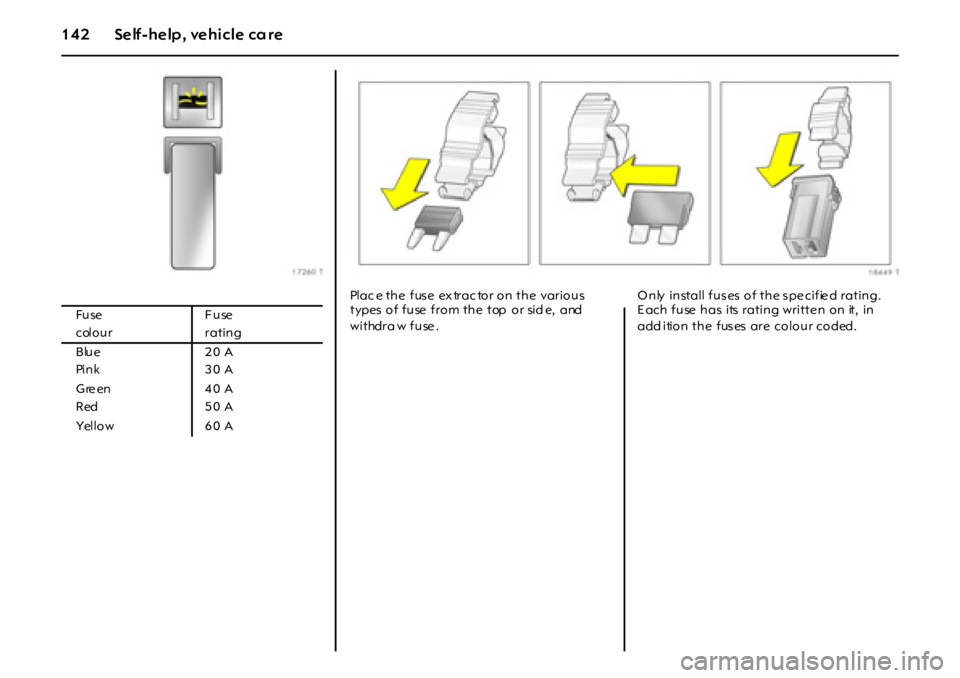
Fu se F u se
colour rating
Blue 20 A
Pink 30 A
Green 40 A
Red 50 A
Yellow 6 0 A
Pl a c e t h e f us e ex tr a c to r o n t h e va r i o u s
types of fuse from the top or sid e, and
withdra w fuse .O nly install fus es of the s pe cifie d rating.
E ach fuse has its rating writte n on it, in
add ition the fuses are colour coded.
Page 143 of 190
14 3Self-help, vehicle care
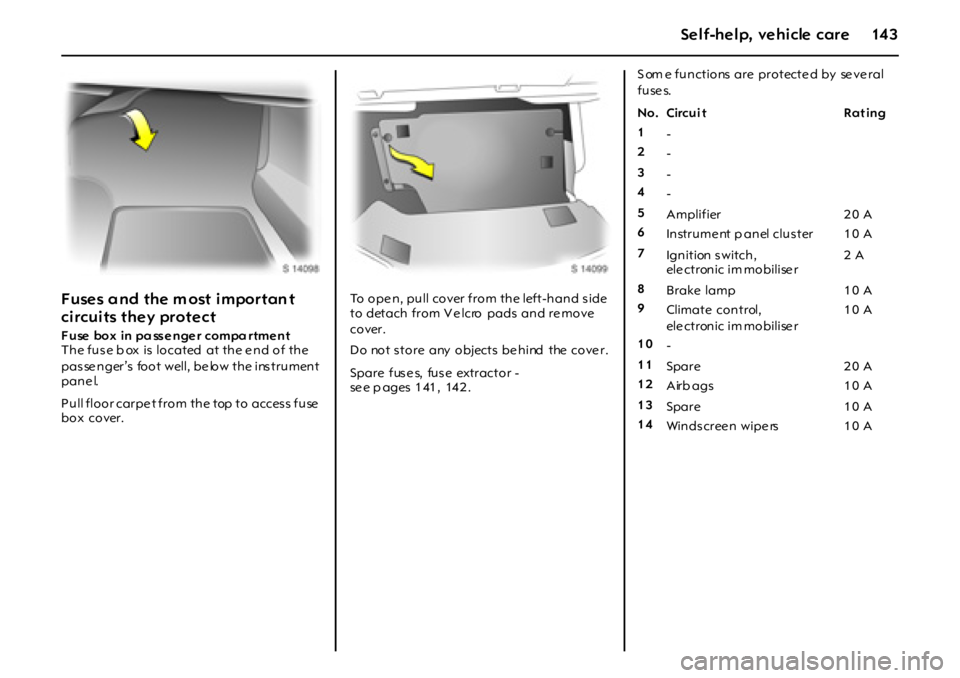
F u se s a n d t h e m o st i m po r t an t
circuits they protect
F use box in pa sse nge r compa rtme nt
The fuse b ox is located at the e nd of the
pas se nger’s foot well, be low the ins trument
pane l.
Pull floor carpe t from the top to access fuse
box cover.To ope n, pull cover from the left-hand s ide
to detach from V e lcro pads and re move
cover.
Do not store any objects behind the cover.
Spare fus e s, fus e extractor -
se e p ages 1 41 , 14 2 . S om e functions are protecte d by se ve ral
f u se s.
No. Circui t Rat ing
1
-
2
-
3
-
4
-
5
Amplifier 2 0 A
6
Instrument p anel cluster 10 A
7
Ign ition s witch ,
ele ctronic im mobilise r2 A
8
Brake lamp 10 A
9
Climate control,
ele ctronic im mobilise r10 A
10
-
11
Spare 2 0 A
12
Airb ags 1 0 A
13
Spare 1 0 A
14
Wi n d s c r ee n w i p e rs 1 0 A
Page 144 of 190
144 Self-help, vehicle care
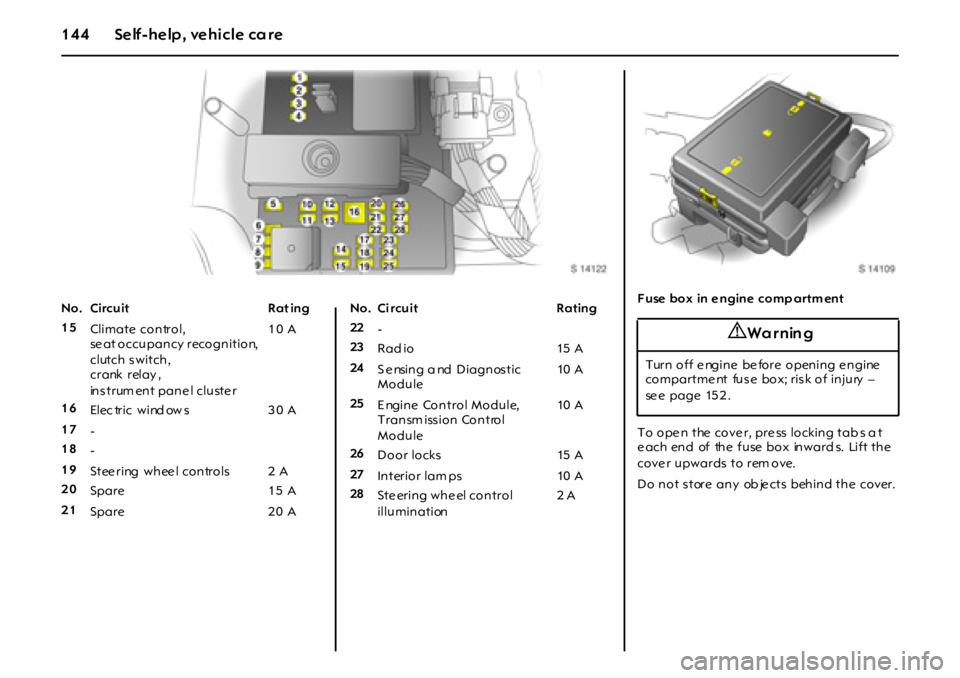
No. Circuit Rat ing
15
Climate co n tro l,
se at occupancy recognition,
clutch s witch,
crank relay ,
instrum ent panel cluster10 A
16
El ec tr i c w i nd ow s 3 0 A
17
-
18
-
19
St ee r i ng w h ee l co n tr o l s 2 A
20
Spare 1 5 A
21
Spare 2 0 ANo. Ci rcuit Rating
22
-
23
Rad io 15 A
24
S e nsing a nd Diagnos tic
Module10 A
25
Engine Control Module,
Transm iss ion Control
Module10 A
26
Door locks 15 A
27
In terio r lam ps 10 A
28
Steering wheel control
illumination2 AF use box in e ngine comp artm ent
To open the cover, press locking tabs a t
each end of the fuse box inwards. Lift the
cove r upwards to rem ove.
Do not store any ob jects behind the cover.
9 Wa r nin g
Turn off e ngine be fore opening e ngine
compartme nt fuse box; risk of injury –
se e page 15 2 .
Page 145 of 190
14 5Self-help, vehicle care
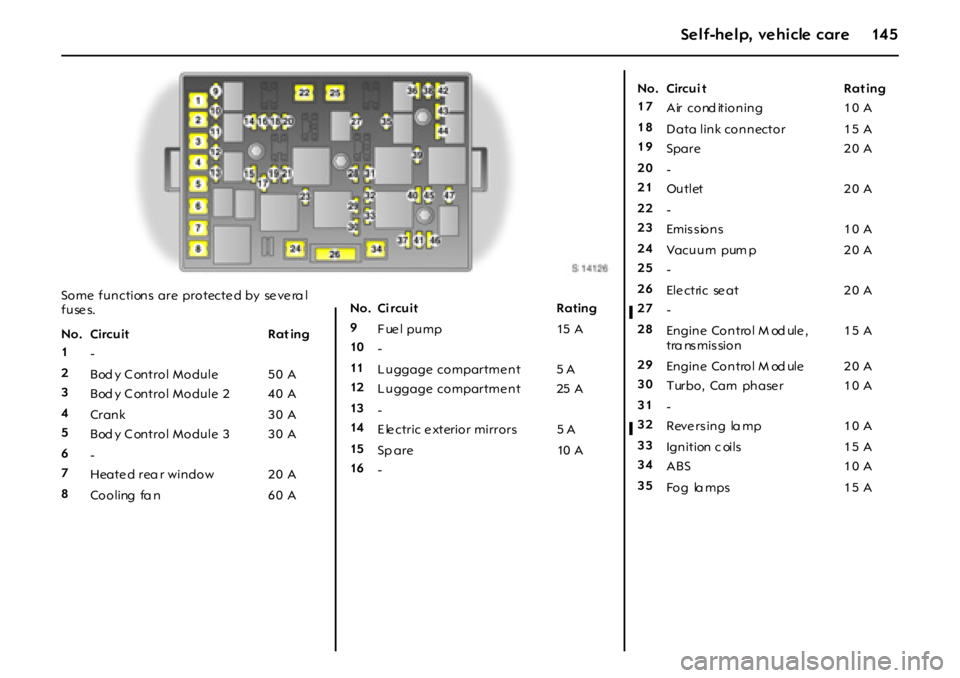
Some functions are protecte d by se ve ra l
f u se s.
No. Circuit Rat ing
1
-
2
Bod y C ontrol Module 50 A
3
Bod y C ontrol Module 2 40 A
4
Cran k 3 0 A
5
Bod y C ontrol Module 3 30 A
6
-
7
Heate d rea r window 2 0 A
8
Cooling fa n 6 0 ANo. Ci rcuit Rating
9
Fuel pump 15 A
10
-
11
L uggage compartme nt 5 A
12
L uggage compartme nt 25 A
13
-
14
E le ctric e xterior mirrors 5 A
15
Sp are 10 A
16
-No. Circui t Rat ing
17
Air cond itioning 10 A
18
Data link connector 1 5 A
19
Spare 2 0 A
20
-
21
Ou t let 2 0 A
22
-
23
Emissions 10 A
24
Vacuum pum p 20 A
25
-
26
Ele ct ric se at 2 0 A
27
-
28
Engine Control M od ule,
tra nsmission15 A
29
Engine Control M od ule 20 A
30
Turbo, Cam phase r 1 0 A
31
-
32
Reve rsing la mp 1 0 A
33
Ign ition c oils 1 5 A
34
ABS 10 A
35
Fo g la m p s 1 5 A
Page 146 of 190

146 Self-help, vehicle care
Bulb replacement
Halogen bulbs contain pres s uris ed gas .
Ta ke spe cial care when d ispos ing of
ha loge n bulbs . Ne ve r touch the glas s with
bare finge rs; risk of injury.
Before re placing a bulb, switch ignition off
and turn off re levant light s witch.
Only hold new bulb at base! Do not touch
the bulb glass with bare hands, othe rwise
finge rprints on the g lass e vaporate.
R es i du e b ui l ds u p o n t h e r ef l ect o r ,
eve ntually res ulting in a dull refle ctor.
Inadve rte ntly s taine d bulbs ma y be
cleaned with a clean non-fluffy cloth,
us ing alcohol or white s pirits. Re place ment bulb m us t be in accordance
with information on bas e of d efectiv e bulb.
Do not exceed wa tta ge specified on ba se
of bulb.
Re place c ra cked or da maged bulb s as dirt
can g et ins id e, coating the insid e of the
bulb a nd reducing light output.
If the headlam ps are d amage d, the light
ma y not be sufficiently d iffused a nd can
blind oncoming drive rs. V ehicle vibration
can als o cause incorre ct he adlamp a im ing .
He adl amp a iming
W e recomme nd that hea dlamp aim ing be
carrie d out by a works hop, who will have
s p e c ia l e q u i p m e n t . No. Circuit Rat ing
36
Horn 1 5 A
37
Remote central locking 1 0 A
38
Driv er’s s ide high be am 1 0 A
39
Windscree n wipers 25 A
40
AB S 1 0 A
41
AB S 2 0 A
42
Passenger’ s side high bea m 10 A
43
Pas s enge r’ s side low be am 1 0 A
44
Driv er’s s ide low beam 1 0 A
45
Instrument pa nel ignition 20 A
46
Can iste r ve nt 1 0 A
47
Pa r k in g l a m p s 1 5 A
9 Warning
To avoid causing da mage to the doors
and the bonnet, ensure the driver’s door
and the p ass enge r’s door are both clos e d
correctly before closing the bonne t.
Page 147 of 190
14 7Self-help, vehicle care
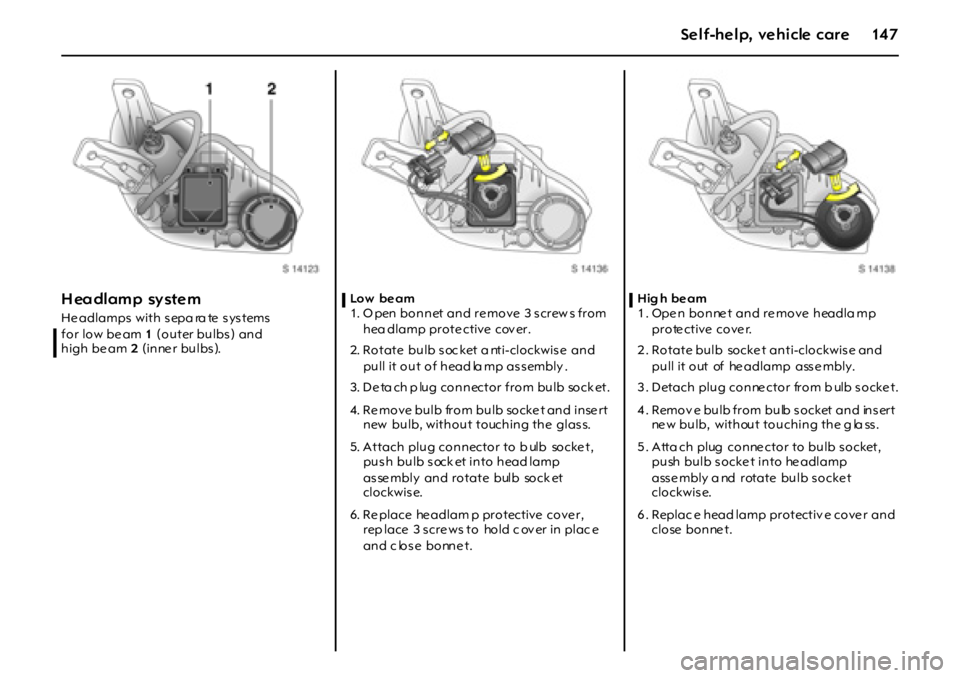
H ea dl am p sy st e m
Headlamps with sepa ra te systems
for low be am 1 (outer bulbs ) and
high be am 2 (inne r bulbs).Lo w b e a m
1. O pen bonnet and re move 3 s crew s from
hea dlamp protective cov er.
2. Rotate bulb soc ket a nti-clockwise and
pull it out of head la mp as s embly .
3. De ta ch p lug connector from bulb sock et.
4. Re move bulb from bulb socke t and inse rt
new bulb, without touching the glass.
5. Attach plug connector to b ulb socke t,
push bulb sock et into head lamp
as se mbly and rotate bulb sock et
clockwis e.
6. Re place he adlam p protective cove r,
rep lace 3 scre ws to hold c ov er in plac e
and c los e bonne t.Hig h beam
1. Open bonnet and remove headla mp
pro te ctive co ve r.
2. Rotate bulb socke t anti-clockwise and
pull it out of he adlamp ass e mbly.
3 . Detach plug conne ctor from b ulb s ocke t.
4 . Remov e bulb from bulb s ocket and ins ert
ne w bulb, without touching the g la ss.
5. Atta ch plug conne ctor to bulb socket,
push bulb s ocke t into he adlamp
asse mbly a nd rotate bulb socke t
clockwis e.
6 . Replac e head lamp protectiv e cove r and
close bonnet.
Page 148 of 190
148 Self-help, vehicle care
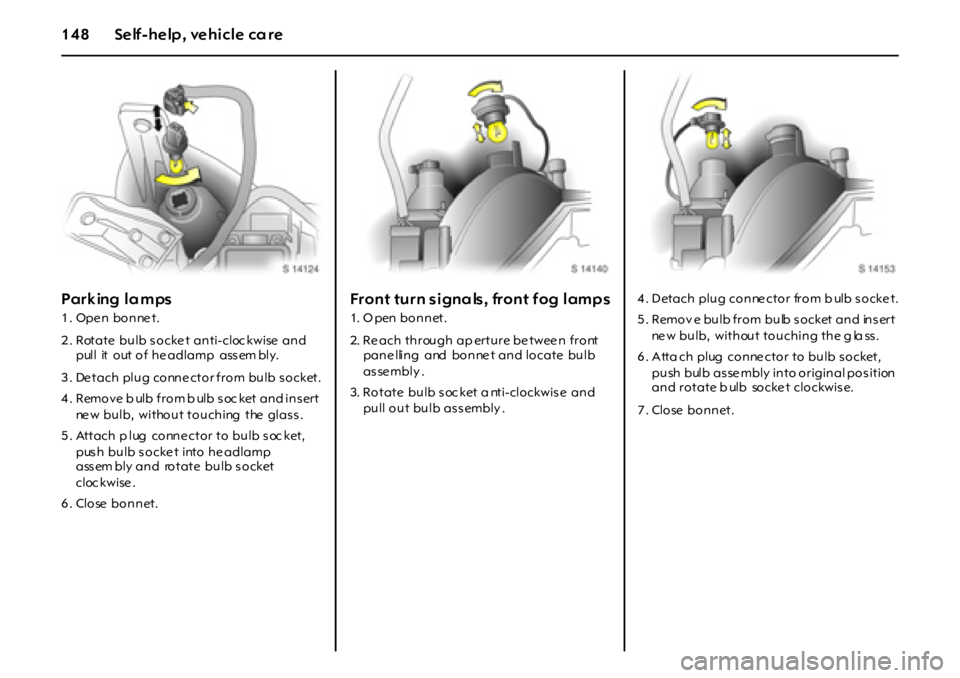
Parking la mps
1. Open bonnet.
2. Rotate bulb socke t anti-cloc kwise and
pull it out of he adlamp ass em bly.
3 . De tach plug conne ctor from bulb s ocket.
4 . Remove b ulb from b ulb s oc ket and ins ert
ne w bulb, without touching the glass.
5. Attach p lug conne ctor to bulb soc ket,
pus h bulb s ocke t into he adlamp
ass em bly and rotate bulb s ocket
cloc kwise .
6. Close bonnet.
Front turn signa ls, front fog lamp s
1. Open bonnet.
2. Reach through ap erture between front
pane lling and bonne t and locate bulb
as se mbly .
3. Rotate bulb soc ket a nti-clockwise and
pull out bulb as s embly .4 . Detach plug conne ctor from b ulb s ocke t.
5 . Remov e bulb from bulb s ocket and ins ert
ne w bulb, without touching the g la ss.
6. Atta ch plug conne ctor to bulb socket,
push bulb as se mbly into original pos ition
and rotate b ulb socke t clockwise.
7. Close bonnet.
Page 149 of 190
14 9Self-help, vehicle care
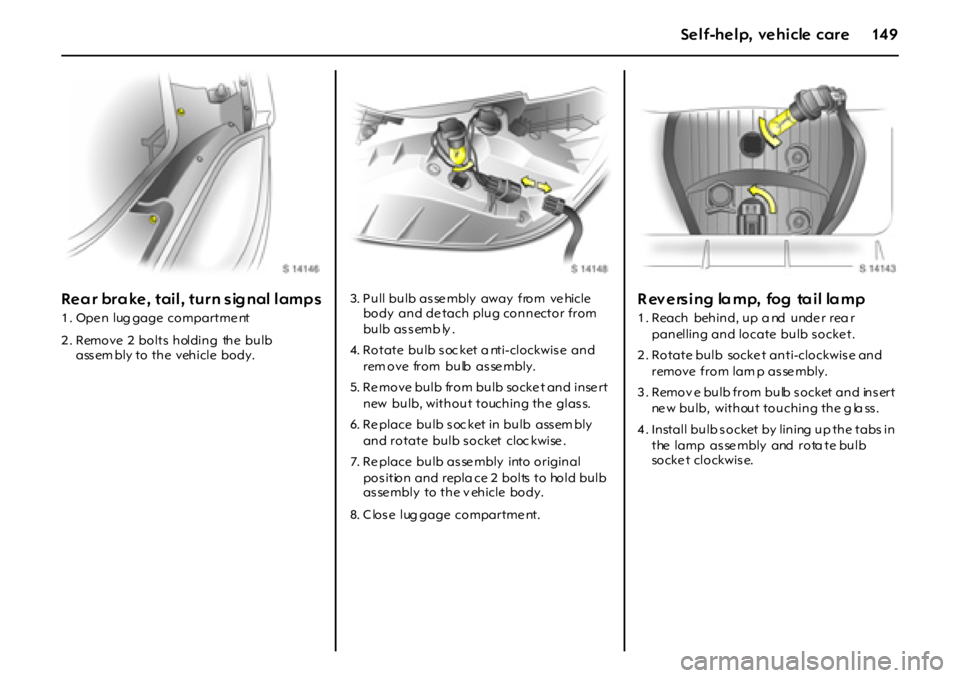
Rear brake, tail, turn signal lamps
1 . Ope n lug gage compartme nt
2 . Remove 2 bolts holding the bulb
assem bly to the vehicle body.3. Pull bulb as se mbly away from ve hicle
body and de tach plug connector from
bulb assemb ly.
4. Rotate bulb soc ket a nti-clockwise and
rem ove from bulb asse mbly.
5. Re move bulb from bulb socke t and inse rt
new bulb, without touching the glass.
6. Re place bulb s oc ket in bulb ass em bly
and rotate bulb socket cloc kwise .
7. Re place bulb as se mbly into original
pos ition and repla ce 2 bolts to hold bulb
asse mbly to the v ehicle body.
8. C los e lug gage compartme nt.
R eversing lamp, fog tail lamp
1. Reach behind, up a nd under rea r
panelling and locate bulb s ocke t.
2. Rotate bulb socke t anti-clockwise and
remove from lam p as se mbly.
3 . Remov e bulb from bulb s ocket and ins ert
ne w bulb, without touching the g la ss.
4 . Install bulb s ocket by lining up the tabs in
the lamp as se mbly and rota te bulb
socke t clockwis e.
Page 150 of 190
150 Self-help, vehicle care
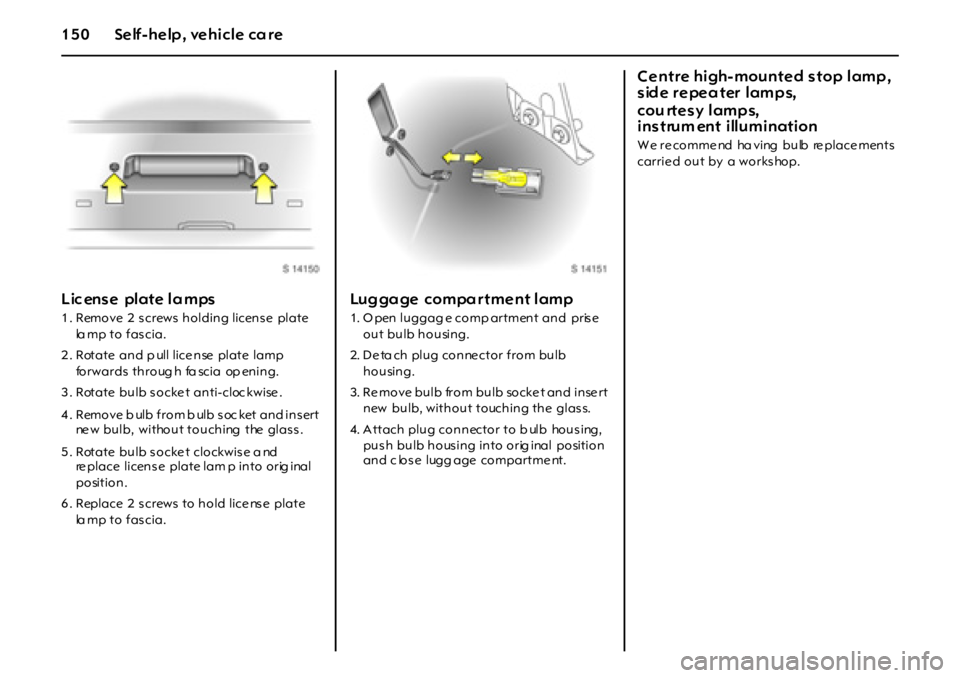
Lic ense plate lamps
1 . Remove 2 s crews holding licens e plate
la m p t o f a s c i a .
2 . Rotate and p ull lice nse plate lamp
forwards throug h fa scia op ening.
3. Rotate bulb socke t anti-cloc kwise .
4 . Remove b ulb from b ulb s oc ket and ins ert
ne w bulb, without touching the glass.
5. Rotate bulb socke t clockwise a nd
re place licens e plate lam p into orig inal
position.
6 . Replace 2 s crews to hold lice ns e plate
la m p t o f a s c i a .
Luggage compartment lamp
1. O pen luggag e comp artment and pris e
out bulb housing.
2. De ta ch plug conne ctor from bulb
housing.
3. Re move bulb from bulb socke t and inse rt
new bulb, without touching the glass.
4. Attach plug connector to b ulb housing,
pus h bulb hous ing into orig inal position
and c los e lugg age compartme nt.
Centre high-mounted stop lamp ,
side repeater lamps,
cou rtesy lamp s,
instrum ent illumination
W e r e c o m m e nd ha v i ng b u lb re p l a c e m en t s
carrie d out by a workshop.